5.5 KiB
translating by Flowsnow
Create a containerized machine learning model
After data scientists have created a machine learning model, it has to be deployed into production. To run it on different infrastructures, using containers and exposing the model via a REST API is a common way to deploy a machine learning model. This article demonstrates how to roll out a TensorFlow machine learning model, with a REST API delivered by Connexion in a container with Podman.
Preparation
First, install Podman with the following command:
sudo dnf -y install podman
Next, create a new folder for the container and switch to that directory.
mkdir deployment_container && cd deployment_container
REST API for the TensorFlow model
The next step is to create the REST-API for the machine learning model. This github repository contains a pretrained model, and well as the setup already configured for getting the REST API working.
Clone this in the deployment_container directory with the command:
git clone https://github.com/svenboesiger/titanic_tf_ml_model.git
prediction.py & ml_model/
The prediction.py file allows for a Tensorflow prediction, while the weights for the 20x20x20 neural network are located in folder ml_model/.
swagger.yaml
The file swagger.yaml defines the API for the Connexion library using the Swagger specification. This file contains all of the information necessary to configure your server to provide input parameter validation, output response data validation, URL endpoint definition.
As a bonus Connexion will provide you also with a simple but useful single page web application that demonstrates using the API with JavaScript and updating the DOM with it.
swagger: "2.0"
info:
  description: This is the swagger file that goes with our server code
  version: "1.0.0"
  title: Tensorflow Podman Article
consumes:
  - "application/json"
produces:
  - "application/json"


basePath: "/"

paths:
  /survival_probability:
    post:
      operationId: "prediction.post"
      tags:
        - "Prediction"
      summary: "The prediction data structure provided by the server application"
      description: "Retrieve the chance of surviving the titanic disaster"
      parameters:
        - in: body
          name: passenger
          required: true
          schema:
            $ref: '#/definitions/PredictionPost'
      responses:
        '201':
          description: 'Survival probability of an individual Titanic passenger'

definitions:
  PredictionPost:
    type: object
server.py & requirements.txt
server.py defines an entry point to start the Connexion server.
import connexion

app = connexion.App(__name__, specification_dir='./')

app.add_api('swagger.yaml')

if __name__ == '__main__':
 app.run(debug=True)
requirements.txt defines the python requirements we need to run the program.
connexion
tensorflow
pandas
Containerize!
For Podman to be able to build an image, create a new file called “Dockerfile” in the deployment_container directory created in the preparation step above:
FROM fedora:28

# File Author / Maintainer
MAINTAINER Sven Boesiger <donotspam@ujelang.com>

# Update the sources
RUN dnf -y update --refresh

# Install additional dependencies
RUN dnf -y install libstdc++

RUN dnf -y autoremove

# Copy the application folder inside the container
ADD /titanic_tf_ml_model /titanic_tf_ml_model

# Get pip to download and install requirements:
RUN pip3 install -r /titanic_tf_ml_model/requirements.txt

# Expose ports
EXPOSE 5000

# Set the default directory where CMD will execute
WORKDIR /titanic_tf_ml_model

# Set the default command to execute
# when creating a new container
CMD python3 server.py
Next, build the container image with the command:
podman build -t ml_deployment .
Run the container
With the Container image built and ready to go, you can run it locally with the command:
podman run -p 5000:5000 ml_deployment
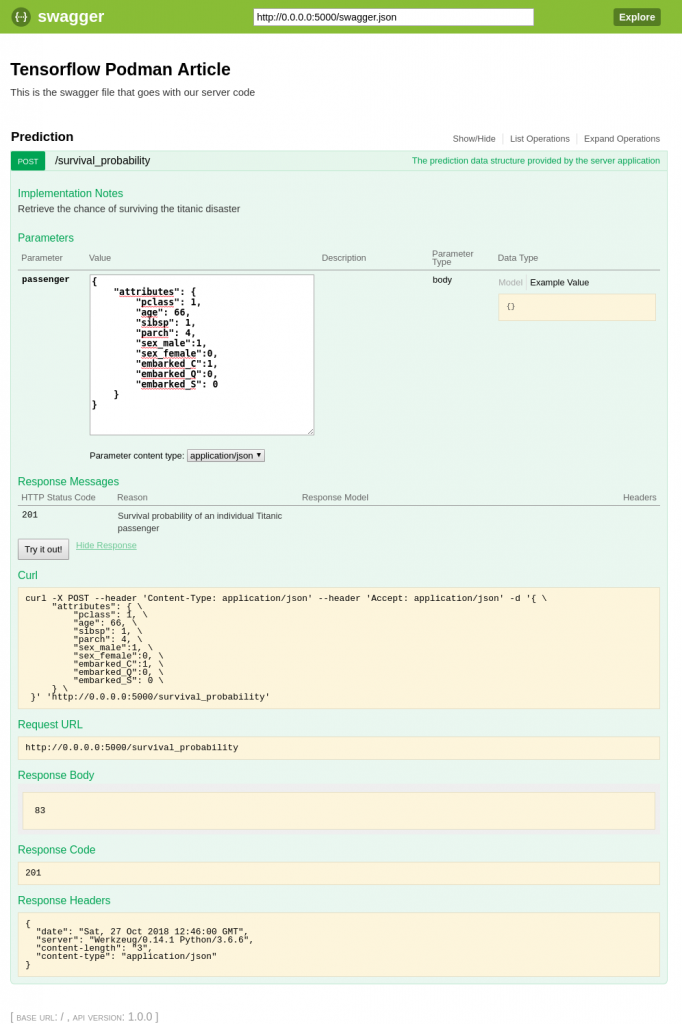
Navigate to http://0.0.0.0:5000/ui in your web browser to access the Swagger/Connexion UI and to test-drive the model:
Of course you can now also access the model with your application via the REST-API.
via: https://fedoramagazine.org/create-containerized-machine-learning-model/
作者:Sven Bösiger 选题:lujun9972 译者:译者ID 校对:校对者ID

