mirror of
https://github.com/LCTT/TranslateProject.git
synced 2025-01-13 22:30:37 +08:00
339 lines
14 KiB
Markdown
339 lines
14 KiB
Markdown
Samba 系列(八):使用 Samba 和 Winbind 将 Ubuntu 16.04 添加到 AD 域
|
||
============================================================
|
||
|
||
这篇文章讲述了如何将 Ubuntu 主机加入到 Samba4 AD 域,并实现使用域帐号登录 Ubuntu 系统。
|
||
|
||
### 要求:
|
||
|
||
1. [在 Ubuntu 系统上使用 Samba4 软件来创建活动目录架构][1]
|
||
|
||
### 第一步: Ubuntu 系统加入到 Samba4 AD 之前的基本配置
|
||
|
||
1、在将 Ubuntu 主机加入到 AD DC 之前,你得先确保 Ubuntu 系统中的一些服务配置正常。
|
||
|
||
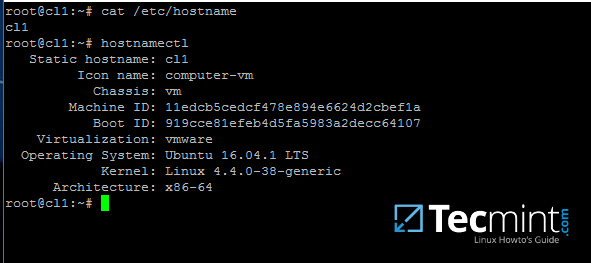
主机名是你的机器的一个重要标识。因此,在加入域前,使用 `hostnamectl` 命令或者通过手动编辑 `/etc/hostname` 文件来为 Ubuntu 主机设置一个合适的主机名。
|
||
|
||
```
|
||
# hostnamectl set-hostname your_machine_short_name
|
||
# cat /etc/hostname
|
||
# hostnamectl
|
||
```
|
||
[
|
||
|
||
][2]
|
||
|
||
*设置系统主机名*
|
||
|
||
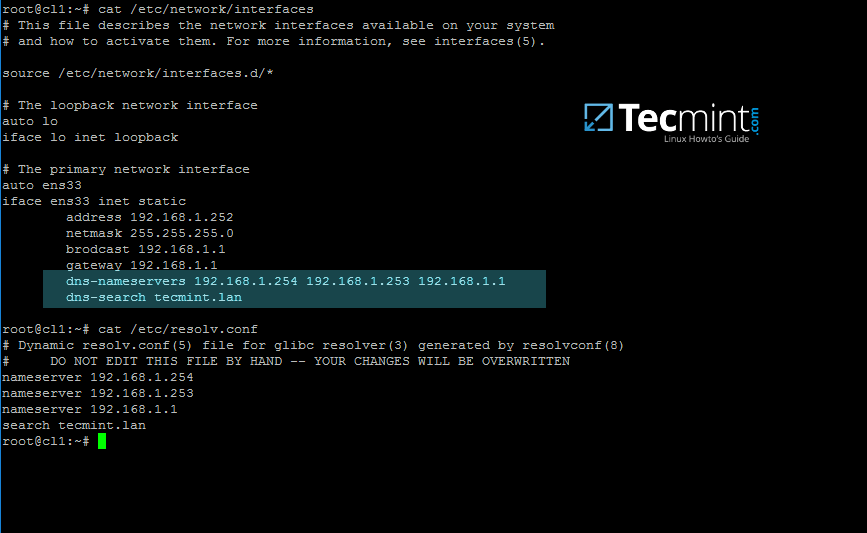
2、在这一步中,打开并编辑网卡配置文件,为你的主机设置一个合适的 IP 地址。注意把 DNS 地址设置为你的域控制器的地址。
|
||
|
||
编辑 `/etc/network/interfaces` 文件,添加 `dns-nameservers` 参数,并设置为 AD 服务器的 IP 地址;添加 `dns-search` 参数,其值为域控制器的主机名,如下图所示。
|
||
|
||
并且,把上面设置的 DNS IP 地址和域名添加到 `/etc/resolv.conf` 配置文件中,如下图所示:
|
||
|
||
[
|
||
|
||
][3]
|
||
|
||
*为 AD 配置网络设置*
|
||
|
||
在上面的截图中, `192.168.1.254` 和 `192.168.1.253` 是 Samba4 AD DC 服务器的 IP 地址, `Tecmint.lan` 是 AD 域名,已加入到这个域中的所有机器都可以查询到该域名。
|
||
|
||
3、重启网卡服务或者重启计算机以使网卡配置生效。使用 ping 命令加上域名来检测 DNS 解析是否正常。
|
||
|
||
AD DC 应该返回的是 FQDN 。如果你的网络中配置了 DHCP 服务器来为局域网中的计算机自动分配 IP 地址,请确保你已经把 AD DC 服务器的 IP 地址添加到 DHCP 服务器的 DNS 配置中。
|
||
|
||
```
|
||
# systemctl restart networking.service
|
||
# ping -c2 your_domain_name
|
||
```
|
||
|
||
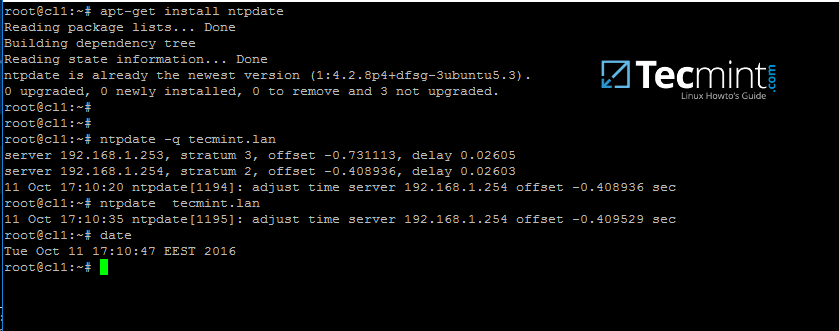
4、最后一步是配置服务器时间同步。安装 `ntpdate` 包,使用下面的命令来查询并同步 AD DC 服务器的时间。
|
||
|
||
```
|
||
$ sudo apt-get install ntpdate
|
||
$ sudo ntpdate -q your_domain_name
|
||
$ sudo ntpdate your_domain_name
|
||
```
|
||
[
|
||
|
||
][4]
|
||
|
||
*AD 服务器时间同步*
|
||
|
||
5、下一步,在 Ubuntu 机器上执行下面的命令来安装加入域环境所必需软件。
|
||
|
||
```
|
||
$ sudo apt-get install samba krb5-config krb5-user winbind libpam-winbind libnss-winbind
|
||
```
|
||
[
|
||

|
||
][5]
|
||
|
||
*在 Ubuntu 机器上安装 Samba4 软件*
|
||
|
||
在 Kerberos 软件包安装的过程中,你会被询问输入默认的域名。输入大写的域名,并按 Enter 键继续安装。
|
||
|
||
[
|
||

|
||
][6]
|
||
|
||
*添加 AD 域名*
|
||
|
||
6、当所有的软件包安装完成之后,使用域管理员帐号来测试 Kerberos 认证,然后执行下面的命令来列出票据信息。
|
||
|
||
```
|
||
# kinit ad_admin_user
|
||
# klist
|
||
```
|
||
[
|
||

|
||
][7]
|
||
|
||
*使用 AD 来检查 Kerberos 认证是否正常*
|
||
|
||
### 第二步:将 Ubuntu 主机添加到 Samba4 AD DC
|
||
|
||
7、将 Ubuntu 主机添加到 Samba4 活动目录域环境中的第一步是编辑 Samba 配置文件。
|
||
|
||
备份 Samba 的默认配置文件,这个配置文件是安装 Samba 软件的过程中自动生成的,使用下面的命令来重新初始化配置文件。
|
||
|
||
```
|
||
# mv /etc/samba/smb.conf /etc/samba/smb.conf.initial
|
||
# nano /etc/samba/smb.conf
|
||
```
|
||
|
||
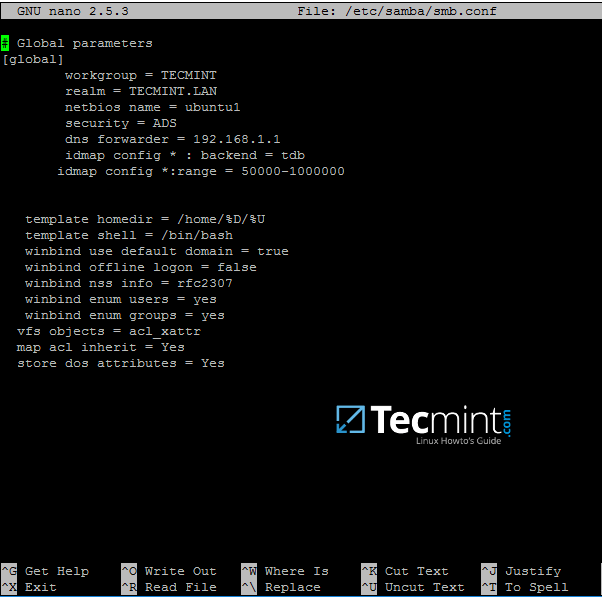
在新的 Samba 配置文件中添加以下内容:
|
||
|
||
```
|
||
[global]
|
||
workgroup = TECMINT
|
||
realm = TECMINT.LAN
|
||
netbios name = ubuntu
|
||
security = ADS
|
||
dns forwarder = 192.168.1.1
|
||
idmap config * : backend = tdb
|
||
idmap config *:range = 50000-1000000
|
||
template homedir = /home/%D/%U
|
||
template shell = /bin/bash
|
||
winbind use default domain = true
|
||
winbind offline logon = false
|
||
winbind nss info = rfc2307
|
||
winbind enum users = yes
|
||
winbind enum groups = yes
|
||
vfs objects = acl_xattr
|
||
map acl inherit = Yes
|
||
store dos attributes = Yes
|
||
```
|
||
[
|
||
|
||
][8]
|
||
|
||
*Samba 服务的 AD 环境配置*
|
||
|
||
根据你本地的实际情况来替换 `workgroup` , `realm` , `netbios name` 和 `dns forwarder` 的参数值。
|
||
|
||
由于 `winbind use default domain` 这个参数会让 winbind 服务把任何登录系统的帐号都当作 AD 帐号。因此,如果存在本地帐号名跟域帐号同名的情况下,请不要设置该参数。
|
||
|
||
8、现在,你应该重启 Samba 后台服务,停止并卸载一些不必要的服务,然后启用 samba 服务的 system-wide 功能,使用下面的命令来完成。
|
||
|
||
|
||
```
|
||
$ sudo systemctl restart smbd nmbd winbind
|
||
$ sudo systemctl stop samba-ad-dc
|
||
$ sudo systemctl enable smbd nmbd winbind
|
||
```
|
||
|
||
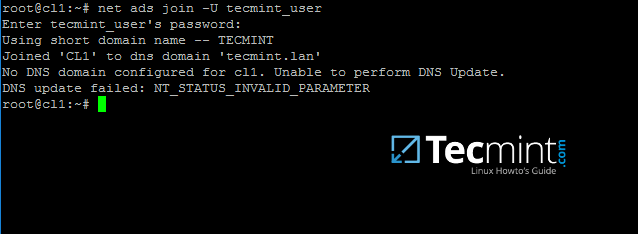
9、通过下面的命令,使用域管理员帐号来把 Ubuntu 主机加入到 Samba4 AD DC 中。
|
||
|
||
```
|
||
$ sudo net ads join -U ad_admin_user
|
||
```
|
||
[
|
||
|
||
][9]
|
||
|
||
*把 Ubuntu 主机加入到 Samba4 AD DC*
|
||
|
||
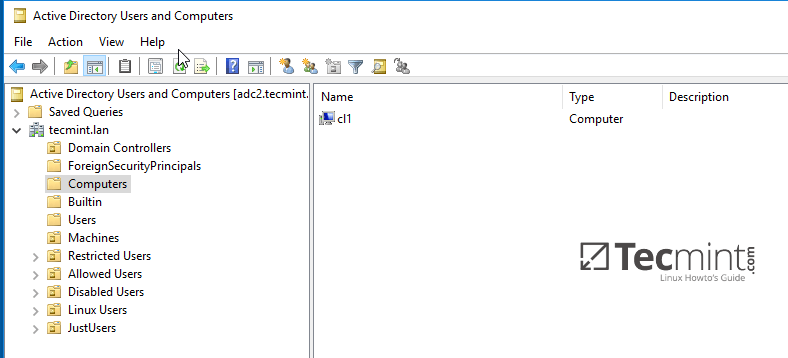
10、在 [安装了 RSAT 工具的 Windows 机器上][10] 打开 AD UC ,展开到包含的计算机。你可以看到已加入域的 Ubuntu 计算机。
|
||
|
||
[
|
||
|
||
][11]
|
||
|
||
*确认 Ubuntu 计算机已加入到 Windows AD DC*
|
||
|
||
### 第三步:配置 AD 帐号认证
|
||
|
||
11、为了在本地完成 AD 帐号认证,你需要修改本地机器上的一些服务和配置文件。
|
||
|
||
首先,打开并编辑名字服务切换 (NSS) 配置文件。
|
||
|
||
```
|
||
$ sudo nano /etc/nsswitch.conf
|
||
```
|
||
|
||
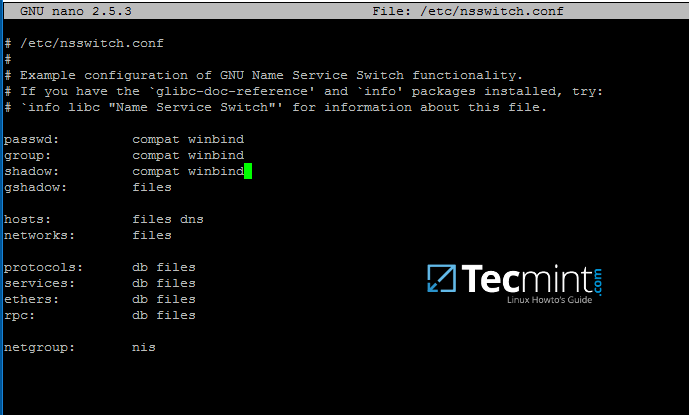
然后在 `passwd` 和 `group` 行添加 winbind 值,如下图所示:
|
||
|
||
```
|
||
passwd: compat winbind
|
||
group: compat winbind
|
||
```
|
||
[
|
||
|
||
][12]
|
||
|
||
*配置 AD 帐号认证*
|
||
|
||
12、为了测试 Ubuntu 机器是否已加入到域中,你可以使用 `wbinfo` 命令来列出域帐号和组。
|
||
|
||
```
|
||
$ wbinfo -u
|
||
$ wbinfo -g
|
||
```
|
||
[
|
||

|
||
][13]
|
||
|
||
*列出域帐号和组*
|
||
|
||
13、同时,使用 `getent` 命令加上管道符及 `grep` 参数来过滤指定域用户或组,以测试 Winbind nsswitch 模块是否运行正常。
|
||
|
||
```
|
||
$ sudo getent passwd| grep your_domain_user
|
||
$ sudo getent group|grep 'domain admins'
|
||
```
|
||
[
|
||

|
||
][14]
|
||
|
||
*检查 AD 域用户和组*
|
||
|
||
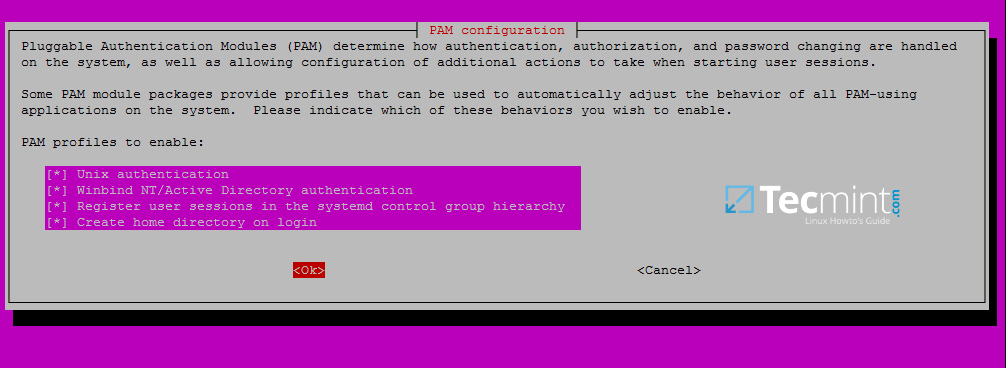
14、为了让域帐号在 Ubuntu 机器上完成认证登录,你需要使用 root 帐号运行 `pam-auth-update` 命令,然后勾选 winbind 服务所需的选项,以让每个域帐号首次登录时自动创建 home 目录。
|
||
|
||
查看所有的选项,按 ‘[空格]’键选中,单击 OK 以应用更改。
|
||
|
||
```
|
||
$ sudo pam-auth-update
|
||
```
|
||
[
|
||
|
||
][15]
|
||
|
||
*使用域帐号登录 Ubuntu 主机*
|
||
|
||
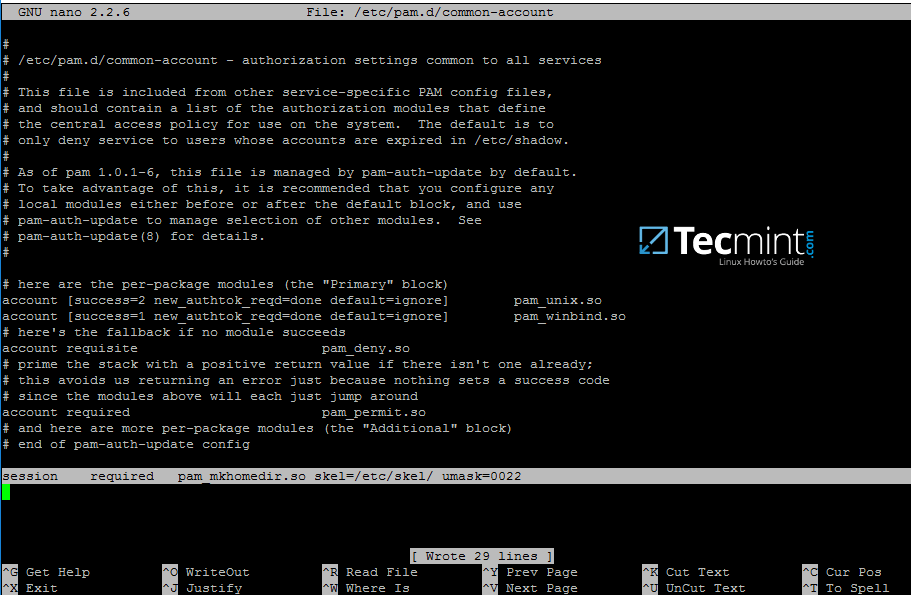
15、在 Debian 系统中,如果想让系统自动为登录的域帐号创建家目录,你需要手动编辑 `/etc/pam.d/common-account` 配置文件,并添加下面的内容。
|
||
|
||
```
|
||
session required pam_mkhomedir.so skel=/etc/skel/ umask=0022
|
||
```
|
||
[
|
||
|
||
][16]
|
||
|
||
*使用域帐号登录 Debian 系统*
|
||
|
||
16、为了让 AD 用户能够在 Linux 的命令行下修改密码,你需要打开 /etc/pam.d/common-password 配置文件,在 `password` 那一行删除 `use_authtok` 参数,如下图所示:
|
||
|
||
```
|
||
password [success=1 default=ignore] pam_winbind.so try_first_pass
|
||
```
|
||
[
|
||

|
||
][17]
|
||
|
||
*允许域帐号在 Linux 命令行下修改密码*
|
||
|
||
17、要使用 Samba4 AD 帐号来登录 Ubuntu 主机,在 `su -` 后面加上域用户名即可。你还可以通过运行 `id` 命令来查看 AD 帐号的其它信息。
|
||
|
||
```
|
||
$ su - your_ad_user
|
||
```
|
||
[
|
||

|
||
][18]
|
||
|
||
*查看 AD 用户信息*
|
||
|
||
使用 [pwd 命令][19]来查看域帐号的当前目录,如果你想修改域帐号的密码,你可以使用 `passwd` 命令来完成。
|
||
|
||
18、如果想让域帐号在 ubuntu 机器上拥有 root 权限,你可以使用下面的命令来把 AD 帐号添加到 sudo 系统组中:
|
||
|
||
```
|
||
$ sudo usermod -aG sudo your_domain_user
|
||
```
|
||
|
||
登录域帐号登录到 Ubuntu 主机,然后运行 `apt-get-update` 命令来更新系统,以验证域账号是否拥有 root 权限。
|
||
|
||
[
|
||

|
||
][20]
|
||
|
||
*给域帐号添加 root 权限*
|
||
|
||
19、要为整个域用户组添加 root 权限,使用 `vi` 命令打开并编辑 `/etc/sudoers` 配置文件,如下图所示,添加如下内容:
|
||
|
||
```
|
||
%YOUR_DOMAIN\\your_domain\ group ALL=(ALL:ALL) ALL
|
||
```
|
||
[
|
||

|
||
][21]
|
||
|
||
*为域帐号组添加 root 权限*
|
||
|
||
使用反斜杠来转义域用户组的名称中包含的空格,或者用来转义第一个反斜杠。在上面的例子中, TECMINT 域的域用户组的名字是 “domain admins" 。
|
||
|
||
前边的 `%` 表明我们指定是的用户组而不是用户名。
|
||
|
||
20、如果你使用的是图形界面的 Ubuntu 系统,并且你想使用域帐号来登录系统,你需要修改 LightDM 显示管理器,编辑 `/usr/share/lightdm/lightdm.conf.d/50-ubuntu.conf` 配置文件,添加下面的内容,然后重启系统才能生效。
|
||
|
||
```
|
||
greeter-show-manual-login=true
|
||
greeter-hide-users=true
|
||
```
|
||
|
||
现在你就可以域帐号来登录 Ubuntu 桌面系统了。使用域用户名或者域用户名@域名.tld 或者域名\域用户名的方式来登录系统。
|
||
|
||
--------------------------------------------------------------------------------
|
||
|
||
作者简介:
|
||
|
||
我是一个电脑迷,开源 Linux 系统和软件爱好者,有 4 年多的 Linux 桌面、服务器系统使用和 Base 编程经验。
|
||
|
||
--------------------------------------------------------------------------------
|
||
|
||
via: http://www.tecmint.com/join-ubuntu-to-active-directory-domain-member-samba-winbind/
|
||
|
||
作者:[Matei Cezar][a]
|
||
译者:[rusking](https://github.com/rusking)
|
||
校对:[wxy](https://github.com/wxy)
|
||
|
||
本文由 [LCTT](https://github.com/LCTT/TranslateProject) 原创编译,[Linux中国](https://linux.cn/) 荣誉推出
|
||
|
||
[a]:http://www.tecmint.com/author/cezarmatei/
|
||
|
||
[1]:http://www.tecmint.com/install-samba4-active-directory-ubuntu/
|
||
[2]:http://www.tecmint.com/wp-content/uploads/2017/03/Set-Ubuntu-System-Hostname.png
|
||
[3]:http://www.tecmint.com/wp-content/uploads/2017/03/Configure-Network-Settings-for-AD.png
|
||
[4]:http://www.tecmint.com/wp-content/uploads/2017/03/Time-Synchronization-with-AD.png
|
||
[5]:http://www.tecmint.com/wp-content/uploads/2017/03/Install-Samba4-in-Ubuntu-Client.png
|
||
[6]:http://www.tecmint.com/wp-content/uploads/2017/03/Add-AD-Domain-Name.png
|
||
[7]:http://www.tecmint.com/wp-content/uploads/2017/03/Check-Kerberos-Authentication-with-AD.png
|
||
[8]:http://www.tecmint.com/wp-content/uploads/2017/03/Configure-Samba.png
|
||
[9]:http://www.tecmint.com/wp-content/uploads/2017/03/Join-Ubuntu-to-Samba4-AD-DC.png
|
||
[10]:http://www.tecmint.com/manage-samba4-ad-from-windows-via-rsat/
|
||
[11]:http://www.tecmint.com/wp-content/uploads/2017/03/Confirm-Ubuntu-Client-in-RSAT-.png
|
||
[12]:http://www.tecmint.com/wp-content/uploads/2017/03/Configure-AD-Accounts-Authentication.png
|
||
[13]:http://www.tecmint.com/wp-content/uploads/2017/03/List-AD-Domain-Accounts-and-Groups.png
|
||
[14]:http://www.tecmint.com/wp-content/uploads/2017/03/Check-AD-Domain-Users-and-Groups.png
|
||
[15]:http://www.tecmint.com/wp-content/uploads/2017/03/Authenticate-Ubuntu-with-Domain-Accounts.png
|
||
[16]:http://www.tecmint.com/wp-content/uploads/2017/03/Authenticate-Debian-with-Domain-Accounts.png
|
||
[17]:http://www.tecmint.com/wp-content/uploads/2017/03/AD-Domain-Users-Change-Password.png
|
||
[18]:http://www.tecmint.com/wp-content/uploads/2017/03/Find-AD-User-Information.png
|
||
[19]:http://www.tecmint.com/pwd-command-examples/
|
||
[20]:http://www.tecmint.com/wp-content/uploads/2017/03/Add-Sudo-User-Root-Group.png
|
||
[21]:http://www.tecmint.com/wp-content/uploads/2017/03/Add-Root-Privileges-to-Domain-Group.jpg
|
||
[22]:http://www.tecmint.com/author/cezarmatei/
|
||
[23]:http://www.tecmint.com/10-useful-free-linux-ebooks-for-newbies-and-administrators/
|
||
[24]:http://www.tecmint.com/free-linux-shell-scripting-books/
|