@tastynoodle @bazz2 @213edu @taichirain  @iov-wang @zky001 @KnightJoker
@DongShuaike @name1e5s @zpl1025 @strugglingyouth @ezio  @cposture
@fw8899
15 KiB
Part 10 - LFCS: Understanding & Learning Basic Shell Scripting and Linux Filesystem Troubleshooting
The Linux Foundation launched the LFCS certification (Linux Foundation Certified Sysadmin), a brand new initiative whose purpose is to allow individuals everywhere (and anywhere) to get certified in basic to intermediate operational support for Linux systems, which includes supporting running systems and services, along with overall monitoring and analysis, plus smart decision-making when it comes to raising issues to upper support teams.
Linux Foundation Certified Sysadmin – Part 10
Check out the following video that guides you an introduction to the Linux Foundation Certification Program.
注:youtube 视频
This is the last article (Part 10) of the present 10-tutorial long series. In this article we will focus on basic shell scripting and troubleshooting Linux file systems. Both topics are required for the LFCS certification exam.
Understanding Terminals and Shells
Let’s clarify a few concepts first.
- A shell is a program that takes commands and gives them to the operating system to be executed.
- A terminal is a program that allows us as end users to interact with the shell. One example of a terminal is GNOME terminal, as shown in the below image.
Gnome Terminal
When we first start a shell, it presents a command prompt (also known as the command line), which tells us that the shell is ready to start accepting commands from its standard input device, which is usually the keyboard.
You may want to refer to another article in this series (Use Command to Create, Edit, and Manipulate files – Part 1) to review some useful commands.
Linux provides a range of options for shells, the following being the most common:
bash Shell
Bash stands for Bourne Again SHell and is the GNU Project’s default shell. It incorporates useful features from the Korn shell (ksh) and C shell (csh), offering several improvements at the same time. This is the default shell used by the distributions covered in the LFCS certification, and it is the shell that we will use in this tutorial.
sh Shell
The Bourne SHell is the oldest shell and therefore has been the default shell of many UNIX-like operating systems for many years. ksh Shell
The Korn SHell is a Unix shell which was developed by David Korn at Bell Labs in the early 1980s. It is backward-compatible with the Bourne shell and includes many features of the C shell.
A shell script is nothing more and nothing less than a text file turned into an executable program that combines commands that are executed by the shell one after another.
Basic Shell Scripting
As mentioned earlier, a shell script is born as a plain text file. Thus, can be created and edited using our preferred text editor. You may want to consider using vi/m (refer to Usage of vi Editor – Part 2 of this series), which features syntax highlighting for your convenience.
Type the following command to create a file named myscript.sh and press Enter.
# vim myscript.sh
The very first line of a shell script must be as follows (also known as a shebang).
#!/bin/bash
It “tells” the operating system the name of the interpreter that should be used to run the text that follows.
Now it’s time to add our commands. We can clarify the purpose of each command, or the entire script, by adding comments as well. Note that the shell ignores those lines beginning with a pound sign # (explanatory comments).
#!/bin/bash
echo This is Part 10 of the 10-article series about the LFCS certification
echo Today is $(date +%Y-%m-%d)
Once the script has been written and saved, we need to make it executable.
# chmod 755 myscript.sh
Before running our script, we need to say a few words about the $PATH environment variable. If we run,
echo $PATH
from the command line, we will see the contents of $PATH: a colon-separated list of directories that are searched when we enter the name of a executable program. It is called an environment variable because it is part of the shell environment – a set of information that becomes available for the shell and its child processes when the shell is first started.
When we type a command and press Enter, the shell searches in all the directories listed in the $PATH variable and executes the first instance that is found. Let’s see an example,
Environment Variables
If there are two executable files with the same name, one in /usr/local/bin and another in /usr/bin, the one in the first directory will be executed first, whereas the other will be disregarded.
If we haven’t saved our script inside one of the directories listed in the $PATH variable, we need to append ./ to the file name in order to execute it. Otherwise, we can run it just as we would do with a regular command.
# pwd
# ./myscript.sh
# cp myscript.sh ../bin
# cd ../bin
# pwd
# myscript.sh
Execute Script
Conditionals
Whenever you need to specify different courses of action to be taken in a shell script, as result of the success or failure of a command, you will use the if construct to define such conditions. Its basic syntax is:
if CONDITION; then
	COMMANDS;
else
	OTHER-COMMANDS
fi
Where CONDITION can be one of the following (only the most frequent conditions are cited here) and evaluates to true when:
- [ -a file ] → file exists.
- [ -d file ] → file exists and is a directory.
- [ -f file ] →file exists and is a regular file.
- [ -u file ] →file exists and its SUID (set user ID) bit is set.
- [ -g file ] →file exists and its SGID bit is set.
- [ -k file ] →file exists and its sticky bit is set.
- [ -r file ] →file exists and is readable.
- [ -s file ]→ file exists and is not empty.
- [ -w file ]→file exists and is writable.
- [ -x file ] is true if file exists and is executable.
- [ string1 = string2 ] → the strings are equal.
- [ string1 != string2 ] →the strings are not equal.
[ int1 op int2 ] should be part of the preceding list, while the items that follow (for example, -eq –> is true if int1 is equal to int2.) should be a “children” list of [ int1 op int2 ] where op is one of the following comparison operators.
- -eq –> is true if int1 is equal to int2.
- -ne –> true if int1 is not equal to int2.
- -lt –> true if int1 is less than int2.
- -le –> true if int1 is less than or equal to int2.
- -gt –> true if int1 is greater than int2.
- -ge –> true if int1 is greater than or equal to int2.
For Loops
This loop allows to execute one or more commands for each value in a list of values. Its basic syntax is:
for item in SEQUENCE; do
		COMMANDS;
done
Where item is a generic variable that represents each value in SEQUENCE during each iteration.
While Loops
This loop allows to execute a series of repetitive commands as long as the control command executes with an exit status equal to zero (successfully). Its basic syntax is:
while EVALUATION_COMMAND; do
		EXECUTE_COMMANDS;
done
Where EVALUATION_COMMAND can be any command(s) that can exit with a success (0) or failure (other than 0) status, and EXECUTE_COMMANDS can be any program, script or shell construct, including other nested loops.
Putting It All Together
We will demonstrate the use of the if construct and the for loop with the following example.
Determining if a service is running in a systemd-based distro
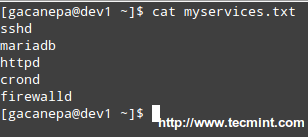
Let’s create a file with a list of services that we want to monitor at a glance.
# cat myservices.txt

sshd
mariadb
httpd
crond
firewalld
Script to Monitor Linux Services
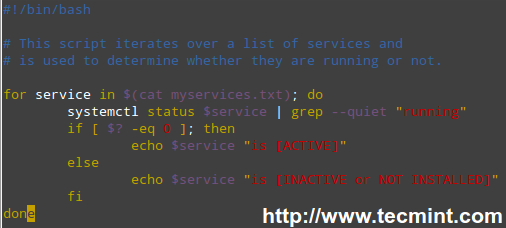
Our shell script should look like.
#!/bin/bash

# This script iterates over a list of services and
# is used to determine whether they are running or not.

for service in $(cat myservices.txt); do
    	systemctl status $service | grep --quiet "running"
    	if [ $? -eq 0 ]; then
            	echo $service "is [ACTIVE]"
    	else
            	echo $service "is [INACTIVE or NOT INSTALLED]"
    	fi
done
Linux Service Monitoring Script
Let’s explain how the script works.
1). The for loop reads the myservices.txt file one element of LIST at a time. That single element is denoted by the generic variable named service. The LIST is populated with the output of,
# cat myservices.txt
2). The above command is enclosed in parentheses and preceded by a dollar sign to indicate that it should be evaluated to populate the LIST that we will iterate over.
3). For each element of LIST (meaning every instance of the service variable), the following command will be executed.
# systemctl status $service | grep --quiet "running"
This time we need to precede our generic variable (which represents each element in LIST) with a dollar sign to indicate it’s a variable and thus its value in each iteration should be used. The output is then piped to grep.
The –quiet flag is used to prevent grep from displaying to the screen the lines where the word running appears. When that happens, the above command returns an exit status of 0 (represented by $? in the if construct), thus verifying that the service is running.
An exit status different than 0 (meaning the word running was not found in the output of systemctl status $service) indicates that the service is not running.
Services Monitoring Script
We could go one step further and check for the existence of myservices.txt before even attempting to enter the for loop.
#!/bin/bash

# This script iterates over a list of services and
# is used to determine whether they are running or not.

if [ -f myservices.txt ]; then
    	for service in $(cat myservices.txt); do
            	systemctl status $service | grep --quiet "running"
            	if [ $? -eq 0 ]; then
                    	echo $service "is [ACTIVE]"
            	else
                    	echo $service "is [INACTIVE or NOT INSTALLED]"
            	fi
    	done
else
    	echo "myservices.txt is missing"
fi
Pinging a series of network or internet hosts for reply statistics
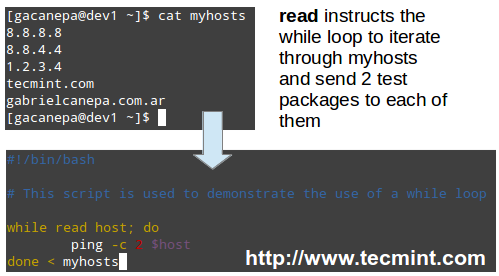
You may want to maintain a list of hosts in a text file and use a script to determine every now and then whether they’re pingable or not (feel free to replace the contents of myhosts and try for yourself).
The read shell built-in command tells the while loop to read myhosts line by line and assigns the content of each line to variable host, which is then passed to the ping command.
#!/bin/bash

# This script is used to demonstrate the use of a while loop

while read host; do
    	ping -c 2 $host
done < myhosts
Script to Ping Servers
Read Also:
- Learn Shell Scripting: A Guide from Newbies to System Administrator
- 5 Shell Scripts to Learn Shell Programming
Filesystem Troubleshooting
Although Linux is a very stable operating system, if it crashes for some reason (for example, due to a power outage), one (or more) of your file systems will not be unmounted properly and thus will be automatically checked for errors when Linux is restarted.
In addition, each time the system boots during a normal boot, it always checks the integrity of the filesystems before mounting them. In both cases this is performed using a tool named fsck (“file system check”).
fsck will not only check the integrity of file systems, but also attempt to repair corrupt file systems if instructed to do so. Depending on the severity of damage, fsck may succeed or not; when it does, recovered portions of files are placed in the lost+found directory, located in the root of each file system.
Last but not least, we must note that inconsistencies may also happen if we try to remove an USB drive when the operating system is still writing to it, and may even result in hardware damage.
The basic syntax of fsck is as follows:
# fsck [options] filesystem
Checking a filesystem for errors and attempting to repair automatically
In order to check a filesystem with fsck, we must first unmount it.
# mount | grep sdg1
# umount /mnt
# fsck -y /dev/sdg1
Check Filesystem Errors
Besides the -y flag, we can use the -a option to automatically repair the file systems without asking any questions, and force the check even when the filesystem looks clean.
# fsck -af /dev/sdg1
If we’re only interested in finding out what’s wrong (without trying to fix anything for the time being) we can run fsck with the -n option, which will output the filesystem issues to standard output.
# fsck -n /dev/sdg1
Depending on the error messages in the output of fsck, we will know whether we can try to solve the issue ourselves or escalate it to engineering teams to perform further checks on the hardware.
Summary
We have arrived at the end of this 10-article series where have tried to cover the basic domain competencies required to pass the LFCS exam.
For obvious reasons, it is not possible to cover every single aspect of these topics in any single tutorial, and that’s why we hope that these articles have put you on the right track to try new stuff yourself and continue learning.
If you have any questions or comments, they are always welcome – so don’t hesitate to drop us a line via the form below!
via: http://www.tecmint.com/linux-basic-shell-scripting-and-linux-filesystem-troubleshooting/
作者:Gabriel Cánepa 译者:译者ID 校对:校对者ID


