mirror of
https://github.com/LCTT/TranslateProject.git
synced 2025-02-19 00:30:12 +08:00
528 lines
20 KiB
Markdown
528 lines
20 KiB
Markdown
在 VirtualBox 虚拟机中安装 Arch Linux 系统指南
|
||
============================================================
|
||
|
||
Arch Linux 是专门为 i386 和 x86-64 架构的计算机而设计的基于 Linux 内核的操作系统。其特有的软件包管理器使用 `pacman` 进行完整追踪来将系统应用软件升级到最新版本。 Pacman 是一个用于安装、升级和卸载软件包的管理器。这是一款完全自由而开源的软件,由 Linux 开源社区提供支持。
|
||
|
||
Arch Linux 也因其丰富的 Wiki 帮助文档而大受推崇。该系统基于二进制的软件包,这些软件包主要是为 i386 的 64 位和 32 位的系统而开发的,同时也为现代的硬件系统提供最佳的性能优化。
|
||
|
||
你可以参考这篇教程直接在你的本地电脑上安装 Arch Linux 系统,或者你也可以使用你的 Windows 电脑中的 VirtualBox 虚拟机来安装。
|
||
|
||
### Arch Linux 软件仓库
|
||
|
||
要在 VirtualBox 中安装 Arch Linux 系统,你得了解该系统的基础软件仓库。软件仓库用于在安装的过程中获取软件包。对于 Arch Linux 系统来说,有很多可用的软件仓库,可以使用 pacman 工具来进行维护。下面列出的是在 VirtualBox 中安装 Arch Linux 系统时用到的一些基础软件仓库列表:
|
||
|
||
* **core ** 软件仓库包括所有的用于对系统进行基本设置的一些软件包,比如启动 Arch Linux 系统和编译软件包。
|
||
* **extra ** 软件仓库包括 core 软件仓库以外的其它软件包以及与桌面环境相关的软件包。
|
||
* **community ** 软件仓库包含的是由可信任的 Linux 社区用户维护的软件包,其中的大多数的软件包都会被迁移到核心软件仓库或者额外软件仓库中。
|
||
* **Multilib ** 软件仓库包括 32 位的软件包以及用于在 64 位操作系统中安装 32 位应用程序的类库。
|
||
* **testing ** 软件仓库包括那些即将成为 core 或 extra 的软件包。
|
||
* **community-testing** 软件仓库主要用于 community 类的测试。
|
||
* **multilib testing ** 软件仓库跟 testing 软件仓库类似,但是它包含 Multilib 类。
|
||
* **gnome-unstable ** 软件仓库包括最新的 GNOME 桌面环境。
|
||
* **kde-unstable ** 软件仓库包括 KDE 最新的发布前软件包。
|
||
|
||
### 在 VirtualBox 虚拟机中安装 Arch Linux 系统
|
||
|
||
#### 下载 Arch Linux 系统
|
||
|
||
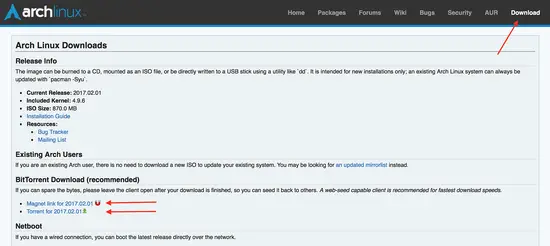
要在 VirtualBox 虚拟机中安装 Arch Linux 系统,你最好使用[官网][10]下载的新版 Arch Linux 系统。你可以选择直接下载或是种子方式下载系统文件,这是一个很安全的下载方式。在安装之前,确保你系统中有 20 GB 的剩余空间和 1 GB 的内存。
|
||
|
||
[
|
||
|
||
][11]
|
||
|
||
#### 在 Oracle VirtualBox 虚拟机管理界面初始化系统安装
|
||
|
||
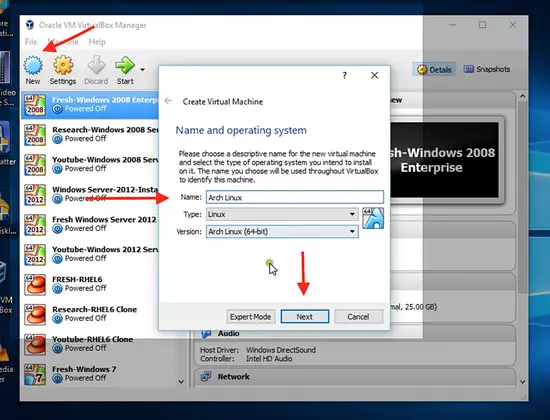
打开 Oracle VirtualBox 虚拟机管理界面,点击新建(new),输入你想创建的新系统的名称;这里输入的是 “Arch Linux” 。系统会自动选择 Arch Linux 的版本和类型,这取决于你的系统配置。单击_下一步_。
|
||
|
||
[
|
||
|
||
][12]
|
||
|
||
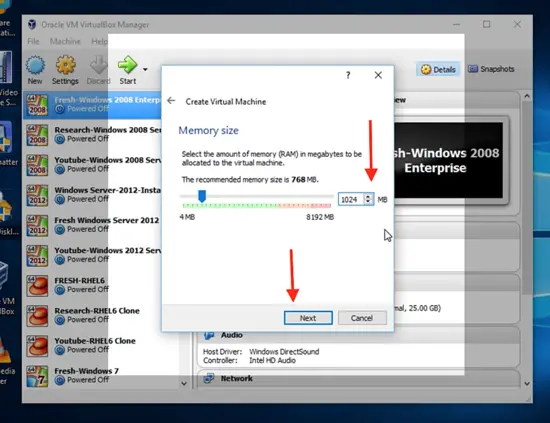
为你的新系统分配内存,最好是 1024 MB 。单击_下一步_,然后点击创建(create)来创建一个虚拟磁盘。
|
||
|
||
[
|
||
|
||
][13]
|
||
|
||
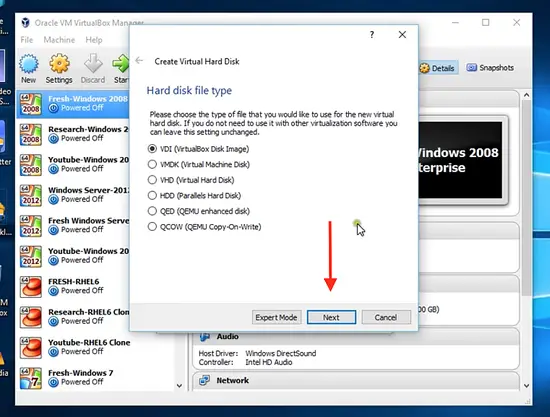
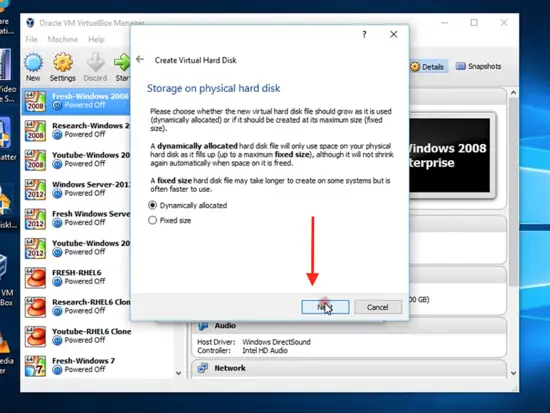
在下一步中,你将会被询问为新系统选择磁盘类型。通常选择 VirtualBox 磁盘镜像(VirtualBox Disk Image,VDI)类型。
|
||
|
||
[
|
||
|
||
][14]
|
||
|
||
选择动态分配(dynamically allocated),单击_下一步_。
|
||
|
||
[
|
||
|
||
][15]
|
||
|
||
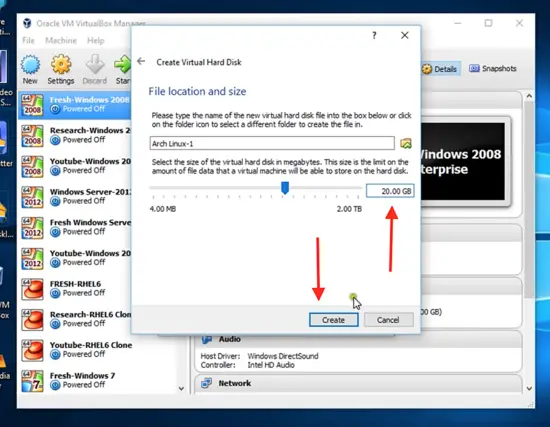
分配 20 GB 的硬盘大小及存放位置。
|
||
|
||
[
|
||
|
||
][16]
|
||
|
||
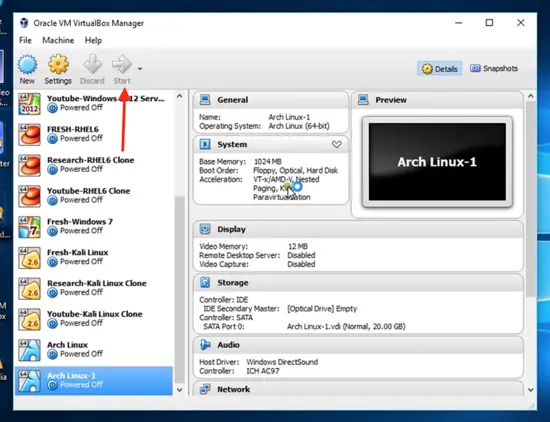
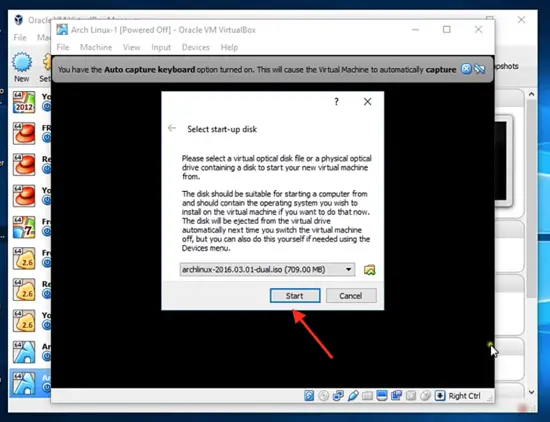
现在你可以看到 Arch Linux 系统已创建完成了。点击开始(start)按钮。
|
||
|
||
[
|
||
|
||
][17]
|
||
|
||
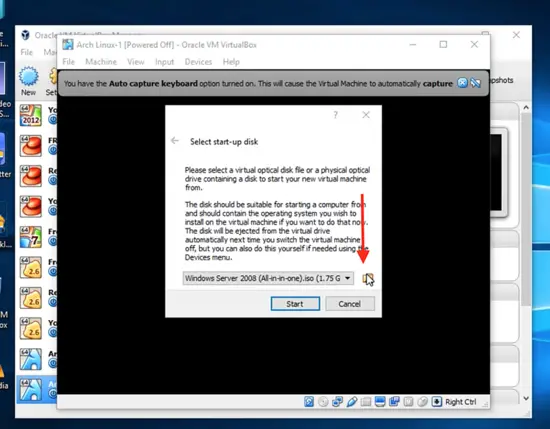
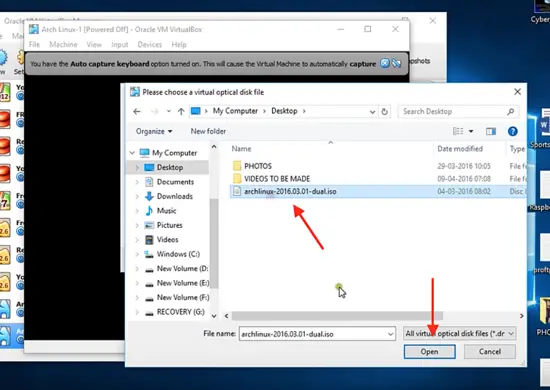
单击浏览(browser)然后选择你从官网下载的启动磁盘。
|
||
|
||
[
|
||
|
||
][18]
|
||
|
||
[
|
||
|
||
][19]
|
||
|
||
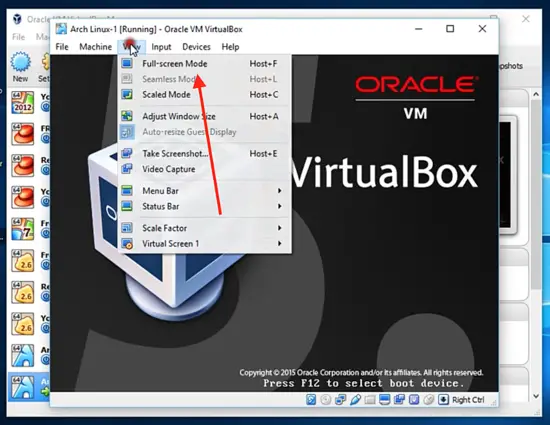
点击启动(start),然后打开全屏模式。
|
||
|
||
[
|
||
|
||
][20]
|
||
|
||
[
|
||
|
||
][21]
|
||
|
||
#### 在 VirtualBox 中启动并安装 Arch Linux 系统
|
||
|
||
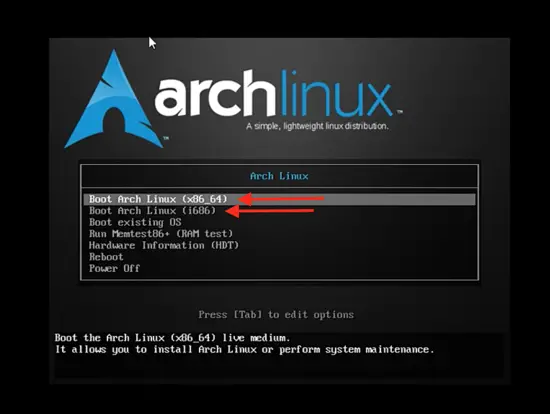
你将会看到 Arch Linux 系统第一个打开界面。单击 “Boot Arch Linux (x86_64)”, 它用于 64 位系统,或者单击 “Boot Arch Linux (i686)”,用于 32 位系统。
|
||
|
||
[
|
||
|
||
][22]
|
||
|
||
当你单击第一个选项后,系统将开始启动。实际上只是进入到一个临时启动状态,即进入到 Arch Linux 的 Live 系统,并以 root 帐号登录了。
|
||
|
||
[
|
||

|
||
][23]
|
||
|
||
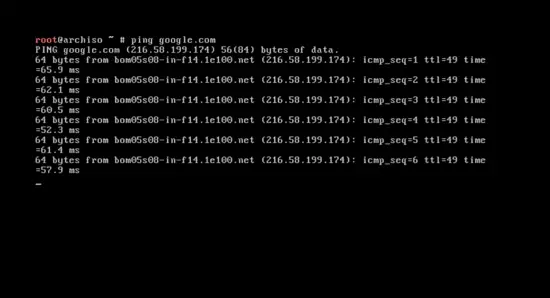
输入下面的命令来检查网络连接。
|
||
|
||
```
|
||
ping google.com
|
||
```
|
||
|
||
这个单词 ping 表示网路封包搜寻。你将会看到下面的返回信息,表明 Arch Linux 已经连接到外网了。这是执行安装过程中的很关键的一点。(LCTT 译注:或许你 ping 不到那个不存在的网站,你选个存在的吧。)
|
||
|
||
[
|
||
|
||
][24]
|
||
|
||
输入如下命令清屏:
|
||
|
||
```
|
||
clear
|
||
```
|
||
|
||
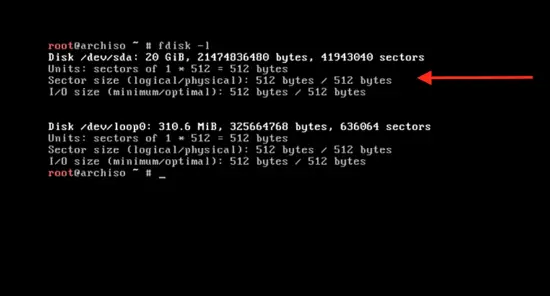
在开始安装之前,你得先为硬盘分区。输入 `fdisk -l` ,你将会看到当前系统的磁盘分区情况。注意一开始你给 Arch Linux 系统分配的 20 GB 存储空间。
|
||
|
||
[
|
||

|
||
][25]
|
||
|
||
#### 硬盘分区
|
||
|
||
我们打算把这个 20 GB 的磁盘分成三个分区。第一个主分区为 root 分区,大小为 10 GB 。第二个分区为 swap 分区,大小为内存的两倍,为 2048 MB 。第三个是逻辑分区,大小为 8 GB 。
|
||
|
||
[
|
||
|
||
][26]
|
||
|
||
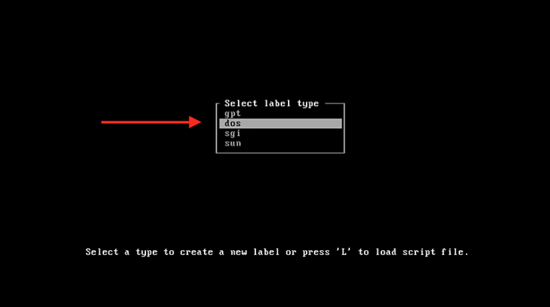
输入下面的命令:
|
||
|
||
```
|
||
cfdisk
|
||
```
|
||
|
||
你将看到 `gpt`、`dos`、`sgi` 和 `sun` 类型,选择 `dos` 选项,然后按回车。
|
||
|
||
[
|
||
|
||
][27]
|
||
|
||
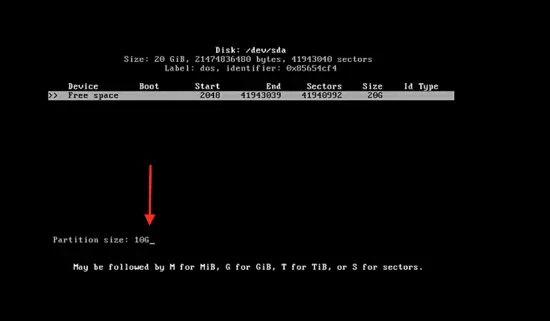
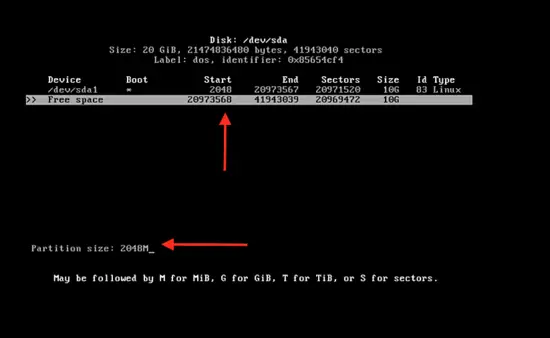
这里你将看到主磁盘空间,大小为 20 GB 。在剩余空间(free space)按回车来修改分区大小,输入 10 GB 。
|
||
|
||
[
|
||
|
||
][28]
|
||
|
||
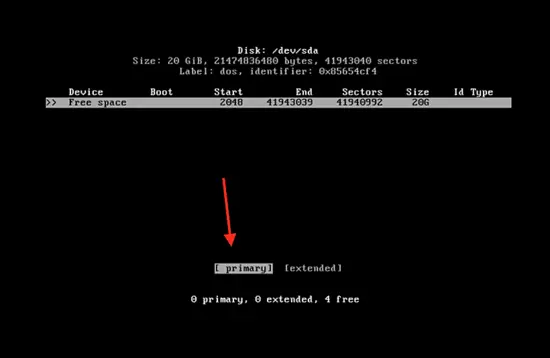
按回车并单击 “主分区(primary)” 。
|
||
|
||
[
|
||
|
||
][29]
|
||
|
||
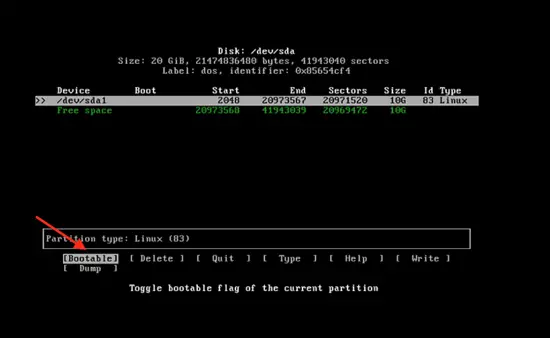
在可引导选项按回车选择“可引导(bootable)”类型。
|
||
|
||
[
|
||
|
||
][30]
|
||
|
||
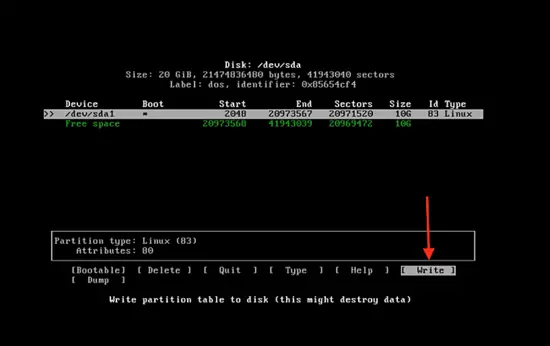
在“写入(write)选项按回车键将分区信息写入磁盘。
|
||
|
||
[
|
||
|
||
][31]
|
||
|
||
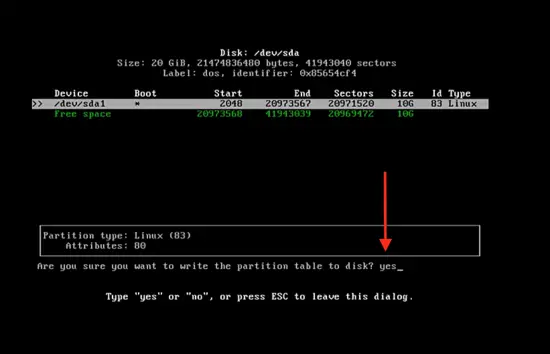
之后输入 `yes` 来应用更改。
|
||
|
||
[
|
||
|
||
][32]
|
||
|
||
现在已经创建完成 10 GB 分区。单击“剩余空间(free space)”,输入分区大小 2048 M 。
|
||
|
||
[
|
||
|
||
][33]
|
||
|
||
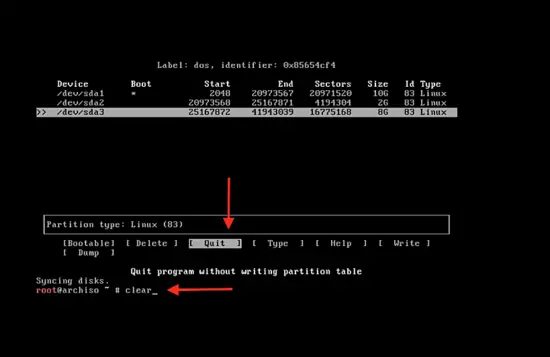
以同样的方式创建逻辑分区。在“退出(quit)”选项按回车键,然后输入下面的命令来清屏:
|
||
|
||
```
|
||
clear
|
||
```
|
||
|
||
[
|
||
|
||
][34]
|
||
|
||
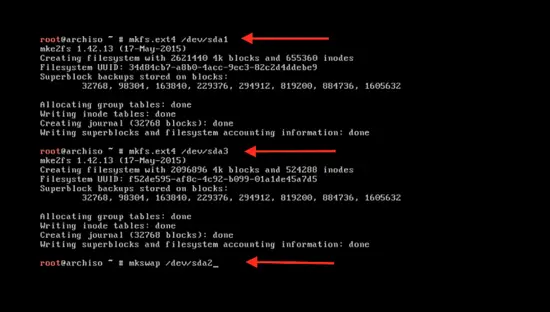
输入下面的命令来格式化新建的分区:
|
||
|
||
```
|
||
mkfs.ext4 /dev/sda1
|
||
```
|
||
|
||
这里的 `sda1` 是分区名。使用同样的命令来格式化第二个分区 `sda3` :
|
||
|
||
```
|
||
mkfs.ext4 /dev/sda3
|
||
```
|
||
|
||
格式化 swap 分区:
|
||
|
||
```
|
||
mkswap /dev/sda2
|
||
```
|
||
|
||
[
|
||
|
||
][35]
|
||
|
||
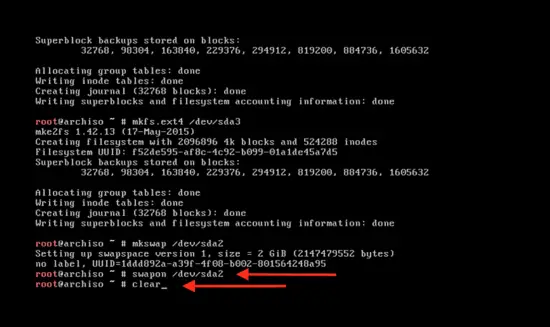
使用下面的命令来激活 swap 分区:
|
||
|
||
```
|
||
swapon /dev/sda2
|
||
```
|
||
|
||
输入 clear 命令清屏:
|
||
|
||
```
|
||
clear
|
||
```
|
||
|
||
[
|
||
|
||
][36]
|
||
|
||
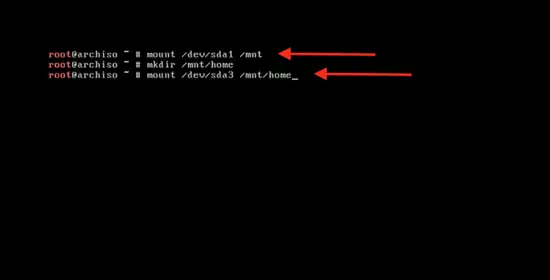
输入下面的命令来挂载主分区以开始系统安装:
|
||
|
||
```
|
||
mount /dev/sda1 /mnt
|
||
```
|
||
|
||
[
|
||
|
||
][37]
|
||
|
||
#### 引导 Arch Linux 启动
|
||
|
||
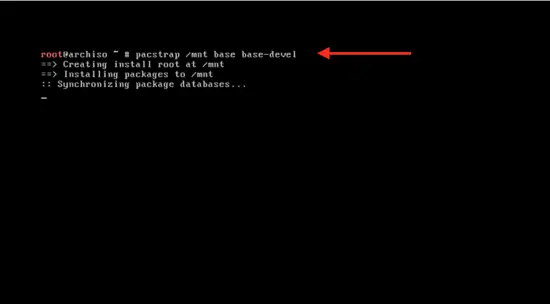
输入下面的命令来引导系统启动:
|
||
|
||
```
|
||
pacstrap /mnt base base-devel
|
||
```
|
||
|
||
可以看到系统正在同步数据包。
|
||
|
||
[
|
||
|
||
][38]
|
||
|
||
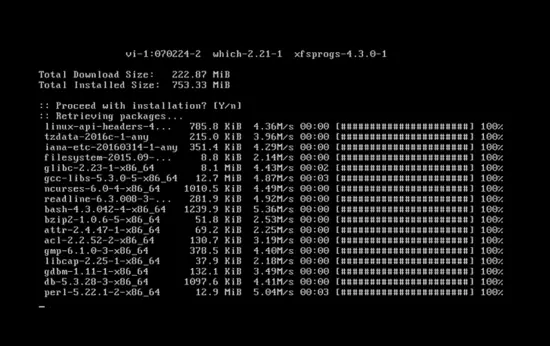
安装将会开始,需要几分钟。
|
||
|
||
[
|
||
|
||
][39]
|
||
|
||
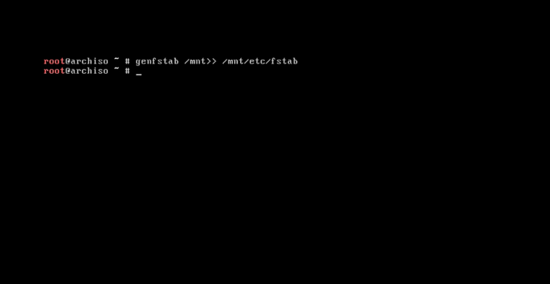
系统基本软件安装完成后,输入下面的命令来创建 fstab 文件:
|
||
|
||
```
|
||
genfstab /mnt>> /mnt/etc/fstab
|
||
```
|
||
|
||
[
|
||
|
||
][40]
|
||
|
||
配置区域、时间和 root 帐号密码。
|
||
|
||
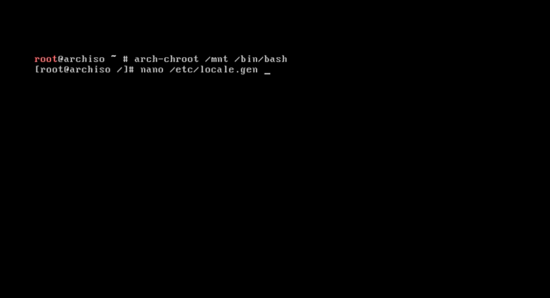
输入下面的命令来更改系统的根目录为 Arch Linux 的安装目录:
|
||
|
||
```
|
||
arch-chroot /mnt /bin/bash
|
||
```
|
||
|
||
现在来更改语言配置:
|
||
|
||
```
|
||
nano /etc/locale.gen
|
||
```
|
||
|
||
[
|
||
|
||
][41]
|
||
|
||
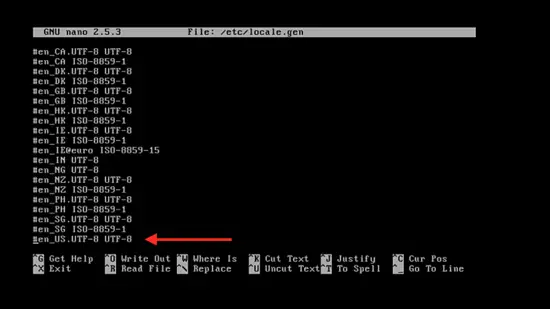
通过删除 `#` 以及按 `control + x` ,按 `y` ,然后再按回车来选择下面的语言配置:
|
||
|
||
[
|
||
|
||
][42]
|
||
|
||
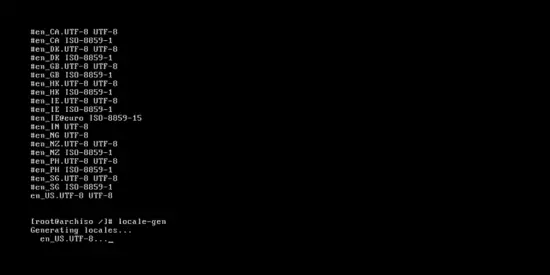
输入下面的命令来激活它:
|
||
|
||
```
|
||
locale-gen
|
||
```
|
||
|
||
按回车。
|
||
|
||
[
|
||
|
||
][43]
|
||
|
||
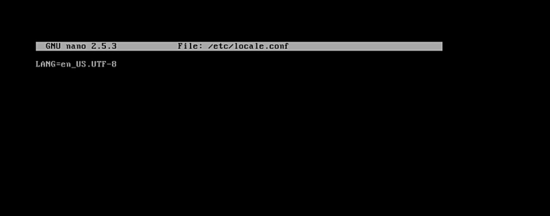
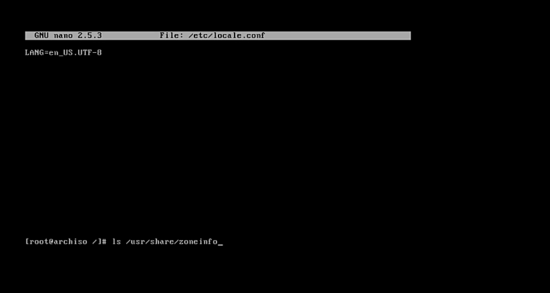
使用下面的命令来创建 `/etc/locale.conf` 配置文件:
|
||
|
||
```
|
||
nano /etc/locale.conf
|
||
```
|
||
|
||
然后按回车。现在你就可以在配置文件中输入下面一行内容来为系统添加语言:
|
||
|
||
```
|
||
LANG=en_US.UTF-8
|
||
```
|
||
|
||
然后按 `control + x` ,按 `y` ,再按回车。
|
||
|
||
[
|
||
|
||
][44]
|
||
|
||
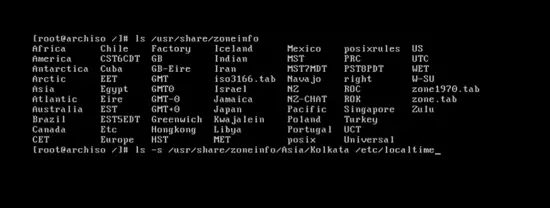
输入下面的命令来同步时区:
|
||
|
||
```
|
||
ls /usr/share/zoneinfo
|
||
```
|
||
|
||
下面你将看到整个世界的时区列表。
|
||
|
||
[
|
||
|
||
][45]
|
||
|
||
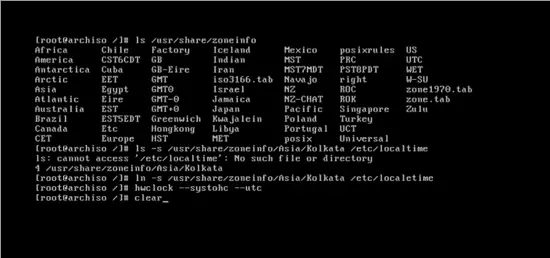
输入下面的命令来选择你所在的时区:
|
||
|
||
```
|
||
ln –s /usr/share/zoneinfo/Asia/Shanghai /etc/localtime
|
||
```
|
||
|
||
或者你可以从下面的列表中选择其它名称。
|
||
|
||
[
|
||
|
||
][46]
|
||
|
||
使用下面的命令来设置标准时间:
|
||
|
||
```
|
||
hwclock --systohc --utc
|
||
```
|
||
|
||
硬件时钟已同步。
|
||
|
||
[
|
||
|
||
][47]
|
||
|
||
设置 root 帐号密码:
|
||
|
||
```
|
||
passwd
|
||
```
|
||
|
||
按回车。 然而输入你想设置的密码,按回车确认。
|
||
|
||
[
|
||

|
||
][48]
|
||
|
||
#### 设置主机名和网络
|
||
|
||
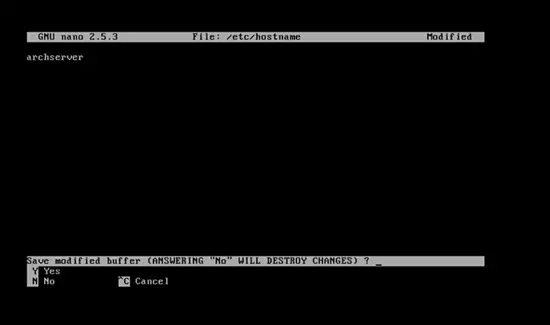
使用下面的命令来设置主机名:
|
||
|
||
```
|
||
nano /etc/hostname
|
||
```
|
||
|
||
然后按回车。输入你想设置的主机名称,按 `control + x` ,按 `y` ,再按回车 。
|
||
|
||
[
|
||
|
||
][49]
|
||
|
||
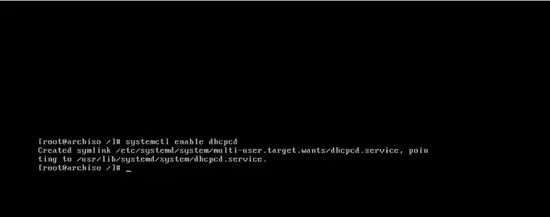
启用 dhcpcd :
|
||
|
||
```
|
||
systemctl enable dhcpcd
|
||
```
|
||
|
||
这样在下一次系统启动时, dhcpcd 将会自动启动,并自动获取一个 IP 地址:
|
||
|
||
[
|
||
|
||
][50]
|
||
|
||
#### 安装引导加载程序
|
||
|
||
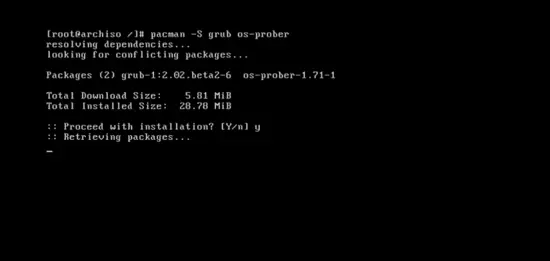
最后一步,输入以下命令来初始化 grub 安装。输入以下命令:
|
||
|
||
```
|
||
pacman –S grub os-rober
|
||
```
|
||
|
||
然后按 `y` ,将会下载相关程序。
|
||
|
||
[
|
||
|
||
][51]
|
||
|
||
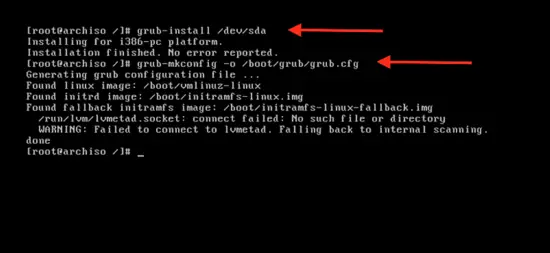
使用下面的命令来将启动加载程序安装到硬盘上:
|
||
|
||
```
|
||
grub-install /dev/sda
|
||
```
|
||
|
||
然后进行配置:
|
||
|
||
```
|
||
grub-mkconfig -o /boot/grub/grub.cfg
|
||
```
|
||
|
||
[
|
||
|
||
][52]
|
||
|
||
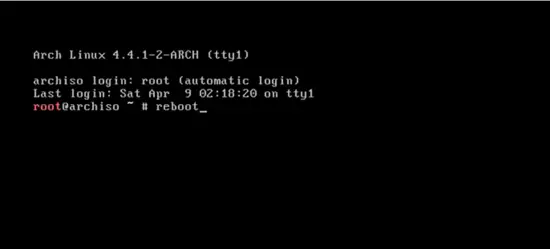
最后重启系统:
|
||
|
||
```
|
||
reboot
|
||
```
|
||
|
||
然后按回车 。
|
||
|
||
[
|
||
|
||
][53]
|
||
|
||
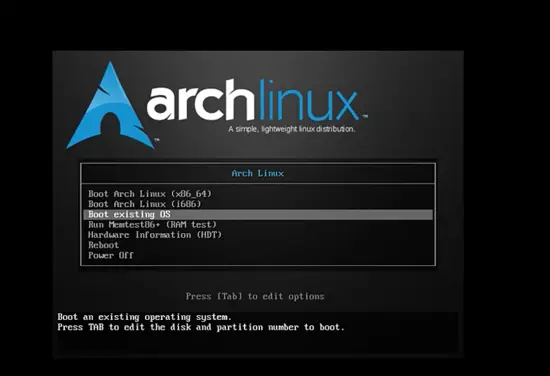
#### 启动进入到已安装完成的 Arch Linux 系统
|
||
|
||
选择“启动已存在的操作系统”选项来启动 Virtual Box 虚拟机中的 Arch Linux 系统。
|
||
|
||
[
|
||
|
||
][54]
|
||
|
||
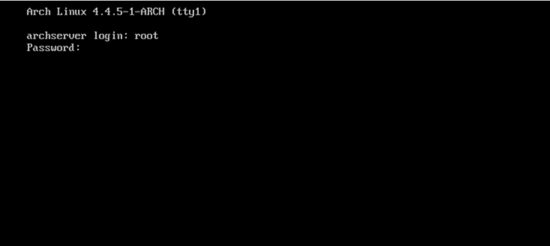
使用 root 帐号和密码登录后,你将进入全新安装好的 Arch Linux 操作系统。
|
||
|
||
[
|
||
|
||
][55]
|
||
|
||
--------------------------------------------------------------------------------
|
||
|
||
via: https://www.howtoforge.com/tutorial/install-arch-linux-on-virtualbox/
|
||
|
||
译者简介:
|
||
|
||
rusking:春城初春/春水初生/春林初盛/春風十裏不如妳
|
||
|
||
作者:[Dimitris][a]
|
||
译者:[rusking](https://github.com/rusking)
|
||
校对:[wxy](https://github.com/wxy)
|
||
|
||
本文由 [LCTT](https://github.com/LCTT/TranslateProject) 原创编译,[Linux中国](https://linux.cn/) 荣誉推出
|
||
|
||
[a]:https://www.howtoforge.com/tutorial/install-arch-linux-on-virtualbox/
|
||
[1]:https://www.howtoforge.com/tutorial/install-arch-linux-on-virtualbox/#download-arch-linux
|
||
[2]:https://www.howtoforge.com/tutorial/install-arch-linux-on-virtualbox/#initializing-installation-with-oracle-vm-virtualbox-manager
|
||
[3]:https://www.howtoforge.com/tutorial/install-arch-linux-on-virtualbox/#partition-the-hard-disk
|
||
[4]:https://www.howtoforge.com/tutorial/install-arch-linux-on-virtualbox/#bootstrap-arch-linux
|
||
[5]:https://www.howtoforge.com/tutorial/install-arch-linux-on-virtualbox/#setup-hostname-and-networking
|
||
[6]:https://www.howtoforge.com/tutorial/install-arch-linux-on-virtualbox/#install-the-bootloader
|
||
[7]:https://www.howtoforge.com/tutorial/install-arch-linux-on-virtualbox/#boot-into-the-installed-archlinux-operating-system
|
||
[8]:https://www.howtoforge.com/tutorial/install-arch-linux-on-virtualbox/#arch-linux-repositories
|
||
[9]:https://www.howtoforge.com/tutorial/install-arch-linux-on-virtualbox/#install-arch-linux-on-virtual-box
|
||
[10]:https://www.archlinux.org/
|
||
[11]:https://www.howtoforge.com/images/install_arch_linux_on_virtual_box/big/1212.png
|
||
[12]:https://www.howtoforge.com/images/install_arch_linux_on_virtual_box/big/12121.png
|
||
[13]:https://www.howtoforge.com/images/install_arch_linux_on_virtual_box/big/12122.png
|
||
[14]:https://www.howtoforge.com/images/install_arch_linux_on_virtual_box/big/12123.png
|
||
[15]:https://www.howtoforge.com/images/install_arch_linux_on_virtual_box/big/12124.png
|
||
[16]:https://www.howtoforge.com/images/install_arch_linux_on_virtual_box/big/12125.png
|
||
[17]:https://www.howtoforge.com/images/install_arch_linux_on_virtual_box/big/12126.png
|
||
[18]:https://www.howtoforge.com/images/install_arch_linux_on_virtual_box/big/12127.png
|
||
[19]:https://www.howtoforge.com/images/install_arch_linux_on_virtual_box/big/12128.png
|
||
[20]:https://www.howtoforge.com/images/install_arch_linux_on_virtual_box/big/12129.png
|
||
[21]:https://www.howtoforge.com/images/install_arch_linux_on_virtual_box/big/121210.png
|
||
[22]:https://www.howtoforge.com/images/install_arch_linux_on_virtual_box/big/121211.png
|
||
[23]:https://www.howtoforge.com/images/install_arch_linux_on_virtual_box/big/121212.png
|
||
[24]:https://www.howtoforge.com/images/install_arch_linux_on_virtual_box/big/121213.png
|
||
[25]:https://www.howtoforge.com/images/install_arch_linux_on_virtual_box/big/121214.png
|
||
[26]:https://www.howtoforge.com/images/install_arch_linux_on_virtual_box/big/121215.png
|
||
[27]:https://www.howtoforge.com/images/install_arch_linux_on_virtual_box/big/121216.png
|
||
[28]:https://www.howtoforge.com/images/install_arch_linux_on_virtual_box/big/121217.png
|
||
[29]:https://www.howtoforge.com/images/install_arch_linux_on_virtual_box/big/121218.png
|
||
[30]:https://www.howtoforge.com/images/install_arch_linux_on_virtual_box/big/121219.png
|
||
[31]:https://www.howtoforge.com/images/install_arch_linux_on_virtual_box/big/121220.png
|
||
[32]:https://www.howtoforge.com/images/install_arch_linux_on_virtual_box/big/121221.png
|
||
[33]:https://www.howtoforge.com/images/install_arch_linux_on_virtual_box/big/121222.png
|
||
[34]:https://www.howtoforge.com/images/install_arch_linux_on_virtual_box/big/121223.png
|
||
[35]:https://www.howtoforge.com/images/install_arch_linux_on_virtual_box/big/121224.png
|
||
[36]:https://www.howtoforge.com/images/install_arch_linux_on_virtual_box/big/121225.png
|
||
[37]:https://www.howtoforge.com/images/install_arch_linux_on_virtual_box/big/121226.png
|
||
[38]:https://www.howtoforge.com/images/install_arch_linux_on_virtual_box/big/121227.png
|
||
[39]:https://www.howtoforge.com/images/install_arch_linux_on_virtual_box/big/121228.png
|
||
[40]:https://www.howtoforge.com/images/install_arch_linux_on_virtual_box/big/121229.png
|
||
[41]:https://www.howtoforge.com/images/install_arch_linux_on_virtual_box/big/121230.png
|
||
[42]:https://www.howtoforge.com/images/install_arch_linux_on_virtual_box/big/121231.png
|
||
[43]:https://www.howtoforge.com/images/install_arch_linux_on_virtual_box/big/121232.png
|
||
[44]:https://www.howtoforge.com/images/install_arch_linux_on_virtual_box/big/1.png
|
||
[45]:https://www.howtoforge.com/images/install_arch_linux_on_virtual_box/big/11.png
|
||
[46]:https://www.howtoforge.com/images/install_arch_linux_on_virtual_box/big/12.png
|
||
[47]:https://www.howtoforge.com/images/install_arch_linux_on_virtual_box/big/13.png
|
||
[48]:https://www.howtoforge.com/images/install_arch_linux_on_virtual_box/big/14.png
|
||
[49]:https://www.howtoforge.com/images/install_arch_linux_on_virtual_box/big/15.png
|
||
[50]:https://www.howtoforge.com/images/install_arch_linux_on_virtual_box/big/16.png
|
||
[51]:https://www.howtoforge.com/images/install_arch_linux_on_virtual_box/big/17.png
|
||
[52]:https://www.howtoforge.com/images/install_arch_linux_on_virtual_box/big/18.png
|
||
[53]:https://www.howtoforge.com/images/install_arch_linux_on_virtual_box/big/19.png
|
||
[54]:https://www.howtoforge.com/images/install_arch_linux_on_virtual_box/big/110.png
|
||
[55]:https://www.howtoforge.com/images/install_arch_linux_on_virtual_box/big/111.png
|