mirror of
https://github.com/LCTT/TranslateProject.git
synced 2024-12-26 21:30:55 +08:00
264 lines
12 KiB
Markdown
264 lines
12 KiB
Markdown
添加Ubuntu 14.10,Ubuntu 14.04和Debian 7到RHEL/CentOS 7的PXE网络启动环境
|
||
================================================================================
|
||
本教程将指引你添加**Ubuntu 14.10 Server, Ubuntu 14.04 Server**和**Debian 7 Wheezy**发行版到**RHEL/CentOS 7**的PXE网络启动环境中。
|
||
|
||

|
||
|
||
*添加Ubuntu和Debian到PXE网络*
|
||
|
||
虽然对于本教程,我只会演示怎样来添加**64位**网络安装镜像,但对于Ubuntu或者Debian的**32位**系统,或者其它架构的镜像,操作步骤也基本相同。同时,就我而言,我会解释添加Ubuntu 32位源的方法,但不会演示配置。
|
||
|
||
从PXE服务器安装 **Ubuntu**或者**Debian**要求你的客户机必须激活网络连接,最好是使用**DHCP**通过**NAT**来进行动态分配地址。以便安装器拉取所需的包并完成安装过程。
|
||
|
||
#### 前置阅读 ####
|
||
|
||
- [在RHEL/CentOS 7中为多种Linux发行版安装PXE网络启动服务器][1]
|
||
|
||
## 步骤 1: 添加Ubuntu 14.10和Ubuntu 14.04服务器到PXE菜单 ##
|
||
|
||
**1.** 要将**Ubuntu 14.10**和**Ubuntu 14.04**添加网络安装源到PXE菜单可以通过两种方式实现:其一是通过下载Ubuntu CD ISO镜像并挂载到PXE服务器机器上,以便可以读取Ubuntu网络启动文件,其二是通过直接下载Ubuntu网络启动归档包并将其解压缩到系统中。下面,我将进一步讨论这两种方法:
|
||
|
||
### 使用Ubuntu 14.10和Ubuntu 14.04 CD ISO镜像 ###
|
||
|
||
为了能使用此方法,你的PXE服务器需要有一台可工作的CD/DVD驱动器(LCTT 译注:也可以不用,参考下面内容)。在一台专用的计算机上,转到[Ubuntu 14.10下载][2]和[Ubuntu 14.04 下载][3]页,获取64位**服务器安装镜像**,将它烧录到CD,并将CD镜像放到PXE服务器DVD/CD驱动器,然后使用以下命令挂载到系统。
|
||
|
||
# mount /dev/cdrom /mnt
|
||
|
||
如果你的PXE服务器没有CD/DVD驱动器,你可以使用**wget**命令下载**Ubuntu 14.10** 和**Ubuntu 14.04**的ISO镜像到本地,然后通过下面的命令(下载并挂载CD)挂载到服务器上上述相同位置。
|
||
|
||
#### 在Ubuntu 14.10上 ####
|
||
|
||
------------------ 32位 ------------------
|
||
|
||
# wget http://releases.ubuntu.com/14.10/ubuntu-14.10-server-i386.iso
|
||
# mount -o loop /path/to/ubuntu-14.10-server-i386.iso /mnt
|
||
|
||
----------
|
||
|
||
------------------ 64位 ------------------
|
||
|
||
# wget http://releases.ubuntu.com/14.10/ubuntu-14.10-server-amd64.iso
|
||
# mount -o loop /path/to/ubuntu-14.10-server-amd64.iso /mnt
|
||
|
||
#### 在Ubuntu 14.04上 ####
|
||
|
||
------------------ 32位 ------------------
|
||
|
||
# wget http://releases.ubuntu.com/14.04/ubuntu-14.04.1-server-i386.iso
|
||
# mount -o loop /path/to/ubuntu-14.04.1-server-i386.iso /mnt
|
||
|
||
----------
|
||
|
||
------------------ 64位 ------------------
|
||
|
||
# wget http://releases.ubuntu.com/14.04/ubuntu-14.04.1-server-amd64.iso
|
||
# mount -o loop /path/to/ubuntu-14.04.1-server-amd64.iso /mnt
|
||
|
||
### 使用Ubuntu 14.10和Ubuntu 14.04网络启动镜像 ###
|
||
|
||
对于该方法,使用以下命令下载Ubuntu网络启动镜像到PXE服务器。
|
||
|
||
#### 在Ubuntu 14.04上 ####
|
||
|
||
------------------ 32位 ------------------
|
||
|
||
# cd
|
||
# wget http://archive.ubuntu.com/ubuntu/dists/utopic/main/installer-i386/current/images/netboot/netboot.tar.gz
|
||
|
||
----------
|
||
|
||
------------------ 64位 ------------------
|
||
|
||
# cd
|
||
# http://archive.ubuntu.com/ubuntu/dists/utopic/main/installer-amd64/current/images/netboot/netboot.tar.gz
|
||
|
||
#### 在Ubuntu 14.04上 ####
|
||
|
||
------------------ 32位 ------------------
|
||
|
||
# cd
|
||
# wget http://archive.ubuntu.com/ubuntu/dists/trusty-updates/main/installer-i386/current/images/netboot/netboot.tar.gz
|
||
|
||
----------
|
||
|
||
------------------ 64位 ------------------
|
||
|
||
# cd
|
||
# wget http://archive.ubuntu.com/ubuntu/dists/trusty-updates/main/installer-amd64/current/images/netboot/netboot.tar.gz
|
||
|
||
对于其它处理器架构,请访问下面的Ubuntu 14.10和Ubuntu 14.04网络启动官方页面,选择你的架构类型并下载所需文件。
|
||
|
||
- [http://cdimage.ubuntu.com/netboot/14.10/][4]
|
||
- [http://cdimage.ubuntu.com/netboot/14.04/][5]
|
||
|
||
**2.** 在下载完**ISO镜像**或**网络启动安装器**归档包后,通过执行以下命令拷贝整个**ubuntu-installer**文件夹到PXE tftp服务器位置。
|
||
|
||
**A).** 对于两种CD ISO镜像(**32位**或**64位**),在挂载特定架构的CD到PXE服务器**/mnt**系统路径后,请使用以下命令。
|
||
|
||
# cp -fr /mnt/install/netboot/ubuntu-installer/ /var/lib/tftpboot/
|
||
|
||
**B).** 对于网络启动归档,根据特定的Ubuntu架构,请运行以下命令。
|
||
|
||
# cd
|
||
# tar xfz netboot.tar.gz
|
||
# cp -rf ubuntu-installer/ /var/lib/tftpboot/
|
||
|
||
如果你想要在PXE服务器上同时使用两种Ubuntu服务器架构,先请下载,然后根据不同的情况挂载或解压缩32位架构,然后拷贝**ubuntu-installer**目录到**/var/lib/tftpboot**,然后卸载CD或删除网络启动归档以及解压缩的文件和文件夹。对于64位架构,请重复上述步骤,以便让最终的**tftp**路径形成以下结构。
|
||
|
||
/var/lib/tftpboot/ubuntu-installer/amd64
|
||
/var/lib/tftpboot/ubuntu-installer/i386
|
||
|
||
**3.** 在接下来的步骤,通过执行以下命令添加**Ubuntu 14.10**和**Ubuntu 14.04**菜单标签到**PXE服务器**默认配置文件中。
|
||
|
||
**重要**:我不可能同时演示两个Ubuntu版本的操作,出于演示的目的,我添加了**Ubuntu 14.04**菜单标签到PXE服务器,下述同样的操作也可应用到Ubuntu 14.10,只需对版本号稍作修改,仅仅只要根据你的Ubuntu版本修改版本号和到OS架构的路径。
|
||
|
||
在你最喜爱的文本编辑器的帮助下,打开PXE默认配置文件,而我偏好nano编辑器。
|
||
|
||
# nano /var/lib/tftpboot/pxelinux.cfg/default
|
||
|
||
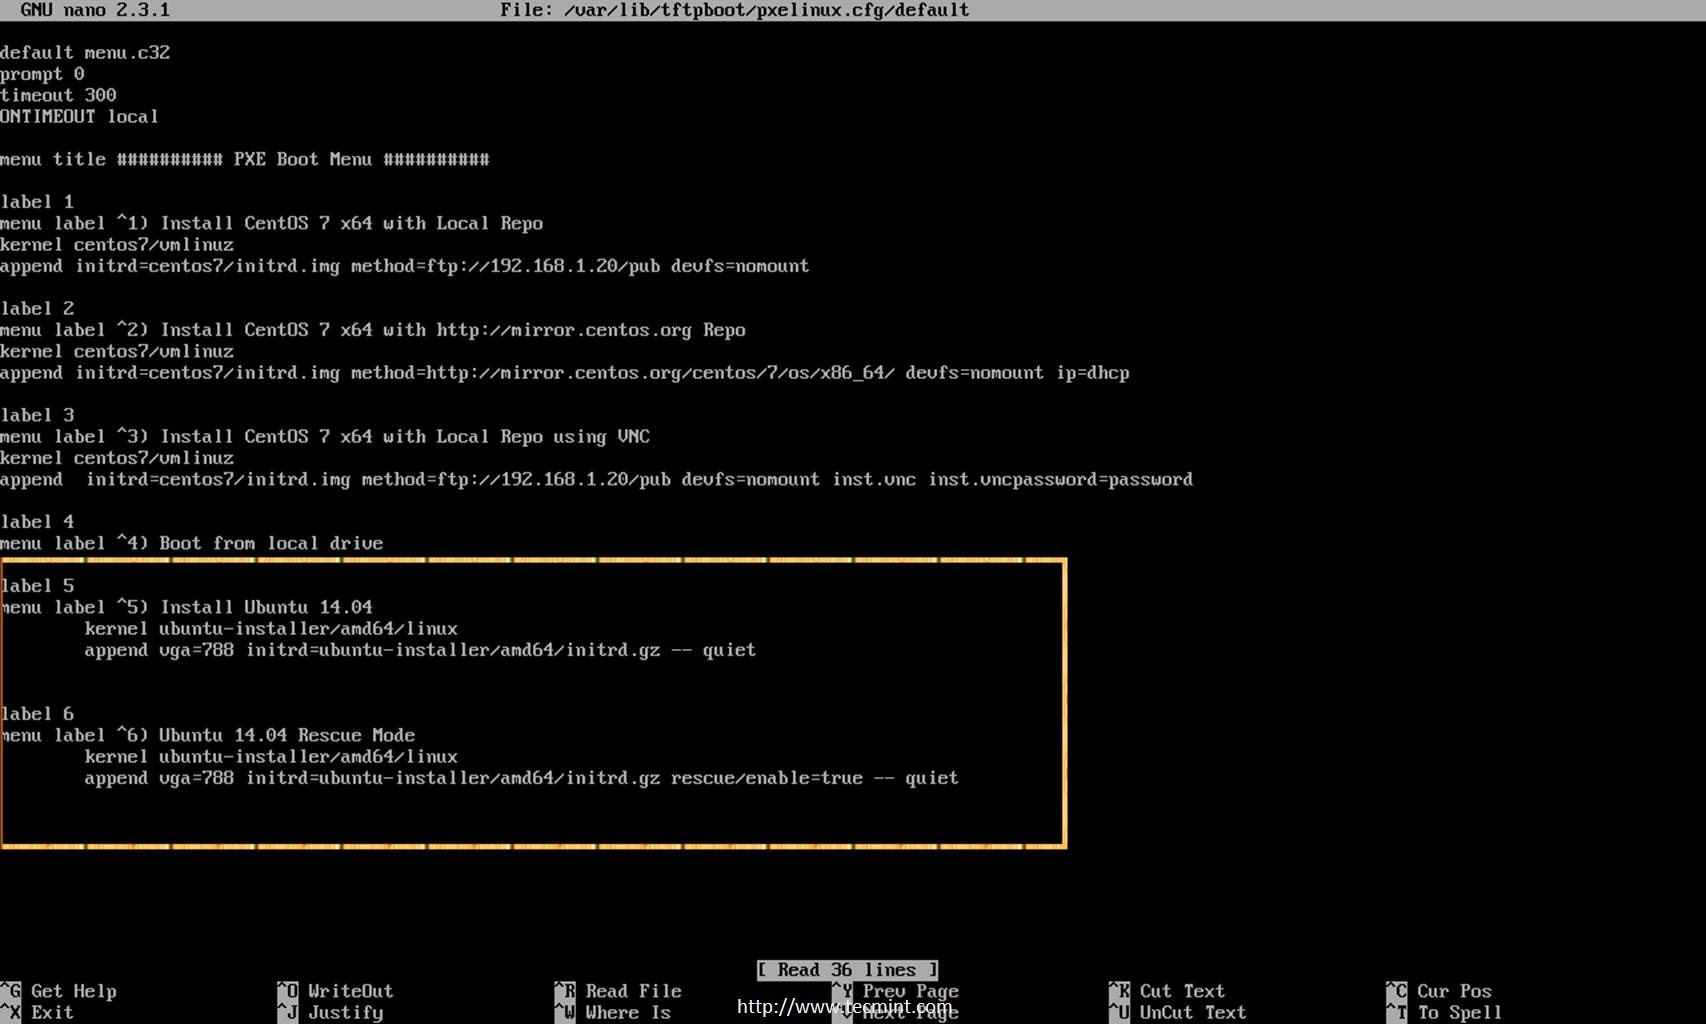
接下来,添加以下配置到PXE菜单。
|
||
|
||
#### 对于Ubuntu 14.04 32位 ####
|
||
|
||
label 1
|
||
menu label ^1) Install Ubuntu 14.04 x32
|
||
kernel ubuntu-installer/i386/linux
|
||
append vga=788 initrd=ubuntu-installer/i386/initrd.gz -- quiet
|
||
|
||
label 2
|
||
menu label ^2) Ubuntu 14.04 Rescue Mode x32
|
||
kernel ubuntu-installer/i386/linux
|
||
append vga=788 initrd=ubuntu-installer/i386/initrd.gz rescue/enable=true -- quiet
|
||
|
||
#### 对于Ubuntu 14.04 64位 ####
|
||
|
||
label 5
|
||
menu label ^5) Install Ubuntu 14.04 x64
|
||
kernel ubuntu-installer/amd64/linux
|
||
append vga=788 initrd=ubuntu-installer/amd64/initrd.gz -- quiet
|
||
|
||
label 5
|
||
menu label ^6) Ubuntu 14.04 Rescue Mode
|
||
kernel ubuntu-installer/amd64/linux
|
||
append vga=788 initrd=ubuntu-installer/amd64/initrd.gz rescue/enable=true -- quiet
|
||
|
||

|
||
添加Ubuntu到PXE启动
|
||
|
||
**注**:如果你想要包含其它Ubuntu架构,请遵循以上相同的操作,并相应替换PXE默认菜单配置文件中的标签号和**ubuntu-installer/$architecture_name/**目录。
|
||
|
||
**4.** 在配置完PXE菜单配置文件后,根据采用的方法清除源文件,并继续进行客户端PXE安装以测试配置是否正确。
|
||
|
||
---------------------- 对于CD/DVD方法 ----------------------
|
||
|
||
# umount /mnt
|
||
|
||
----------
|
||
|
||
---------------------- 对于网络启动方法 ----------------------
|
||
|
||
# cd && rm -rf ubuntu-installer/netboot.tar.gz pxelinux.* version.info
|
||
|
||
下面是**Ubuntu 14.04**PXE客户端安装测试的截图。
|
||
|
||

|
||
|
||
*从PXE菜单选择Ubuntu*
|
||
|
||

|
||
|
||
*选择Ubuntu安装语言*
|
||
|
||

|
||
|
||
*选择Ubuntu救援模式*
|
||
|
||

|
||
|
||
*Ubuntu救援模式Shell*
|
||
|
||
## 步骤 2: 添加Debian 7 Wheezy到PXE菜单 ##
|
||
|
||
**5.** 添加**Debian 7**到PXE服务器,需要上述Ubuntu服务器版本相同的步骤。唯一不同点在于网络启动归档镜像下载链接和源目录的名称,现在改为**debian-installer**。
|
||
|
||
要下载**Debian Wheezy**网络启动归档,请转到[Debian网络安装下载][6]页,从**网络启动**菜单选择你想要的系统架构,然后点击**目录**列表中的**网络启动**链接,并从**文件名**列表中下载**netboot.tar.gz**归档包。
|
||
|
||
因为Debian为众多系统架构如Armel,ia64,Mips,PowerPC,Sparc等等提供了网络安装源,所以在本指南中,我将只讨论**64位**架构。因为其它架构的配置过程和当前的几乎一样,唯一不同的是**debian-installer/$directory_architecture name**。
|
||
|
||
所以,要进一步深入,以root帐号登录到你的**PXE服务器**,并通过以下命令抓取Debian 7 64位网络启动归档包。
|
||
|
||
# wget http://ftp.nl.debian.org/debian/dists/wheezy/main/installer-amd64/current/images/netboot/netboot.tar.gz
|
||
|
||

|
||
|
||
*下载Debian 7网络启动包*
|
||
|
||
**6.** 在**wget**下载完成**netboot.tar.gz**文件后,请将其解压缩并运行以下命令拷贝**debian-installer**目录到tftp服务器默认路径。
|
||
|
||
# tar xfz netboot.tar.gz
|
||
# cp -rf debian-installer/ /var/lib/tftpboot/
|
||
|
||

|
||
|
||
*解压缩Debian 7网络启动包*
|
||
|
||

|
||
|
||
*拷贝Debian 7网络启动文件到FTP*
|
||
|
||
**7.** 要添加**Debian Wheezy**标签到**PXE菜单**,请用你最喜爱的文本编辑器打开PXE服务器默认配置文件并添加以下标签。
|
||
|
||
# nano /var/lib/tftpboot/pxelinux.cfg/default
|
||
|
||
Debian Wheezy 64位的PXE标签菜单。
|
||
|
||
label 7
|
||
menu label ^7) Install Debian 7 x64
|
||
kernel debian-installer/amd64/linux
|
||
append vga=788 initrd=debian-installer/amd64/initrd.gz -- quiet
|
||
|
||
label 8
|
||
menu label ^8) Install Debian 7 x64 Automated
|
||
kernel debian-installer/amd64/linux
|
||
append auto=true priority=critical vga=788 initrd=debian-installer/amd64/initrd.gz -- quiet
|
||
|
||

|
||
|
||
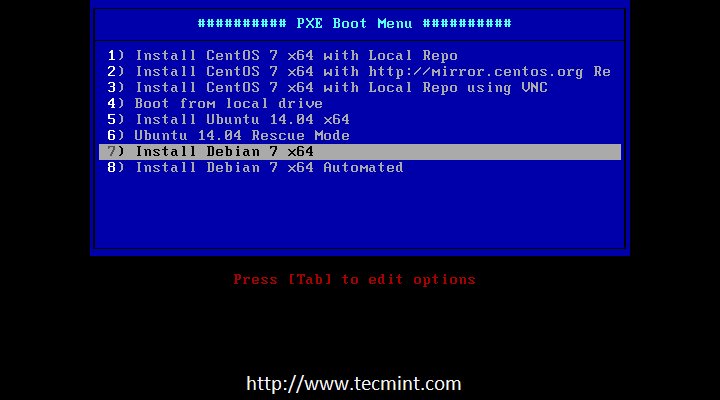
*添加Debian到PXE启动*
|
||
|
||
**注**:如果你想要添加其它Debian架构,请重复上述步骤,并相应替换PXE默认菜单配置文件中的标签号和**debian-installer/$architecture_name/**目录。
|
||
|
||
**8.** 在进行客户端测试配置之前,请执行以下命令来清除Debian源文件。
|
||
|
||
# cd && rm -rf debian-installer/ netboot.tar.gz pxelinux.* version.info
|
||
|
||
**9.** 然后通过网络启动一台客户机,选择从PXE菜单安装Debian,并像正常安装一样进一步下去。
|
||
|
||

|
||
|
||
*选择从PXE安装Debian*
|
||
|
||

|
||
|
||
*选择Debian安装语言*
|
||
|
||
以上是要求添加并从RHEL/CentOS 7 PXE服务器安装**Ubuntu**或**Debian**到客户机上的全部步骤。在我的下一篇文章中,我将讨论一种更为复杂的方法,如何使用RHEL/CentOS 7 PXE网络启动服务器来安装**Windows 7**到客户机。
|
||
|
||
--------------------------------------------------------------------------------
|
||
|
||
via: http://www.tecmint.com/add-ubuntu-to-pxe-network-boot/
|
||
|
||
作者:[Matei Cezar][a]
|
||
译者:[GOLinux](https://github.com/GOLinux)
|
||
校对:[Mr小眼儿](https://github.com/tinyeyeser)
|
||
|
||
本文由 [LCTT](https://github.com/LCTT/TranslateProject) 原创翻译,[Linux中国](http://linux.cn/) 荣誉推出
|
||
|
||
[a]:http://www.tecmint.com/author/cezarmatei/
|
||
[1]:http://linux.cn/article-4902-1.html
|
||
[2]:http://releases.ubuntu.com/14.10/
|
||
[3]:http://releases.ubuntu.com/14.04/
|
||
[4]:http://cdimage.ubuntu.com/netboot/14.10/
|
||
[5]:http://cdimage.ubuntu.com/netboot/14.04/
|
||
[6]:https://www.debian.org/distrib/netinst
|