14 KiB
How I containerize a build system
Building a repeatable structure to deliver applications as containers
can be complicated. Here is one way to do it effectively.

A build system is comprised of the tools and processes used to transition from source code to a running application. This transition also involves changing the code's audience from the software developer to the end user, whether the end user is a colleague in operations or a deployment system.
After creating a few build systems using containers, I think I have a decent, repeatable approach that's worth sharing. These build systems were used for generating loadable software images for embedded hardware and compiling machine learning algorithms, but the approach is abstract enough to be used in any container-based build system.
This approach is about creating or organizing the build system in a way that makes it easy to use and maintain. It's not about the tricks needed to deal with containerizing any particular software compilers or tools. It applies to the common use case of software developers building software to hand off a maintainable image to other technical users (whether they are sysadmins, DevOps engineers, or some other title). The build system is abstracted away from the end users so that they can focus on the software.
Why containerize a build system?
Creating a repeatable, container-based build system can provide a number of benefits to a software team:
- Focus: I want to focus on writing my application. When I call a tool to "build," I want the toolset to deliver a ready-to-use binary. I don't want to spend time troubleshooting the build system. In fact, I'd rather not know or care about the build system.
- Identical build behavior: Whatever the use case, I want to ensure that the entire team uses the same versions of the toolset and gets the same results when building. Otherwise, I am constantly dealing with the case of "it works on my PC but not yours." Using the same toolset version and getting identical output for a given input source file set is critical in a team project.
- Easy setup and future migration: Even if a detailed set of instructions is given to everyone to install a toolset for a project, chances are someone will get it wrong. Or there could be issues due to how each person has customized their Linux environment. This can be further compounded by the use of different Linux distributions across the team (or other operating systems). The issues can get uglier quickly when it comes time for moving to the next version of the toolset. Using containers and the guidelines in this article will make migration to newer versions much easier.
Containerizing the build systems that I use on my projects has certainly been valuable in my experience, as it has alleviated the problems above. I tend to use Docker for my container tooling, but there can still be issues due to the installation and network configuration being unique environment to environment, especially if you work in a corporate environment involving some complex proxy settings. But at least now I have fewer build system problems to deal with.
Walking through a containerized build system
I created a tutorial repository you can clone and examine at a later time or follow along through this article. I'll be walking through all the files in the repository. The build system is deliberately trivial (it runs gcc) to keep the focus on the build system architecture.
Build system requirements
Two key aspects that I think are desirable in a build system are:
- Standard build invocation: I want to be able to build code by pointing to some work directory whose path is /path/to/workdir. I want to invoke the build as: [code]
./build.sh /path/to/workdir[/code] To keep the example architecture simple (for the sake of explanation), I'll assume that the output is also generated somewhere within /path/to/workdir. (Otherwise, it would increase the number of volumes exposed to the container, which is not difficult, but more cumbersome to explain.) - Custom build invocation via shell: Sometimes, the toolset needs to be used in unforeseen ways. In addition to the standard build.sh to invoke the toolset, some of these could be added as options to build.sh, if needed. But I always want to be able to get to a shell where I can invoke toolset commands directly. In this trivial example, say I sometimes want to try out different gcc optimization options to see the effects. To achieve this, I want to invoke: [code]
./shell.sh /path/to/workdir[/code] This should get me to a Bash shell inside the container with access to the toolset and to my workdir, so I can experiment as I please with the toolset.
Build system architecture
To comply with the basic requirements above, here is how I architect the build system:
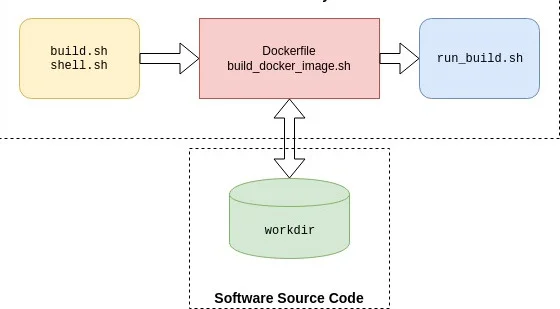
At the bottom, the workdir represents any software source code that needs to be built by the software developer end users. Typically, this workdir will be a source-code repository. The end users can manipulate this source code repository in any way they want before invoking a build. For example, if they're using git for version control, they could git checkout the feature branch they are working on and add or modify files. This keeps the build system independent of the workdir.
The three blocks at the top collectively represent the containerized build system. The left-most (yellow) block at the top represents the scripts (build.sh and shell.sh) that the end user will use to interact with the build system.
In the middle (the red block) is the Dockerfile and the associated script build_docker_image.sh. The development operations people (me, in this case) will typically execute this script and generate the container image. (In fact, I'll execute this many, many times until I get everything working right, but that's another story.) And then I would distribute the image to the end users, such as through a container trusted registry. The end users will need this image. In addition, they will clone the build system repository (i.e., one that is equivalent to the tutorial repository).
The run_build.sh script on the right is executed inside the container when the end user invokes either build.sh or shell.sh. I'll explain these scripts in detail next. The key here is that the end user does not need to know anything about the red or blue blocks or how a container works in order to use any of this.
Build system details
The tutorial repository's file structure maps to this architecture. I've used this prototype structure for relatively complex build systems, so its simplicity is not a limitation in any way. Below, I've listed the tree structure of the relevant files from the repository. The dockerize-tutorial folder could be replaced with any other name corresponding to a build system. From within this folder, I invoke either build.sh or shell.sh with the one argument that is the path to the workdir.
dockerize-tutorial/
├── build.sh
├── shell.sh
└── swbuilder
    ├── build_docker_image.sh
    ├── install_swbuilder.dockerfile
    └── scripts
        └── run_build.sh
Note that I've deliberately excluded the example_workdir above, which you'll find in the tutorial repository. Actual source code would typically reside in a separate repository and not be part of the build tool repository; I included it in this repository, so I didn't have to deal with two repositories in the tutorial.
Doing the tutorial is not necessary if you're only interested in the concepts, as I'll explain all the files. But if you want to follow along (and have Docker installed), first build the container image swbuilder:v1 with:
cd dockerize-tutorial/swbuilder/
./build_docker_image.sh
docker image ls  # resulting image will be swbuilder:v1
Then invoke build.sh as:
cd dockerize-tutorial
./build.sh ~/repos/dockerize-tutorial/example_workdir
The code for build.sh is below. This script instantiates a container from the container image swbuilder:v1. It performs two volume mappings: one from the example_workdir folder to a volume inside the container at path /workdir, and the second from dockerize-tutorial/swbuilder/scripts outside the container to /scripts inside the container.
docker container run                              \
    --volume $(pwd)/swbuilder/scripts:/scripts    \
    --volume $1:/workdir                          \
    --user $(id -u ${USER}):$(id -g ${USER})      \
    --rm -it --name build_swbuilder swbuilder:v1  \
    build
In addition, the build.sh also invokes the container to run with your username (and group, which the tutorial assumes to be the same) so that you will not have issues with file permissions when accessing the generated build output.
Note that shell.sh is identical except for two things: build.sh creates a container named build_swbuilder while shell.sh creates one named shell_swbuilder. This is so that there are no conflicts if either script is invoked while the other one is running.
The other key difference between the two scripts is the last argument: build.sh passes in the argument build while shell.sh passes in the argument shell. If you look at the Dockerfile that is used to create the container image, the last line contains the following ENTRYPOINT. This means that the docker container run invocation above will result in executing the run_build.sh script with either build or shell as the sole input argument.
# run bash script and process the input command
ENTRYPOINT [ "/bin/bash", "/scripts/run_build.sh"]
run_build.sh uses this input argument to either start the Bash shell or invoke gcc to perform the build of the trivial helloworld.c project. A real build system would typically invoke a Makefile and not run gcc directly.
cd /workdir

if [ $1 = "shell" ]; then
    echo "Starting Bash Shell"
    /bin/bash
elif [ $1 = "build" ]; then
    echo "Performing SW Build"
    gcc helloworld.c -o helloworld -Wall
fi
You could certainly pass more than one argument if your use case demands it. For the build systems I've dealt with, the build is usually for a given project with a specific make invocation. In the case of a build system where the build invocation is complex, you can have run_build.sh call a specific script inside workdir that the end user has to write.
A note about the scripts folder
You may be wondering why the scripts folder is located deep in the tree structure rather than at the top level of the repository. Either approach would work, but I didn't want to encourage the end user to poke around and change things there. Placing it deeper is a way to make it more difficult to poke around. Also, I could have added a .dockerignore file to ignore the scripts folder, as it doesn't need to be part of the container context. But since it's tiny, I didn't bother.
Simple yet flexible
While the approach is simple, I've used it for a few rather different build systems and found it to be quite flexible. The aspects that are going to be relatively stable (e.g., a given toolset that changes only a few times a year) are fixed inside the container image. The aspects that are more fluid are kept outside the container image as scripts. This allows me to easily modify how the toolset is invoked by updating the script and pushing the changes to the build system repository. All the user needs to do is to pull the changes to their local build system repository, which is typically quite fast (unlike updating a Docker image). The structure lends itself to having as many volumes and scripts as are needed while abstracting the complexity away from the end user.
How will you need to modify your application to optimize it for a containerized environment?
via: https://opensource.com/article/20/4/how-containerize-build-system
作者:Ravi Chandran 选题:lujun9972 译者:译者ID 校对:校对者ID
