9.5 KiB
How to Install and Configure HAProxy on Ubuntu 22.04
In this post, we will demonstrate how to install HAProxy on Ubuntu 22.04 (Jammy Jellyfish) step by step. We will later configure it to act as a load balancer by distributing incoming requests between two web servers.
What is HAProxy?
HaProxy, short for High Availability Proxy, is a free and open-source HTTP load balancer and reverse-proxy solution that is widely used to provide high availability to web applications and guarantee maximum possible uptime.
It is a high-performance application that injects performance improvements to your web apps by distributing traffic across multiple endpoints. This way, it ensures that no webserver is overloaded with incoming HTTP requests since the workload is equitably distributed across several nodes.
While free, the Enterprise Edition provides added features such as WAF ( Web Application Firewall ), application acceleration, advanced DDoS protection, advanced health checks and so much more.
Lab setup
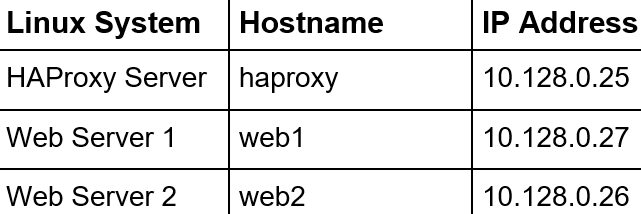
To demonstrate HAProxy in action, you need to have at least three Linux systems. One will act as the HAProxy load balancer, while the rest will act as web servers.
Step 1) Install HAProxy Load Balancer
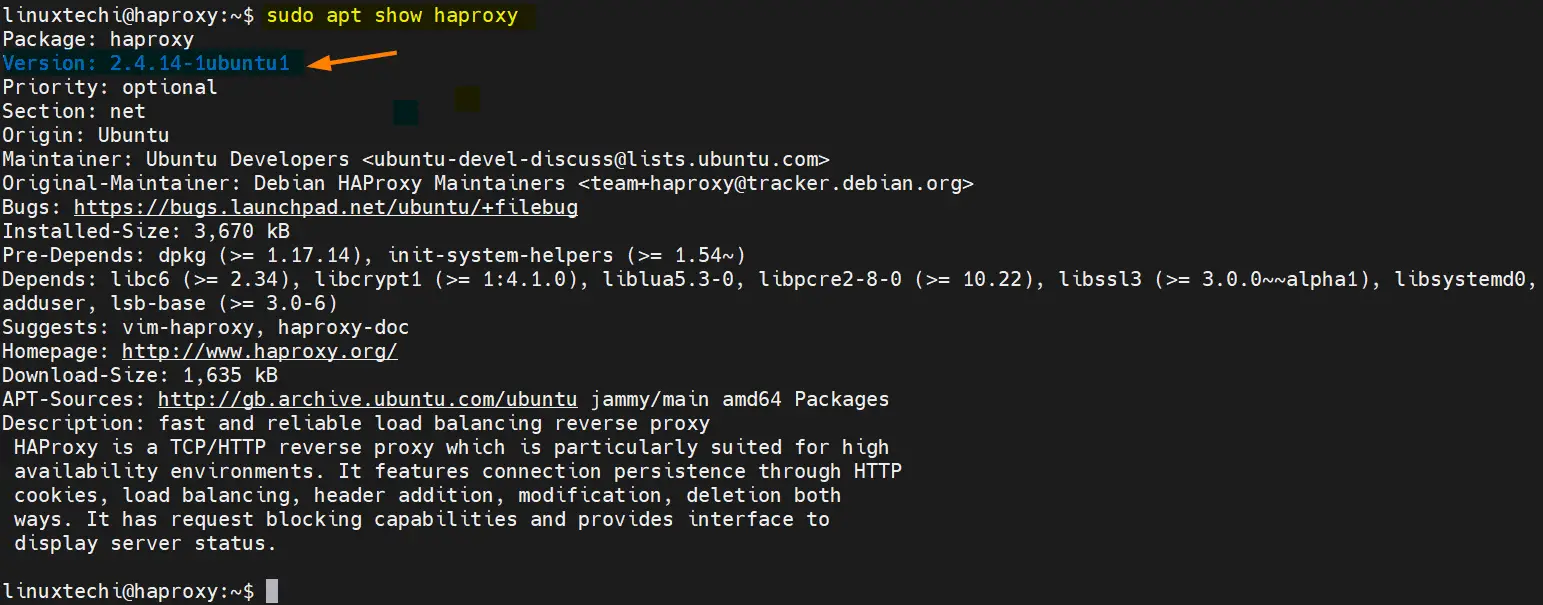
The first step is to install HAProxy on Ubuntu. Ubuntu repositories provide HAProxy by default, but it is not the latest one.
To view available haproxy package version from default repositories, run
$ sudo apt update
$ sudo apt show haproxy
But the latest long term support release is HAProxy is 2.6, So to install HAProxy 2.6, first enable PPA repository, run following command
$ sudo add-apt-repository ppa:vbernat/haproxy-2.6 -y
Now install haproxy 2.6 by executing the following commands
$ sudo apt update
$ sudo apt install -y haproxy=2.6.\*
Once installed, confirm the version of HAProxy installed as shown.
$ haproxy -v
Upon installation, the HAProxy service starts by default and listens to TCP port 80. To verify HAProxy is running, run the command
$ sudo systemctl status haproxy
It’s recommended to enable the service to auto-start on very system reboot as shown.
$ sudo systemctl enable haproxy
Step 2) Configure HAProxy
The next step is to configure HAProxy to distribute traffic evenly between two web servers. The configuration file for haproxy is /etc/haproxy/haproxy.cfg.
Before making any changes to the file, first, make a backup copy.
$ sudo cp /etc/haproxy/haproxy.cfg /etc/haproxy/haproxy.cfg.bk
Then open the file using your preferred text editor. Here, we are using Nano.
$ sudo nano /etc/haproxy/haproxy.cfg
Haproxy configuration file is made up of the following sections:
- global: This is the first section that you see at the very top. It contains system-wide settings that handle performance tuning and security.
- defaults: As the name suggests, this section contains settings that should work well without additional customization. These settings include timeout and error reporting configurations.
- frontend and backend: These are the settings that define the frontend and backend settings. For the frontend, we will define the HAProxy server as the front end which will distribute requests to the backend servers which are the webservers. We will also set HAProxy to use round robbin load balancing criteria for distributing traffic.
- listen: This is an optional setting that enables you to enable monitoring of HAProxy statistics.
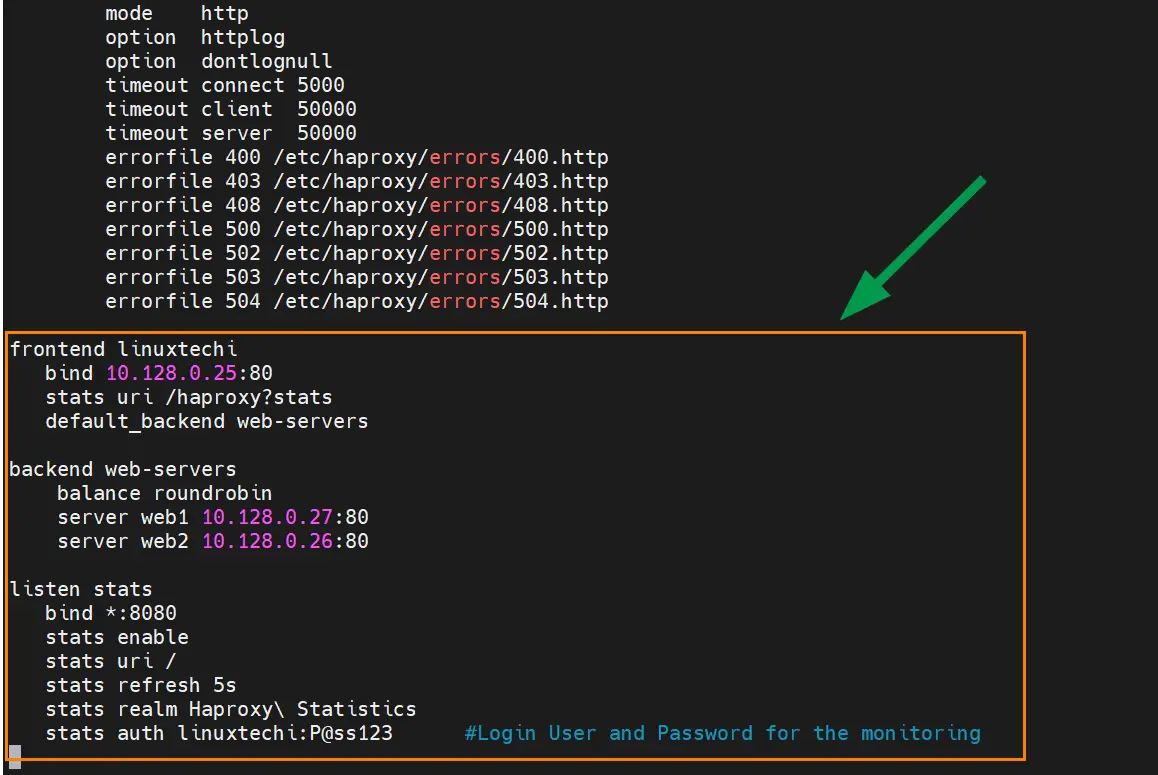
Now define the frontend and backend settings:
frontend linuxtechi
   bind 10.128.0.25:80
   stats uri /haproxy?stats
   default_backend web-servers

backend web-servers
    balance roundrobin
    server web1 10.128.0.27:80
    server web2 10.128.0.26:80
Here, we have configured both the HAProxy server and the web server nodes to listed to port 80. Be sure to replace the IP address for the HAProxy and webservers with your setup.
In order to enable viewing the HAProxy statistics from a browser, add the following ‘listen’ section.
listen stats
   bind *:8080
   stats enable
   stats uri /
   stats refresh 5s
   stats realm Haproxy\ Statistics
   stats auth linuxtechi:[email protected]     #Login User and Password for the monitoring
The stats auth directive specifies the username and password for the login user for viewing statistics on the browser.
Now save all the changes and exit the configuration file. To reload the new settings, restart haproxy service.
$ sudo systemctl restart haproxy
Next edit the /etc/hosts file.
Define the hostnames and IP addresses of the haproxy main server and the webservers.
10.128.0.25 haproxy
10.128.0.27 web1
10.128.0.27 web2
Save the changes and exit.
Step 3) Configure Web Servers
In this step, we will configure the remaining Linux systems which are the web servers.
So, log in to each of the web servers and install the Apache web server package.
$ sudo apt update
$ sudo apt install -y apache2
Next, verify that Apache is running on each of the servers.
$ sudo systemctl status apache2
Then enable Apache webserver to start on boot on both servers.
$ sudo systemctl enable apache2
Next, modify the index.html files for each web server.
For Web Server 1
Switch to the root user
$ sudo su
Then run the following command.
# echo "<H1>Hello! This is webserver1: 10.128.0.27 </H1>" > /var/www/html/index.html
For Web Server 2
Similarly, switch to the root user
$ sudo su
And create the index.html file as shown.
# echo "<H1>Hello! This is webserver2: 10.128.0.26 </H1>" > /var/www/html/index.html
Next, configure the /etc/hosts file.
$ sudo nano /etc/hosts
Add the HAProxy entry to each node.
10.128.0.25 haproxy
Save the changes and exit the configuration file.
Be sure you can ping the HAProxy server from each of the web server nodes.
Note: Make Sure port 80 is allowed in the OS firewall in case it is enabled on web servers.
Step 4) Test HAProxy Load Balancing
Up until this point, we have successfully configured our HAProxy and both of the back-end web servers. To test if your configuration is working as expected, browse the IP address of the HAProxy server
When you browse for the first time, you should see the web page for the first web server
Upon refreshing, you should the webpage for the second web server
This shows that the HAProxy server is performing its load balancing job spectacularly by distributing incoming web traffic across the two web servers in a Round Robbin algorithm.
Moreover, you can use the following do-while loop with the curl command:
$ while true; do curl 10.128.0.25; sleep1; done
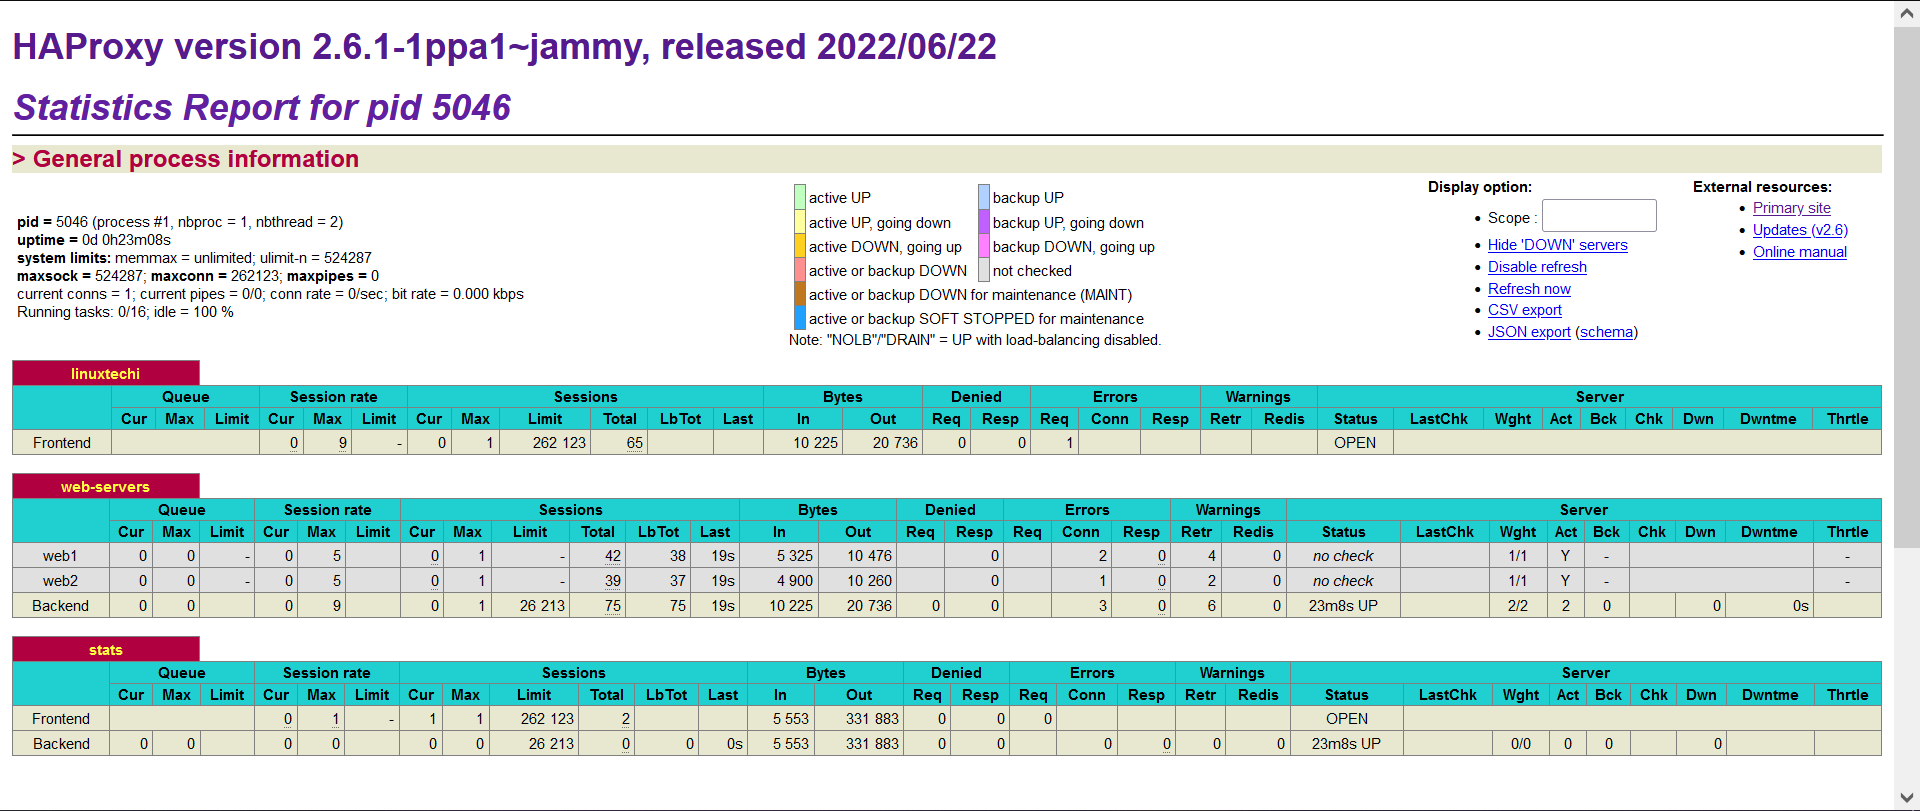
To view monitoring statistics, browse the following URL:
You will be required to authenticate, so provide your details as specified in Step 2.
You will see the following page with statistics on the performance of the HAProxy server.
Conclusion
There you have it! We have successfully installed HAProxy on Ubuntu 22.04 and configured it to serve requests across two web servers using the Round Robbin load balancing criteria.
Read Also: How to Configure Static IP Address on Ubuntu 22.04 LTS
via: https://www.linuxtechi.com/install-configure-haproxy-on-ubuntu/
作者:Pradeep Kumar 选题:lkxed 译者:译者ID 校对:校对者ID


