mirror of
https://github.com/LCTT/TranslateProject.git
synced 2025-01-10 22:21:11 +08:00
151 lines
6.1 KiB
Markdown
151 lines
6.1 KiB
Markdown
在 Linux 上给用户赋予指定目录的读写权限
|
||
============================================================
|
||
|
||
在上篇文章中我们向您展示了如何在 Linux 上[创建一个共享目录][3]。这次,我们会为您介绍如何将 Linux 上指定目录的读写权限赋予用户。
|
||
|
||
有两种方法可以实现这个目标:第一种是 [使用 ACL (访问控制列表)][4] ,第二种是[创建用户组来管理文件权限][5],下面会一一介绍。
|
||
|
||
为了完成这个教程,我们将使用以下设置。
|
||
|
||
- 操作系统:CentOS 7
|
||
- 测试目录:`/shares/project1/reports`
|
||
- 测试用户:tecmint
|
||
- 文件系统类型:ext4
|
||
|
||
请确认所有的命令都是使用 root 用户执行的,或者使用 [sudo 命令][6] 来享受与之同样的权限。
|
||
|
||
让我们开始吧!下面,先使用 `mkdir` 命令来创建一个名为 `reports` 的目录。
|
||
|
||
```
|
||
# mkdir -p /shares/project1/reports
|
||
```
|
||
|
||
### 使用 ACL 来为用户赋予目录的读写权限
|
||
|
||
重要提示:打算使用此方法的话,您需要确认您的 Linux 文件系统类型(如 ext3 和 ext4, NTFS, BTRFS)支持 ACL。
|
||
|
||
1、 首先, 依照以下命令在您的系统中[检查当前文件系统类型][7],并且查看内核是否支持 ACL:
|
||
|
||
```
|
||
# df -T | awk '{print $1,$2,$NF}' | grep "^/dev"
|
||
# grep -i acl /boot/config*
|
||
```
|
||
|
||
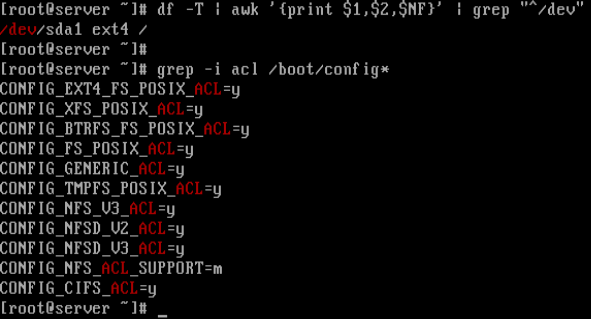
从下方的截屏可以看到,文件系统类型是 `ext4`,并且从 `CONFIG_EXT4_FS_POSIX_ACL=y` 选项可以发现内核是支持 **POSIX ACLs** 的。
|
||
|
||
[
|
||

|
||
][8]
|
||
|
||
*查看文件系统类型和内核的 ACL 支持。*
|
||
|
||
2、 接下来,查看文件系统(分区)挂载时是否使用了 ACL 选项。
|
||
|
||
```
|
||
# tune2fs -l /dev/sda1 | grep acl
|
||
```
|
||
[
|
||

|
||
][9]
|
||
|
||
*查看分区是否支持 ACL*
|
||
|
||
通过上边的输出可以发现,默认的挂载项目中已经对 **ACL** 进行了支持。如果发现结果不如所愿,你可以通过以下命令对指定分区(此例中使用 `/dev/sda3`)开启 ACL 的支持。
|
||
|
||
```
|
||
# mount -o remount,acl /
|
||
# tune2fs -o acl /dev/sda3
|
||
```
|
||
|
||
3、 现在是时候指定目录 `reports` 的读写权限分配给名为 `tecmint` 的用户了,依照以下命令执行即可。
|
||
|
||
```
|
||
# getfacl /shares/project1/reports # Check the default ACL settings for the directory
|
||
# setfacl -m user:tecmint:rw /shares/project1/reports # Give rw access to user tecmint
|
||
# getfacl /shares/project1/reports # Check new ACL settings for the directory
|
||
```
|
||
[
|
||

|
||
][10]
|
||
|
||
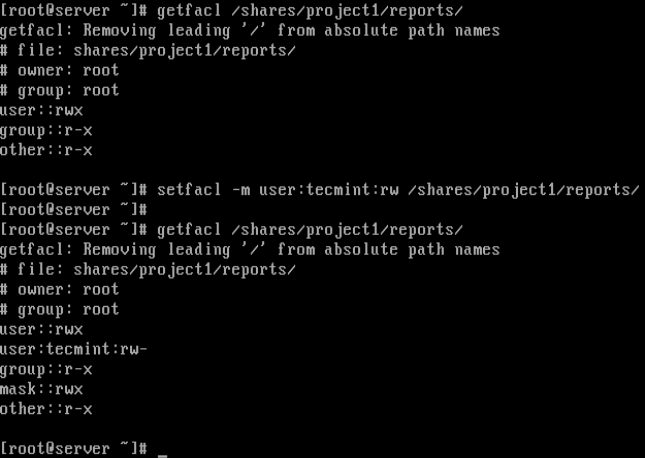
*通过 ACL 对指定目录赋予读写权限*
|
||
|
||
在上方的截屏中,通过输出结果的第二行 `getfacl` 命令可以发现,用户 `tecmint` 已经成功的被赋予了 `/shares/project1/reports` 目录的读写权限。
|
||
|
||
如果想要获取 ACL 列表的更多信息。可以在下方查看我们的其他指南。
|
||
|
||
1. [如何使用访问控制列表(ACL)为用户/组设置磁盘配额][1]
|
||
2. [如何使用访问控制列表(ACL)挂载网络共享][2]
|
||
|
||
现在我们来看看如何使用第二种方法来为目录赋予读写权限。
|
||
|
||
### 使用用户组来为用户赋予指定目录的读写权限
|
||
|
||
1、 如果用户已经拥有了默认的用户组(通常组名与用户名相同),就可以简单的通过变更文件夹的所属用户组来完成。
|
||
|
||
```
|
||
# chgrp tecmint /shares/project1/reports
|
||
```
|
||
|
||
另外,我们也可以通过以下方法为多个用户(需要赋予指定目录读写权限的)新建一个用户组。如此一来,也就[创建了一个共享目录][11]。
|
||
|
||
```
|
||
# groupadd projects
|
||
```
|
||
|
||
2、 接下来将用户 `tecmint` 添加到 `projects` 组中:
|
||
|
||
```
|
||
# usermod -aG projects tecmint # add user to projects
|
||
# groups tecmint # check users groups
|
||
```
|
||
|
||
3、 将目录的所属用户组变更为 projects:
|
||
|
||
```
|
||
# chgrp projects /shares/project1/reports
|
||
```
|
||
|
||
4、 现在,给组成员设置读写权限。
|
||
|
||
```
|
||
# chmod -R 0760 /shares/projects/reports
|
||
# ls -l /shares/projects/ #check new permissions
|
||
```
|
||
|
||
|
||
好了!这篇教程中,我们向您展示了如何在 Linux 中将指定目录的读写权限赋予用户。若有疑问,请在留言区中提问。
|
||
|
||
--------------------------------------------------------------------------------
|
||
|
||
|
||
作者简介:
|
||
|
||
Aaron Kili 是 Linux 和 F.O.S.S 爱好者,未来的 Linux 系统管理员和网络开发人员,目前是 TecMint 的内容创作者,他喜欢用电脑工作,并坚信分享知识。
|
||
|
||
--------------------------------------------------------------------------------
|
||
|
||
via: http://www.tecmint.com/give-read-write-access-to-directory-in-linux/
|
||
|
||
作者:[Aaron Kili][a]
|
||
译者:[Mr-Ping](http://www.mr-ping.com)
|
||
校对:[jasminepeng](https://github.com/jasminepeng)
|
||
|
||
本文由 [LCTT](https://github.com/LCTT/TranslateProject) 原创编译,[Linux中国](https://linux.cn/) 荣誉推出
|
||
|
||
[a]:http://www.tecmint.com/author/aaronkili/
|
||
[1]:http://www.tecmint.com/set-access-control-lists-acls-and-disk-quotas-for-users-groups/
|
||
[2]:http://www.tecmint.com/rhcsa-exam-configure-acls-and-mount-nfs-samba-shares/
|
||
[3]:https://linux.cn/article-8187-1.html
|
||
[4]:http://www.tecmint.com/secure-files-using-acls-in-linux/
|
||
[5]:http://www.tecmint.com/manage-users-and-groups-in-linux/
|
||
[6]:http://www.tecmint.com/sudoers-configurations-for-setting-sudo-in-linux/
|
||
[7]:http://www.tecmint.com/find-linux-filesystem-type/
|
||
[8]:http://www.tecmint.com/wp-content/uploads/2017/03/Check-Filesystem-Type-and-Kernel-ACL-Support.png
|
||
[9]:http://www.tecmint.com/wp-content/uploads/2017/03/Check-Partition-ACL-Support.png
|
||
[10]:http://www.tecmint.com/wp-content/uploads/2017/03/Give-Read-Write-Access-to-Directory-Using-ACL.png
|
||
[11]:http://www.tecmint.com/create-a-shared-directory-in-linux/
|
||
[12]:http://www.tecmint.com/author/aaronkili/
|
||
[13]:http://www.tecmint.com/10-useful-free-linux-ebooks-for-newbies-and-administrators/
|
||
[14]:http://www.tecmint.com/free-linux-shell-scripting-books/
|