mirror of
https://github.com/LCTT/TranslateProject.git
synced 2025-01-07 22:11:09 +08:00
321 lines
12 KiB
Markdown
321 lines
12 KiB
Markdown
在 RHEL、CentOS 及 Fedora 上安装 Drupal 8
|
||
============================================================
|
||
|
||
**Drupal** 是一个开源,灵活,高度可拓展和安全的<ruby>内容管理系统<rt>Content Management System</rt></ruby>(CMS),使用户轻松的创建网站。
|
||
|
||
它可以使用模块拓展,使用户将内容管理转换为强大的数字解决方案。
|
||
|
||
**Drupal** 运行在诸如 Apache、IIS、Lighttpd、Cherokee、Nginx 的 Web 服务器上,后端数据库可以使用 MySQL、MongoDB、MariaDB、PostgreSQL、MSSQL Server。
|
||
|
||
在这篇文章中, 我们会展示在 RHEL 7/6、CentOS 7/6 和 Fedora 20-25 发行版上使用 LAMP 架构,如何手动安装和配置 Drupal 8。
|
||
|
||
#### Drupal 需求:
|
||
|
||
1. **Apache 2.x** (推荐)
|
||
2. **PHP 5.5.9** 或 更高 (推荐 PHP 5.5)
|
||
3. **MySQL 5.5.3** 或 **MariaDB 5.5.20** 与 PHP 数据对象(PDO) 支持
|
||
|
||
安装过程中,我使用 `drupal.tecmint.com` 作为网站主机名,IP 地址为 `192.168.0.104`。你的环境也许与这些设置不同,因此请适当做出更改。
|
||
|
||
### 步骤 1:安装 Apache Web 服务器
|
||
|
||
1、 首先我们从官方仓库开始安装 Apache Web 服务器。
|
||
|
||
```
|
||
# yum install httpd
|
||
```
|
||
|
||
2、 安装完成后,服务开始是被禁用的,因此我们需要手动启动它,同时让它下次系统启动时自动启动,如下:
|
||
|
||
```
|
||
------------- 通过 SystemD - CentOS/RHEL 7 和 Fedora 22+ -------------------
|
||
# systemctl start httpd
|
||
# systemctl enable httpd
|
||
|
||
------------- 通过 SysVInit - CentOS/RHEL 6 和 Fedora ----------------------
|
||
# service httpd start
|
||
# chkconfig --level 35 httpd on
|
||
```
|
||
|
||
3、 接下来,为了允许通过 **HTTP** 和 **HTTPS** 访问 Apache 服务,我们必须打开 **HTTPD** 守护进程正在监听的 **80** 和 **443** 端口,如下所示:
|
||
|
||
```
|
||
------------ 通过 Firewalld - CentOS/RHEL 7 and Fedora 22+ -------------
|
||
# firewall-cmd --permanent --zone=public --add-service=http
|
||
# firewall-cmd --permanent --zone=public --add-service=https
|
||
# firewall-cmd --reload
|
||
|
||
------------ 通过 IPtables - CentOS/RHEL 6 and Fedora 22+ -------------
|
||
# iptables -A INPUT -p tcp -m tcp --dport 80 -j ACCEPT
|
||
# iptables -A INPUT -p tcp -m tcp --dport 443 -j ACCEPT
|
||
# service iptables save
|
||
# service iptables restart
|
||
```
|
||
|
||
4、 现在验证 Apache 是否正常工作, 打开浏览器在地址栏中输入 `http://server_IP`, 输入你的服务器 IP 地址, 默认 Apache2 页面应出现,如下面截图所示:
|
||
|
||
[
|
||

|
||
][1]
|
||
|
||
*Apache 默认页面*
|
||
|
||
### 步骤 2: 安装 Apache PHP 支持
|
||
|
||
5、 接下来,安装 PHP 和 PHP 所需模块。
|
||
|
||
```
|
||
# yum install php php-mbstring php-gd php-xml php-pear php-fpm php-mysql php-pdo php-opcache
|
||
```
|
||
|
||
**重要**: 假如你想要安装 **PHP7**, 你需要增加以下仓库:**EPEL** 和 **Webtactic** 才可以使用 yum 安装 PHP7.0:
|
||
|
||
```
|
||
------------- Install PHP 7 in CentOS/RHEL and Fedora -------------
|
||
# rpm -Uvh https://dl.fedoraproject.org/pub/epel/epel-release-latest-7.noarch.rpm
|
||
# rpm -Uvh https://mirror.webtatic.com/yum/el7/webtatic-release.rpm
|
||
# yum install php70w php70w-opcache php70w-mbstring php70w-gd php70w-xml php70w-pear php70w-fpm php70w-mysql php70w-pdo
|
||
```
|
||
|
||
6、 接下来,要从浏览器得到关于 PHP 安装和配置完整信息,使用下面命令在 Apache 文档根目录 (`/var/www/html`) 创建一个 `info.php` 文件。
|
||
|
||
```
|
||
# echo "<?php phpinfo(); ?>" > /var/www/html/info.php
|
||
```
|
||
|
||
然后重启 HTTPD 服务器 ,在浏览器地址栏输入 `http://server_IP/info.php`。
|
||
|
||
```
|
||
# systemctl restart httpd
|
||
或
|
||
# service httpd restart
|
||
```
|
||
|
||
[
|
||

|
||
][2]
|
||
|
||
*验证 PHP 信息*
|
||
|
||
### 步骤 3: 安装和配置 MariaDB 数据库
|
||
|
||
7、 请知晓, **Red Hat Enterprise Linux/CentOS 7.0** 从支持 **MySQL** 转为了 **MariaDB** 作为默认数据库管理系统。
|
||
|
||
要安装 **MariaDB** 数据库, 你需要添加 [官方 MariaDB 库][3] 到 `/etc/yum.repos.d/MariaDB.repo` 中,如下所示。
|
||
|
||
```
|
||
[mariadb]
|
||
name = MariaDB
|
||
baseurl = http://yum.mariadb.org/10.1/centos7-amd64
|
||
gpgkey=https://yum.mariadb.org/RPM-GPG-KEY-MariaDB
|
||
gpgcheck=1
|
||
```
|
||
|
||
当仓库文件准备好后,你可以像这样安装 MariaDB:
|
||
|
||
```
|
||
# yum install mariadb-server mariadb
|
||
```
|
||
|
||
8、 当 MariaDB 数据库安装完成,启动数据库的守护进程,同时使它能够在下次启动后自动启动。
|
||
|
||
```
|
||
------------- 通过 SystemD - CentOS/RHEL 7 and Fedora 22+ -------------
|
||
# systemctl start mariadb
|
||
# systemctl enable mariadb
|
||
------------- 通过 SysVInit - CentOS/RHEL 6 and Fedora -------------
|
||
# service mysqld start
|
||
# chkconfig --level 35 mysqld on
|
||
```
|
||
|
||
9、 然后运行 `mysql_secure_installation` 脚本去保护数据库(设置 root 密码, 禁用远程登录,移除测试数据库并移除匿名用户),如下所示:
|
||
|
||
```
|
||
# mysql_secure_installation
|
||
```
|
||
[
|
||

|
||
][4]
|
||
|
||
*MySQL 安全安装*
|
||
|
||
### 步骤 4: 在 CentOS 中安装和配置 Drupal 8
|
||
|
||
10、 这里我们使用 [wget 命令][6] [下载最新版本 Drupal][5](例如 8.2.6),如果你没有安装 wget 和 gzip 包 ,请使用下面命令安装它们:
|
||
|
||
```
|
||
# yum install wget gzip
|
||
# wget -c https://ftp.drupal.org/files/projects/drupal-8.2.6.tar.gz
|
||
```
|
||
|
||
11、 之后,[解压 tar 文件][7] 并移动 Drupal 目录到 Apache 文档根目录(`/var/www/html`)。
|
||
|
||
```
|
||
# tar -zxvf drupal-8.2.6.tar.gz
|
||
# mv drupal-8.2.6 /var/www/html/drupal
|
||
```
|
||
|
||
12、 然后,依据 `/var/www/html/drupal/sites/default` 目录下的示例设置文件 `default.settings.php`,创建设置文件 `settings.php`,然后给 Drupal 站点目录设置适当权限,包括子目录和文件,如下所示:
|
||
|
||
```
|
||
# cd /var/www/html/drupal/sites/default/
|
||
# cp default.settings.php settings.php
|
||
# chown -R apache:apache /var/www/html/drupal/
|
||
```
|
||
|
||
13、 更重要的是在 `/var/www/html/drupal/sites/` 目录设置 **SElinux** 规则,如下:
|
||
|
||
```
|
||
# chcon -R -t httpd_sys_content_rw_t /var/www/html/drupal/sites/
|
||
```
|
||
|
||
14、 现在我们必须为 Drupal 站点去创建一个用于管理的数据库和用户。
|
||
|
||
```
|
||
# mysql -u root -p
|
||
Enter password:
|
||
MySQL Shell
|
||
Welcome to the MariaDB monitor. Commands end with ; or \g.
|
||
Your MySQL connection id is 12
|
||
Server version: 5.1.73 Source distribution
|
||
Copyright (c) 2000, 2016, Oracle, MariaDB Corporation Ab and others.
|
||
Type 'help;' or '\h' for help. Type '\c' to clear the current input statement.
|
||
**MySQL [(none)]> create database drupal;**
|
||
Query OK, 1 row affected (0.00 sec)
|
||
**MySQL [(none)]> create user ravi@localhost identified by 'tecmint123';**
|
||
Query OK, 0 rows affected (0.00 sec)
|
||
**MySQL [(none)]> grant all on drupal.* to ravi@localhost;**
|
||
Query OK, 0 rows affected (0.00 sec)
|
||
**MySQL [(none)]> flush privileges;**
|
||
Query OK, 0 rows affected (0.00 sec)
|
||
**MySQL [(none)]> exit**
|
||
Bye
|
||
```
|
||
|
||
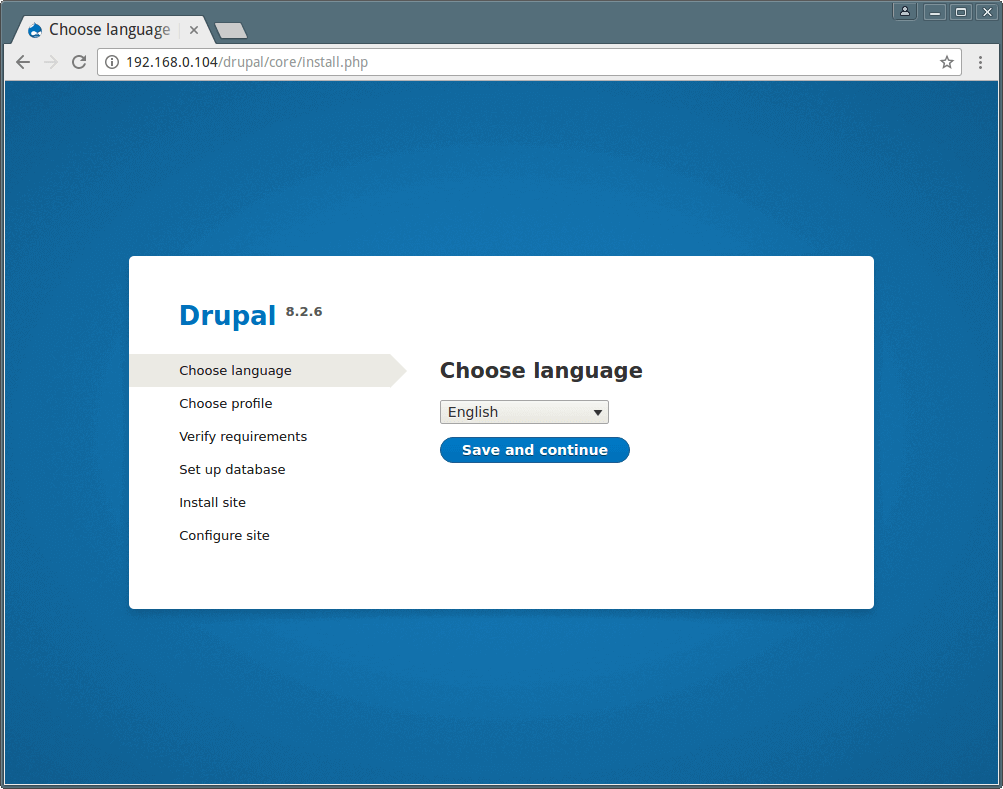
15、 最后,打开地址: `http://server_IP/drupal/` 开始网站的安装,选择你首选的安装语言然后点击保存以继续。
|
||
|
||
[
|
||
|
||
][8]
|
||
|
||
*Drupal 安装语言*
|
||
|
||
16、 下一步,选择安装配置文件,选择 Standard(标准),点击保存继续。
|
||
|
||
[
|
||

|
||
][9]
|
||
|
||
*Drupal 安装配置文件*
|
||
|
||
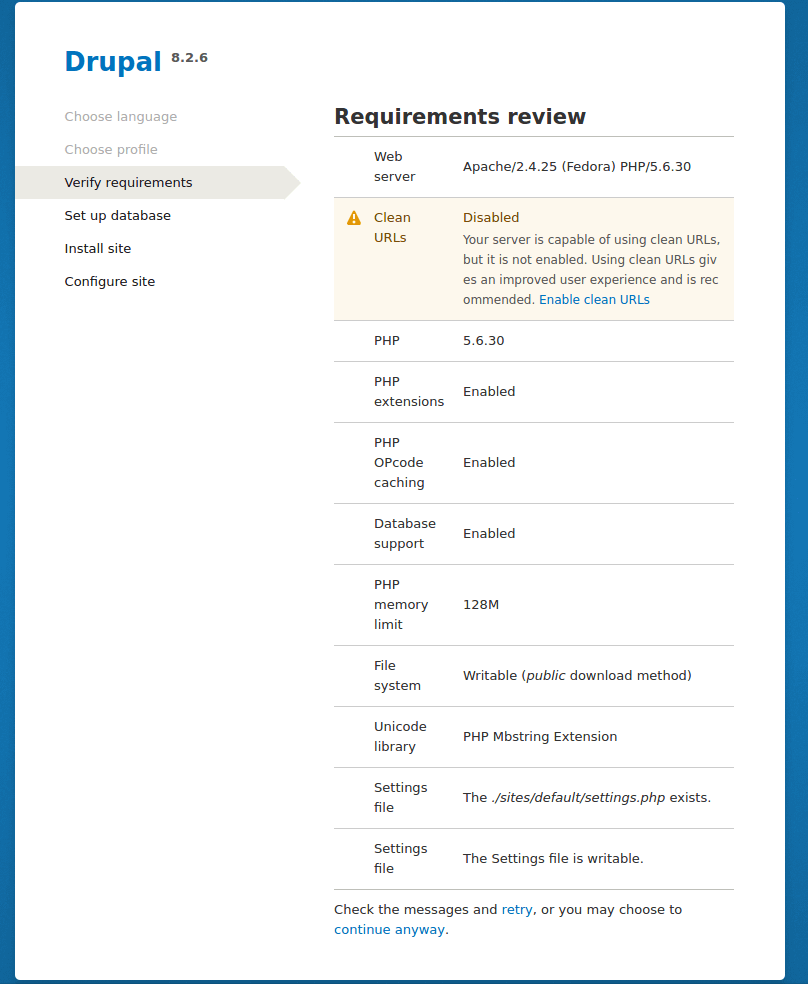
17、 在进行下一步之前查看并通过需求审查并启用 `Clean URL`。
|
||
|
||
[
|
||
|
||
][10]
|
||
|
||
*验证 Drupal 需求*
|
||
|
||
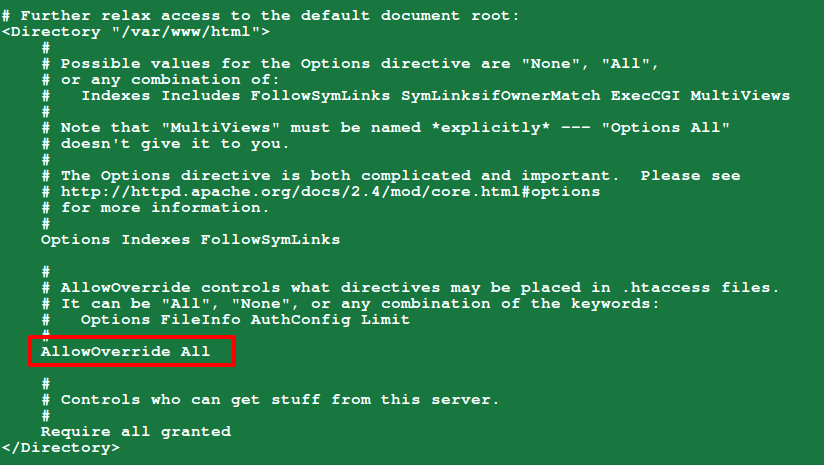
现在在你的 Apache 配置下启用 Clean URL 的 Drupal。
|
||
|
||
```
|
||
# vi /etc/httpd/conf/httpd.conf
|
||
```
|
||
|
||
确保为默认根文档目录 `/var/www/html` 设置 `AllowOverride All`,如下图所示:
|
||
|
||
[
|
||
|
||
][11]
|
||
|
||
*在 Drupal 中启用 Clean URL*
|
||
|
||
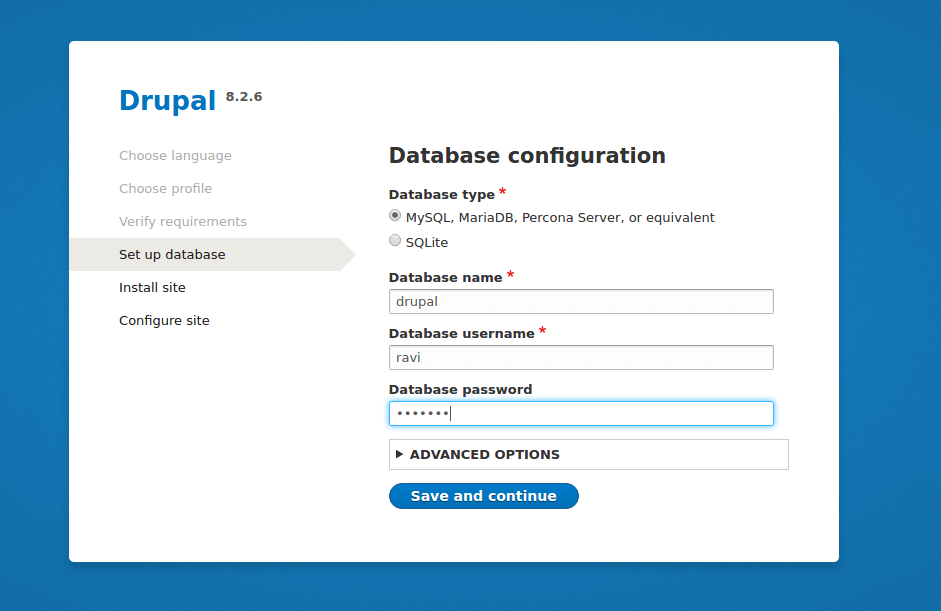
18、 当你为 Drupal 启用 Clean URL,刷新页面从下面界面执行数据库配置,输入 Drupal 站点数据库名,数据库用户和数据库密码。
|
||
|
||
当填写完所有信息点击**保存并继续**。
|
||
|
||
[
|
||
|
||
][12]
|
||
|
||
*Drupal 数据库配置*
|
||
|
||
若上述设置正确,Drupal 站点安装应该完成了,如下图界面。
|
||
|
||
[
|
||

|
||
][13]
|
||
|
||
*Drupal 安装*
|
||
|
||
19、 接下来配置站点为下面的设置(使用适用你的情况的值):
|
||
|
||
- **站点名称** – TecMint Drupal Site
|
||
- **站点邮箱地址** – admin@tecmint.com
|
||
- **用户名** – admin
|
||
- **密码** – ##########
|
||
- **用户的邮箱地址** – admin@tecmint.com
|
||
- **默认国家** – India
|
||
- **默认时区** – UTC
|
||
|
||
设置适当的值后,点击**保存并继续**完成站点安装过程。
|
||
|
||
[
|
||

|
||
][14]
|
||
|
||
*Drupal 站点配置*
|
||
|
||
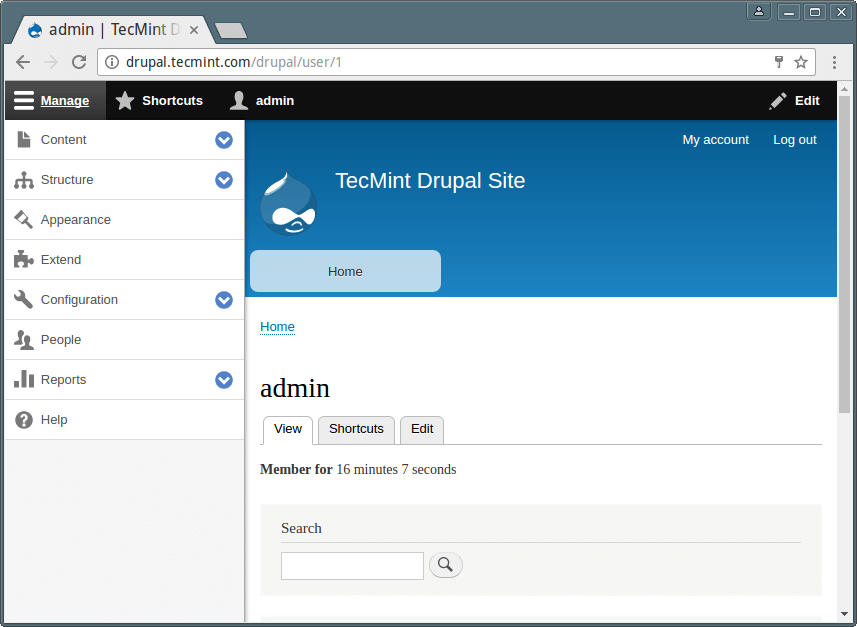
20. 下图显示的是通过 LAMP 成功安装的 Drupal 8 站点。
|
||
|
||
[
|
||
|
||
][15]
|
||
|
||
*Drupal 站点面板*
|
||
|
||
现在你可以点击**增加内容**,创建示例网页内容。
|
||
|
||
选项: 有些人[使用 MySQL 命令行管理数据库][16]不舒服,可以从浏览器界面 [安装 PHPMYAdmin 管理数据库][17]
|
||
|
||
浏览 Drupal 文档 : [https://www.drupal.org/docs/8][18]
|
||
|
||
就这样! 在这个文章, 我们展示了在 CentOS 7 上如何去下载、安装和使用基本配置来设置 LAMP 以及 Drupal 8。 欢迎就这个教程提供反馈,或提供给我们一些相关信息。
|
||
|
||
--------------------------------------------------------------------------------
|
||
|
||
作者简介:
|
||
|
||
Aaron Kili 是 linux 和 F.O.S.S 爱好者,将成为 Linux 系统管理员,Web 开发者,目前是 TecMint 的原创作者,热爱计算机工作,并且坚信知识共享。
|
||
|
||
--------------------------------------------------------------------------------
|
||
|
||
via: http://www.tecmint.com/install-drupal-in-centos-rhel-fedora/
|
||
|
||
作者:[Aaron Kili][a]
|
||
译者:[imxieke](https://github.com/imxieke)
|
||
校对:[jasminepeng](https://github.com/jasminepeng)
|
||
|
||
本文由 [LCTT](https://github.com/LCTT/TranslateProject) 原创编译,[Linux中国](https://linux.cn/) 荣誉推出
|
||
|
||
[a]:http://www.tecmint.com/author/aaronkili/
|
||
|
||
[1]:http://www.tecmint.com/wp-content/uploads/2013/07/Apache-Default-Page.png
|
||
[2]:http://www.tecmint.com/wp-content/uploads/2013/07/PHP-Information.png
|
||
[3]:https://downloads.mariadb.org/mariadb/repositories/#mirror=Fibergrid&distro=CentOS
|
||
[4]:http://www.tecmint.com/wp-content/uploads/2013/07/Mysql-Secure-Installation.png
|
||
[5]:https://www.drupal.org/download
|
||
[6]:http://www.tecmint.com/10-wget-command-examples-in-linux/
|
||
[7]:http://www.tecmint.com/extract-tar-files-to-specific-or-different-directory-in-linux/
|
||
[8]:http://www.tecmint.com/wp-content/uploads/2013/07/Drupal-Installation-Language.png
|
||
[9]:http://www.tecmint.com/wp-content/uploads/2013/07/Drupal-Installation-Profile.png
|
||
[10]:http://www.tecmint.com/wp-content/uploads/2013/07/Verify-Drupal-Requirements.png
|
||
[11]:http://www.tecmint.com/wp-content/uploads/2013/07/Enable-Clean-URL-in-Drupal.png
|
||
[12]:http://www.tecmint.com/wp-content/uploads/2013/07/Drupal-Database-Configuration.png
|
||
[13]:http://www.tecmint.com/wp-content/uploads/2013/07/Drupal-Installation.png
|
||
[14]:http://www.tecmint.com/wp-content/uploads/2013/07/Drupal-Site-Configuration.png
|
||
[15]:http://www.tecmint.com/wp-content/uploads/2013/07/Drupal-Site-Dashboard.png
|
||
[16]:http://www.tecmint.com/mysqladmin-commands-for-database-administration-in-linux/
|
||
[17]:http://www.tecmint.com/install-phpmyadmin-rhel-centos-fedora-linux/
|
||
[18]:https://www.drupal.org/docs/8
|