8.8 KiB
translating by rieon
Deploy Kubernetes cluster for Linux containers
In this quick start, a Kubernetes cluster is deployed using the Azure CLI. A multi-container application consisting of web front-end and a Redis instance is then deployed and run on the cluster. Once completed, the application is accessible over the internet.
This quick start assumes a basic understanding of Kubernetes concepts, for detailed information on Kubernetes see the Kubernetes documentation.
If you don't have an Azure subscription, create a free account before you begin.
Launch Azure Cloud Shell
The Azure Cloud Shell is a free Bash shell that you can run directly within the Azure portal. It has the Azure CLI preinstalled and configured to use with your account. Click the Cloud Shell button on the menu in the upper-right of the Azure portal.
The button launches an interactive shell that you can use to run all of the steps in this topic:
If you choose to install and use the CLI locally, this quickstart requires that you are running the Azure CLI version 2.0.4 or later. Run az --version to find the version. If you need to install or upgrade, see Install Azure CLI 2.0.
Create a resource group
Create a resource group with the az group create command. An Azure resource group is a logical group in which Azure resources are deployed and managed.
The following example creates a resource group named myResourceGroup in the eastus location.
Azure CLICopyTry It
az group create --name myResourceGroup --location eastus
Output:
JSONCopy
{
  "id": "/subscriptions/00000000-0000-0000-0000-000000000000/resourceGroups/myResourceGroup",
  "location": "eastus",
  "managedBy": null,
  "name": "myResourceGroup",
  "properties": {
    "provisioningState": "Succeeded"
  },
  "tags": null
}
Create Kubernetes cluster
Create a Kubernetes cluster in Azure Container Service with the az acs createcommand. The following example creates a cluster named myK8sCluster with one Linux master node and three Linux agent nodes.
Azure CLICopyTry It
az acs create --orchestrator-type=kubernetes --resource-group myResourceGroup --name=myK8sCluster --generate-ssh-keys
After several minutes, the command completes and returns json formatted information about the cluster.
Connect to the cluster
To manage a Kubernetes cluster, use kubectl, the Kubernetes command-line client.
If you're using Azure CloudShell, kubectl is already installed. If you want to install it locally, you can use the az acs kubernetes install-cli command.
To configure kubectl to connect to your Kubernetes cluster, run the az acs kubernetes get-credentials command. This steps downloads credentials and configures the Kubernetes CLI to use them.
Azure CLICopyTry It
az acs kubernetes get-credentials --resource-group=myResourceGroup --name=myK8sCluster
To verify the connection to your cluster, use the kubectl get command to return a list of the cluster nodes.
Azure CLICopyTry It
kubectl get nodes
Output:
bashCopy
NAME                    STATUS                     AGE       VERSION
k8s-agent-14ad53a1-0    Ready                      10m       v1.6.6
k8s-agent-14ad53a1-1    Ready                      10m       v1.6.6
k8s-agent-14ad53a1-2    Ready                      10m       v1.6.6
k8s-master-14ad53a1-0   Ready,SchedulingDisabled   10m       v1.6.6
Run the application
A Kubernetes manifest file defines a desired state for the cluster, including things like what container images should be running. For this example, a manifest is used to create all object needed to run the Azure Vote application.
Create a file named azure-vote.yaml and copy into it the following YAML.
yamlCopy
apiVersion: apps/v1beta1
kind: Deployment
metadata:
  name: azure-vote-back
spec:
  replicas: 1
  template:
    metadata:
      labels:
        app: azure-vote-back
    spec:
      containers:
      - name: azure-vote-back
        image: redis
        ports:
        - containerPort: 6379
          name: redis
---
apiVersion: v1
kind: Service
metadata:
  name: azure-vote-back
spec:
  ports:
  - port: 6379
  selector:
    app: azure-vote-back
---
apiVersion: apps/v1beta1
kind: Deployment
metadata:
  name: azure-vote-front
spec:
  replicas: 1
  template:
    metadata:
      labels:
        app: azure-vote-front
    spec:
      containers:
      - name: azure-vote-front
        image: microsoft/azure-vote-front:redis-v1
        ports:
        - containerPort: 80
        env:
        - name: REDIS
          value: "azure-vote-back"
---
apiVersion: v1
kind: Service
metadata:
  name: azure-vote-front
spec:
  type: LoadBalancer
  ports:
  - port: 80
  selector:
    app: azure-vote-front
Use the kubectl create command to run the application.
Azure CLICopyTry It
kubectl create -f azure-vote.yaml
Output:
bashCopy
deployment "azure-vote-back" created
service "azure-vote-back" created
deployment "azure-vote-front" created
service "azure-vote-front" created
Test the application
As the application is run, a Kubernetes service is created that exposes the application front-end to the internet. This process can take a few minutes to complete.
To monitor progress, use the kubectl get service command with the --watchargument.
Azure CLICopyTry It
kubectl get service azure-vote-front --watch
Initially the EXTERNAL-IP for the azure-vote-front service appears as pending . Once the EXTERNAL-IP address has changed from pending to an IP address , use CTRL-C to stop the kubectl watch process.
bashCopy
azure-vote-front   10.0.34.242   <pending>     80:30676/TCP   7s
azure-vote-front   10.0.34.242   52.179.23.131   80:30676/TCP   2m
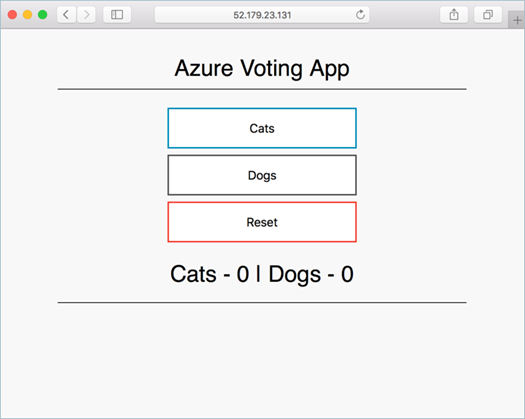
You can now browse to the external IP address to see the Azure Vote App.
Delete cluster
When the cluster is no longer needed, you can use the az group deletecommand to remove the resource group, container service, and all related resources.
Azure CLICopyTry It
az group delete --name myResourceGroup --yes --no-wait
Get the code
In this quick start, pre-created container images have been used to create a Kubernetes deployment. The related application code, Dockerfile, and Kubernetes manifest file are available on GitHub.+
https://github.com/Azure-Samples/azure-voting-app-redis
Next steps
In this quick start, you deployed a Kubernetes cluster and deployed a multi-container application to it.
To learn more about Azure Container Service, and walk through a complete code to deployment example, continue to the Kubernetes cluster tutorial.
作者:neilpeterson ,mmacy 译者:译者ID 校对:校对者ID


