7.3 KiB
Use a drop-down terminal for fast commands in Fedora
A drop-down terminal lets you tap a key and quickly enter any command on your desktop. Often it creates a terminal in a smooth way, sometimes with effects. This article demonstrates how it helps to improve and speed up daily tasks, using drop-down terminals like Yakuake, Tilda, Guake and a GNOME extension.
Yakuake
Yakuake is a drop-down terminal emulator based on KDE Konsole techonology. It is distributed under the terms of the GNU GPL Version 2. It includes features such as:
- Smoothly rolls down from the top of your screen
- Tabbed interface
- Configurable dimensions and animation speed
- Skinnable
- Sophisticated D-Bus interface
To install Yakuake, use the following command:
$ sudo dnf install -y yakuake
Startup and configuration
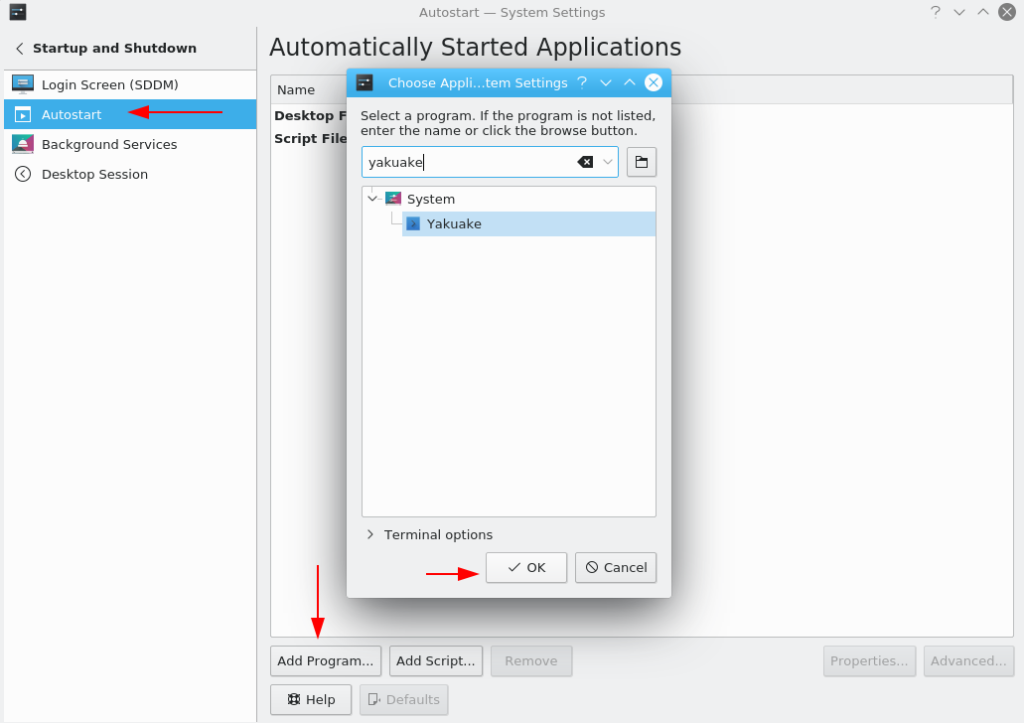
If you’re runnign KDE, open the System Settings and go to Startup and Shutdown. Add yakuake to the list of programs under Autostart, like this:
It’s easy to configure Yakuake while running the app. To begin, launch the program at the command line:
$ yakuake &
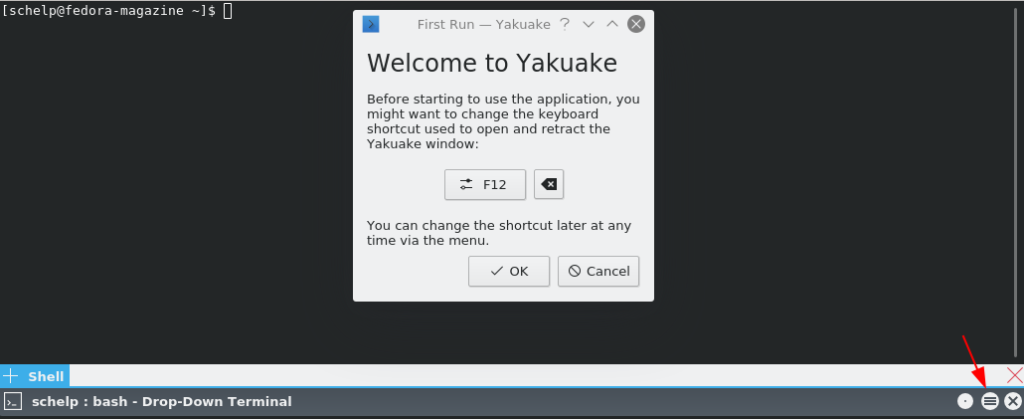
The following welcome dialog appears. You can set a new keyboard shortcut if the standard one conflicts with another keystroke you already use:
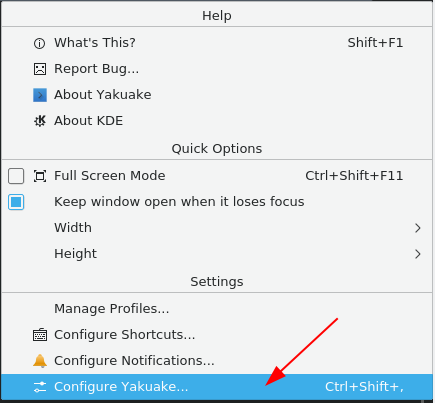
Now click the menu button, and the following help menu appears. Next, select Configure Yakuake… to access the configuration options.
You can customize the options for appearance, such as opacity; behavior, such as focusing terminals when the mouse pointer is moved over them; and window, such as size and animation. In the window options you’ll find one of the most useful options is you use two or more monitors: Open on screen: At mouse location.
Using Yakuake
The main shortcuts are:
- F12 = Open/Retract Yakuake
- Ctrl+F11 = Full Screen Mode
- Ctrl+) = Split Top/Bottom
- Ctrl+( = Split Left/Right
- Ctrl+Shift+T = New Session
- Shift+Right = Next Session
- Shift+Left = Previous Session
- Ctrl+Alt+S = Rename Session
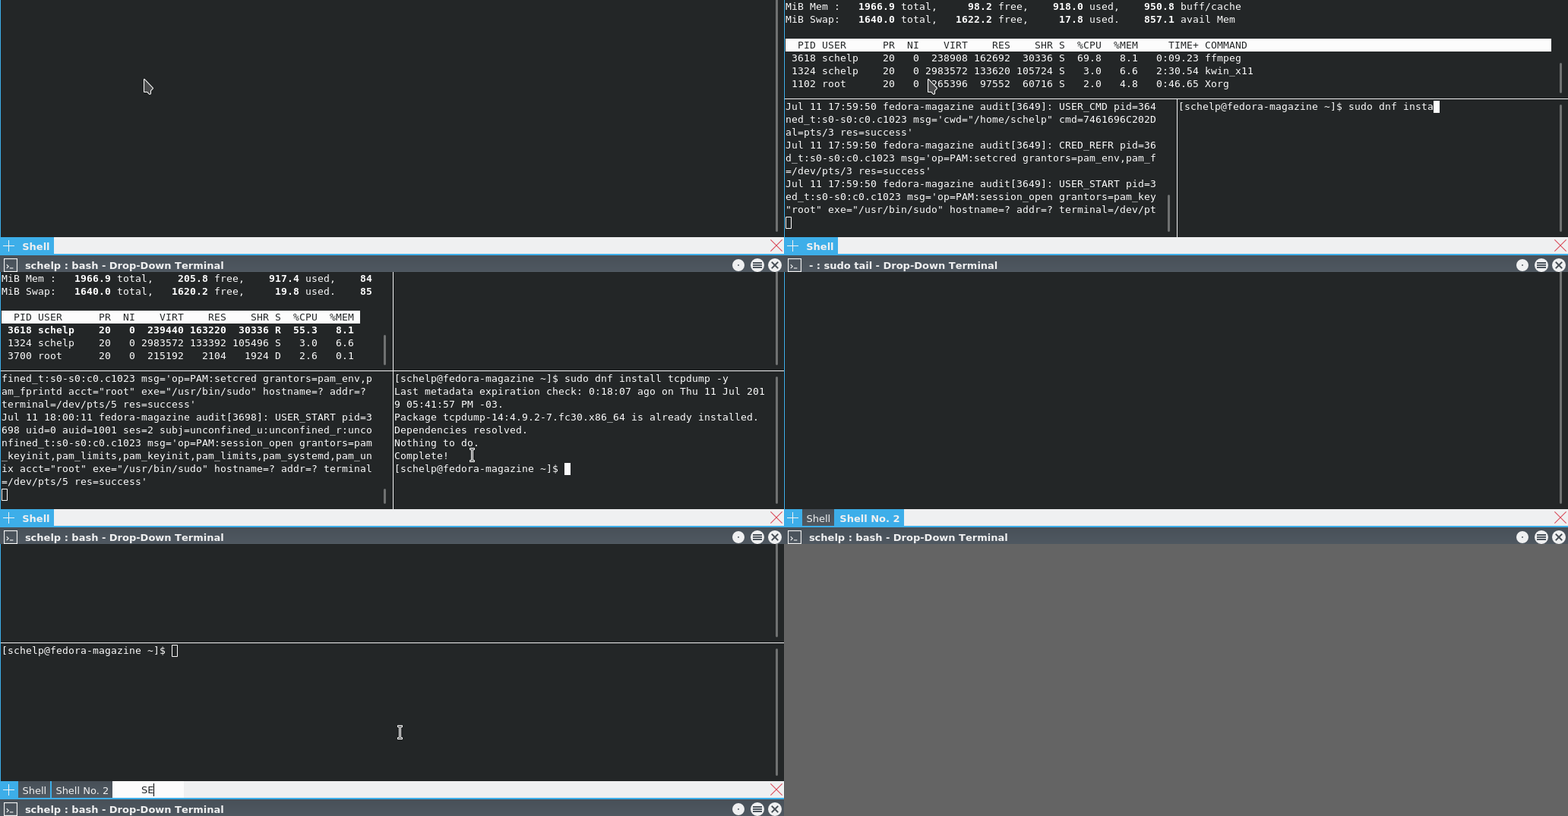
Below is an example of Yakuake being used to split the session like a terminal multiplexer. Using this feature, you can run several shells in one session.
Tilda
Tilda is a drop-down terminal that compares with other popular terminal emulators such as GNOME Terminal, KDE’s Konsole, xterm, and many others.
It features a highly configurable interface. You can even change options such as the terminal size and animation speed. Tilda also lets you enable hotkeys you can bind to commands and operations.
To install Tilda, run this command:
$ sudo dnf install -y tilda
Startup and configuration
Most users prefer to have a drop-down terminal available behind the scenes when they login. To set this option, first go to the app launcher in your desktop, search for Tilda, and open it.
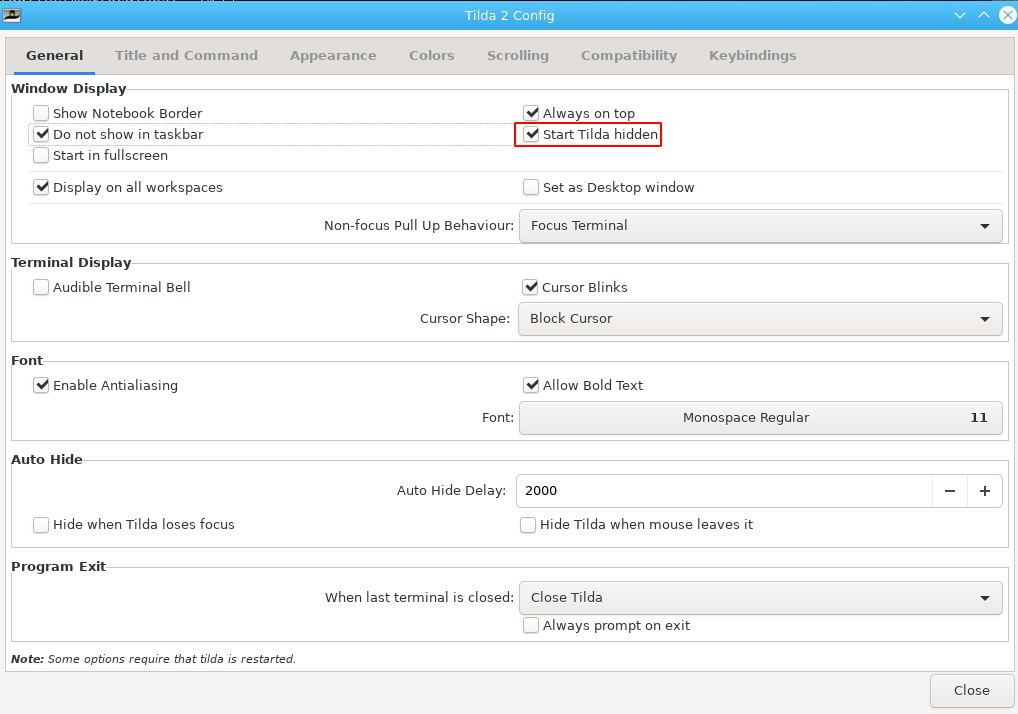
Next, open up the Tilda Config window. Select Start Tilda hidden, which means it will not display a terminal immediately when started.
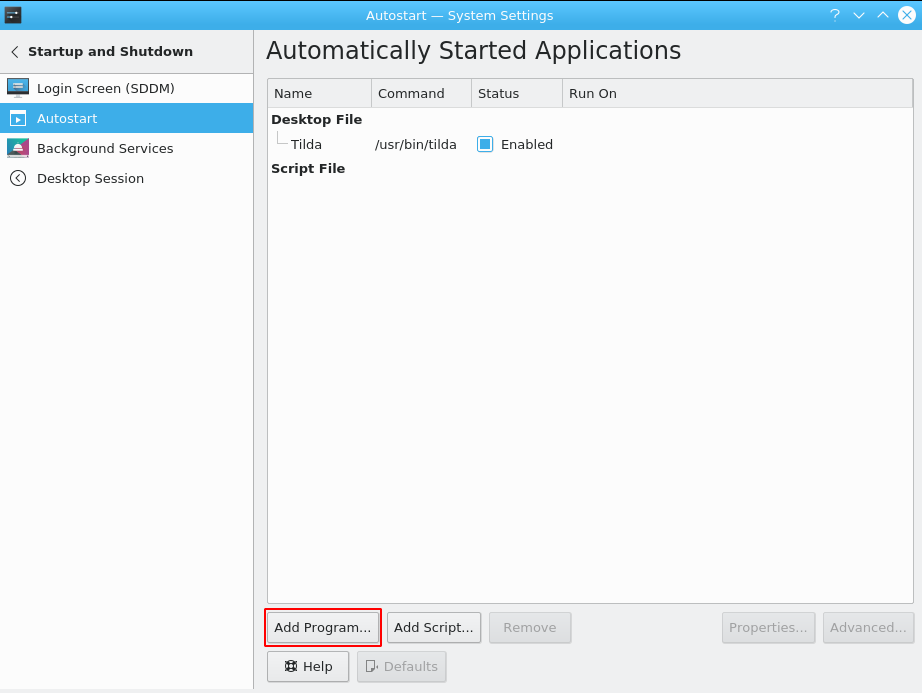
Next, you’ll set your desktop to start Tilda automatically. If you’re using KDE, go to System Settings > Startup and Shutdown > Autostart and use Add a Program.
If you’re using GNOME, you can run this command in a terminal:
$ ln -s /usr/share/applications/tilda.desktop ~/.config/autostart/
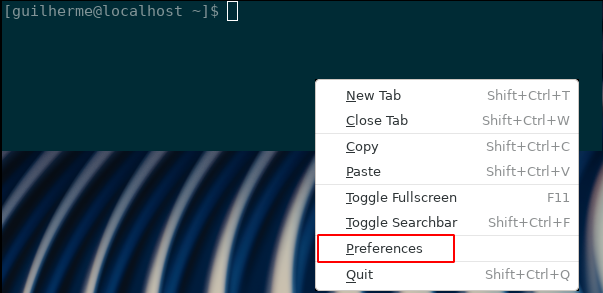
When you run for the first time, a wizard shows up to set your preferences. If you need to change something, right click and go to Preferences in the menu.
You can also create multiple configuration files, and bind other keys to open new terminals at different places on the screen. To do that, run this command:
$ tilda -C
Every time you use the above command, Tilda creates a new config file located in the ~/.config/tilda/ folder called config_0, config_1, and so on. You can then map a key combination to open a new Tilda terminal with a specific set of options.
Using Tilda
The main shortcuts are:
- F1 = Pull Down Terminal Tilda (Note: If you have more than one config file, the shortcuts are the same, with a diferent open/retract shortcut like F1, F2, F3, and so on)
- F11 = Full Screen Mode
- F12 = Toggle Transparency
- Ctrl+Shift+T = Add Tab
- Ctrl+Page Up = Go to Next Tab
- Ctrl+Page Down = Go to Previous Tab
GNOME Extension
The Drop-down Terminal GNOME Extension lets you use this useful tool in your GNOME Shell. It is easy to install and configure, and gives you fast access to a terminal session.
Installation
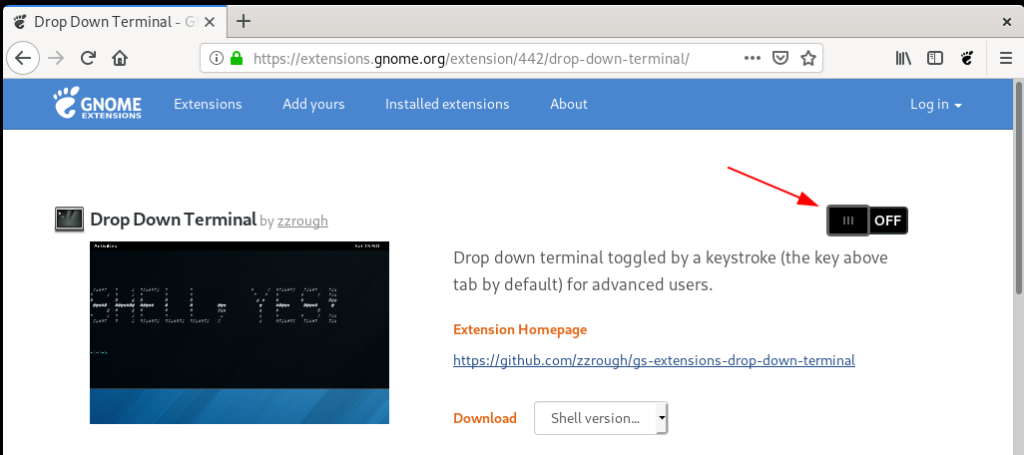
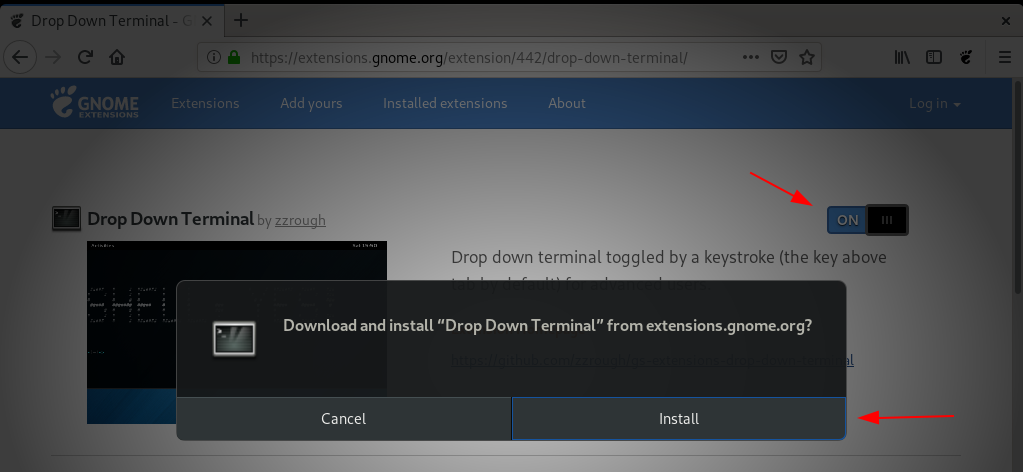
Open a browser and go to the site for this GNOME extension. Enable the extension setting to On, as shown here:
Then select Install to install the extension on your system.
Once you do this, there’s no reason to set any autostart options. The extension will automatically run whenever you login to GNOME!
Configuration
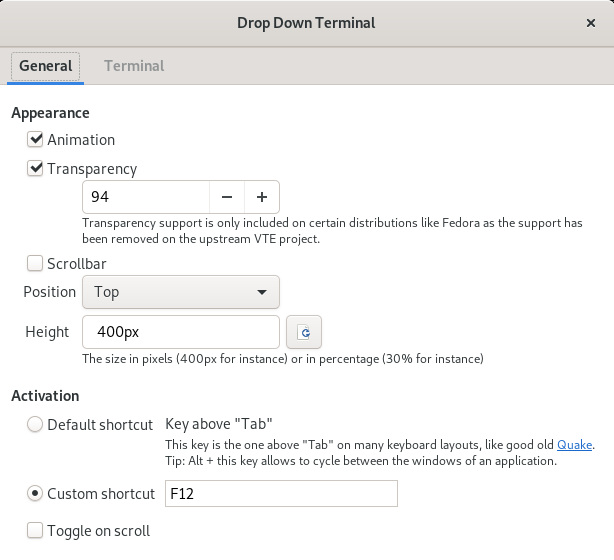
After install, the Drop Down Terminal configuration window opens to set your preferences. For example, you can set the size of the terminal, animation, transparency, and scrollbar use.
If you need change some preferences in the future, run the gnome-shell-extension-prefs command and choose Drop Down Terminal.
Using the extension
The shortcuts are simple:
- ` (usually the key above Tab) = Open/Retract Terminal
- F12 (customize as you prefer) = Open/Retract Terminal
via: https://fedoramagazine.org/use-a-drop-down-terminal-for-fast-commands-in-fedora/
作者:Guilherme Schelp 选题:lujun9972 译者:译者ID 校对:校对者ID
