mirror of
https://github.com/LCTT/TranslateProject.git
synced 2025-01-16 22:42:21 +08:00
149 lines
9.7 KiB
Markdown
149 lines
9.7 KiB
Markdown
开发者的实用 Vim 插件(一)
|
||
============
|
||
|
||
作为 Vi 的升级版,[Vim][31] 毫无争议是 Linux 中最受欢迎的命令行编辑器之一。除了是一个多功能编辑器外,世界各地的软件开发者将 Vim 当做 IDE(Integrated Development Environment,集成开发环境)来使用。
|
||
|
||
事实上,因为 Vim 可以通过插件来扩展其自身功能才使得它如此功能强大。不用说,肯定有那么几个 Vim 插件是旨在提高用户的编程体验的。
|
||
|
||
特别是对于刚刚使用 Vim 或者使用 Vim 做开发的的软件开发者来说,我们将在本教程中讨论一些非常有用的 Vim 插件,具体请看例示。
|
||
|
||
请注意:本教程中列举的所有例示、命令和说明都是在 Ubuntu 16.04 环境下进行测试的,并且,我们使用的 Vim 版本是 7.4。
|
||
|
||
### 插件安装设置
|
||
|
||
这是为新用户准备的,假设他们不知道如何安装 Vim 插件。所以,首先,就是给出一些完成安装设置的步骤。
|
||
|
||
* 在你的家目录下创建 `.vim` 目录,并在其中创建子目录 `autoload` 和 `bundle`。
|
||
* 然后,在 `autoload` 放置 [pathogen.vim][20] 文件,这个文件可以从[此处][19] 下载。
|
||
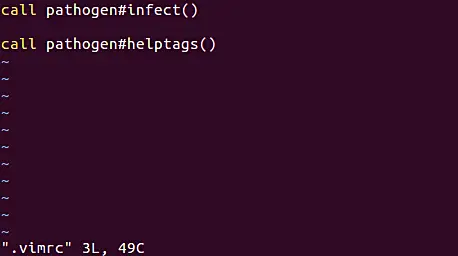
* 最后,在你的家目录创建 `.vimrc` 文件,并添加以下内容。
|
||
|
||
```
|
||
call pathogen#infect()
|
||
```
|
||
|
||
|
||
|
||
至此,你已完成了 Vim 插件安装的准备工作。
|
||
|
||
注意:我们已经讨论了使用 Pathogen 管理 Vim 插件。当然还有其他的插件管理工具——欲了解,请访问[此处][29]。
|
||
|
||
现在已经全部设置完毕,就让我们来讨论两个好用的 Vim 插件吧。
|
||
|
||
### Vim 标签侧边栏(Tagbar)插件
|
||
|
||
首先就是标签侧边栏(Tagbar)插件。该插件能够让你浏览源文件包含的标签,从而提供该源文件的结构简览。[其官网的插件说明][28]是这样说的:“它通过创建侧边栏,然后以一定顺序展示从当前文件以 ctags 提取的标签来完成这一功能。这意味着,比如,C++ 中的方法将展示在其自身所定义在的类里边。”
|
||
|
||
听起来很酷,不是吗?让我们来看看该怎么安装它。
|
||
|
||
标签侧边栏(Tagbar)的安装过程是相当容易的——你只需要运行下列命令:
|
||
|
||
```
|
||
cd ~/.vim/bundle/
|
||
|
||
git clone git://github.com/majutsushi/tagbar
|
||
```
|
||
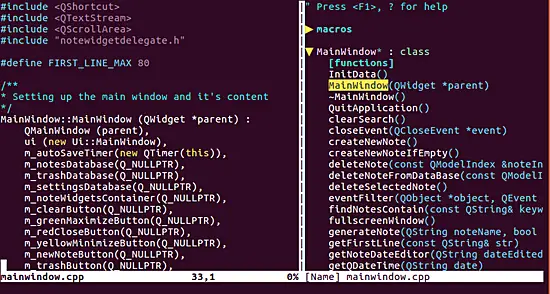
安装完之后就可以使用了,你可以在 Vim 中打开一个 .cpp 文件来测试它:进入[命令模式][27],然后运行 `:TagbarOpen` 命令。以下是运行 `:TagbarOpen` 命令之后出现侧边栏(右侧) 的效果图。
|
||
|
||
[][26]
|
||
|
||
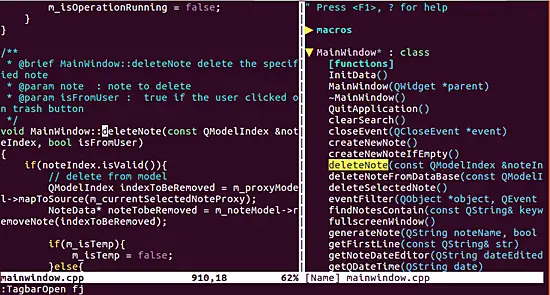
使用 `:TagbarClose` 可以关闭侧边栏。值得一提的是,可以使用 `:TagbarOpen fj` 命令打开侧边栏来打开它的跳转(shift control)功能。也就是说,你可以很方便的浏览当前文件包含的标签——在对应的标签上按下 Enter 键,然后在左侧的源代码窗口跳转到对应的位置。
|
||
|
||
|
||
|
||
假如你想要反复地开关侧边栏,你可以使用 `:TagbarToggle` 命令,而不用交替的使用 `:TagbarOpen` 和 `:TagbarClose` 命令。
|
||
|
||
如果你觉得输入这些命令很费时间,你可以为 `:TagbarToggle` 命令创建快捷键。比如,添加以下内容到 `.vimrc` 文件中:
|
||
|
||
```
|
||
nmap <F8> :TagbarToggle<CR>
|
||
```
|
||
这样,你就可以用 F8 来切换标签侧边栏(Tagbar)了。
|
||
|
||
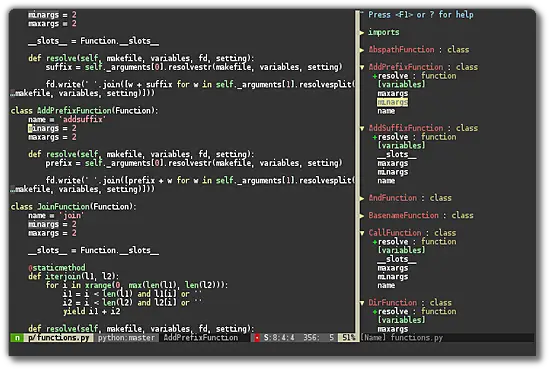
更进一步,有时候你可能会注意到某个标签前边有一个 `+`、`-` 或者 `#` 符号。比如,以下截图(取自该插件的官网)展示了一些前边有 `+` 号的标签。
|
||
|
||
|
||
|
||
这些符号基本是用来表明一个特定标签的可见性信息。特别是 `+` 表示该类是 public 的,而 `-` 表示一个 private 类。`#` 则是表示一个 protected 类。
|
||
|
||
以下是使用标签侧边栏(Tagbar)的一些注意事项:
|
||
|
||
* 该插件的官网早就有说明:“标签侧边栏(Tagbar)并非是管理标签(tags)文件而设计,它只是在内存中动态创建所需的标签,而非创建任何文件。标签(tags)文件的管理有其他插件提供支持。”
|
||
* 低于 7.0.167 版本的 Vim 和标签侧边栏(Tagbar)插件存在着一个兼容性问题。根据官网:“如果你受到此问题的影响,请使用代替版:[下载 zip 压缩包][18]。这对应到 2.2 版本,但由于大量的依赖变更,它可能不会再升级。”
|
||
* 如果你在加载该插件时遇到这样的错误:未找到 ctags!(Tagbar: Exuberant ctags not found!)。你可以从 [此处][17]下载并安装 ctags 来修复错误。
|
||
* 获取更多信息请访问 [这里][16]。
|
||
|
||
### Vim 界定符自动补齐(delimitMate)插件
|
||
|
||
下一个要介绍的插件就是界定符自动补齐(delimitMate)。该插件在 Vim 插入模式下提供引号、圆括号和方括号等界定符自动补齐功能。
|
||
|
||
[该插件官网][23]说:“它同时也提供一些相关的特性让你在输入模式下变得更加便捷,比如语法纠错(在注释区或者其他的可配置区不会自动插入结束界定符)、回车和空格填充(默认关闭)等。”
|
||
|
||
安装步骤与之前介绍的相似:
|
||
|
||
```
|
||
cd ~/.vim/bundle/
|
||
|
||
git clone git://github.com/Raimondi/delimitMate.git
|
||
```
|
||
|
||
一旦你成功安装这个插件(即上述命令执行成功),你就不需要进行任何配置了——当 Vim 启动时会自动加载这个插件。
|
||
|
||
至此,在你使用 Vim 的任何时候,只要你输入一个双引号、单引号、单号、圆括号、方括号,它们都会自动补齐。
|
||
|
||
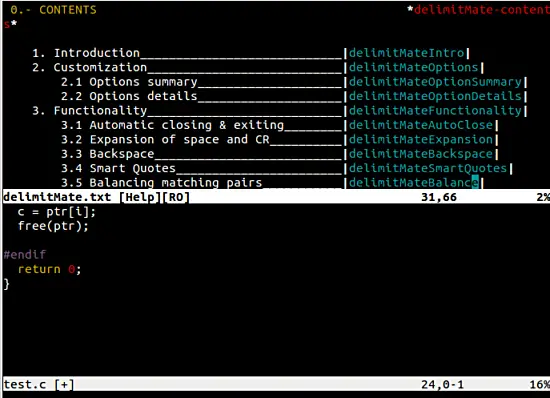
你可以自己配置界定符自动补齐(delimitMate)。比如,你可以添加需要自动补齐的符号列表,阻止自动加载该插件,对指定类型文件关闭该插件等。想了解如何配置这些(或者其他更多的配置),请阅读该插件的详细文档——运行 `:help delimitMate` 即可。
|
||
|
||
上述命令会将你的 Vim 窗口水平分割成两个,上边一个包含我们所说的文档。
|
||
|
||
|
||
|
||
### 结论
|
||
|
||
本文之中提到的两个插件,Tagbar 需要花费较多时间来适应——你应该会同样这个说法。但只要正确设置好它(这意味着你像是有了快捷键一样方便),就容易使用了。至于 delimitMate,不需要任何要求就可以上手。
|
||
|
||
本教程就是向你展示 Vim 如何高效能的想法。除了本文中提及的,仍然还有许多开发者可用的插件,我们将在下一个部分进行讨论。假如你正在使用一个关于开发的 Vim 插件,并希望广为人知,请在下方留下评论。
|
||
|
||
我们将在本教程的第二部分讲到 [语法高亮插件:Syntastic][21]。
|
||
|
||
--------------------------------------------------------------------------------
|
||
|
||
via: https://www.howtoforge.com/tutorial/vim-editor-plugins-for-software-developers/
|
||
|
||
作者:[Ansh][a]
|
||
译者:[GHLandy](https://github.com/GHLandy)
|
||
校对:[wxy](https://github.com/wxy)
|
||
|
||
本文由 [LCTT](https://github.com/LCTT/TranslateProject) 原创编译,[Linux中国](https://linux.cn/) 荣誉推出
|
||
|
||
[a]: https://www.howtoforge.com/tutorial/vim-editor-plugins-for-software-developers/
|
||
[1]:https://www.youtube.com/channel/UCOfXyFkINXf_e9XNosTJZDw
|
||
[2]:https://www.youtube.com/user/desainew
|
||
[3]:https://www.youtube.com/channel/UCEQXp_fcqwPcqrzNtWJ1w9w
|
||
[4]:http://www.facebook.com/sharer/sharer.php?u=https%3A%2F%2Ffreedompenguin.com%2Farticles%2Fopinion%2Fopen-source-design-thing%2F
|
||
[5]:http://twitter.com/intent/tweet/?text=Is+Open+Source+Design+a+Thing%3F&url=https%3A%2F%2Ffreedompenguin.com%2Farticles%2Fopinion%2Fopen-source-design-thing%2F
|
||
[6]:https://plus.google.com/share?url=https%3A%2F%2Ffreedompenguin.com%2Farticles%2Fopinion%2Fopen-source-design-thing%2F
|
||
[7]:https://atom.io/
|
||
[8]:http://froont.com/
|
||
[9]:https://webflow.com/
|
||
[10]:https://gravit.io/
|
||
[11]:http://getbootstrap.com/
|
||
[12]:https://inkscape.org/en/
|
||
[13]:https://www.gimp.org/
|
||
[14]:https://en.wikipedia.org/wiki/Free_and_open-source_software
|
||
[15]:https://medium.com/dawn-capital/why-leverage-the-power-of-open-source-to-build-a-successful-software-business-8aba6f665bc4#.ggmn2ojxp
|
||
[16]:https://github.com/majutsushi/tagbar
|
||
[17]:http://ctags.sourceforge.net/
|
||
[18]:https://github.com/majutsushi/tagbar/zipball/70fix
|
||
[19]:https://raw.githubusercontent.com/tpope/vim-pathogen/master/autoload/pathogen.vim
|
||
[20]:http://www.vim.org/scripts/script.php?script_id=2332
|
||
[21]:https://www.howtoforge.com/tutorial/vim-editor-plugins-for-software-developers-2-syntastic/
|
||
[22]:https://www.howtoforge.com/images/vim-editor-plugins-for-software-developers/big/vimplugins-delimitmate-help.png
|
||
[23]:https://github.com/Raimondi/delimitMate
|
||
[24]:https://www.howtoforge.com/images/vim-editor-plugins-for-software-developers/big/vimplugins-tagbar-visibility.png
|
||
[25]:https://www.howtoforge.com/images/vim-editor-plugins-for-software-developers/big/vimplugins-tagbar-ex2.png
|
||
[26]:https://www.howtoforge.com/images/vim-editor-plugins-for-software-developers/big/vimplugins-tagbar-example.png
|
||
[27]:http://www.tldp.org/LDP/intro-linux/html/sect_06_02.html
|
||
[28]:http://majutsushi.github.io/tagbar/
|
||
[29]:http://vi.stackexchange.com/questions/388/what-is-the-difference-between-the-vim-plugin-managers
|
||
[30]:https://www.howtoforge.com/images/vim-editor-plugins-for-software-developers/big/vimplugins-vimrc.png
|
||
[31]:http://www.vim.org/
|