mirror of
https://github.com/LCTT/TranslateProject.git
synced 2025-02-25 00:50:15 +08:00
240 lines
9.5 KiB
Markdown
240 lines
9.5 KiB
Markdown
在RHEL/CentOS 7.0中安装LAMP(Linux、 Apache、 MariaDB、 PHP/PhpMyAdmin)
|
||
================================================================================
|
||
跳过LAMP的介绍因为我认为你们大多数已经知道了。这个教程会集中在如何在升级到Apache 2.4的 Red Hat Enterprise Linux 7.0 和 CentOS 7.0中安装和配置LAMP-Linux Apache、 MariaDB、 PHP、PhpMyAdmin。
|
||
|
||

|
||
|
||
在RHEL/CentOS 7.0中安装LAMP
|
||
|
||
#### 要求 ####
|
||
|
||
根据使用的发行版,RHEL 或者 CentOS 7.0使用下面的链接来执行最小的系统安装,网络使用静态ip
|
||
|
||
**对于RHEL 7.0**
|
||
|
||
- [RHEL 7.0安装过程][1]
|
||
- [在RHEL 7.0中注册和启用订阅仓库][2]
|
||
|
||
**对于 CentOS 7.0**
|
||
|
||
- [CentOS 7.0 安装过程][3]
|
||
|
||
### 第一步: 使用基本配置安装apache ###
|
||
|
||
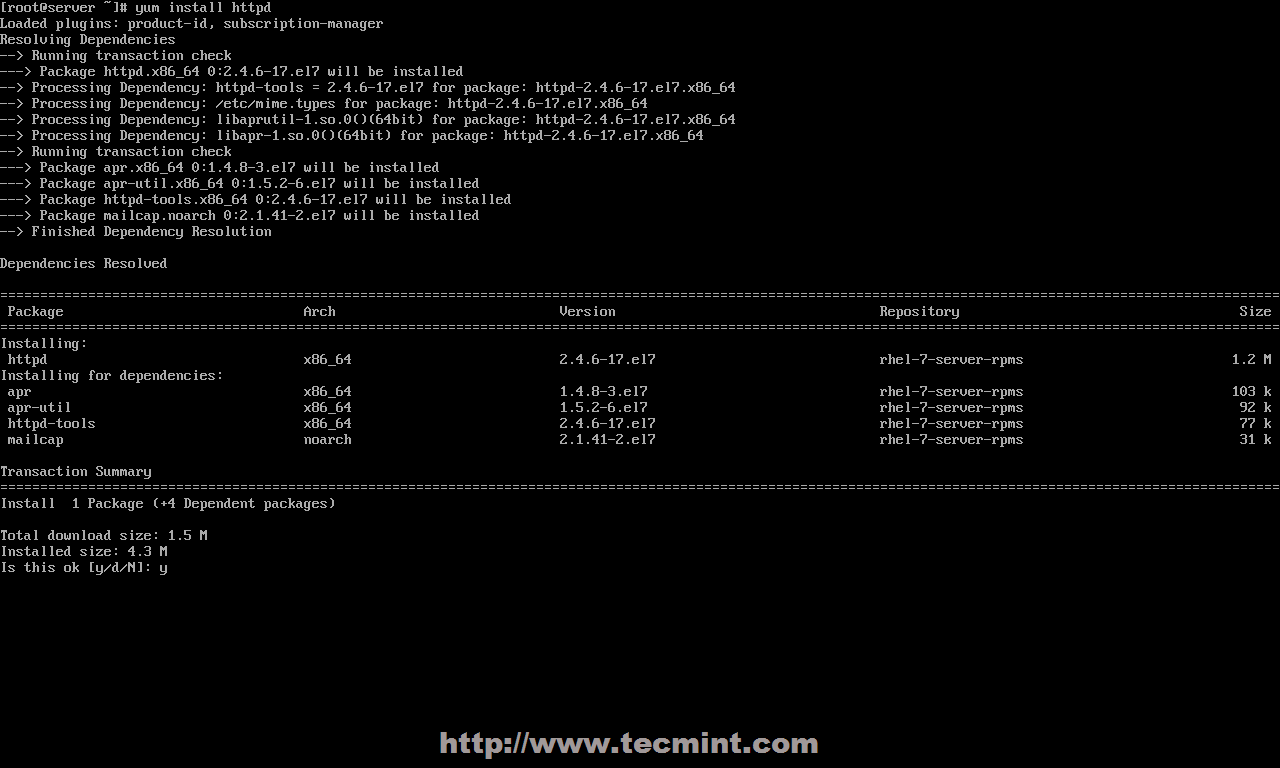
**1. 在执行最小系统安装并配置[在RHEL/CentOS 7.0中配置静态ip][4]**就可以从使用下面的命令从官方仓库安装最新的Apache 2.4 httpd服务。
|
||
|
||
# yum install httpd
|
||
|
||
|
||
|
||
安装apache服务
|
||
|
||
**2. 安装安城后,使用下面的命令来管理apache守护进程,因为RHEL and CentOS 7.0都将init脚本从SysV升级到了systemd - 你也可以同事使用SysV和Apache脚本来管理服务。**
|
||
|
||
# systemctl status|start|stop|restart|reload httpd
|
||
|
||
或者
|
||
|
||
# service httpd status|start|stop|restart|reload
|
||
|
||
或者
|
||
|
||
# apachectl configtest| graceful
|
||
|
||

|
||
|
||
启动apache服务
|
||
|
||
**3. 下一步使用systemd初始化脚本来启动apache服务并用firewall-cmd打开RHEL/CentOS 7.0防火墙规则, 这是通过firewalld守护进程管理iptables的默认命令。**
|
||
|
||
# firewall-cmd --add-service=http
|
||
|
||
**注意**:上面的命令会在系统重启或者firewalld服务重启后失效,因为它是即时的规则,它不会永久生效。要使iptables规则在fiewwall中持久化,使用-permanent选项并重启firewalld服务来生效。
|
||
|
||
# firewall-cmd --permanent --add-service=http
|
||
# systemctl restart firewalld
|
||
|
||

|
||
|
||
在CentOS 7中启用Firewall
|
||
|
||
下面是firewalld其他的重要选项:
|
||
|
||
# firewall-cmd --state
|
||
# firewall-cmd --list-all
|
||
# firewall-cmd --list-interfaces
|
||
# firewall-cmd --get-service
|
||
# firewall-cmd --query-service service_name
|
||
# firewall-cmd --add-port=8080/tcp
|
||
|
||
**4. 要验证apache的功能,打开一个远程浏览器并使用http协议输入你服务器的ip地址(http://server_IP), 应该会显示下图中的默认页面。**
|
||
|
||

|
||
|
||
Apache默认页
|
||
|
||
**5. 现在apache的根地址在/var/www/html,该目录中没有提供任何index文件。如果你想要看见根目录下的文件夹列表,打开apache欢迎配置文件并设置 <LocationMach>下Indexes前的状态从-到+,下面的截图就是一个例子。**
|
||
|
||
# nano /etc/httpd/conf.d/welcome.conf
|
||
|
||

|
||
|
||
Apache目录列出
|
||
|
||
**6. 关闭文件,重启apache服务来使设置生效,重载页面来看最终效果。**
|
||
|
||
# systemctl restart httpd
|
||
|
||

|
||
|
||
Apache Index 文件
|
||
|
||
### 第二步: 为Apache安装php5支持 ###
|
||
|
||
|
||
**7. 在为apache安装php支持之前,使用下面的命令的得到所有可用的php模块和扩展。**
|
||
|
||
# yum search php
|
||
|
||

|
||
|
||
在
|
||
|
||
**8. Depending on what type of applications you want to use, install the required PHP modules from the above list, but for a basic MariaDB support in PHP and PhpMyAdmin you need to install the following modules.**
|
||
|
||
# yum install php php-mysql php-pdo php-gd php-mbstring
|
||
|
||

|
||
|
||
Install PHP Modules
|
||
|
||

|
||
|
||
Install PHP mbstring Module
|
||
|
||
**9. To get a full information list on PHP from your browser, create a info.php file on Apache Document Root using the following command from root account, restart httpd service and direct your browser to the http://server_IP/info.php address.**
|
||
|
||
# echo "<?php phpinfo(); ?>" > /var/www/html/info.php
|
||
# systemctl restart httpd
|
||
|
||

|
||
|
||
Check PHP Info in CentOS 7
|
||
|
||
**10. If you get an error on PHP Date and Timezone, open php.ini configuration file, search and uncomment date.timezone statement, append your physical location and restart Apache daemon.**
|
||
|
||
# nano /etc/php.ini
|
||
|
||
Locate and change date.timezone line to look like this, using [PHP Supported Timezones list][5].
|
||
|
||
date.timezone = Continent/City
|
||
|
||

|
||
|
||
Set Timezone in PHP
|
||
|
||
### Step 3: Install and Configure MariaDB Database ###
|
||
|
||
**11. Red Hat Enterprise Linux/CentOS 7.0 switched from MySQL to MariaDB for its default database management system. To install MariaDB database use the following command.**
|
||
|
||
# yum install mariadb-server mariadb
|
||
|
||

|
||
|
||
在CentOS 7中安装PHP
|
||
|
||
***12. 安装MariaDB后,开启数据库守护进程并使用mysql_secure_installation脚本来保护数据库(设置root密码、禁止远程root登录、移除测试数据库、移除匿名用户)**
|
||
|
||
# systemctl start mariadb
|
||
# mysql_secure_installation
|
||
|
||

|
||
|
||
启动MariaDB数据库
|
||
|
||

|
||
|
||
MySQL安全设置
|
||
|
||
**13. 要测试数据库功能,使用root账户登录MariaDB并用quit退出。**
|
||
|
||
mysql -u root -p
|
||
MariaDB > SHOW VARIABLES;
|
||
MariaDB > quit
|
||
|
||

|
||
|
||
连接MySQL数据库
|
||
|
||
### 第四步: 安装PhpMyAdmin ###
|
||
|
||
**14. RHEL 7.0 或者 CentOS 7.0仓库默认没有提供PhpMyAdmin二进制安装包。如果你不适应使用MySQL命令行来管理你的数据库,你可以通过下面的命令启用CentOS 7.0 rpmforge仓库来安装PhpMyAdmin。**
|
||
|
||
# yum install http://pkgs.repoforge.org/rpmforge-release/rpmforge-release-0.5.3-1.el7.rf.x86_64.rpm
|
||
|
||
启用rpmforge仓库后,下面安装PhpMyAdmin。
|
||
|
||
# yum install phpmyadmin
|
||
|
||

|
||
|
||
启用RPMForge仓库
|
||
|
||
**15. 下面配置PhpMyAdmin的phpmyadmin.conf来允许远程连接,它位于Apache conf.d目录下,并注释掉下面的行。**
|
||
|
||
# nano /etc/httpd/conf.d/phpmyadmin.conf
|
||
|
||
使用#来注释掉行。
|
||
|
||
# Order Deny,Allow
|
||
# Deny from all
|
||
# Allow from 127.0.0.1
|
||
|
||

|
||
|
||
允许远程PhpMyAdmin访问
|
||
|
||
**16. 要使用cookie验证来登录PhpMyAdmin,像下面的截图那样使用[生成字符串][6]添加一个blowfish字符串到config.inc.php文件下,重启apache服务并打开URL:http://server_IP/phpmyadmin/。**
|
||
|
||
# nano /etc/httpd/conf.d/phpmyadmin.conf
|
||
# systemctl restart httpd
|
||
|
||

|
||
|
||
在PhpMyAdmin中添加Blowfish
|
||
|
||

|
||
|
||
PhpMyAdmin面板
|
||
|
||
### 第五步: 系统范围启用LAMP ###
|
||
|
||
**17. 如果你需要在重启后自动运行MariaDB和Apache服务,你需要系统级地启用它们。**
|
||
|
||
# systemctl enable mariadb
|
||
# systemctl enable httpd
|
||
|
||

|
||
|
||
系统级启用服务
|
||
|
||
这就是在Red Hat Enterprise 7.0或者CentOS 7.0中安装LAMP的过程。CentOS/RHEL 7.0上关于LAMP洗系列文章将会讨论在Apache中创建虚拟主机,生成SSL证书、密钥和添加SSL事物支持。
|
||
|
||
--------------------------------------------------------------------------------
|
||
|
||
via: http://www.tecmint.com/install-lamp-in-centos-7/
|
||
|
||
作者:[Matei Cezar][a]
|
||
译者:[geekpi](https://github.com/geekpi)
|
||
校对:[校对者ID](https://github.com/校对者ID)
|
||
|
||
本文由 [LCTT](https://github.com/LCTT/TranslateProject) 原创翻译,[Linux中国](https://linux.cn/) 荣誉推出
|
||
|
||
[a]:http://www.tecmint.com/author/cezarmatei/
|
||
[1]:http://www.tecmint.com/redhat-enterprise-linux-7-installation/
|
||
[2]:http://www.tecmint.com/enable-redhat-subscription-reposiories-and-updates-for-rhel-7/
|
||
[3]:http://www.tecmint.com/centos-7-installation/
|
||
[4]:http://www.tecmint.com/configure-network-interface-in-rhel-centos-7-0/
|
||
[5]:http://php.net/manual/en/timezones.php
|
||
[6]:http://www.question-defense.com/tools/phpmyadmin-blowfish-secret-generator
|