6.9 KiB
How to Mount Remote Linux Filesystem or Directory Using SSHFS Over SSH
The main purpose of writing this article is to provide a step-by-step guide on how to mount remote Linux file system using SSHFS client over SSH.
This article is useful for those users and system administrators who want to mount remote file system on their local systems for whatever purposes. We have practically tested by installing SSHFS client on one of our Linux system and successfully mounted remote file systems.
Before we go further installation let’s understand about SSHFS and how it works.
Sshfs Mount Remote Linux Filesystem or Directory
What Is SSHFS?
SSHFS stands for (Secure SHell FileSystem) client that enable us to mount remote filesystem and interact with remote directories and files on a local machine using SSH File Transfer Protocol (SFTP).
SFTP is a secure file transfer protocol that provides file access, file transfer and file management features over Secure Shell protocol. Because SSH uses encryption while transferring files over the network from one computer to another computer and SSHFS comes with built-in FUSE (Filesystem in Userspace) kernel module that allows any non-privileged users to create their file system without modifying kernel code.
In this article, we will show you how to install and use SSHFS client on any Linux distribution to mount remote Linux filesystem or directory on a local Linux machine.
Step 1: Install SSHFS Client in Linux Systems
By default sshfs packages does not exists on all major Linux distributions, you need to enable epel repository under your Linux systems to install sshfs with the help of Yum command with their dependencies.
# yum install sshfs
# dnf install sshfs              [On Fedora 22+ releases]
$ sudo apt-get install sshfs     [On Debian/Ubuntu based systems]
Step 2: Creating SSHFS Mount Directory
Once the sshfs package installed, you need to create a mount point directory where you will mount your remote file system. For example, we have created mount directory under /mnt/tecmint.
# mkdir /mnt/tecmint
$ sudo mkdir /mnt/tecmint     [On Debian/Ubuntu based systems]
Step 3: Mounting Remote Filesystem with SSHFS
Once you have created your mount point directory, now run the following command as a root user to mount remote file system under /mnt/tecmint. In your case the mount directory would be anything.
The following command will mount remote directory called /home/tecmint under /mnt/tecmint in local system. (Don’t forget replace x.x.x.x with your IP Address and mount point).
# sshfs tecmint@x.x.x.x:/home/tecmint/ /mnt/tecmint
$ sudo sshfs -o allow_other tecmint@x.x.x.x:/home/tecmint/ /mnt/tecmint     [On Debian/Ubuntu based systems]
If your Linux server is configured with SSH key based authorization, then you will need to specify the path to your public keys as shown in the following command.
# sshfs -o IdentityFile=~/.ssh/id_rsa tecmint@x.x.x.x:/home/tecmint/ /mnt/tecmint
$ sudo sshfs -o allow_other,IdentityFile=~/.ssh/id_rsa tecmint@x.x.x.x:/home/tecmint/ /mnt/tecmint     [On Debian/Ubuntu based systems]
Step 4: Verifying Remote Filesystem is Mounted
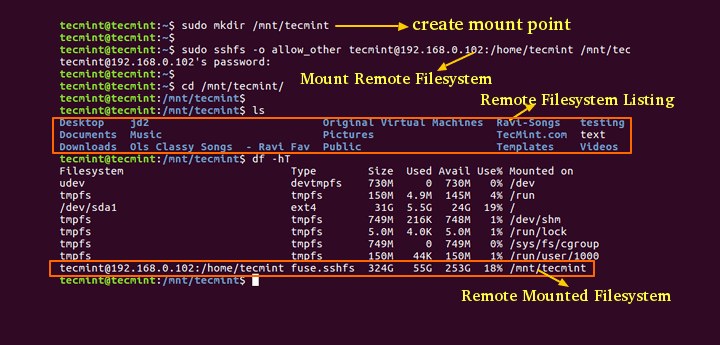
If you have run the above command successfully without any errors, you will see the list of remote files and directories mounted under /mnt/tecmint.
# cd /mnt/tecmint
# ls
[root@ tecmint]# ls
12345.jpg                       ffmpeg-php-0.6.0.tbz2                Linux                                           news-closeup.xsl     s3.jpg
cmslogs                         gmd-latest.sql.tar.bz2               Malware                                         newsletter1.html     sshdallow
epel-release-6-5.noarch.rpm     json-1.2.1                           movies_list.php                                 pollbeta.sql
ffmpeg-php-0.6.0                json-1.2.1.tgz                       my_next_artical_v2.php                          pollbeta.tar.bz2
Step 5: Checking Mount Point with df -hT Command
If you run df -hT command you will see the remote file system mount point.
# df -hT
Sample Output
Filesystem                          Type        Size  Used Avail Use% Mounted on
udev                                devtmpfs    730M     0  730M   0% /dev
tmpfs                               tmpfs       150M  4.9M  145M   4% /run
/dev/sda1                           ext4         31G  5.5G   24G  19% /
tmpfs                               tmpfs       749M  216K  748M   1% /dev/shm
tmpfs                               tmpfs       5.0M  4.0K  5.0M   1% /run/lock
tmpfs                               tmpfs       749M     0  749M   0% /sys/fs/cgroup
tmpfs                               tmpfs       150M   44K  150M   1% /run/user/1000
tecmint@192.168.0.102:/home/tecmint fuse.sshfs  324G   55G  253G  18% /mnt/tecmint
Step 6: Mounting Remote Filesystem Permanently
To mount remote filesystem permanently, you need to edit the file called /etc/fstab. To do, open the file with your favorite editor.
# vi /etc/fstab
$ sudo vi /etc/fstab     [On Debian/Ubuntu based systems]
Go to the bottom of the file and add the following line to it and save the file and exit. The below entry mount remote server file system with default settings.
sshfs#tecmint@x.x.x.x:/home/tecmint/ /mnt/tecmint fuse.sshfs defaults 0 0
Make sure you’ve SSH Passwordless Login in place between servers to auto mount filesystem during system reboots..
sshfs#tecmint@x.x.x.x:/home/tecmint/ /mnt/tecmint fuse.sshfs IdentityFile=~/.ssh/id_rsa defaults 0 0
Next, you need to update the fstab file to reflect the changes.
# mount -a
$ sudo mount -a   [On Debian/Ubuntu based systems]
Step 7: Unmounting Remote Filesystem
To unmount remote filesystem, jun issue the following command it will unmount the remote file system.
# umount /mnt/tecmint
That’s all for now, if you’re facing any difficulties or need any help in mounting remote file system, please contact us via comments and if you feel this article is much useful then share it with your friends.
作者:Ravi Saive 译者:译者ID 校对:校对者ID
