mirror of
https://github.com/LCTT/TranslateProject.git
synced 2025-01-04 22:00:34 +08:00
228 lines
9.6 KiB
Markdown
228 lines
9.6 KiB
Markdown
How to install Xen hypervisor on unused old hardware
|
|
================================================================================
|
|
Xen is a bare metal hypervisor, meaning that you must prepare a bare machine to install and run Xen. KVM is a little different - you can add it to any machine already running Linux. This tutorial describes how to install and configure Xen hypervisor on unused hardware.
|
|
|
|
This procedure uses Debian Jessie (their testing distribution) as the host OS (also known as [Dom0][1]). Jessie is not the only choice - Xen support is built into the Linux kernel, and [plenty of Linux distributions][2] include one of these Xen-enabled kernels.
|
|
|
|
### Find unused hardware ###
|
|
|
|
As a start, find a suitable workstation which can be wiped out, such as an old laptop or desktop. Older hardware may not be good for gaming, but it is good enough for a host OS and a couple of guests. A PC with these specifications works fine.
|
|
|
|
- 1 CPU with 2 cores (64-bit)
|
|
- 4GB memory
|
|
- 80GB hard disk
|
|
- ability to boot from CD, DVD or USB
|
|
- a network interface
|
|
|
|
Note that the CPU must be a 64-bit processor since Debian dropped support for 32-bit Xen packages. If you don't have spare hardware, you could invest in an old machine. 2010's $1000 flagship laptop is today's $100 bargain. A second-hand laptop from eBay and a memory upgrade will do fine.
|
|
|
|
### Burn a bootable CD/USB ###
|
|
|
|
Download the ISO image for Debian Jessie. The small netinst image available from the [official Debian website][3] works fine.
|
|
|
|
$ wget http://cdimage.debian.org/cdimage/jessie_di_beta_2/amd64/iso-cd/debian-jessie-DI-b2-amd64-netinst.iso
|
|
|
|
Next, identify the device name assigned to your [CD/DVD][4] or [USB drive][5] (e.g., /dev/sdc).
|
|
|
|
Burn the downloaded ISO image into a bootable CD or a USB using dd command. Replace /dev/sdc with the device name you identified above.
|
|
|
|
$ sudo dd if=debian-jessie-DI-b2-amd64-netinst.iso of=/dev/sdc
|
|
|
|
### Start the installation ###
|
|
|
|
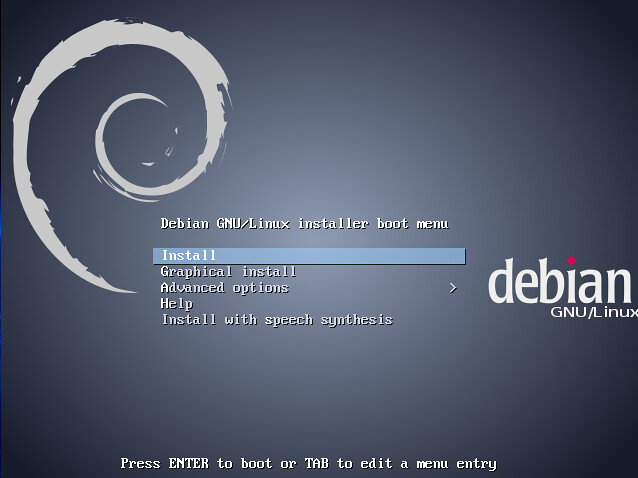
To start the installation, boot with the Debian installer CD/USB.
|
|
|
|
It's a good idea to use a wired connection, not WiFi. If the WiFi won't connect because firmware or driver software is missing, you won't get very far.
|
|
|
|
|
|
|
|
### Partition the disk ###
|
|
|
|
This setup uses four primary disk partitions. Automatic OS installers usually set up an extended partition that contains logical partitions. Set up the four partitions like this.
|
|
|
|
- sda1 mount on /boot, 200MB
|
|
- sda2 /, 20GB, Ubuntu uses 4GB
|
|
- sda3 swap, 6GB (4GB of memory x 1.5 = 6)
|
|
- sda4 reserved for LVM, not mounted, all the rest of the disk space
|
|
|
|
### Install the base system ###
|
|
|
|
It's a good idea to make the install as simple and short as possible. A basic working system can always be added to later. Debian's APT (Advanced Package Tool) makes adding software easy. Installing Debian on a workstation can cause pretty obscure time-wasting issues. Perhaps a graphics driver does not agree with the kernel or maybe the old CD-ROM drive only works intermittently.
|
|
|
|
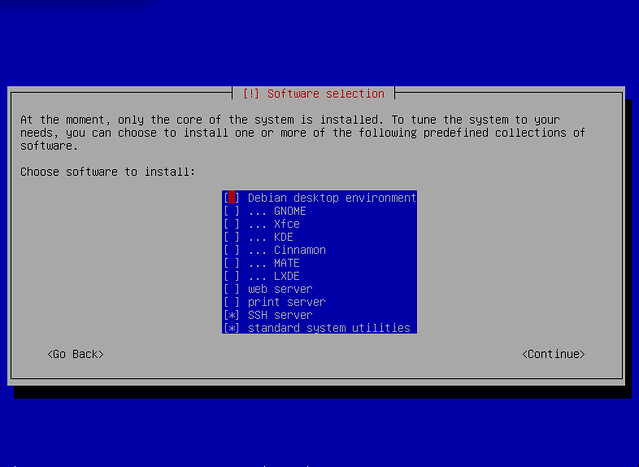
When it comes to choosing what to install, do install an SSH server and don't install a desktop like Gnome.
|
|
|
|
|
|
|
|
A graphical desktop requires hundreds of package installs - it's a lot of extra work that can be done later. If you run into problems, waiting for that desktop install is a waste of time. Also, without desktop component, the system boot will be much quicker - seconds rather than minutes. This procedure requires a few reboots, so that's a handy time-saver.
|
|
|
|
An SSH server lets you configure the workstation from another computer. This allows you to avoid some of the problems with old hardware - perhaps the old machine's keyboard is missing keys, the LCD screen has dead pixels or the trackpad is unresponsive etc.
|
|
|
|
### Add LVM (Logical Volume Manager) ###
|
|
|
|
Install the LVM tools as the root.
|
|
|
|
# apt-get update
|
|
# apt-get install lvm2
|
|
|
|
Pick a physical volume to work with.
|
|
|
|
# pvcreate /dev/sda4
|
|
|
|
Create a volume group.
|
|
|
|
# vgcreate vg0 /dev/sda4
|
|
|
|
You don't need to create a logical volume. If you want to test LVM works, create a volume then delete it.
|
|
|
|
# lvcreate -nmytempvol -L10G vg0
|
|
# lvremove /dev/vg0/mytempvol
|
|
|
|
Check LVM status.
|
|
|
|
# pvs (to view information about physical volumes)
|
|
# vgs (to view information about volume groups)
|
|
# lvs (to view information about logical volumes)
|
|
|
|
### Add a Linux Ethernet bridge ###
|
|
|
|
We are going to set up a Linux bridge so that all Xen's guest domains can be connected to, and communicate through the bridge.
|
|
|
|
Install the bridge tools.
|
|
|
|
# apt-get install bridge-utils
|
|
|
|
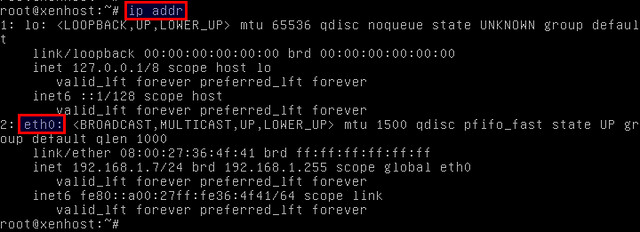
See what interfaces are configured.
|
|
|
|
# ip addr
|
|
|
|
|
|
|
|
In this example, we have one primary interface assigned eth0. We are going to add eth0 to the Linux bridge by editing the network configuration file (/etc/network/interfaces).
|
|
|
|
Before making any change, back up the network configuration file to keep the original working configuration safe.
|
|
|
|
# cd /etc/network/
|
|
# cp interfaces interfaces.backup
|
|
# vi /etc/network/interfaces
|
|
|
|
The file contents look something like this.
|
|
|
|
auto lo
|
|
iface lo inet loopback
|
|
|
|
allow-hotplug eth0
|
|
iface eth0 inet dhcp
|
|
|
|
Change the file to this.
|
|
|
|
auto lo
|
|
iface lo inet loopback
|
|
|
|
auto eth0
|
|
iface eth0 inet manual
|
|
|
|
auto xenbr0
|
|
iface xenbr0 inet dhcp
|
|
bridge_ports eth0
|
|
|
|
Activate the network configuration change:
|
|
|
|
# systemctl restart networking
|
|
|
|
### Verify networking settings ###
|
|
|
|
Verify that a Linux bridge xenbr0 is created successfully.
|
|
|
|
# ip addr show xenbr0
|
|
|
|
Also check that the primary interface eth0 is successfully added to the bridge.
|
|
|
|
# brctl show
|
|
|
|

|
|
|
|
You now have a working machine with Jessie installed. Xen is not yet installed at this point. Let's proceed to install Xen next.
|
|
|
|
### Install the Xen hypervisor ###
|
|
|
|
Install Xen and QEMU packages, and update the GRUB bootloader.
|
|
|
|
# apt-get install xen-linux-system
|
|
|
|
Reboot.
|
|
|
|
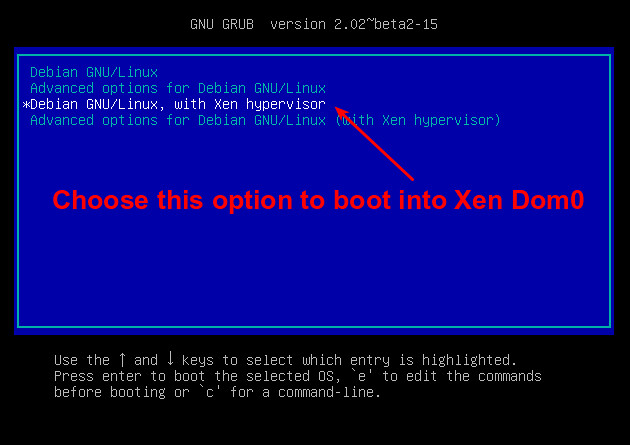
When the GRUB screen appears, you can see extra booting options listed.
|
|
|
|
|
|
|
|
The first option will boot automatically in five seconds (see the GRUB_TIMEOUT line in /etc/default/grub), so this is not the time to get a coffee.
|
|
|
|
Press the down arrow to highlight the option "Debian GNU/Linux, with Xen hypervisor", and press RETURN. Many lines of information appear, followed by the usual login screen.
|
|
|
|
### Check Xen works ###
|
|
|
|
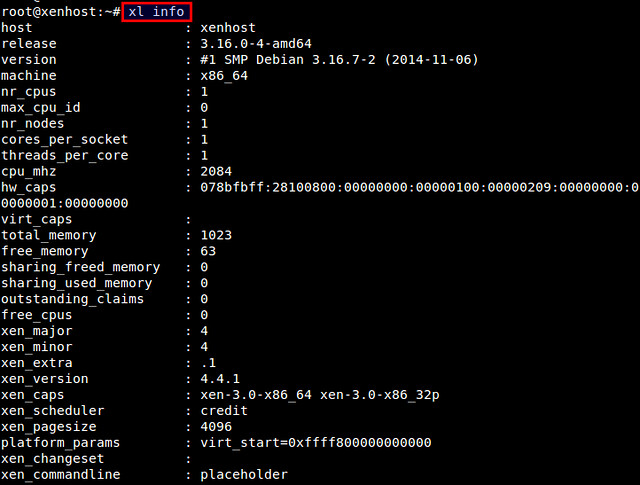
Xen hypervisor comes with Xen management command-line tool called xl, which can be used to create and manage Xen guest domains. Let's use xl command to check if Xen is successfully installed.
|
|
|
|
Log in as root, and run:
|
|
|
|
# xl info
|
|
|
|
which will display various information about Xen host.
|
|
|
|
|
|
|
|
To see a list of existing Xen domains:
|
|
|
|
# xl list
|
|
|
|

|
|
|
|
A little table of domains appears. Without any Xen guest domain created, the only entry should be Domain-0, your Debian installation.
|
|
|
|
### Change the boot order ###
|
|
|
|
When you reach this point, the Xen install is complete. There is one more thing to fix - the default boot will not load Xen. GRUB chooses the first item in the boot menu (Debian GNU/Linux), not the third (Debian GNU/Linux, with Xen hypervisor).
|
|
|
|
The default option in the boot menu is defined in the grub configuration file /boot/grub/grub.cfg. To change the default option, don't edit that file, but edit /etc/default/grub instead. A little helper program called grub-mkconfig reads in this default configuration file and all the templates in /etc/grub.d/, then writes the grub.cfg file.
|
|
|
|
Edit Debian's configuration file for grub-mkconfig.
|
|
|
|
# vi /etc/default/grub
|
|
|
|
Change the line:
|
|
|
|
GRUB_DEFAULT=0
|
|
|
|
to
|
|
|
|
GRUB_DEFAULT='Debian GNU/Linux, with Xen hypervisor'
|
|
|
|
Then update the grub configuration file.
|
|
|
|
# grub-mkconfig -o /boot/grub/grub.cfg
|
|
|
|
Finally reboot. After a few seconds, the grub boot menu appears. Check that the third option "Debian GNU/Linux, with Xen hypervisor" is highlighted automatically.
|
|
|
|
### Final note ###
|
|
|
|
If you use this machine as your hands-on workstation, install a graphical desktop. The Debian library includes a few [desktop environments][6]. If you want a graphical desktop that includes everything and the kitchen sink, go for Gnome. If graphics just get in your way, try Awesome.
|
|
|
|
Note that the Debian Jessie default environment Gnome comes with a huge amount of extra applications including the productivity suite LibreOffice, the Iceweasel web browser and the Rhythmbox music player. The install command "apt-get install gnome" adds 1,000 packages and takes up nearly 2GB of disk space. Running this heavyweight desktop takes up 1GB of memory.
|
|
|
|
--------------------------------------------------------------------------------
|
|
|
|
via: http://xmodulo.com/install-xen-hypervisor.html
|
|
|
|
作者:[Nick Hardiman][a]
|
|
译者:[译者ID](https://github.com/译者ID)
|
|
校对:[校对者ID](https://github.com/校对者ID)
|
|
|
|
本文由 [LCTT](https://github.com/LCTT/TranslateProject) 原创翻译,[Linux中国](http://linux.cn/) 荣誉推出
|
|
|
|
[a]:http://xmodulo.com/author/nick
|
|
[1]:http://wiki.xen.org/wiki/Dom0
|
|
[2]:http://wiki.xen.org/wiki/Dom0_Kernels_for_Xen
|
|
[3]:https://www.debian.org/devel/debian-installer/
|
|
[4]:http://ask.xmodulo.com/detect-dvd-writer-device-name-writing-speed-command-line-linux.html
|
|
[5]:http://ask.xmodulo.com/find-device-name-usb-drive-linux.html
|
|
[6]:https://wiki.debian.org/DesktopEnvironment |