mirror of
https://github.com/LCTT/TranslateProject.git
synced 2025-02-22 00:40:10 +08:00
172 lines
7.4 KiB
Markdown
172 lines
7.4 KiB
Markdown
Linux中的scp命令
|
||
=======================
|
||
|
||

|
||
|
||
|
||
scp 意味着安全拷贝协议 (Secure Copy Protocol), 和众多Linux/Unix使用者所了解的拷贝(cp)命令一样. scp 的使用方式跟 cp命令是很相似的, cp命令将一个文件或文件夹从本地操作系统的一个位置拷贝到目标位置上,而scp用来将一个文件或者文件夹通过网络传输从一个主机拷贝到另一个主机当中去。
|
||
|
||
scp命令的使用方法如下所示,在这个例子中,我将一个叫 “imporimposetantfile”的文件从本机(10.10.16.147)拷贝到远程主机(10.0.0.6)中。在这个命令里,你也可以使用主机名字来替代IP地址。
|
||
|
||
```
|
||
[root@localhost ~]# scp importantfile admin@10.0.0.6:/home/admin/
|
||
The authenticity of host '10.0.0.6 (10.0.0.6)' can't be established.
|
||
RSA key fingerprint is SHA256:LqBzkeGa6K9BfWWKgcKlQoE0u+gjorX0lPLx5YftX1Y.
|
||
RSA key fingerprint is MD5:ed:44:42:59:3e:dd:4c:12:43:4a:89:b1:5d:bd:9e:20.
|
||
Are you sure you want to continue connecting (yes/no)? yes
|
||
Warning: Permanently added '10.0.0.6' (RSA) to the list of known hosts.
|
||
admin@10.0.0.6's password:
|
||
importantfile 100% 0 0.0KB/s 00:00
|
||
[root@localhost ~]#
|
||
```
|
||
|
||
同样的,如果你想从一个远程主机中获取文件,你可以利用如下的scp命令。
|
||
|
||
```
|
||
[root@localhost ~]# scp root@10.10.16.137:/root/importantfile /home/admin/
|
||
The authenticity of host '10.10.16.137 (10.10.16.137)' can't be established.
|
||
RSA key fingerprint is b0:b0:a3:c3:2e:94:13:0c:29:2e:ba:0b:d3:d6:12:8f.
|
||
Are you sure you want to continue connecting (yes/no)? yes
|
||
Warning: Permanently added '10.10.16.137' (RSA) to the list of known hosts.
|
||
root@10.10.16.137's password:
|
||
importantfile 100% 0 0.0KB/s 00:00
|
||
[root@localhost ~]#
|
||
```
|
||
|
||
你同样可以像cp命令一样,在scp命令中使用不同的选项,scp的man文件详细地阐述了不同选项的用法和优点。
|
||
|
||
**简单输出.**
|
||
|
||
|
||
|
||
```
|
||
scp可选参数如下所示:
|
||
|
||
-B 采取批量模式 (prevents asking for passwords or passphrases).
|
||
|
||
-C 允许压缩. 通过指明-C来开启压缩模式.
|
||
|
||
-c 加密方式
|
||
选择在传输过程中用来加密的加密方式
|
||
这个选项会被直接传递到ssh(1).
|
||
|
||
-F ssh配置
|
||
为ssh指定一个用来替代默认配置的文件.
|
||
这个选项会被直接传递到ssh(1).
|
||
|
||
-l 限速
|
||
限制命令使用的带宽, 默认单位是 Kbit/s.
|
||
|
||
-P 端口
|
||
指定需要的连接的远程主机的端口.
|
||
注意,这个选项使用的是一个大写的"P", 因为小写的 -p 已经用来保留目标文件的时间和模式相关信息。
|
||
|
||
-p 保留目标文件的修改时间,访问时间以及权限模式.
|
||
|
||
-q 静默模式: 不显示来自ssh(1)命令的进度信息,警告和诊断信息.
|
||
|
||
-r 递归拷贝整个目录.
|
||
注意,scp命令在树形遍历的时候同样会对符号连接进行相同的处理。
|
||
|
||
-v 详细模式.scp和ssh(1)将会打印出处理过程中的调试信息.当你要调试连接,认证和配置问题的时候这将会帮助到你。
|
||
|
||
```
|
||
|
||
利用scp命令的-v选项,你可以获得认证,调试相关的处理信息.
|
||
|
||

|
||
|
||
当我们使用-v选项的时候,一个简单的输出如下所示
|
||
|
||
```
|
||
[root@localhost ~]# scp -v abc.txt admin@10.0.0.6:/home/admin
|
||
Executing: program /usr/bin/ssh host 10.0.0.6, user admin,
|
||
command scp -v -t/home/admin
|
||
OpenSSH_7.1p1, OpenSSL 1.0.2d-fips 9 Jul 2015
|
||
debug1: Reading configuration data /etc/ssh/ssh_config
|
||
debug1: /etc/ssh/ssh_config line 56: Applying options for *
|
||
debug1: Connecting to 10.0.0.6 [10.0.0.6] port 22.
|
||
debug1: Connection established.
|
||
debug1: Server host key: ssh-rsa SHA256:LqBzkeGa6K9BfWWKgcKlQoE0u+gjorX0lPLx5YftX1Y
|
||
debug1: Next authentication method: publickey
|
||
debug1: Trying private key: /root/.ssh/id_rsa
|
||
debug1: Trying private key: /root/.ssh/id_dsa
|
||
debug1: Trying private key: /root/.ssh/id_ecdsa
|
||
debug1: Trying private key: /root/.ssh/id_ed25519
|
||
debug1: Next authentication method: password
|
||
admin@10.0.0.6's password:
|
||
debug1: Authentication succeeded (password).
|
||
Authenticated to 10.0.0.6 ([10.0.0.6]:22).
|
||
debug1: channel 0: new [client-session]
|
||
debug1: Requesting no-more-sessions@openssh.com
|
||
debug1: Entering interactive session.
|
||
debug1: Sending environment.
|
||
debug1: Sending command: scp -v -t /home/admin
|
||
Sending file modes: C0644 174 abc.txt
|
||
Sink: C0644 174 abc.txt
|
||
abc.txt 100% 174 0.2KB/s 00:00
|
||
Transferred: sent 3024, received 2584 bytes, in 0.3 seconds
|
||
Bytes per second: sent 9863.3, received 8428.1
|
||
debug1: Exit status 0
|
||
[root@localhost ~]#
|
||
```
|
||
|
||
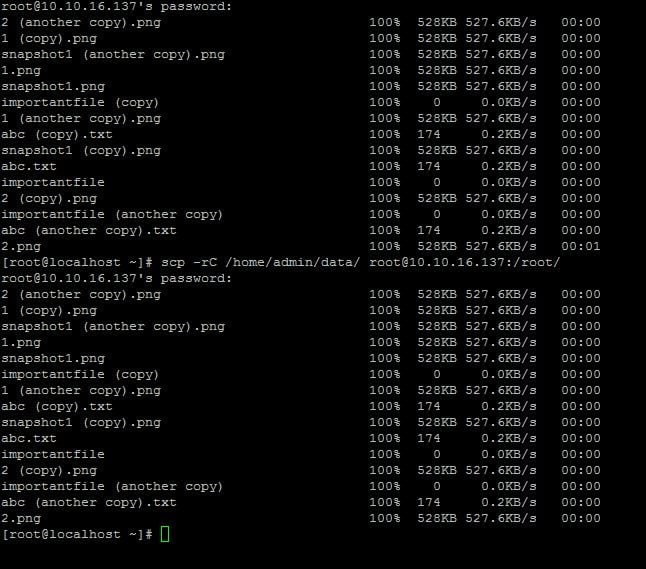
当我们需要拷贝一个目录或者文件夹的时候,我们可以使用-r选项,它会递归拷贝整个目录。
|
||
|
||

|
||
|
||
静默模式:
|
||
|
||
如果你想要关闭进度信息以及警告和诊断信息,你可以通过使用scp命令中的-q选项.
|
||
|
||

|
||
|
||
上一次我们仅仅使用-r参数,它显示了逐个文件的信息,但这一次当我们使用了-q参数,它就不显示进度信息.
|
||
|
||
利用scp的-p选项来保留目标文件的更新时间,访问时间和权限模式.
|
||
|
||

|
||
|
||
通过 -P 选项来指定远程主机的连接端口。
|
||
scp使用ssh命令来在两个主机之间传输文件,因为ssh使用的是22端口号,所以scp也使用相同的22端口号.
|
||
|
||
如果我们希望改变这个端口号,我们可以使用-P(大写的P,因为小写的p用来保存文件的访问时间等) 选项来指定所需的端口号
|
||
|
||
举个例子,如果我们想要使用2222端口号,我们可以使用如下的命令
|
||
|
||
```
|
||
[root@localhost ~]# scp -P 2222 abcd1 root@10.10.16.137:/root/
|
||
```
|
||
|
||
**限制命令使用的带宽, 指定的单位是 Kbit/s**
|
||
|
||
如下所示,我们可以使用-l参数来指定scp命令所使用的带宽,在此我们将速度限制为512kbit/s
|
||
|
||

|
||
|
||
**开启压缩**
|
||
|
||
如下所示,我们可以通过开启scp命令的压缩模式来节省传输过程中的带宽和时间
|
||
|
||
|
||
|
||
**选择加密数据的加密方式**
|
||
|
||
scp默认使用 AES-128的加密方式,如果我们想要改变这个加密方式,可以通过-c(小写的c) 参数来指定其他的加密方式
|
||
|
||

|
||
|
||
现在你可以利用scp(Secure copy)命令在你所属网络中的两个结点之间安全地拷贝文件了.
|
||
|
||
--------------------------------------------------------------------------------
|
||
|
||
via: https://www.unixmen.com/scp-command-linuxunix/?utm_source=feedburner&utm_medium=feed&utm_campaign=Feed%3A+unixmenhowtos+%28Unixmen+Howtos+%26+Tutorials%29
|
||
|
||
作者:[Naga Ramesh][a]
|
||
译者:[lujianbo](https://github.com/lujianbo)
|
||
校对:[校对者ID](https://github.com/校对者ID)
|
||
|
||
本文由 [LCTT](https://github.com/LCTT/TranslateProject) 原创编译,[Linux中国](https://linux.cn/) 荣誉推出
|
||
|
||
[a]: https://www.unixmen.com/author/naga/
|