7.7 KiB
How To Setup Multilingual Input Method On Ubuntu
For those who don’t know, there are hundreds of spoken languages in India and 22 languages are listed as official languages in Indian constitution. I am not a native English speaker, so I often use Google translate if I ever needed to type and/or translate something from English to my native language, which is Tamil. Well, I guess I don’t need to rely on Google translate anymore. I just found way to type in Indian languages on Ubuntu. This guide explains how to setup multilingual input method. It has been exclusively written for Ubuntu 18.04 LTS, however it might work on other Ubuntu variants like Linux mint, Elementary OS.
Setup Multilingual Input Method On Ubuntu Linux
With the help of IBus , we can easily setup multilingual input method on Ubuntu and its derivatives. Ibus, stands for I ntelligent I nput Bus , is an input method framework for multilingual input in Unix-like operating systems. It allows us to type in our native language in most GUI applications, for example LibreOffice.
Install IBus On Ubuntu
To install IBus package on Ubuntu, run:
$ sudo apt install ibus-m17n
The Ibus-m17n package provides a lot of Indian and other countries languages including amharic, arabic, armenian, assamese, athapascan languages, belarusian, bengali, burmese, central khmer, chamic languages, chinese, cree, croatian, czech, danish, divehi, dhivehi, maldivian, esperanto, french, georgian, ancient and modern greek, gujarati, hebrew, hindi, inuktitut, japanese, kannada, kashmiri, kazakh, korean, lao, malayalam, marathi, nepali, ojibwa, oriya, panjabi, punjabi, persian, pushto, pashto, russian, sanskrit, serbian, sichuan yi, nuosu, siksika, sindhi, sinhala, sinhalese, slovak, swedish, tai languages, tamil, telugu, thai, tibetan, uighur, uyghur, urdu, uzbek, vietnamese, as well as yiddish.
Add input languages
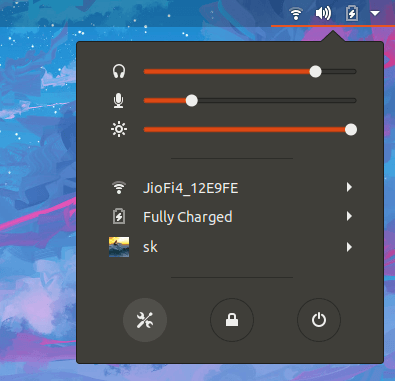
We can add languages in System Settings section. Click the drop down arrow on the top right corner of your Ubuntu desktop and choose Settings icon in the bottom left corner.
Launch System’s settings from top panel
From the Settings section, click on Region & Language option in the left pane. Then click the + (plus) sign button on the right side under Input Sources tab.
Region & language section in Settings section
In the next window, click on the three vertical dots button.
Add input source in Ubuntu
Search and choose the input language you’d like to add from the list.
Add input language
For the purpose of this guide, I am going to add Tamil language. After choosing the language, click Add button.
Add Input Source
Now you will see the selected input source has been added. You will see it in Region & Language section under Input Sources tab.
Input sources section in Ubuntu
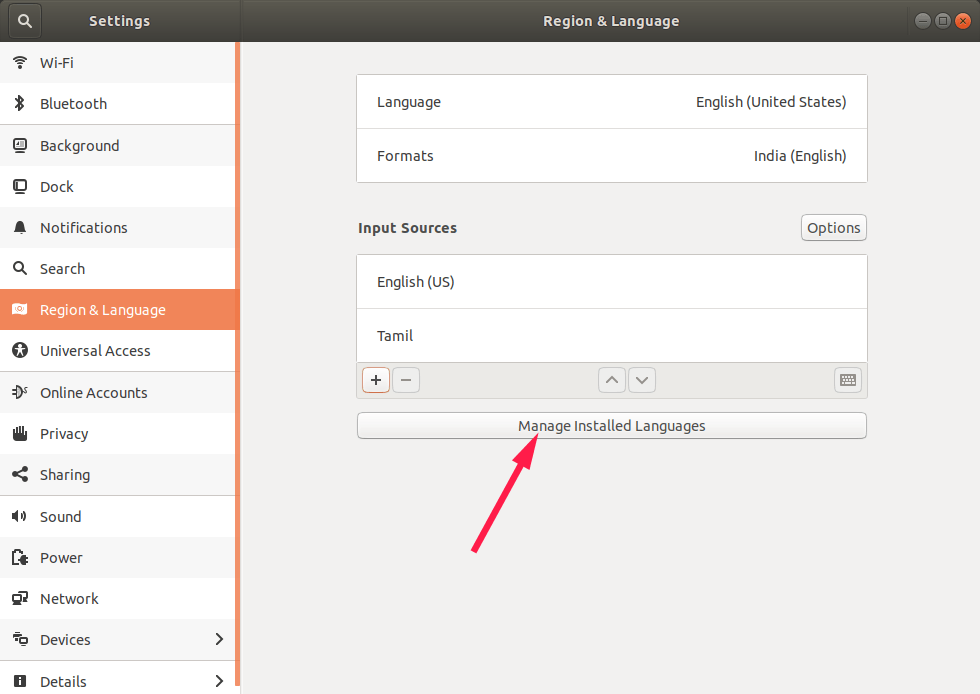
Click the “Manage Installed Languages” button under Input Sources tab.
Manage Installed Languages In Ubuntu
Next you will be asked whether you want to install translation packs for the chosen language. You can install them if you want. Or, simply choose “Remind Me Later” button. You will be notified when you open this next time.
The language support is not installed completely
Once the translation packs are installed, Click Install / Remove Languages button. Also make sure IBus is selected in Keyboard input method system.
Install / Remove Languages In Ubuntu
Choose your desired language from the list and click Apply button.
Choose input language
That’s it. That’s we have successfully setup multilingual input method on Ubuntu 18.04 desktop. Similarly, add as many as input languages you want.
After adding all language sources, log out and log in back.
Type In Indian languages and/or your preferred languages
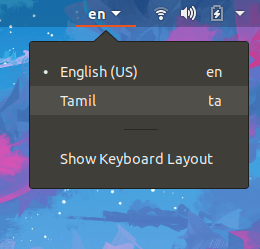
Once you have added all languages, you will see them from the drop download on the top bar of your Ubuntu desktop.
Choose input language from top bar in Ubuntu desktop
Alternatively, you can use SUPER+SPACE keys from the Keyboard to switch between input languages.
Choose input language using Super+Space keys in Ubuntu
Open any GUI text editors/apps and start typing!
Type in Indian languages in Ubuntu
Add IBus to startup applications
We need let IBus to start automatically on every reboot, so you need not to start it manually whenever you want to type in your preferred language.
To do so, simply type “startup applications” in the dash and click on Startup Applications option.
Launch startup applications in Ubuntu
In the next window, click Add, type “Ibus” in the name field and “ibus-daemon” in the Command field and then click Add button.
Add Ibus to startup applications on Ubuntu
From now IBus will automatically start on system startup.
Suggested read:
- How To Use Google Translate From Commandline In Linux
- How To Type Indian Rupee Sign (₹) In Linux
- How To Setup Japanese Language Environment In Arch Linux
So, it is your turn now. What application/tool you’re using to type in local Indian languages? Let us know them in the comment section below.
Reference:
via: https://www.ostechnix.com/how-to-setup-multilingual-input-method-on-ubuntu/


