mirror of
https://github.com/LCTT/TranslateProject.git
synced 2025-01-04 22:00:34 +08:00
260 lines
11 KiB
Markdown
260 lines
11 KiB
Markdown
Fedora 25 Workstation 安装指南
|
||
============================================================
|
||
|
||
在这篇教程中,我们将会走完在电脑上安装 Fedora 25 workstation 的每一步。该指南包括整个安装过程中的每一步截图,因此,请认真跟着操作。
|
||
|
||
#### Fedora 25 Workstation 有哪些新特性?
|
||
|
||
正如大家所期待的那样,Fedora 的这个最新版本在基础组件上做了很多的改变以及修复大量的 bugs,除此之外,它带来了很多新的功能强大的软件,如下所示:
|
||
|
||
- GNOME 3.22, 可以重命名多个文件,重新设计的键盘布局工具以及一些用户界面上的改进。
|
||
- 使用 Wayland 代替 X11 系统,以满足现代图形硬件设备。
|
||
- 支持 MP3 格式解码。
|
||
- Docker 1.12。
|
||
- Node.js 6.9.1。
|
||
- 支持 Rust 系统编程语言。
|
||
- 支持多个版本的 Python 编程语言,包括 Python2.6, 2.7, 3.3, 3.4 和 3.5。
|
||
- 不再检查 GNOME Shell 扩展与当前的 Shell 版本的兼容性等等。
|
||
|
||
注意:如果电脑上已安装了前一个版本 Fedora 24,或许你可以考虑使用更简单的几个步骤[将 Fedora 24 升级到 Fedora 25][3] 以避免全新的安装过程。
|
||
|
||
### 安装 Fedora 25 Workstation 版本
|
||
|
||
从下面的链接下载 ISO 系统镜像开始,本安装教程将使用 64 位的镜像来安装。
|
||
|
||
- [下载 Fedora 25 Workstation 64 位版本][1]
|
||
- [下载 Fedora 25 Workstation 32位版本][2]
|
||
|
||
下载完 Fedora 25 的系统镜像后,第一步是创建一个可启动设备(DVD 或 USB 设备),使用 [Unetbootin 和 dd 命令][4]来制作 USB 启动工具,或使用其它你想用的方法也行。
|
||
|
||
1. 创建完成启动设备后,插入并从该设备(DVD/USB)启动,此时,你应该看到如下图所示的 **Fedora Workstation Live** 的启动界面。
|
||
|
||
选择 “**Start Fedora-Workstation-Live 25**” 选项,然后单点 Enter 按钮。
|
||
|
||
[
|
||

|
||
][5]
|
||
|
||
*Fedora 25 启动菜单*
|
||
|
||
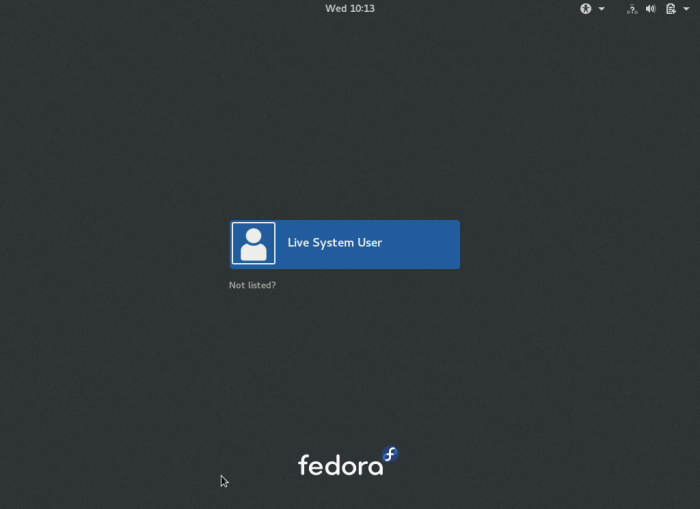
2. 接下来,你会进入到登录界面,单击“**Live System User**”以 Live user 身份进入系统。
|
||
|
||
[
|
||
|
||
][6]
|
||
|
||
*Fedora 25 Live User 登录
|
||
|
||
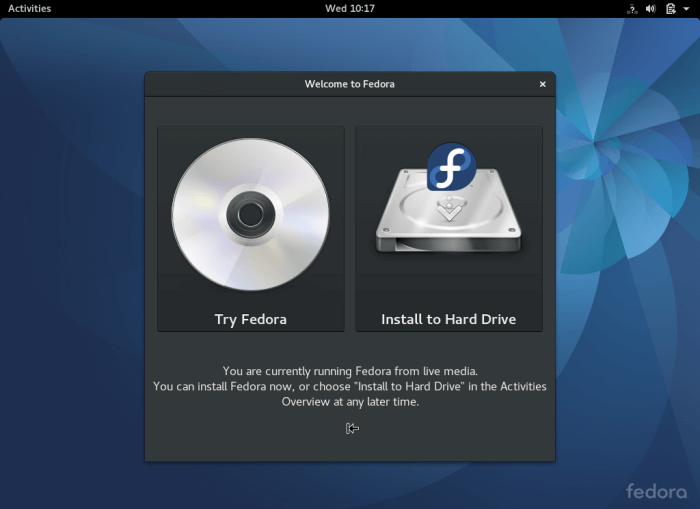
3. 登入系统后,几秒钟后桌面上会出现下面的欢迎界面,如果你想在安装前试用 Fedora 系统,单击 “**Try Fedora**”,否则单击 “**Install to Hard Disk**” 进入到全新安装过程。
|
||
|
||
[
|
||
|
||
][7]
|
||
|
||
*Fedora 25 欢迎界面*
|
||
|
||
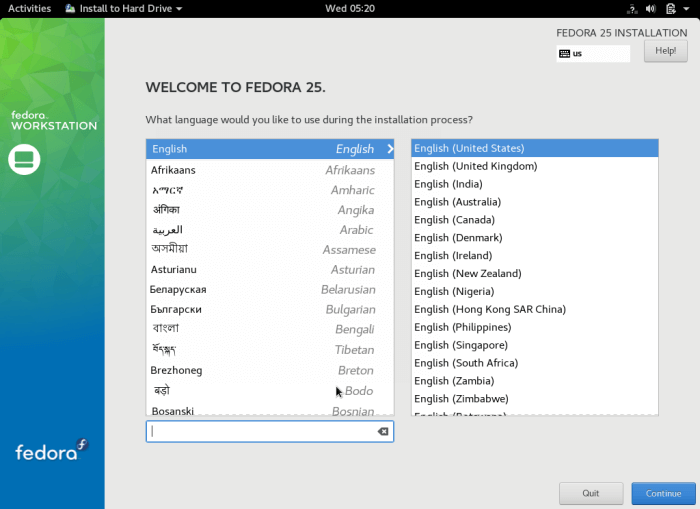
4. 在下面的界面中,选择想要使用的安装语言,然后单击“**Continue**"按钮进入到安装总结页面。
|
||
|
||
[
|
||
|
||
][8]
|
||
|
||
*选择安装语言类型*
|
||
|
||
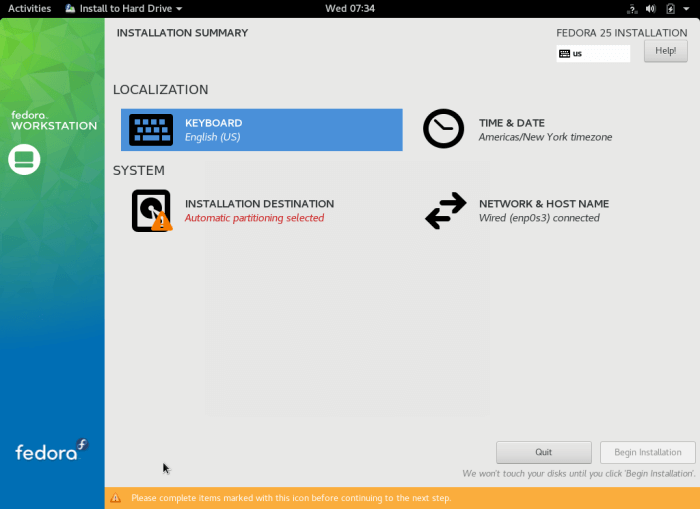
5. 下图是安装总结界面,显示默认的区域及系统设置内容。你可以根据自己的位置和喜好来定制区域及系统设置。
|
||
|
||
从键盘设置开始。单击“**KEYBOARD**”进入到键盘布局自定义设置界面。
|
||
|
||
[
|
||
|
||
][9]
|
||
|
||
*Fedora 25 安装总结*
|
||
|
||
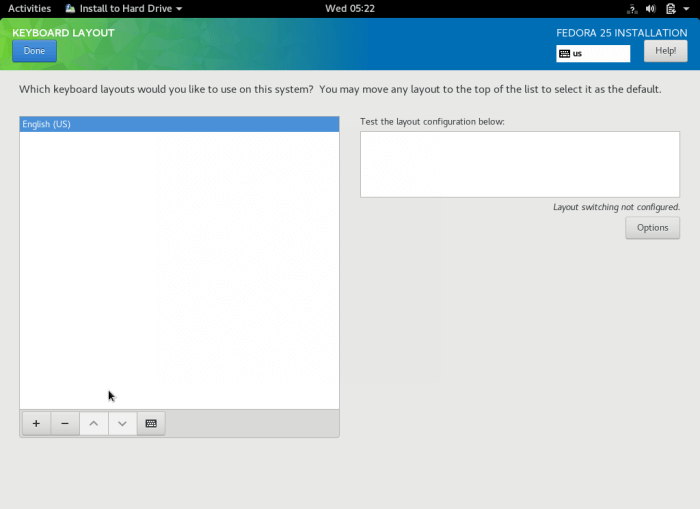
6. 在这个界面中,根据你电脑之前的设置使用`+`号来添加你需要的键盘布局,然后单击“**Done**"返回到安装总结界面。
|
||
|
||
[
|
||
|
||
][10]
|
||
|
||
*设置键盘布局*
|
||
|
||
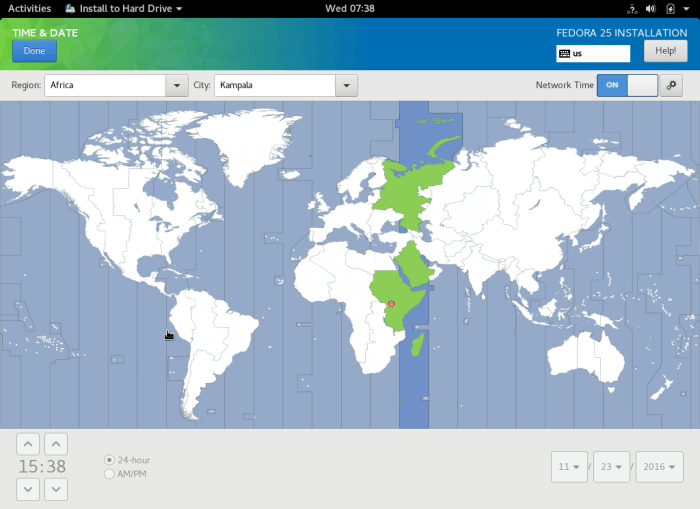
7. 下一步,单击“**TIME & DATA**"调整系统时间和日期。输入所在地区和城市来设置时区,或者快速从地图上选择。
|
||
|
||
注意你可以从右上角启用或者停用网络时间。设置完系统时间和日期后,单击“**Done**”返回到安装总结界面。
|
||
|
||
[
|
||
|
||
][11]
|
||
|
||
*设置系统时区*
|
||
|
||
8. 返回到安装总结界面,单击“**NETWORK & HOSTNAME**” 设置网络和主机名。
|
||
|
||
主机名设置完成后,单击 **Apply** 应用按钮检查主机名是否可用,如果可用,单击“**Done**”。
|
||
|
||
[
|
||

|
||
][12]
|
||
|
||
*设置 Fedora 25 的主机名*
|
||
|
||
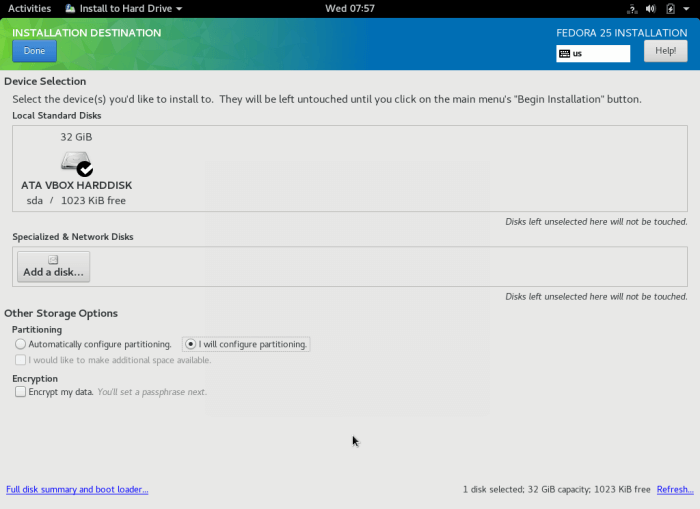
9. 此时,在安装总结界面,单击“**INSTALLATION DESTINATION**”来为系统文件划分安装空间。
|
||
|
||
在“**Other Storage Options**(其它存储选项)上选择“**I will configure partitioning**”来执行手动分区,然后单击 “**Done**” 前进至手动分区界面。
|
||
|
||
[
|
||
|
||
][13]
|
||
|
||
*选择安装位置*
|
||
|
||
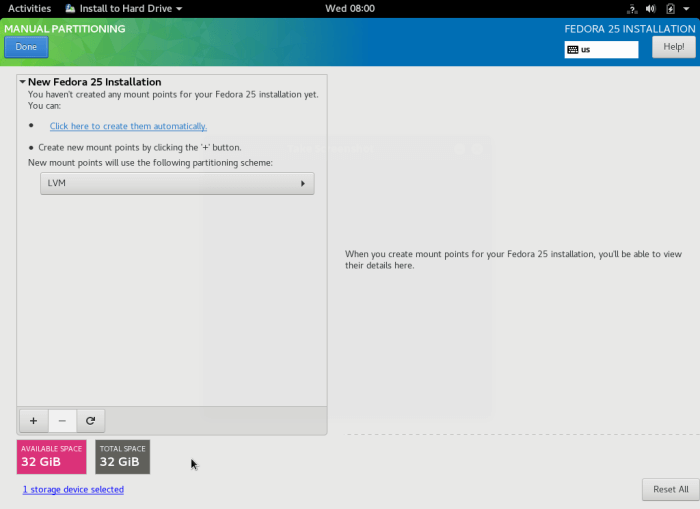
10. 下面是手动分区界面,选择“**Standard Partition**”(标准分区)为新的分区模式来安装。
|
||
|
||
[
|
||
|
||
][14]
|
||
|
||
*手动配置分区*
|
||
|
||
11. 现在通过点`+`号增加一个挂载点来创建一个`/root`分区。
|
||
|
||
```
|
||
Mount Point: /root
|
||
Desired Capacity: set appropriate size( eg 100 GB)
|
||
```
|
||
|
||
之后,单击“**Add mount point**”添加刚刚创建的分区/挂载点。
|
||
|
||
[
|
||

|
||
][15]
|
||
|
||
创建新的 Root 分区
|
||
|
||
下图展示为 `/root` 分区设置。
|
||
|
||
[
|
||

|
||
][16]
|
||
|
||
*Root 分区设置*
|
||
|
||
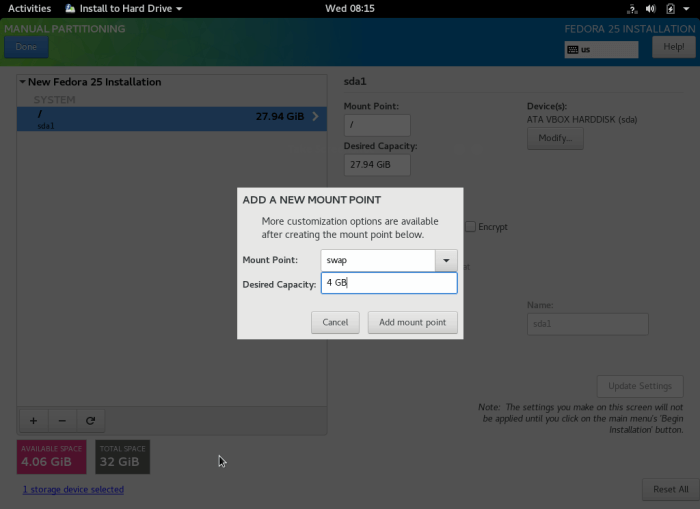
12.下一步,通过`+`号创建 swap 分区
|
||
|
||
Swap 分区是硬盘上的一个虚拟的磁盘空间,用于临时存放那些当前 CPU 不使用的内存数据。
|
||
|
||
```
|
||
Mount Point: swap
|
||
Desired Capacity: set appropriate size( eg 4 GB)
|
||
```
|
||
|
||
单击 **Add mount point** 来添加swap分区。
|
||
|
||
[
|
||
|
||
][17]
|
||
|
||
*创建 Swap 分区*
|
||
|
||
[
|
||
|
||
][18]
|
||
|
||
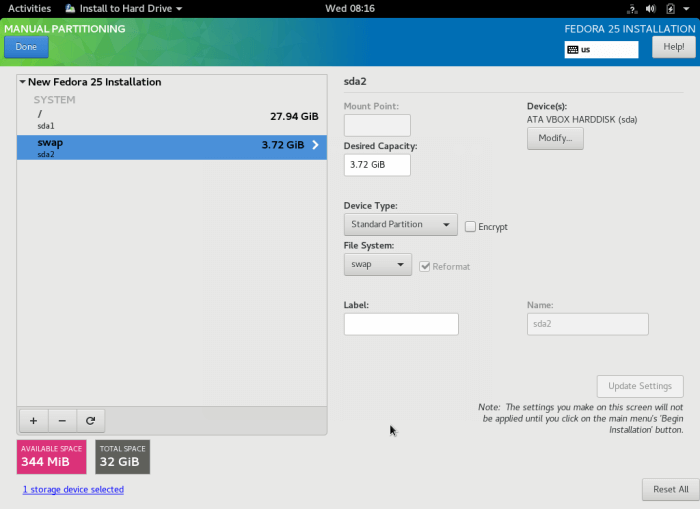
*Swap 分区设置*
|
||
|
||
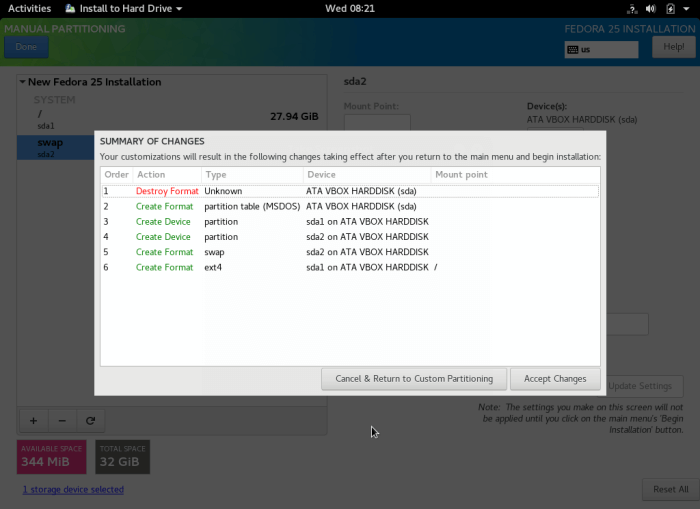
13. 创建完 `root` 分区和 `swap` 分区后,单击“**Done**”按钮来查看这些要对磁盘进行的更改。单击 “**Accept Changes**” 允许执行所有的分区调整。
|
||
|
||
[
|
||
|
||
][19]
|
||
|
||
*接受分区调整*
|
||
|
||
14. 你最后的安装总结内容应该跟下图显示的差不多。单击“**Begin Installation**”开始真正安装系统。
|
||
|
||
[
|
||

|
||
][20]
|
||
|
||
*最后的安装总结内容*
|
||
|
||
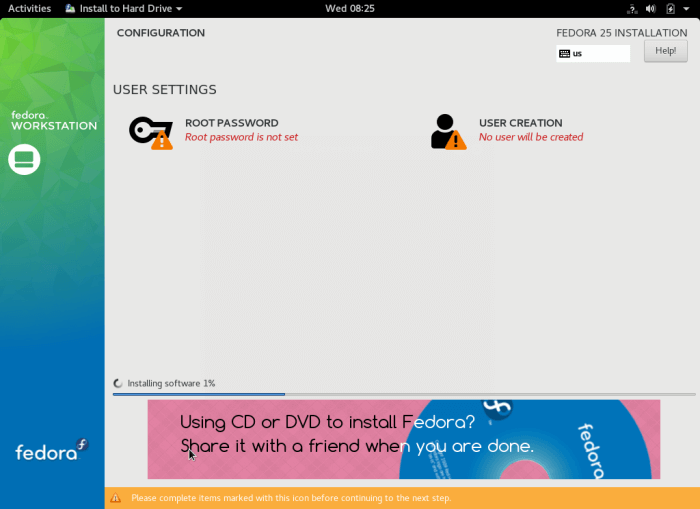
15. 系统文件安装开始后,你可以在下面的界面中,创建一个常用的系统用户,并为 root 账号设置密码。
|
||
|
||
[
|
||
|
||
][21]
|
||
|
||
*用户配置设置*
|
||
|
||
16. 之后,单击 **ROOT PASSWORD** 来设置 root 账号密码。像之前一样,单击 **Done** 返回到用户配置界面。
|
||
|
||
[
|
||

|
||
][22]
|
||
|
||
*设置root账号密码*
|
||
|
||
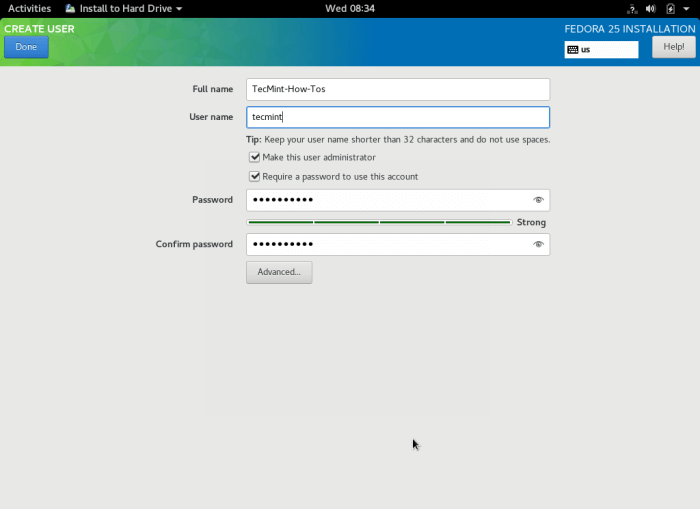
17. 之后,在用户配置界面单击 **USER CREATION** 按钮来创建一个常用的系统用户。你也可以勾选“**Make the user administrator**”选项把该用户提升为系统管理员。
|
||
|
||
再次单击 **Done** 按钮继续。
|
||
|
||
[
|
||
|
||
][23]
|
||
|
||
*创建系统用户账号*
|
||
|
||
18. 安装过程将会持续一段时间,你可以去休息会了。安装完成之后,单击 **Quit** 重启系统,并弹出你使用的启动设备。终于,你可以登录进入新的Fedora 25 Workstation了。
|
||
|
||
[
|
||

|
||
][24]
|
||
|
||
*Fedora 25登录界面*
|
||
|
||
[
|
||

|
||
][25]
|
||
|
||
*Fedora 25 Workstation 桌面*
|
||
|
||
就写到这里吧!请在下面提出相关的问题并发表评论。
|
||
|
||
--------------------------------------------------------------------------------
|
||
|
||
via: http://www.tecmint.com/fedora-25-installation-guide/
|
||
|
||
作者:[Aaron Kili][a]
|
||
译者:[rusking](https://github.com/rusking)
|
||
校对:[jasminepeng](https://github.com/jasminepeng)
|
||
|
||
本文由 [LCTT](https://github.com/LCTT/TranslateProject) 原创编译,[Linux中国](https://linux.cn/) 荣誉推出
|
||
|
||
[a]:http://www.tecmint.com/author/aaronkili/
|
||
[1]:https://download.fedoraproject.org/pub/fedora/linux/releases/25/Workstation/x86_64/iso/Fedora-Workstation-Live-x86_64-25-1.3.iso
|
||
[2]:https://download.fedoraproject.org/pub/fedora/linux/releases/25/Workstation/i386/iso/Fedora-Workstation-Live-i386-25-1.3.iso
|
||
[3]:http://www.tecmint.com/upgrade-fedora-24-to-fedora-25-workstation-server/
|
||
[4]:http://www.tecmint.com/install-linux-from-usb-device/
|
||
[5]:http://www.tecmint.com/wp-content/uploads/2016/11/Start-Fedora-25.png
|
||
[6]:http://www.tecmint.com/wp-content/uploads/2016/11/Fedora-25-Live-User-Login.png
|
||
[7]:http://www.tecmint.com/wp-content/uploads/2016/11/Fedora-25-Welcome-Screen.png
|
||
[8]:http://www.tecmint.com/wp-content/uploads/2016/11/Select-Installation-Language-Type.png
|
||
[9]:http://www.tecmint.com/wp-content/uploads/2016/11/Fedora-25-Installation-Summary.png
|
||
[10]:http://www.tecmint.com/wp-content/uploads/2016/11/Set-Keyboard-Layout.png
|
||
[11]:http://www.tecmint.com/wp-content/uploads/2016/11/Set-System-Timezone.png
|
||
[12]:http://www.tecmint.com/wp-content/uploads/2016/11/Set-Hostname-Fedora-25.png
|
||
[13]:http://www.tecmint.com/wp-content/uploads/2016/11/Select-Installation-Destination-Drive.png
|
||
[14]:http://www.tecmint.com/wp-content/uploads/2016/11/Manual-Partitioning-Selection.png
|
||
[15]:http://www.tecmint.com/wp-content/uploads/2016/11/Create-New-Root-Partition.png
|
||
[16]:http://www.tecmint.com/wp-content/uploads/2016/11/Root-Partition-Settings.png
|
||
[17]:http://www.tecmint.com/wp-content/uploads/2016/11/Create-Swap-Partition.png
|
||
[18]:http://www.tecmint.com/wp-content/uploads/2016/11/Swap-Partition-Settings.png
|
||
[19]:http://www.tecmint.com/wp-content/uploads/2016/11/Accept-Partition-Changes.png
|
||
[20]:http://www.tecmint.com/wp-content/uploads/2016/11/Final-Installation-Summary.png
|
||
[21]:http://www.tecmint.com/wp-content/uploads/2016/11/User-Configuration-Settings.png
|
||
[22]:http://www.tecmint.com/wp-content/uploads/2016/11/Set-Root-Account-Password.png
|
||
[23]:http://www.tecmint.com/wp-content/uploads/2016/11/Create-System-User-Account.png
|
||
[24]:http://www.tecmint.com/wp-content/uploads/2016/11/Fedora-25-Login-Screen.png
|
||
[25]:http://www.tecmint.com/wp-content/uploads/2016/11/Fedora-25-Workstation-Desktop.png
|