mirror of
https://github.com/LCTT/TranslateProject.git
synced 2025-01-22 23:00:57 +08:00
109 lines
4.4 KiB
Markdown
109 lines
4.4 KiB
Markdown
Linux FAQs with Answers--How to create a MySQL database from the command line
|
|
================================================================================
|
|
> **Question**: I have a MySQL server up and running somewhere. How can I create and populate a MySQL database from the command line?
|
|
|
|
To create a MySQL database from the command line, you can use mysql CLI client. Here is a step-by-step procedure to create and populate a MySQL database using mysql client from the command line.
|
|
|
|
### Step One: Install MySQL Client ###
|
|
|
|
Of course you need to make sure that MySQL client program is installed. If not, you can install it as follows.
|
|
|
|
On Debian, Ubuntu or Linux Mint:
|
|
|
|
$ sudo apt-get install mysql-client
|
|
|
|
On Fedora, CentOS or RHEL:
|
|
|
|
$ sudo yum install mysql
|
|
|
|
### Step Two: Log in to a MySQL Server ###
|
|
|
|
To begin, first log in to your MySQL server as root with the following command:
|
|
|
|
$ mysql -u root -h <mysql-server-ip-address> -p
|
|
|
|
Note that to be able to log in to a remote MySQL server, you need to [enable remote access on the server][1]. If you are invoking mysql command on the same host where the MySQL server is running, you can omit "-h <mysql-server-ip-address>" as follows.
|
|
|
|
$ mysql -u root -p
|
|
|
|
You will be then asked for the password of the MySQL root user. If the authentication succeeds, the MySQL prompt will appear.
|
|
|
|

|
|
|
|
### Step Three: Create a MySQL Database ###
|
|
|
|
Before you start typing commands at the MySQL prompt, remember that each command must end with a semicolon (otherwise it will not execute). In addition, consider using uppercase letters for commands and lowercase letter for database objects. Note that this is not required but helpful for reading.
|
|
|
|
Now, let's create a database named xmodulo_DB:
|
|
|
|
mysql> CREATE DATABASE IF NOT EXISTS xmodulo_DB;
|
|
|
|

|
|
|
|
### Step Four: Create a MySQL Table ###
|
|
|
|
For a demonstration purpose, we will create a tabled called posts_tbl where we want to store the following information about posts:
|
|
|
|
- Text of article
|
|
- Author's first name
|
|
- Author's last name
|
|
- Whether the post is enabled (visible) or not
|
|
- Date when article was posted
|
|
|
|
This process is actually performed in two steps:
|
|
|
|
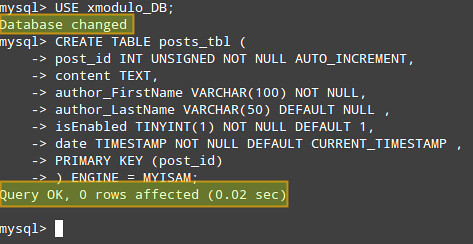
First, select the database that we want to use:
|
|
|
|
mysql> USE xmodulo_DB;
|
|
|
|
Then create a new table in the database:
|
|
|
|
mysql> CREATE TABLE 'posts_tbl' (
|
|
'post_id' INT UNSIGNED NOT NULL AUTO_INCREMENT,
|
|
'content' TEXT,
|
|
'author_FirstName' VARCHAR(100) NOT NULL,
|
|
'author_LastName' VARCHAR(50) DEFAULT NULL ,
|
|
'isEnabled' TINYINT(1) NOT NULL DEFAULT 1,
|
|
'date' TIMESTAMP NOT NULL DEFAULT CURRENT_TIMESTAMP ,
|
|
PRIMARY KEY ( 'post_id' )
|
|
) TYPE = MYISAM;
|
|
|
|

|
|
|
|
### Step Five: Create a User Account and Grant Permissions ###
|
|
|
|
When it comes to accessing our newly created database and tables, it's a good idea to create a new user account, so it can access that database (and that database only) without full permissions to the whole MySQL server.
|
|
|
|
You can create a new user, grant permissions and apply changes in two easy steps as follows:
|
|
|
|
mysql> GRANT ALL PRIVILEGES ON xmodulo_DB.* TO 'new_user'@'%' IDENTIFIED BY 'new_password';
|
|
mysql> FLUSH PRIVILEGES;
|
|
|
|
where 'new_user' and 'new_password' refer to the new user account name and its password, respectively. This information will be stored in the mysql.user table, and the password will be encrypted.
|
|
|
|
### Step Six: Testing ###
|
|
|
|
Let's insert one dummy record to the posts_tbl table:
|
|
|
|
mysql> USE xmodulo_DB;
|
|
mysql> INSERT INTO posts_tbl (content, author_FirstName, author_LastName)
|
|
VALUES ('Hi! This is some dummy text.', 'Gabriel', 'Canepa');
|
|
|
|
Then view all the records in posts_tbl table:
|
|
|
|
mysql> SELECT * FROM posts_tbl;
|
|
|
|

|
|
|
|
Note that MySQL automatically inserted the proper default values in the fields where we defined them earlier (e.g., 'isEnabled' and 'date').
|
|
|
|
--------------------------------------------------------------------------------
|
|
|
|
via: http://ask.xmodulo.com/create-mysql-database-command-line.html
|
|
|
|
译者:[译者ID](https://github.com/译者ID)
|
|
校对:[校对者ID](https://github.com/校对者ID)
|
|
|
|
本文由 [LCTT](https://github.com/LCTT/TranslateProject) 原创翻译,[Linux中国](http://linux.cn/) 荣誉推出
|
|
|
|
[1]:http://xmodulo.com/2012/06/how-to-allow-remote-access-to-mysql.html |