28 KiB
LFCS 系列第七讲: 通过 SysVinit、Systemd 和 Upstart 管理系统自启动进程和服务 Part 7 - LFCS: Managing System Startup Process and Services (SysVinit, Systemd and Upstart)
几个月前, Linux 基金会宣布 LFCS(Linux 基金会认证系统管理员) 认证诞生了,这个令人兴奋的新计划定位于让来自全球各地的初级到中级的 Linux 系统管理员得到认证。这其中包括维护已经在运行的系统和服务能力、第一手的问题查找和分析能力、以及决定何时向开发团队提交问题的能力。 A couple of months ago, the Linux Foundation announced the LFCS (Linux Foundation Certified Sysadmin) certification, an exciting new program whose aim is allowing individuals from all ends of the world to get certified in performing basic to intermediate system administration tasks on Linux systems. This includes supporting already running systems and services, along with first-hand problem-finding and analysis, plus the ability to decide when to raise issues to engineering teams.

第七讲: Linux 基金会认证系统管理员 Linux Foundation Certified Sysadmin – Part 7
下面的视频简要介绍了 Linux 基金会认证计划。 The following video describes an brief introduction to The Linux Foundation Certification Program.
注:youtube 视频
这篇博文是 10 指南系列中的第七篇,在这篇文章中,我们会介绍如何管理 Linux 系统自启动进程和服务,这是 LFCS 认证考试要求的一部分。 This post is Part 7 of a 10-tutorial series, here in this part, we will explain how to Manage Linux System Startup Process and Services, that are required for the LFCS certification exam.
管理 Linux 自启动进程
Managing the Linux Startup Process
Linux 系统的启动程序包括多个阶段,每个阶段由一个不同的组件表示。下面的图示简要总结了启动过程以及所有包括的主要组件。 The boot process of a Linux system consists of several phases, each represented by a different component. The following diagram briefly summarizes the boot process and shows all the main components involved.

Linux 启动过程 Linux Boot Process
当你按下你机器上的电源键时, 存储在主板 EEPROM 芯片中的固件初始化 POST(通电自检) 检查系统硬件资源的状态。POST 结束后,固件会搜索并加载位于第一块可用磁盘上的 MBR 或 EFI 分区的第一阶段引导程序,并把控制权交给引导程序。 When you press the Power button on your machine, the firmware that is stored in a EEPROM chip in the motherboard initializes the POST (Power-On Self Test) to check on the state of the system’s hardware resources. When the POST is finished, the firmware then searches and loads the 1st stage boot loader, located in the MBR or in the EFI partition of the first available disk, and gives control to it.
MBR 方式
MBR Method
MBR 是位于 BISO 设置中标记为可启动磁盘上的第一个扇区,大小是 512 个字节。 The MBR is located in the first sector of the disk marked as bootable in the BIOS settings and is 512 bytes in size.
- 前面 446 个字节:包括可执行代码和错误信息文本的引导程序
- 接下来的 64 个字节:四个分区(主分区或扩展分区)中每个分区一条记录的分区表。其中,每条记录标示了每个一个分区的状态(是否活跃)、大小以及开始和结束扇区。
- 最后 2 个字节: MBR 有效性检查的魔数。
- First 446 bytes: The bootloader contains both executable code and error message text.
- Next 64 bytes: The Partition table contains a record for each of four partitions (primary or extended). Among other things, each record indicates the status (active / not active), size, and start / end sectors of each partition.
- Last 2 bytes: The magic number serves as a validation check of the MBR.
下面的命令对 MBR 进行备份(在本例中,/dev/sda 是第一块硬盘)。结果文件 mbr.bkp 在分区表被破坏、例如系统不可引导时能排上用场。 The following command performs a backup of the MBR (in this example, /dev/sda is the first hard disk). The resulting file, mbr.bkp can come in handy should the partition table become corrupt, for example, rendering the system unbootable.
当然,为了后面需要的时候能使用它,我们需要把它保存到别的地方(例如一个 USB 设备)。该文件能帮助我们重新恢复 MBR,这只在我们操作过程中没有改变硬盘驱动布局时才有效。 Of course, in order to use it later if the need arises, we will need to save it and store it somewhere else (like a USB drive, for example). That file will help us restore the MBR and will get us going once again if and only if we do not change the hard drive layout in the meanwhile.
备份 MBR Backup MBR
# dd if=/dev/sda of=mbr.bkp bs=512 count=1

在 Linux 中备份 MBR Backup MBR in Linux
恢复 MBR Restoring MBR
# dd if=mbr.bkp of=/dev/sda bs=512 count=1
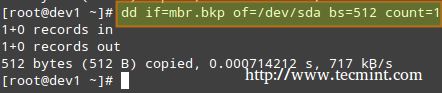
在 Linux 中恢复 MBR Restore MBR in Linux
EFI/UEFI 方式
EFI/UEFI Method
对于使用 EFI/UEFI 方式的系统, UEFI 固件读取它的设置来决定从哪里启动哪个 UEFI 应用。(例如, EFI 分区位于哪块磁盘或分区)。 For systems using the EFI/UEFI method, the UEFI firmware reads its settings to determine which UEFI application is to be launched and from where (i.e., in which disk and partition the EFI partition is located).
接下来,加载并运行第二阶段引导程序(又名引导管理器)。GRUB[GRand Unified Boot] 是 Linux 中最常使用的引导管理器。今天大部分使用的系统中都能找到它两个中的其中一个版本。 Next, the 2nd stage boot loader (aka boot manager) is loaded and run. GRUB [GRand Unified Boot] is the most frequently used boot manager in Linux. One of two distinct versions can be found on most systems used today.
- GRUB 有效配置文件: /boot/grub/menu.lst(旧发行版, EFI/UEFI 固件不支持)。
- GRUB2 配置文件: 通常是 /etc/default/grub。
- GRUB legacy configuration file: /boot/grub/menu.lst (older distributions, not supported by EFI/UEFI firmwares).
- GRUB2 configuration file: most likely, /etc/default/grub.
尽管 LFCS 考试目标没有明确要求了解 GRUB 内部知识,但如果你足够大胆并且不怕把你的系统搞乱(为了以防万一,你可以先在虚拟机上进行尝试)你可以运行: Although the objectives of the LFCS exam do not explicitly request knowledge about GRUB internals, if you’re brave and can afford to mess up your system (you may want to try it first on a virtual machine, just in case), you need to run.
# update-grub
为了使更改生效,你需要以 root 用户修改 GRUB 的配置。 As root after modifying GRUB’s configuration in order to apply the changes.
首先, GRUB 加载默认的内核以及 initrd 或 initramfs 镜像。补充一句,initrd 或者 initramfs 帮助完成硬件检测、内核模块加载、以及发现挂载根目录文件系统需要的设备。 Basically, GRUB loads the default kernel and the initrd or initramfs image. In few words, initrd or initramfs help to perform the hardware detection, the kernel module loading and the device discovery necessary to get the real root filesystem mounted.
一旦真正的根目录文件系统启动,为了显示用户界面,内核就会执行系统和服务管理器(init 或 systemd,进程号 PID 一般为 1)开始普通用户态的引导程序。 Once the real root filesystem is up, the kernel executes the system and service manager (init or systemd, whose process identification or PID is always 1) to begin the normal user-space boot process in order to present a user interface.
init 和 systemd 都是管理其它守护进程的守护进程(后台进程),它们总是最先启动(系统引导时),最后结束(系统关闭时)。 Both init and systemd are daemons (background processes) that manage other daemons, as the first service to start (during boot) and the last service to terminate (during shutdown).

Systemd 和 Init
自启动服务(SysVinit)
Starting Services (SysVinit)
Linux 中运行等级的概念表示通过控制运行哪些服务来以不同方式使用系统。换句话说,运行等级控制着当前执行状态下可以完成什么任务(以及什么不能完成)。 The concept of runlevels in Linux specifies different ways to use a system by controlling which services are running. In other words, a runlevel controls what tasks can be accomplished in the current execution state = runlevel (and which ones cannot).
传统上,这个启动过程是基于起源于 System V Unix 的形式,通过执行脚本启动或者停止服务从而使机器进入指定的运行等级(换句话说,是一个不同的系统运行模式)。 Traditionally, this startup process was performed based on conventions that originated with System V UNIX, with the system passing executing collections of scripts that start and stop services as the machine entered a specific runlevel (which, in other words, is a different mode of running the system).
在每个运行等级中,独立服务可以设置为运行、或者在运行时关闭。一些主流发行版的最新版本中,已经移除了标准的 System V,而用一个称为 systemd(表示系统守护进程)的新服务和系统管理器代替,但为了兼容性,通常也支持 sysv 命令。这意味着你可以在基于 systemd 的发行版中运行大部分有名的 sysv 初始化工具。 Within each runlevel, individual services can be set to run, or to be shut down if running. Latest versions of some major distributions are moving away from the System V standard in favour of a rather new service and system manager called systemd (which stands for system daemon), but usually support sysv commands for compatibility purposes. This means that you can run most of the well-known sysv init tools in a systemd-based distribution.
- Read Also: Why ‘systemd’ replaces ‘init’ in Linux
- 推荐阅读: Linux 为什么用 ‘systemd’ 代替 ‘init’
除了启动系统进程,init 还会查看 /etc/inittab 来决定进入哪个运行等级。 Besides starting the system process, init looks to the /etc/inittab file to decide what runlevel must be entered.
注:表格
| Runlevel | Description |
| 0 | 停止系统。运行等级 0 是一个用于快速关闭系统的特殊过渡状态。Halt the system. Runlevel 0 is a special transitional state used to shutdown the system quickly. |
| 1 | 别名为 s 或 S,这个运行等级有时候也称为维护模式。在这个运行等级启动的服务由于发行版不同而不同。通常用于正常系统操作损坏时低级别的系统维护。Also aliased to s, or S, this runlevel is sometimes called maintenance mode. What services, if any, are started at this runlevel varies by distribution. It’s typically used for low-level system maintenance that may be impaired by normal system operation. |
| 2 | 多用户。在 Debian 系统及其衍生版中,这是默认的运行等级,还包括了一个图形化登录(如果有的话)。在基于红帽的系统中,这是没有网络的多用户模式。Multiuser. On Debian systems and derivatives, this is the default runlevel, and includes -if available- a graphical login. On Red-Hat based systems, this is multiuser mode without networking. |
| 3 | 在基于红帽的系统中,这是默认的多用户模式,运行除了图形化环境以外的所有东西。基于 Debian 的系统中通常不会使用这个运行等级以及等级 4 和 5。On Red-Hat based systems, this is the default multiuser mode, which runs everything except the graphical environment. This runlevel and levels 4 and 5 usually are not used on Debian-based systems. |
| 4 | 通常默认情况下不使用,可用于自定制。Typically unused by default and therefore available for customization. |
| 5 | 基于红帽的系统中,支持 GUI 登录的完全多用户模式。这个运行等级和等级 3 类似,但是有可用的 GUI 登录。On Red-Hat based systems, full multiuser mode with GUI login. This runlevel is like level 3, but with a GUI login available. |
| 6 | 重启系统。Reboot the system. |
要在运行等级之间切换,我们只需要使用 init 命令更改运行等级:init N(其中 N 是上面列出的一个运行等级)。 请注意这并不是运行中的系统切换运行等级的推荐方式,因为它不会给已经登录的用户发送警告(因而导致他们丢失工作以及进程异常终结)。 To switch between runlevels, we can simply issue a runlevel change using the init command: init N (where N is one of the runlevels listed above). Please note that this is not the recommended way of taking a running system to a different runlevel because it gives no warning to existing logged-in users (thus causing them to lose work and processes to terminate abnormally).
相反,应该用 shutdown 命令重启系统(它首先发送警告信息给所有已经登录的用户,并锁住任何新的登录;然后再给 init 发送信号切换运行等级)但是,首先要在 /etc/inittab 文件中设置好默认的运行等级(系统引导到的等级)。 Instead, the shutdown command should be used to restart the system (which first sends a warning message to all logged-in users and blocks any further logins; it then signals init to switch runlevels); however, the default runlevel (the one the system will boot to) must be edited in the /etc/inittab file first.
因为这个原因,按照下面的步骤切当地切换运行等级。以 root 用户在 /etc/inittab 中查找下面的行。 For that reason, follow these steps to properly switch between runlevels, As root, look for the following line in /etc/inittab.
id:2:initdefault:
并用你喜欢的文本编辑器,例如 vim(本系列的第二讲 : 如何在 Linux 中使用 vi/vim 编辑器),更改数字 2 为想要的运行等级。 and change the number 2 for the desired runlevel with your preferred text editor, such as vim (described in How to use vi/vim editor in Linux – Part 2 of this series).
然后,以 root 用户执行 Next, run as root.
# shutdown -r now
最后一个命令会重启系统,并使它在下一次引导时进入指定的运行等级,并会执行保存在 /etc/rc[runlevel].d 目录中的脚本以决定应该启动什么服务、不应该启动什么服务。例如,在下面的系统中运行等级 2。 That last command will restart the system, causing it to start in the specified runlevel during next boot, and will run the scripts located in the /etc/rc[runlevel].d directory in order to decide which services should be started and which ones should not. For example, for runlevel 2 in the following system.

在 Linux 中更改运行等级 Change Runlevels in Linux
使用 chkconfig 管理服务
Manage Services using chkconfig
为了在启动时启动或者停用系统服务,我们可以在 CentOS / openSUSE 中使用 chkconfig 命令,在 Debian 及其衍生版中使用 sysv-rc-conf 命令。这个工具还能告诉我们对于一个指定的运行等级预先配置的状态是什么。 To enable or disable system services on boot, we will use chkconfig command in CentOS / openSUSE and sysv-rc-conf in Debian and derivatives. This tool can also show us what is the preconfigured state of a service for a particular runlevel.
- 推荐阅读: 如何在 Linux 中停止和停用不想要的服务
- Read Also: How to Stop and Disable Unwanted Services in Linux
列出某个服务的运行等级配置。 Listing the runlevel configuration for a service.
# chkconfig --list [service name]
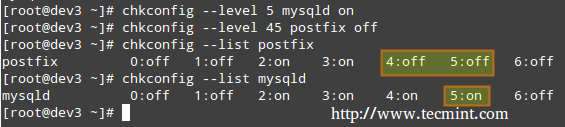
# chkconfig --list postfix
# chkconfig --list mysqld

列出运行等级配置 Listing Runlevel Configuration
In the above image we can see that postfix is set to start when the system enters runlevels 2 through 5, whereas mysqld will be running by default for runlevels 2 through 4. Now suppose that this is not the expected behaviour.
For example, we need to turn on mysqld for runlevel 5 as well, and turn off postfix for runlevels 4 and 5. Here’s what we would do in each case (run the following commands as root).
Enabling a service for a particular runlevel
# chkconfig --level [level(s)] service on
# chkconfig --level 5 mysqld on
Disabling a service for particular runlevels
# chkconfig --level [level(s)] service off
# chkconfig --level 45 postfix off
Enable Disable Services
We will now perform similar tasks in a Debian-based system using sysv-rc-conf.
Manage Services using sysv-rc-conf
Configuring a service to start automatically on a specific runlevel and prevent it from starting on all others.
-
Let’s use the following command to see what are the runlevels where mdadm is configured to start.
ls -l /etc/rc[0-6].d | grep -E 'rc[0-6]|mdadm'

Check Runlevel of Service Running
-
We will use sysv-rc-conf to prevent mdadm from starting on all runlevels except 2. Just check or uncheck (with the space bar) as desired (you can move up, down, left, and right with the arrow keys).
sysv-rc-conf

SysV Runlevel Config
Then press q to quit.
-
We will restart the system and run again the command from STEP 1.
ls -l /etc/rc[0-6].d | grep -E 'rc[0-6]|mdadm'

Verify Service Runlevel
In the above image we can see that mdadm is configured to start only on runlevel 2.
What About systemd?
systemd is another service and system manager that is being adopted by several major Linux distributions. It aims to allow more processing to be done in parallel during system startup (unlike sysvinit, which always tends to be slower because it starts processes one at a time, checks whether one depends on another, and waits for daemons to launch so more services can start), and to serve as a dynamic resource management to a running system.
Thus, services are started when needed (to avoid consuming system resources) instead of being launched without a solid reason during boot.
Viewing the status of all the processes running on your system, both systemd native and SysV services, run the following command.
# systemctl

Check All Running Processes
The LOAD column shows whether the unit definition (refer to the UNIT column, which shows the service or anything maintained by systemd) was properly loaded, while the ACTIVE and SUB columns show the current status of such unit. Displaying information about the current status of a service
When the ACTIVE column indicates that an unit’s status is other than active, we can check what happened using.
# systemctl status [unit]
For example, in the image above, media-samba.mount is in failed state. Let’s run.
# systemctl status media-samba.mount

Check Service Status
We can see that media-samba.mount failed because the mount process on host dev1 was unable to find the network share at //192.168.0.10/gacanepa.
Starting or Stopping Services
Once the network share //192.168.0.10/gacanepa becomes available, let’s try to start, then stop, and finally restart the unit media-samba.mount. After performing each action, let’s run systemctl status media-samba.mount to check on its status.
# systemctl start media-samba.mount
# systemctl status media-samba.mount
# systemctl stop media-samba.mount
# systemctl restart media-samba.mount
# systemctl status media-samba.mount

Starting Stoping Services
Enabling or disabling a service to start during boot
Under systemd you can enable or disable a service when it boots.
# systemctl enable [service] 		# enable a service
# systemctl disable [service] 		# prevent a service from starting at boot
The process of enabling or disabling a service to start automatically on boot consists in adding or removing symbolic links in the /etc/systemd/system/multi-user.target.wants directory.

Enabling Disabling Services
Alternatively, you can find out a service’s current status (enabled or disabled) with the command.
# systemctl is-enabled [service]
For example,
# systemctl is-enabled postfix.service
In addition, you can reboot or shutdown the system with.
# systemctl reboot
# systemctl shutdown
Upstart
Upstart is an event-based replacement for the /sbin/init daemon and was born out of the need for starting services only, when they are needed (also supervising them while they are running), and handling events as they occur, thus surpassing the classic, dependency-based sysvinit system.
It was originally developed for the Ubuntu distribution, but is used in Red Hat Enterprise Linux 6.0. Though it was intended to be suitable for deployment in all Linux distributions as a replacement for sysvinit, in time it was overshadowed by systemd. On February 14, 2014, Mark Shuttleworth (founder of Canonical Ltd.) announced that future releases of Ubuntu would use systemd as the default init daemon.
Because the SysV startup script for system has been so common for so long, a large number of software packages include SysV startup scripts. To accommodate such packages, Upstart provides a compatibility mode: It runs SysV startup scripts in the usual locations (/etc/rc.d/rc?.d, /etc/init.d/rc?.d, /etc/rc?.d, or a similar location). Thus, if we install a package that doesn’t yet include an Upstart configuration script, it should still launch in the usual way.
Furthermore, if we have installed utilities such as chkconfig, you should be able to use them to manage your SysV-based services just as we would on sysvinit based systems.
Upstart scripts also support starting or stopping services based on a wider variety of actions than do SysV startup scripts; for example, Upstart can launch a service whenever a particular hardware device is attached.
A system that uses Upstart and its native scripts exclusively replaces the /etc/inittab file and the runlevel-specific SysV startup script directories with .conf scripts in the /etc/init directory.
These *.conf scripts (also known as job definitions) generally consists of the following:
- Description of the process.
- Runlevels where the process should run or events that should trigger it.
- Runlevels where process should be stopped or events that should stop it.
- Options.
- Command to launch the process.
For example,
# My test service - Upstart script demo description "Here goes the description of 'My test service'" author "Dave Null <dave.null@example.com>"
# Stanzas

#
# Stanzas define when and how a process is started and stopped
# See a list of stanzas here: http://upstart.ubuntu.com/wiki/Stanzas#respawn
# When to start the service
start on runlevel [2345]
# When to stop the service
stop on runlevel [016]
# Automatically restart process in case of crash
respawn
# Specify working directory
chdir /home/dave/myfiles
# Specify the process/command (add arguments if needed) to run
exec bash backup.sh arg1 arg2
To apply changes, you will need to tell upstart to reload its configuration.
# initctl reload-configuration
Then start your job by typing the following command.
$ sudo start yourjobname
Where yourjobname is the name of the job that was added earlier with the yourjobname.conf script.
A more complete and detailed reference guide for Upstart is available in the project’s web site under the menu “Cookbook”.
Summary
A knowledge of the Linux boot process is necessary to help you with troubleshooting tasks as well as with adapting the computer’s performance and running services to your needs.
In this article we have analyzed what happens from the moment when you press the Power switch to turn on the machine until you get a fully operational user interface. I hope you have learned reading it as much as I did while putting it together. Feel free to leave your comments or questions below. We always look forward to hearing from our readers!
via: http://www.tecmint.com/linux-boot-process-and-manage-services/
作者:Gabriel Cánepa 译者:译者ID 校对:校对者ID