mirror of
https://github.com/LCTT/TranslateProject.git
synced 2025-01-13 22:30:37 +08:00
144 lines
6.6 KiB
Markdown
144 lines
6.6 KiB
Markdown
RHCE 系列(九):如何使用无客户端配置 Postfix 邮件服务器(SMTP)
|
||
================================================================================
|
||
尽管现在有很多在线联系方式,电子邮件仍然是一个人传递信息给远在世界尽头或办公室里坐在我们旁边的另一个人的有效方式。
|
||
|
||
下面的图描述了电子邮件从发送者发出直到信息到达接收者收件箱的传递过程。
|
||
|
||

|
||
|
||
*电子邮件如何工作*
|
||
|
||
要实现这一切,背后发生了好多事情。为了使电子邮件信息从一个客户端应用程序(例如 [Thunderbird][1]、Outlook,或者 web 邮件服务,例如 Gmail 或 Yahoo 邮件)投递到一个邮件服务器,并从其投递到目标服务器并最终到目标接收人,每个服务器上都必须有 SMTP(简单邮件传输协议)服务。
|
||
|
||
这就是为什么我们要在这篇博文中介绍如何在 RHEL 7 中设置 SMTP 服务器,从本地用户发送的邮件(甚至发送到另外一个本地用户)被转发(forward)到一个中央邮件服务器以便于访问。
|
||
|
||
在这个考试的要求中这称为无客户端(null-client)安装。
|
||
|
||
在我们的测试环境中将包括一个起源(originating)邮件服务器和一个中央服务器或中继主机(relayhost)。
|
||
|
||
- 起源邮件服务器: (主机名: box1.mydomain.com / IP: 192.168.0.18)
|
||
- 中央邮件服务器: (主机名: mail.mydomain.com / IP: 192.168.0.20)
|
||
|
||
我们在两台机器中都会使用你熟知的 `/etc/hosts` 文件做名字解析:
|
||
|
||
192.168.0.18 box1.mydomain.com box1
|
||
192.168.0.20 mail.mydomain.com mail
|
||
|
||
### 安装 Postfix 和防火墙/SELinux 注意事项 ###
|
||
|
||
首先,我们需要(在两台机器上):
|
||
|
||
**1、 安装 Postfix:**
|
||
|
||
# yum update && yum install postfix
|
||
|
||
**2、 启动服务并启用开机自动启动:**
|
||
|
||
# systemctl start postfix
|
||
# systemctl enable postfix
|
||
|
||
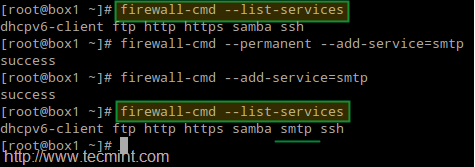
**3、 允许邮件流量通过防火墙:**
|
||
|
||
# firewall-cmd --permanent --add-service=smtp
|
||
# firewall-cmd --add-service=smtp
|
||
|
||

|
||
|
||
*在防火墙中开通邮件服务器端口*
|
||
|
||
**4、 在 box1.mydomain.com 配置 Postfix**
|
||
|
||
Postfix 的主要配置文件是 `/etc/postfix/main.cf`。这个文件本身是一个很大的文本文件,因为其中包含了解释程序设置的用途的注释。
|
||
|
||
为了简洁,我们只显示了需要编辑的行(没错,在起源服务器中你需要保留 `mydestination` 为空;否则邮件会被存储到本地,而不是我们实际想要发往的中央邮件服务器):
|
||
|
||
myhostname = box1.mydomain.com
|
||
mydomain = mydomain.com
|
||
myorigin = $mydomain
|
||
inet_interfaces = loopback-only
|
||
mydestination =
|
||
relayhost = 192.168.0.20
|
||
|
||
**5、 在 mail.mydomain.com 配置 Postfix**
|
||
|
||
myhostname = mail.mydomain.com
|
||
mydomain = mydomain.com
|
||
myorigin = $mydomain
|
||
inet_interfaces = all
|
||
mydestination = $myhostname, localhost.$mydomain, localhost, $mydomain
|
||
mynetworks = 192.168.0.0/24, 127.0.0.0/8
|
||
|
||
如果还没有设置,还要设置相关的 SELinux 布尔值永久为真:
|
||
|
||
# setsebool -P allow_postfix_local_write_mail_spool on
|
||
|
||

|
||
|
||
*设置 Postfix SELinux 权限*
|
||
|
||
上面的 SELinux 布尔值会允许中央服务器上的 Postfix 可以写入邮件池(mail spool)。
|
||
|
||
**6、 在两台机子上重启服务以使更改生效:**
|
||
|
||
# systemctl restart postfix
|
||
|
||
如果 Postfix 没有正确启动,你可以使用下面的命令进行错误处理。
|
||
|
||
# systemctl -l status postfix
|
||
# journalctl -xn
|
||
# postconf -n
|
||
|
||
### 测试 Postfix 邮件服务 ###
|
||
|
||
要测试邮件服务器,你可以使用任何邮件用户代理(Mail User Agent,常简称为 MUA),例如 [mail 或 mutt][2]。
|
||
|
||
由于我个人喜欢 mutt,我会在 box1 中使用它发送邮件给用户 tecmint,并把现有文件(mailbody.txt)作为信息内容:
|
||
|
||
# mutt -s "Part 9-RHCE series" tecmint@mydomain.com < mailbody.txt
|
||
|
||

|
||
|
||
*测试 Postfix 邮件服务器*
|
||
|
||
现在到中央邮件服务器(mail.mydomain.com)以 tecmint 用户登录,并检查是否收到了邮件:
|
||
|
||
# su – tecmint
|
||
# mail
|
||
|
||

|
||
|
||
*检查 Postfix 邮件服务器发送*
|
||
|
||
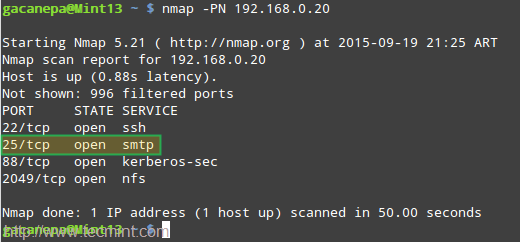
如果没有收到邮件,检查 root 用户的邮件池看看是否有警告或者错误提示。你也许需要使用 [nmap 命令][3]确保两台服务器运行了 SMTP 服务,并在中央邮件服务器中打开了 25 号端口:
|
||
|
||
# nmap -PN 192.168.0.20
|
||
|
||

|
||
|
||
*Postfix 邮件服务器错误处理*
|
||
|
||
### 总结 ###
|
||
|
||
像本文中展示的设置邮件服务器和中继主机是每个系统管理员必须拥有的重要技能,也代表了理解和安装更复杂情景的基础,例如一个邮件服务器托管有多个邮件账户(甚至成百上千)的域名。
|
||
|
||
(请注意这种类型的设置需要有 DNS 服务器,这不在本文的介绍范围),但你可以参照下面的文章设置 DNS 服务器:
|
||
|
||
- [在 CentOS/RHEL 07 上配置仅缓存的 DNS 服务器][4]
|
||
|
||
最后,我强烈建议你熟悉 Postfix 的配置文件(main.cf)和这个程序的帮助手册。如果有任何疑问,别犹豫,使用下面的评论框或者我们的论坛 Linuxsay.com 告诉我们吧,你会从世界各地的 Linux 高手中获得几乎是及时的帮助。
|
||
|
||
--------------------------------------------------------------------------------
|
||
|
||
via: http://www.tecmint.com/setup-postfix-mail-server-smtp-using-null-client-on-centos/
|
||
|
||
作者:[Gabriel Cánepa][a]
|
||
译者:[ictlyh](https//www.mutouxiaogui.cn/blog/)
|
||
校对:[wxy](https://github.com/wxy)
|
||
|
||
本文由 [LCTT](https://github.com/LCTT/TranslateProject) 原创编译,[Linux中国](https://linux.cn/) 荣誉推出
|
||
|
||
[a]:http://www.tecmint.com/author/gacanepa/
|
||
[1]:http://www.tecmint.com/install-thunderbird-17-in-ubuntu-xubuntu-linux-mint/
|
||
[2]:http://www.tecmint.com/send-mail-from-command-line-using-mutt-command/
|
||
[3]:http://www.tecmint.com/nmap-command-examples/
|
||
[4]:http://www.tecmint.com/setup-dns-cache-server-in-centos-7/ |