mirror of
https://github.com/LCTT/TranslateProject.git
synced 2024-12-26 21:30:55 +08:00
105 lines
6.8 KiB
Markdown
105 lines
6.8 KiB
Markdown
如何在树莓派中安装 Asterisk
|
||
============================================================
|
||
|
||
> 你是否在为小型企业或家庭办公室寻找电话系统?
|
||
|
||

|
||
|
||
>图片版权: Dwight Sipler 的 [Flickr][8]
|
||
|
||
你是否在为小型企业或家庭办公室寻找电话系统?我一直对可扩展 VoIP(Voice over IP)解决方案感兴趣,后来我在树莓派上找到 [Asterisk][9] 的一个实现。
|
||
|
||
我的好奇心被激起了,我决心尝试一下,所以我从 [Asterisk][11] 官网[下载][10]了它(RasPBX),然后使用我的树莓派 3 构建服务器。
|
||
|
||
### 准备开始
|
||
|
||
首先,我将下载的镜像刻录到 MicroSD 卡上。建议的最小值是 4 GB。将镜像传输到 MicroSD 卡并插到树莓派上的相应插槽中后,我将网线连接到树莓派和家庭路由器上的以太网端口中。
|
||
|
||
更多关于树莓派的内容:
|
||
|
||
* [什么是树莓派?][2]
|
||
* [开始使用树莓派][3]
|
||
* [给我们发送你的树莓派项目和教程][4]
|
||
|
||
接下来,我在 Linux 上打开一个终端,并输入 `ssh root@192.168.1.8`,这是我的服务器的 IP 地址。我被提示以 `root` 用户身份登录到 RasPBX 上。默认密码是 `raspberry`。 (出于安全考虑,如果你打算再多试试,请务必更改默认密码。)
|
||
|
||
当我登录到了 RasPBX 上的 shell 后,接下来我需要准备配置了。根据网站上提供的[文档][12],我在 shell 下输入 `regen-hostkeys` 来创建新的主机密钥。然后输入 `configure-timezone` 来配置服务器的时区。我通过在提示符下输入 `dpkg-reconfigure locales` 来配置区域设置。我也安装了 [Fail2Ban][13] 来保障服务器的安全性。
|
||
|
||
现在我准备测试我的配置。
|
||
|
||
### 测试
|
||
|
||
我从 RasPBX 的 shell 中登出,然后打开浏览器并输入我的服务器的 IP 地址。将服务器 IP 地址加载到浏览器中,我看到了一个可爱的登录页面。
|
||
|
||
[FreePBX][14] 提供了一个非常好的基于 Web 的开源图形用户界面,我用它来控制和配置 Asterisk(可在 [GitHub][15] 上找到)。(FreePBX 是 GPL 许可的)。我用它来完成其余的配置。FreePBX 的默认登录账号为用户名:`admin`; 密码:`admin`。
|
||
|
||

|
||
|
||
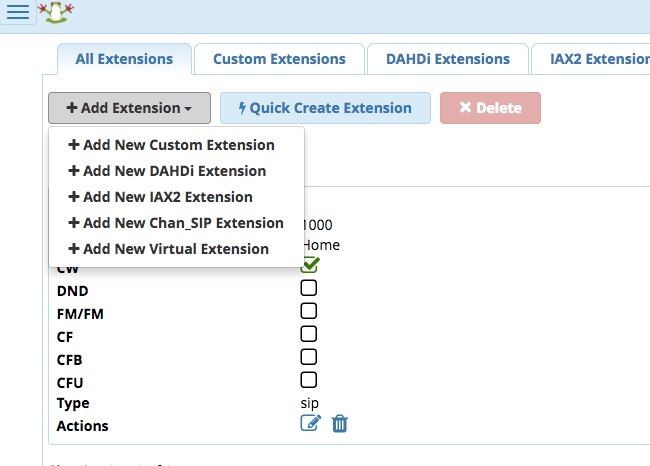
登录之后,我进入位于显示屏左上方的<ruby>应用菜单<rt>Application Menu</rt></ruby>。点击菜单链接并选择了第二个选项,即 <ruby>“应用”<rt>Applications</rt></ruby>,接着选择了第四个选项,<ruby>“分机”<rt>Extensions</rt></ruby>。从那里我选择创建一个 New Chan_Sip 分机。
|
||
|
||

|
||
|
||
我使用密码配置了一个 sip 分机用户。密码是自动生成的,也可以选择创建自己的密码。
|
||
|
||
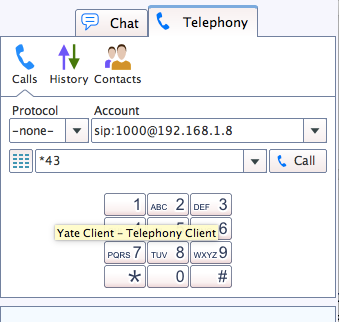
现在我有了一个完整的分机,我急于尝试我的新的 VoIP 服务器。我下载并安装了 [Yate 客户端][16],这是在构建服务器的过程中发现的。安装 [Yate][17] 之后,我想测试与服务器的连接。我发现我可以使用 Yate 连接到服务器并输入 `*43` 进行回声测试。当我听到客户端指示时,我感到很激动。
|
||
|
||

|
||
|
||
我决定创建另外一个 sip 分机,这样我就可以测试系统的语音信箱功能。 在完成后,我使用 Yate 客户端来呼叫这个分机,并留下了简短的语音留言。然后再次使用 Yate 呼叫该分机并输入 `*97` 来检索语音留言。然后我想看看我是否可以使用我的新服务器来呼叫外线。返回到菜单,选择 <ruby>“连接”<rt>Connectivity</rt></ruby> 选项,并添加了 Google Voice 号码。
|
||
|
||

|
||
|
||
接着我返回到 “连接” 菜单,并将 Google Voice 添加到出站路由中。
|
||
|
||

|
||
|
||
### 完成一个呼叫
|
||
|
||
回到 Yate 客户端,我呼叫了一个外线并成功完成了这个呼叫。
|
||
|
||
我相信这个特定的 VoIP 解决方案可以轻松地为一个小型办公室工作。根据 RasPBX 网站的[常见问题][18]部分,典型的树莓派系统可以在树莓派 1 上支持多达 10 个并发呼叫。
|
||
|
||
Asterisk 有很多细微差别的功能,FreePBX 则可以很容易地利用它们。
|
||
|
||
_关于树莓派上的 Asterisk 的更多信息,请参考他们的[博客][5]。你可以在他们的网站上找到有关[ FreePBX 源代码][6]的其他信息。_
|
||
|
||
--------------------------------------------------------------------------------
|
||
|
||
作者简介:
|
||
|
||
Don Watkins - 教育家、教育技术专家、企业家、开源倡导者。教育心理学硕士、教育领导硕士、Linux 系统管理员、CCNA、使用 Virtual Box 虚拟化。关注我 @Don_Watkins。
|
||
|
||
----------
|
||
|
||
|
||
via: https://opensource.com/article/17/4/asterisk-raspberry-pi-3
|
||
|
||
作者:[Don Watkins][a]
|
||
译者:[geekpi](https://github.com/geekpi)
|
||
校对:[jasminepeng](https://github.com/jasminepeng)
|
||
|
||
本文由 [LCTT](https://github.com/LCTT/TranslateProject) 原创编译,[Linux中国](https://linux.cn/) 荣誉推出
|
||
|
||
[a]:https://opensource.com/users/don-watkins
|
||
[1]:https://opensource.com/tags/raspberry-pi?src=raspberry_pi_resource_menu
|
||
[2]:https://opensource.com/resources/what-raspberry-pi?src=raspberry_pi_resource_menu
|
||
[3]:https://opensource.com/article/16/12/getting-started-raspberry-pi?src=raspberry_pi_resource_menu
|
||
[4]:https://opensource.com/article/17/2/raspberry-pi-submit-your-article?src=raspberry_pi_resource_menu
|
||
[5]:http://www.raspberry-asterisk.org/blog/
|
||
[6]:https://www.freepbx.org/development/source-code/
|
||
[7]:https://opensource.com/article/17/4/asterisk-raspberry-pi-3?rate=zM9tOp0HEPyOUq31Np__W0QNnuAfWATkdkixOdSysDY
|
||
[8]:http://www.flickr.com/photos/photofarmer/272567650/
|
||
[9]:http://www.asterisk.org/
|
||
[10]:http://download.raspberry-asterisk.org/raspbx-28-01-2017.zip
|
||
[11]:http://www.raspberry-asterisk.org/downloads/
|
||
[12]:http://www.raspberry-asterisk.org/documentation/
|
||
[13]:http://www.raspberry-asterisk.org/documentation/#fail2ban
|
||
[14]:https://www.freepbx.org/
|
||
[15]:https://github.com/asterisk/asterisk/blob/master/LICENSE
|
||
[16]:http://yateclient.yate.ro/index.php/Download/Download
|
||
[17]:https://en.wikipedia.org/wiki/Yate_(telephony_engine)
|
||
[18]:http://www.raspberry-asterisk.org/faq/
|
||
[19]:https://opensource.com/user/15542/feed
|
||
[20]:https://opensource.com/article/17/4/asterisk-raspberry-pi-3#comments
|
||
[21]:https://opensource.com/users/don-watkins
|