mirror of
https://github.com/LCTT/TranslateProject.git
synced 2025-01-22 23:00:57 +08:00
154 lines
8.1 KiB
Markdown
154 lines
8.1 KiB
Markdown
vim-kakali translating
|
||
|
||
|
||
How to record a region of your desktop as animated GIF on Linux
|
||
============================================================
|
||
|
||
### On this page
|
||
|
||
1. [Gifine][1]
|
||
2. [Gifine Download/Installation/Setup][2]
|
||
3. [Gifine Usage][3]
|
||
4. [Conclusion][4]
|
||
|
||
It won't be a stretch to say - and you'll likely agree - that animated gifs have become a rage in the past few years. While one of the most popular uses of animated gifs is to add humor to the text-based conversation that people usually have online, there are many other areas where these animations prove to be really useful.
|
||
|
||
Those in technical spheres usually use animated gifs to quickly describe how a problem or an error gets triggered. It's also a useful way of explaining how a particular feature in a software application works. You can easily use gifs in online forums, your company presentations, and more.
|
||
|
||
Now, suppose you have various applications opened on your Linux desktop, and for whatever purpose, you want to create an animated gif out of your activity with a particular application that's occupying only a small area of your desktop. What would you do? Obviously, look for a tool that lets you do the same.
|
||
|
||
If you've been looking for one such tool that lets you record a particular region of you desktop and then automatically convert the recording into an animated gif, then look no further, as in this tutorial, we will discuss a Linux command line utility that lets you do just that.
|
||
|
||
Before we proceed, keep in mind that all the examples in this tutorial have been tested on Ubuntu 14.04 with Bash version 4.3.11(1).
|
||
|
||
### Gifine
|
||
|
||
The tool in question is [Gifine][5]. It is is basically a GTK application implemented in MoonScript using lgi. Gifine not only lets you record your desktop screen and create animated gifs or video, but also lets you stitch together short gifs or videos.
|
||
|
||
According to the application's developer: "You can either load a directory of frames, or select a region of your desktop to record. After loading some frames, you can scroll through them and trim out what isn't necessary. When you've finalized the video you can export to gif or mp4.".
|
||
|
||
### Gifine Download/Installation/Setup
|
||
|
||
Before we go ahead and tell you the steps to download and install Gifine, it's worth mentioning that the tool has several dependencies that you need to install before installing the tool itself.
|
||
|
||
The first dependency that you need to install is FFmpeg, which is basically a cross-platform solution to record, convert and stream audio and video. Following is the command that should install the tool:
|
||
|
||
```
|
||
sudo apt-get install ffmpeg
|
||
```
|
||
|
||
Next up is GraphicsMagick, which is basically an image processing system. "It provides a robust and efficient collection of tools and libraries which support reading, writing, and manipulating an image in over 88 major formats including important formats like DPX, GIF, JPEG, JPEG-2000, PNG, PDF, PNM, and TIFF," the tool's official website says.
|
||
|
||
Following is the command to download and install it:
|
||
|
||
```
|
||
sudo apt-get install graphicsmagick
|
||
```
|
||
|
||
Next up is a tool dubbed XrectSel. It's basically an application that tells you the geometry of a rectangular screen region which you have selected by dragging the mouse/pointer. The only way to install XrectSel is from source, which you can download by heading [here][6].
|
||
|
||
Once you've downloaded theXrectSel source code on your system, the next step is extract the downloaded archive and enter the top-level directory on a command line terminal. Once there, run the following commands:
|
||
|
||
```
|
||
./bootstrap
|
||
```
|
||
|
||
The above command is required if ./configure is not present
|
||
|
||
```
|
||
./configure --prefix /usr
|
||
|
||
make
|
||
|
||
make DESTDIR="$directory" install
|
||
```
|
||
|
||
Moving on, the last dependency is Gifsicle. It's a command-line tool for creating, editing, and getting information about GIF images and animations. Downloading and installing Gifsicle is quite easy - all you need to do is to run the following command:
|
||
|
||
```
|
||
sudo apt-get install gifsicle
|
||
```
|
||
|
||
So that was all about the dependencies. Now, let us come to the installation of Gifine. The following two commands will do the needful:
|
||
|
||
```
|
||
sudo apt-get install luarocks
|
||
|
||
sudo luarocks install --server=http://luarocks.org/dev gifine
|
||
```
|
||
|
||
Please note that the second command above may give you the following error:
|
||
|
||
```
|
||
No package 'gobject-introspection-1.0' found
|
||
```
|
||
|
||
In that case, you need to install the package using the following command:
|
||
|
||
```
|
||
sudo apt-get install libgirepository1.0-dev
|
||
```
|
||
|
||
And then run the 'luarocks install' command again.
|
||
|
||
### Gifine Usage
|
||
|
||
Once you're done with the installation part, you can launch the tool using the following command:
|
||
|
||
```
|
||
gifine
|
||
```
|
||
|
||
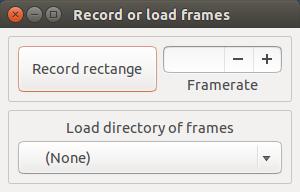
The application's UI looks like this:
|
||
|
||
[
|
||

|
||
][7]
|
||
|
||
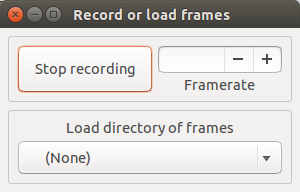
So you have a couple of options here: record frames and load frames. If you click the Record rectangle button, then your mouse pointer gets converted into a +, allowing you to select a rectangular area on your screen. As soon as you are done selecting an area, the recording begins, and the 'Record rectangle' button is replaced by a 'Stop recording' button.
|
||
|
||
[
|
||

|
||
][8]
|
||
|
||
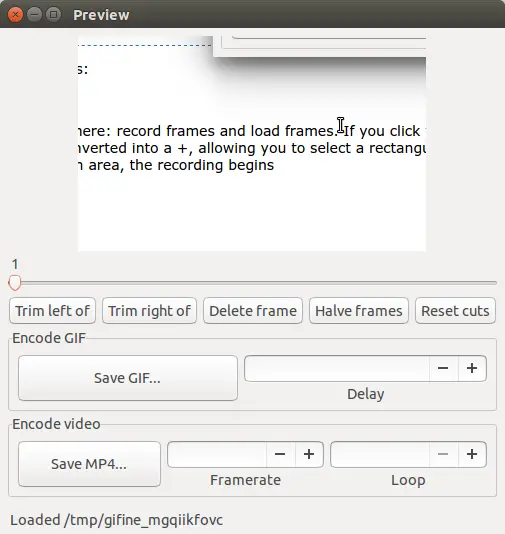
As soon as you are done with the recording, click the 'Stop recording' button and you'll see that the Gifine window shows several buttons.
|
||
|
||
[
|
||

|
||
][9]
|
||
|
||
The upper part of the UI contains the recording, which you can see frame by frame using the slider below it. Suppose you want to delete all the frames before frame 5 or after frame 50, then this can be done using the Trim left of and Trim right of buttons. Then there are also buttons to delete a particular frame, half the number of frames, as well as reset any frame cuts that you've made.
|
||
|
||
Once you are done with all the editing part, use the Save GIF... or Save MP4... buttons to save the recording as an animated gif or a video. There are options to set frame delay, frame rate, and number of loops as well.
|
||
|
||
Please keep in mind that "the recorded frames recorded aren't automatically cleaned up. You can find them in your `/tmp` dir if you want to reload a session. Use the load directory button on the initial screen.".
|
||
|
||
### Conclusion
|
||
|
||
There's not much of a learning curve associated with Gifine - all the features are available in the form of buttons, and the text on them makes their functionality self explanatory.
|
||
|
||
The only issue for me was the installation part - installing so many dependencies one by one and then dealing with errors that may pop up could be a big no no for many. But otherwise, on the whole, Gifine is a nice tool that does what it promises, and if that's what you were looking for, do give it a try.
|
||
|
||
Already a Gifine user? How has your experience been so far? Let us known in comments below.
|
||
|
||
--------------------------------------------------------------------------------
|
||
|
||
via: https://www.howtoforge.com/tutorial/record-screen-to-animated-gif-on-linux/
|
||
|
||
作者:[Ansh][a]
|
||
译者:[译者ID](https://github.com/译者ID)
|
||
校对:[校对者ID](https://github.com/校对者ID)
|
||
|
||
本文由 [LCTT](https://github.com/LCTT/TranslateProject) 原创编译,[Linux中国](https://linux.cn/) 荣誉推出
|
||
|
||
[a]:https://www.howtoforge.com/tutorial/record-screen-to-animated-gif-on-linux/
|
||
[1]:https://www.howtoforge.com/tutorial/record-screen-to-animated-gif-on-linux/#gifine
|
||
[2]:https://www.howtoforge.com/tutorial/record-screen-to-animated-gif-on-linux/#gifine-downloadinstallationsetup
|
||
[3]:https://www.howtoforge.com/tutorial/record-screen-to-animated-gif-on-linux/#gifine-usage
|
||
[4]:https://www.howtoforge.com/tutorial/record-screen-to-animated-gif-on-linux/#conclusion
|
||
[5]:https://github.com/leafo/gifine
|
||
[6]:https://github.com/lolilolicon/xrectsel
|
||
[7]:https://www.howtoforge.com/images/record-screen-to-animated-gif-on-linux/big/gifine-ui.png
|
||
[8]:https://www.howtoforge.com/images/record-screen-to-animated-gif-on-linux/big/gifine-stop-rec.png
|
||
[9]:https://www.howtoforge.com/images/record-screen-to-animated-gif-on-linux/big/gifine-post-rec.png
|