mirror of
https://github.com/LCTT/TranslateProject.git
synced 2024-12-26 21:30:55 +08:00
141 lines
4.6 KiB
Markdown
141 lines
4.6 KiB
Markdown
如何在 Linux 中添加一块大于 2TB 的新磁盘
|
||
============================================================
|
||
|
||
你有没有试过使用 [fdisk][1] 对大于 2TB 的硬盘进行分区,并且纳闷为什么会得到需要使用 GPT 的警告? 是的,你看到的没错。我们无法使用 fdisk 对大于 2TB 的硬盘进行分区。
|
||
|
||
在这种情况下,我们可以使用 `parted` 命令。它的主要区别在于 fdisk 使用 DOS 分区表格式而 parted 使用 GPT 格式。
|
||
|
||
提示:你可以使用 `gdisk` 来代替 `parted`。
|
||
|
||
在本文中,我们将介绍如何将大于 2TB 的新磁盘添加到现有的 Linux 服务器中(如 RHEL/CentOS 或 Debian/Ubuntu)中。
|
||
|
||
我使用的是 `fdisk` 和 `parted` 来进行此配置。
|
||
|
||
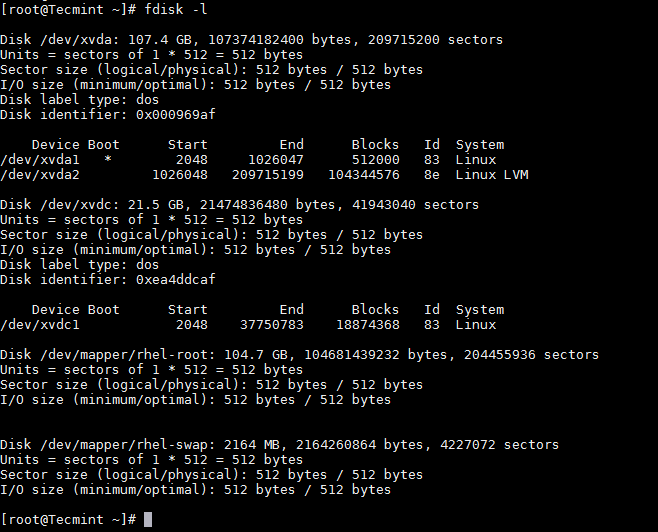
首先使用 `fdisk` 命令列出当前的分区详细信息,如图所示。
|
||
|
||
```
|
||
# fdisk -l
|
||
```
|
||
[
|
||

|
||
][2]
|
||
|
||
*列出 Linux 分区表*
|
||
|
||
为了本文的目的,我加了一块 20GB 的磁盘,这也可以是大于 2TB 的磁盘。在你加完磁盘后,使用相同的 `fdisk` 命令验证分区表。
|
||
|
||
```
|
||
# fdisk -l
|
||
```
|
||
[
|
||

|
||
][3]
|
||
|
||
*列出新的分区表*
|
||
|
||
提示:如果你添加了一块物理磁盘,你可能会发现分区已经创建了。此种情况下,你可以在使用 `parted` 之前使用 `fdisk` 删除它。
|
||
|
||
```
|
||
# fdisk /dev/xvdd
|
||
```
|
||
|
||
在命令中使用 `d` 开关删除分区,使用 `w` 保存更改并退出。
|
||
|
||
[
|
||

|
||
][4]
|
||
|
||
*删除 Linux 分区*
|
||
|
||
**重要:在删除分区时你需要小心点。这会擦除磁盘上的数据。**
|
||
|
||
现在是使用 `parted` 命令分区新的磁盘了。
|
||
|
||
```
|
||
# parted /dev/xvdd
|
||
```
|
||
|
||
将分区表格式化成 GPT
|
||
|
||
```
|
||
(parted) mklabel gpt
|
||
```
|
||
|
||
创建主分区并分配磁盘容量,这里我使用 20GB (在你这里可能是 2TB)。
|
||
|
||
```
|
||
(parted) mkpart primary 0GB 20GB
|
||
```
|
||
[
|
||

|
||
][5]
|
||
|
||
*使用 parted 创建分区*
|
||
|
||
出于好奇,让我们用 `fdisk` 看看新的分区。
|
||
|
||
```
|
||
# fdisk /dev/xvdd
|
||
```
|
||
[
|
||

|
||
][6]
|
||
|
||
*验证分区细节*
|
||
|
||
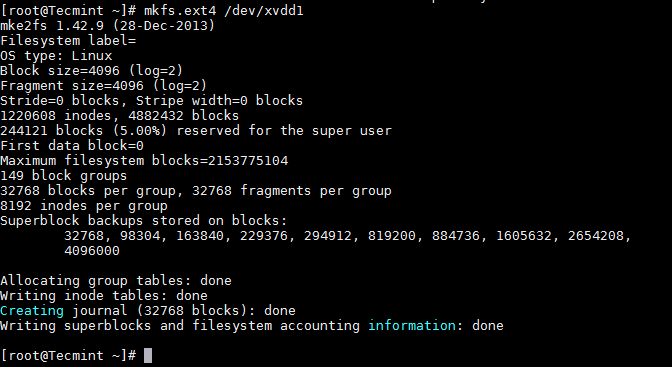
现在格式化并挂载分区,并在 `/etc/fstab` 添加相同的信息,它控制在系统启动时挂载文件系统。
|
||
|
||
```
|
||
# mkfs.ext4 /dev/xvdd1
|
||
```
|
||
[
|
||

|
||
][7]
|
||
|
||
*格式化 Linux 分区*
|
||
|
||
一旦分区格式化之后,是时候在 `/data1` 下挂载分区了。
|
||
|
||
```
|
||
# mount /dev/xvdd1 /data1
|
||
```
|
||
|
||
要永久挂载,在 `/etc/fstab` 添加条目。
|
||
|
||
```
|
||
/dev/xvdd1 /data1 ext4 defaults 0 0
|
||
```
|
||
|
||
重要:要使用 GPT 分区格式需要内核支持。默认上 RHEL/CentOS 的内核已经支持 GPT,但是对于 Debian/Ubuntu,你需要在修改配置之后重新编译内核。
|
||
|
||
就是这样了!在本文中,我们向你展示了如何使用 `parted` 命令。与我们分享你的评论和反馈。
|
||
|
||
--------------------------------------------------------------------------------
|
||
|
||
作者简介:
|
||
|
||
我在包括 IBM-AIX、Solaris、HP-UX 以及 ONTAP 和 OneFS 存储技术的不同平台上工作,并掌握 Oracle 数据库。
|
||
|
||
-----------------------
|
||
|
||
via: http://www.tecmint.com/add-disk-larger-than-2tb-to-an-existing-linux/
|
||
|
||
作者:[Lakshmi Dhandapani][a]
|
||
译者:[geekpi](https://github.com/geekpi)
|
||
校对:[wxy](https://github.com/wxy)
|
||
|
||
本文由 [LCTT](https://github.com/LCTT/TranslateProject) 原创编译,[Linux中国](https://linux.cn/) 荣誉推出
|
||
|
||
[a]:http://www.tecmint.com/author/lakshmi/
|
||
|
||
[1]:http://www.tecmint.com/fdisk-commands-to-manage-linux-disk-partitions/
|
||
[2]:http://www.tecmint.com/wp-content/uploads/2017/04/List-Linux-Partition-Table.png
|
||
[3]:http://www.tecmint.com/wp-content/uploads/2017/04/List-New-Partition-Table.png
|
||
[4]:http://www.tecmint.com/wp-content/uploads/2017/04/Delete-Linux-Partition.png
|
||
[5]:http://www.tecmint.com/wp-content/uploads/2017/04/Create-Partition-using-Parted.png
|
||
[6]:http://www.tecmint.com/wp-content/uploads/2017/04/Verify-Partition-Details.png
|
||
[7]:http://www.tecmint.com/wp-content/uploads/2017/04/Format-Linux-Partition.png
|
||
[8]:http://www.tecmint.com/author/lakshmi/
|
||
[9]:http://www.tecmint.com/10-useful-free-linux-ebooks-for-newbies-and-administrators/
|
||
[10]:http://www.tecmint.com/free-linux-shell-scripting-books/
|