11 KiB
Getting started with Jenkins X
Jenkins X provides continuous integration, automated testing, and continuous delivery to Kubernetes.

Jenkins X is an open source system that offers software developers continuous integration, automated testing, and continuous delivery, known as CI/CD, in Kubernetes. Jenkins X-managed projects get a complete CI/CD process with a Jenkins pipeline that builds and packages project code for deployment to Kubernetes and access to pipelines for promoting projects to staging and production environments.
Developers are already benefiting from running "classic" open source Jenkins and CloudBees Jenkins on Kubernetes, thanks in part to the Jenkins Kubernetes plugin, which allows you to dynamically spin-up Kubernetes pods to run Jenkins build agents. Jenkins X adds what's missing from Jenkins: comprehensive support for continuous delivery and managing the promotion of projects to preview, staging, and production environments running in Kubernetes.
This article is a high-level explanation of how Jenkins X works; it assumes you have some knowledge of Kubernetes and classic Jenkins.
What you get with Jenkins X
If you're running on one of the major cloud providers (Amazon Elastic Container Service for Kubernetes, Google Kubernetes Engine, or Microsoft Azure Kubernetes Service), installing and deploying Jenkins X is easy. Download the Jenkins X command-line interface and run the jx create cluster command. You'll be prompted for the necessary information and, if you take the defaults, Jenkins X will create a starter-size Kubernetes cluster and install Jenkins X.
When you deploy Jenkins X, a number of services are put in motion to watch your Git repositories and respond by building, testing, and promoting your applications to staging, production, and other environments you define. Jenkins X also deploys a set of supporting services, including Jenkins, Docker Registry, Chart Museum, and Monocular to manage Helm charts, and Nexus, which serves as a Maven and npm repository.
The Jenkins X deployment also creates two Git repositories, one for your staging environment and one for production. These are in addition to the Git repositories you use to manage your project source code. Jenkins X uses these repositories to manage what is deployed to each environment, and promotions are done via Git pull requests (PRs)—this approach is known as GitOps. Each repository contains a Helm chart that specifies the applications to be deployed to the corresponding environment. Each repository also has a Jenkins pipeline to handle promotions.
Creating a new project with Jenkins X
To create a new project with Jenkins X, use the jx create quickstart command. If you don't specify any options, jx will prompt you to select a project name and a platform—which can be just about anything. SpringBoot, Go, Python, Node, ASP.NET, Rust, Angular, and React are all supported, and the list keeps growing. Once you have chosen your project name and platform, Jenkins X will:
- Create a new project that includes a "hello-world"-style web project
- Add the appropriate type of makefile or build script for the chosen platform
- Add a Jenkinsfile to manage promotions to staging and production environments
- Add a Dockerfile and Helm charts, created via Draft
- Add a Skaffold configuration for deploying the application to Kubernetes
- Create a Git repository and push the new project code there
Next, a webhook from Git will notify Jenkins X that a project changed, and it will run your project's Jenkins pipeline to build and push your Docker image and Helm charts.
Finally, the pipeline will submit a PR to the staging environment's Git repository with the changes needed to promote the application.
Once the PR is merged, the staging pipeline will run to apply those changes and do the promotion. A couple of minutes after creating your project, you'll have end-to-end CI/CD, and your project will be running in staging and available for use.
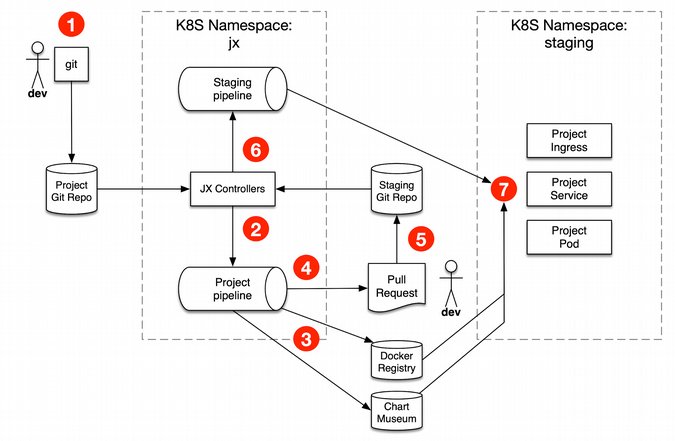
Developer commits changes, project deployed to the staging environment.
The figure above illustrates the repositories, registries, and pipelines and how they interact in a Jenkins X promotion to staging. Here are the steps:
- The developer commits and pushes the change to the project's Git repository
- Jenkins X is notified and runs the project's Jenkins pipeline in a Docker image that includes the project's language and supporting frameworks
- The project pipeline builds, tests, and pushes the project's Helm chart to Chart Museum and its Docker image to the registry
- The project pipeline creates a PR with changes needed to add the project to the staging environment
- Jenkins X automatically merges the PR to Master
- Jenkins X is notified and runs the staging pipeline
- The staging pipeline runs Helm, which deploys the environment, pulling Helm charts from Chart Museum and Docker images from the Docker registry. Kubernetes creates the project's resources, typically a pod, service, and ingress.
Importing your existing projects into Jenkins X
jx import , Jenkins X adds the things needed for your project to be deployed to Kubernetes and participate in CI/CD. It will add a Jenkins pipeline, Helm charts, and a Skaffold configuration for deploying the application to Kubernetes. Jenkins X will create a Git repository and push the changes there. Next, a webhook from Git will notify Jenkins X that a project changed, and promotion to staging will happen as described above for new projects.
Promoting your project to production
When you import a project via, Jenkins X adds the things needed for your project to be deployed to Kubernetes and participate in CI/CD. It will add a Jenkins pipeline, Helm charts, and a Skaffold configuration for deploying the application to Kubernetes. Jenkins X will create a Git repository and push the changes there. Next, a webhook from Git will notify Jenkins X that a project changed, and promotion to staging will happen as described above for new projects.
To promote a version of your project to the production environment, use the jx promote command. This command will prepare a Git PR that contains the Helm chart changes needed to deploy into the production environment and submit this request to the production environment's Git repository. Once the request is manually approved, Jenkins X will run the production pipeline to deploy your project via Helm.
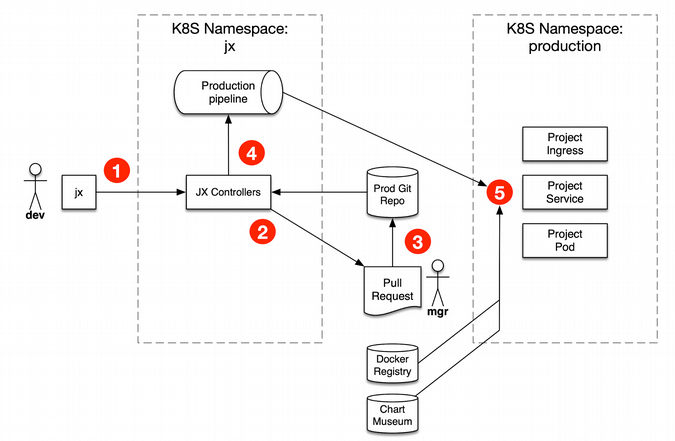
Developer promotes the project to production.
This figure illustrates the repositories, registries, and pipelines and how they interact in a Jenkins X promotion to production. Here are the steps:
- The developer runs the jx promote command to promote a project to production
- Jenkins X creates a PR with changes needed to add the project to the production environment
- The developer manually approves the PR, and it is merged to Master
- Jenkins X is notified and runs the production pipeline
- The production pipeline runs Helm, which deploys the environment, pulling Helm charts from Chart Museum and Docker images from the Docker registry. Kubernetes creates the project's resources, typically a pod, service, and ingress.
Other features of Jenkins X
Other interesting and appealing features of Jenkins X include:
Preview environments
When you create a PR to add a new feature to your project, you can ask Jenkins X to create a preview environment so you can make your new feature available for preview and testing before the PR is merged.
Extensions
It is possible to create extensions to Jenkins X. An extension is code that runs at specific times in the CI/CD process. An extension can provide code that runs when the extension is installed, uninstalled, as well as before and after each pipeline.
Serverless Jenkins
Instead of running the Jenkins web application, which continually consumes CPU and memory resources, you can run Jenkins only when you need it. During the past year, the Jenkins community created a version of Jenkins that can run classic Jenkins pipelines via the command line with the configuration defined by code instead of HTML forms.
This capability is now available in Jenkins X. When you create a Jenkins X cluster, you can choose to use Serverless Jenkins. If you do, Jenkins X will deploy Prow to handle webhooks from GitHub and Knative to run Jenkins pipelines.
Jenkins X limitations
Jenkins X also has some limitations that should be considered:
- Jenkins X is currently limited to projects that use Git: Jenkins X is opinionated about CI/CD and assumes everybody wants to run and deploy software to Kubernetes and everybody is happy to use Git for source code and defining environments. Also, the Serverless Jenkins feature currently works only with GitHub.
- Jenkins X is limited to Kubernetes: It is true that Jenkins X can run automated builds, testing, and continuous integration for any type of software, but the continuous delivery part targets a Kubernetes namespace managed by Jenkins X.
- Jenkins X requires cluster-admin level Kubernetes access: Jenkins X needs cluster-admin access so it can define and manage a Kubernetes custom resource definition. Hopefully, this is a temporary limitation, because it could be a show-stopper for some.
Conclusions
Jenkins X looks to be a good way to implement CI/CD for Kubernetes, and I'm looking forward to putting it to the test in production. Using Jenkins X is also a good way to learn about some useful open source tools for deploying to Kubernetes, including Helm, Draft, Skaffold, Prow, and more. These are things you might want to use even if you decide Jenkins X is not for you. If you're deploying to Kubernetes, take Jenkins X for a spin.
via: https://opensource.com/article/18/11/getting-started-jenkins-x
作者:Dave Johnson 选题:lujun9972 译者:译者ID 校对:校对者ID

