9.7 KiB
Play Doom on Kubernetes
Terminate pods while having fun by playing Kube DOOM.

Do you ever feel nostalgic for Doom and other blocky video games, the ones that didn't require much more than a mouse and the hope that you could survive on a LAN with your friends? You know what I'm talking about; the days when your weekends were consumed with figuring out how you could travel with your desktop and how many Mountain Dews you could fit in your cargo pants pockets? If this memory puts a warm feeling in your heart, well, this article is for you.
Get ready to play Doom again, only this time you'll be playing for a legitimate work reason: doing chaos engineering. I'll be using my fork of Kube DOOM (with a new Helm chart because that's how I sometimes spend my weekends). I also have a pull request with the original Kube DOOM creator that I'm waiting to hear about.
The first article in this series explained what chaos engineering is, and the second demonstrated how to get your system's steady state so that you can compare it against a chaos state. In the next few articles, I introduced some chaos engineering tools you can use: Litmus for testing arbitrary failures and experiments in your Kubernetes cluster; Chaos Mesh, an open source chaos orchestrator with a web user interface; and Kube-monkey for stress-testing your systems by scheduling random termination pods in your cluster.
In this sixth article, I'll use Pop!_OS 20.04, Helm 3, Minikube 1.14.2, a VNC viewer, and Kubernetes 1.19.
Configure Minikube
If you haven't already, install Minikube in whatever way that makes sense for your environment. If you have enough resources, I recommend giving your virtual machine a bit more than the default memory and CPU power:
$ minikube config set memory 8192
❗  These changes will take effect upon a minikube delete and then a minikube start
$ minikube config set cpus 6
❗  These changes will take effect upon a minikube delete and then a minikube start
Then start and check the status of your system:
$ minikube start
😄  minikube v1.14.2 on Debian bullseye/sid
🎉  minikube 1.19.0 is available! Download it: <https://github.com/kubernetes/minikube/releases/tag/v1.19.0>
💡  To disable this notice, run: 'minikube config set WantUpdateNotification false'

✨  Using the docker driver based on user configuration
👍  Starting control plane node minikube in cluster minikube
🔥  Creating docker container (CPUs=6, Memory=8192MB) ...
🐳  Preparing Kubernetes v1.19.0 on Docker 19.03.8 ...
🔎  Verifying Kubernetes components...
🌟  Enabled addons: storage-provisioner, default-storageclass
🏄  Done! kubectl is now configured to use "minikube" by default
$ minikube status
minikube
type: Control Plane
host: Running
kubelet: Running
apiserver: Running
kubeconfig: Configured
Preinstall pods with Helm
Before moving forward, you'll need to deploy some pods into your cluster. To do this, I generated a simple Helm chart and changed the replicas in my values file from 1 to 8.
If you need to generate a Helm chart, you can read my article on creating a Helm chart for guidance. I created a Helm chart named nginx and created a namespace to install my chart into using the commands below.
Create a namespace:
`$ kubectl create ns nginx`
Install the chart in your new namespace with a name:
$ helm install chaos-pods nginx -n nginx

NAME: chaos-pods
LAST DEPLOYED: Sun May 23 10:15:52 2021
NAMESPACE: nginx
STATUS: deployed
REVISION: 1
NOTES:
1\. Get the application URL by running these commands:
  export POD_NAME=$(kubectl get pods --namespace nginx -l "app.kubernetes.io/name=nginx,app.kubernetes.io/instance=chaos-pods" -o jsonpath="{.items[0].metadata.name}")
  export CONTAINER_PORT=$(kubectl get pod --namespace nginx $POD_NAME -o jsonpath="{.spec.containers[0].ports[0].containerPort}")
  echo "Visit <http://127.0.0.1:8080> to use your application"
  kubectl --namespace nginx port-forward $POD_NAME 8080:$CONTAINER_PORT
Install Kube DOOM
You can use any Virtual Network Computer (VNC) viewer you want; I installed TigerVNC on my Linux box. There are several ways you can set up Kube DOOM. Before I generated my Helm chart, you could set it up with kind or use it locally with Docker, and the README contains instructions for those uses.
Get started with a git clone:
$ git clone [git@github.com][15]:Alynder/kubedoom.git
Cloning into 'kubedoom'...
Then change directory into the kubedoom/helm folder:
`$ cd kubedoom/helm/`
Since the base values file is already set up correctly, you just need to run a single install command:
$ helm install kubedoom kubedoom/ -n kubedoom
NAME: kubedoom
LAST DEPLOYED: Mon May 31 11:16:58 2021
NAMESPACE: kubedoom
STATUS: deployed
REVISION: 1
NOTES:
1\. Get the application URL by running these commands:
  export NODE_PORT=$(kubectl get --namespace kubedoom -o jsonpath="{.spec.ports[0].nodePort}" services kubedoom-kubedoom-chart)
  export NODE_IP=$(kubectl get nodes --namespace kubedoom -o jsonpath="{.items[0].status.addresses[0].address}")
  echo http://$NODE_IP:$NODE_PORT
Everything should be installed, set up, and ready to go.
Play with Kube DOOM
Now you just need to get in there, run a few commands, and start playing your new chaos video game. The first command is a port forward, followed by the VNC viewer connection command. The VNC viewer connection needs a password, which is idbehold.
Find your pod for the port forward:
$ kubectl get pods -n kubedoom
NAME                                       READY   STATUS    RESTARTS   AGE
kubedoom-kubedoom-chart-676bcc5c9c-xkwpp   1/1     Running   0          68m
Run the port-forward command using your pod name:
$  kubectl port-forward  kubedoom-kubedoom-chart-676bcc5c9c-xkwpp 5900:5900 -n kubedoom
Forwarding from 127.0.0.1:5900 -> 5900
Forwarding from [::1]:5900 -> 5900
Everything is ready to play, so you just need to run the VNC viewer command (shown below with output):
$  vncviewer viewer localhost:5900

TigerVNC Viewer 64-bit v1.10.1
Built on: 2020-04-09 06:49
Copyright (C) 1999-2019 TigerVNC Team and many others (see README.rst)
See <https://www.tigervnc.org> for information on TigerVNC.

Mon May 31 11:33:23 2021
 DecodeManager: Detected 64 CPU core(s)
 DecodeManager: Creating 4 decoder thread(s)
 CConn:       Connected to host localhost port 5900
Next, you'll see the password request, so enter it (idbehold, as given above).
(Jess Cherry, CC BY-SA 4.0)
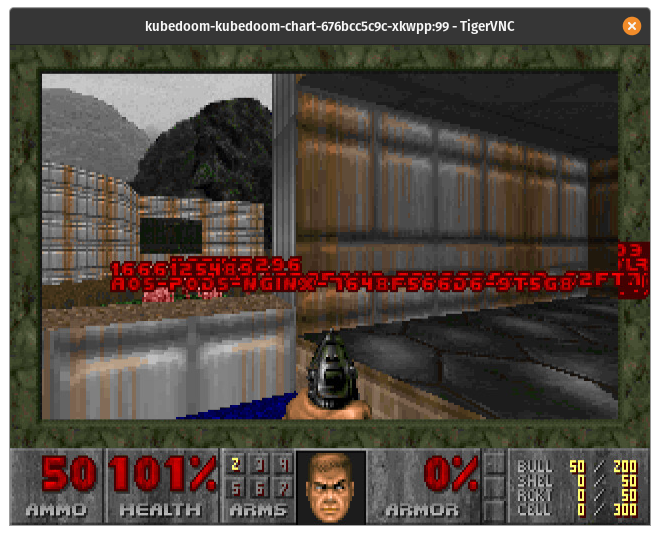
Once you are logged in, you should be able to walk around and see your enemies with pod names.
(Jess Cherry, CC BY-SA 4.0)
I'm terrible at this game, so I use some cheats to have a little more fun:
- Type
idspispopdto walk straight through a wall to get to your army of pods. - Can't handle the gun? That's cool; I'm bad at it, too. If you type
idkfaand press the number 5, you'll get a better weapon.
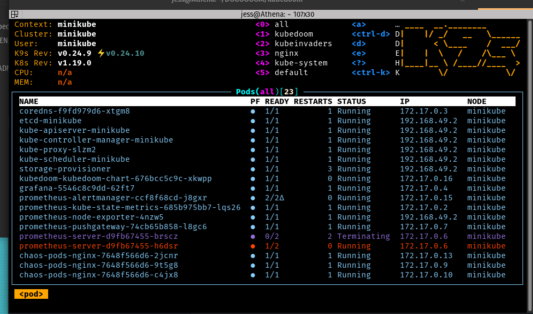
This is what it looks like when you kill something (I used k9s for this view).
(Jess Cherry, CC BY-SA 4.0)
Final notes
Because this application requires a cluster-admin role, you have to really pay attention to the names of the pods—you might run into a kube-system pod, and you'd better run away. If you kill one of those pods, you will kill an important part of the system.
I love this application because it's the quickest gamified way to do chaos engineering. It did remind me of how bad I was at this video game, but it was hilarious to try it. Happy hunting!
via: https://opensource.com/article/21/6/kube-doom
作者:Jessica Cherry 选题:lujun9972 译者:译者ID 校对:校对者ID


