mirror of
https://github.com/LCTT/TranslateProject.git
synced 2025-01-22 23:00:57 +08:00
177 lines
8.2 KiB
Markdown
177 lines
8.2 KiB
Markdown
在 Linux 系统下使用 PhotoRec & TestDisk 工具来恢复文件
|
||
============================================================
|
||
|
||
当你在系统中有意或无意地使用 `shift + delete` 组合键、删除选项,或是清空回收站的方式来删除一个文件时,该文件的内容并没有从硬盘(或是其它存储设备)上直接销毁。
|
||
|
||
它仅仅是从系统的目录结构中被移除,然后你在删除文件的目录下就看不到该文件了,但是这个文件仍然存在你磁盘中的某个位置上。
|
||
|
||
如果你有一个合适的工具和相关的专业知识,你就可以[从电脑中恢复已丢失的文件][1]。然而,随着你存储的文件越来越多,删除的文件将会被覆盖,你可能只能恢复最近删除的文件了。
|
||
|
||
在这篇文章中,我们将阐明如何在 Linux 系统中使用 **TestDisk** 来恢复硬盘上已删除或丢失的文件,它是非常优秀的修复工具,随一款免费的叫做 **PhotoRec** 的工具发布。
|
||
|
||
**PhoteRec** 工具用于从存储介质比如硬盘,数码相机和 cdrom 设备中恢复丢失的文件。(LCTT 译注:PhotoRec 的意思是 Photo Recovery,不是 Photo Recorder。)
|
||
|
||
### 在 Linux 系统中安装 TestDisk(PhotoRec)
|
||
|
||
在系统中执行以下相关的命令来安装 **TestDisk**:
|
||
|
||
```
|
||
------- On Debian/Ubuntu/Linux Mint -------
|
||
$ sudo apt-get install testdisk
|
||
------- On CentOS/RHEL/Fedora -------
|
||
$ sudo yum install testdisk
|
||
------- On Fedora 22+ -------
|
||
$ sudo dnf install testdisk
|
||
------- On Arch Linux -------
|
||
$ pacman -S testdisk
|
||
------- On Gentoo -------
|
||
$ emerge testdisk
|
||
```
|
||
|
||
如果你的 Linux 系统仓库中没有这个安装包,可以从 [这里][2] 下载然后在 Live CD 中运行即可。
|
||
|
||
这个安装包也可以在应急修复 CD 工具中找到,比如 Gparted LiveCD 、 Parted Magic 、 Ubuntu Boot CD 、 Ubuntu-Rescue-Remix 及其它工具等。
|
||
|
||
安装完成之后,使用 root 账号权限打开文本窗口,启动 **PhotoRec**,并指定已删除文件的分区:
|
||
|
||
```
|
||
$ sudo photorec /dev/sda3
|
||
```
|
||
|
||
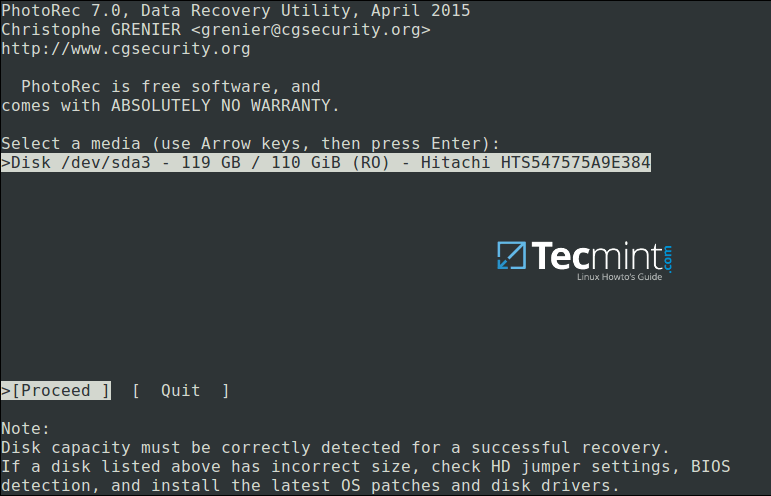
你将会看到下面的交互界面:
|
||
|
||
[
|
||
|
||
][3]
|
||
|
||
*Linux 系统 PhotoRec 数据恢复工具*
|
||
|
||
使用左右箭头选择菜单选项,按回车键确认。要继续恢复操作,选择 `[Proceed]` 并单击 Enter。
|
||
|
||
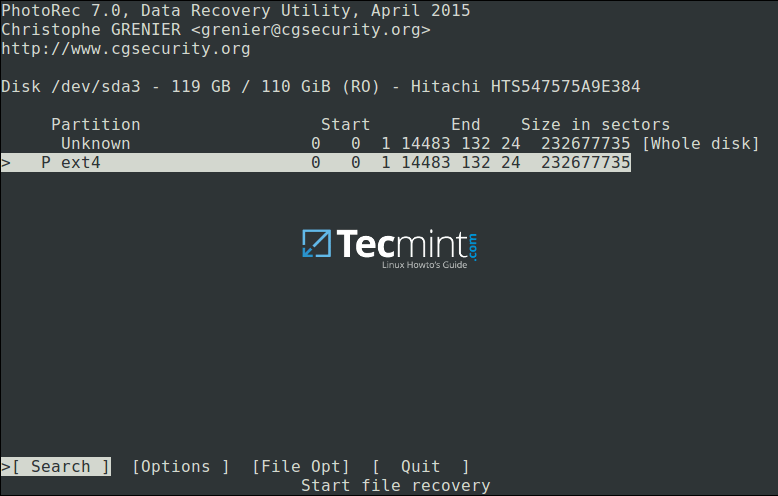
你将看到下面的界面:
|
||
|
||
[
|
||
|
||
][4]
|
||
|
||
*选择分区进行文件恢复*
|
||
|
||
选择 `[Options]` 来查看可用的恢复选项,如下图所示:
|
||
|
||
[
|
||

|
||
][5]
|
||
|
||
*Linux 系统文件恢复选项*
|
||
|
||
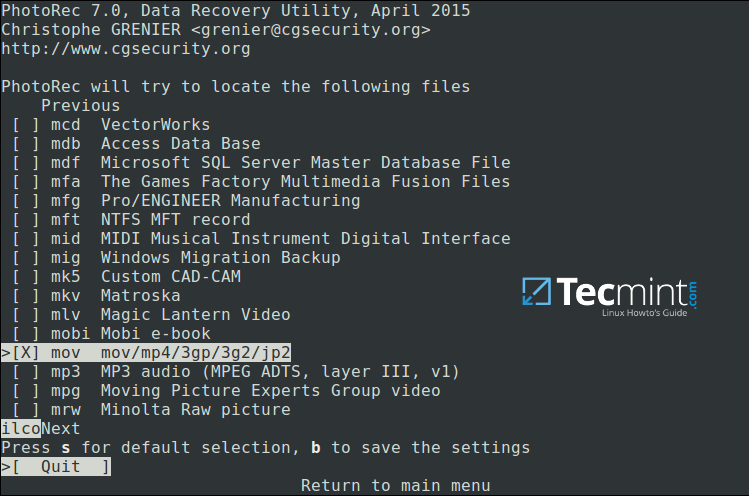
按 `Q` 返回,在下图界面,你可以指定你想要查询并恢复的文件扩展名。因此,选择 `[File Opt]`,按回车键确认。
|
||
|
||
按 `s` 来选择或取消选择所有的文件扩展名,如果你已经取消选择了所有的文件扩展名,只需要使用向右箭头选择你想要恢复的文件类型即可(或者按向左箭头取消选择)。
|
||
|
||
例如,我想恢复所有系统中丢失的 `.mov` 类型的文件:
|
||
|
||
[
|
||
|
||
][6]
|
||
|
||
*指定恢复文件类型*
|
||
|
||
按 `b` 键保存设置,之后你应该看到如下图所示信息。单击回车键返回(或者按 `Q` 键),再按 `Q` 键返回到主界面。
|
||
|
||
[
|
||

|
||
][7]
|
||
|
||
*保存文件恢复设置*
|
||
|
||
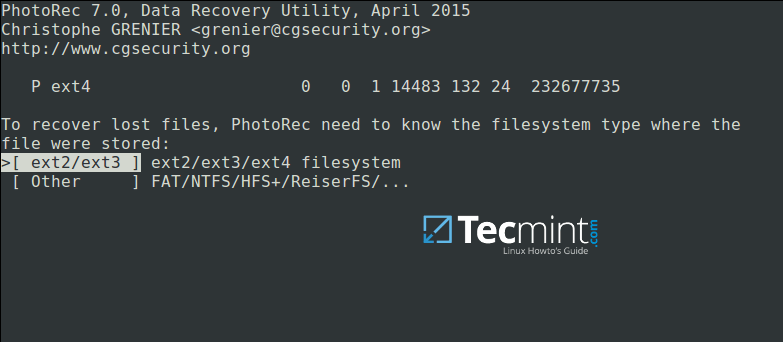
现在选择 `[Search]` 开始文件恢复。在下图中,选择存储文件分区的文件系统类型,然后按回车键。
|
||
|
||
[
|
||
|
||
][8]
|
||
|
||
*选择文件系统类型来恢复删除的文件*
|
||
|
||
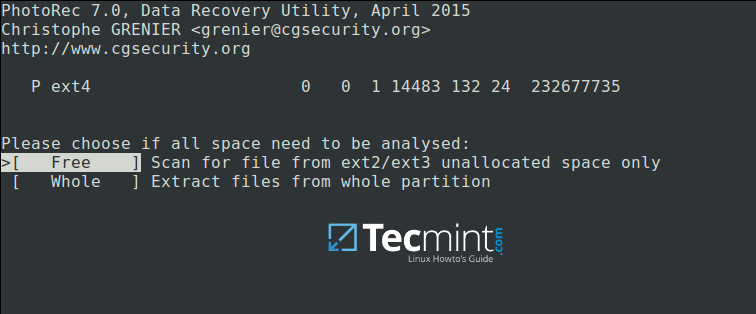
下一步,如下图所示,选择是仅对空闲空间还是整个分区进行分析。注意选择整个分区将会让操作过程变得更长更慢。选择合适的选项后,按回车键继续。
|
||
|
||
[
|
||
|
||
][9]
|
||
|
||
*选择文件系统进行分析*
|
||
|
||
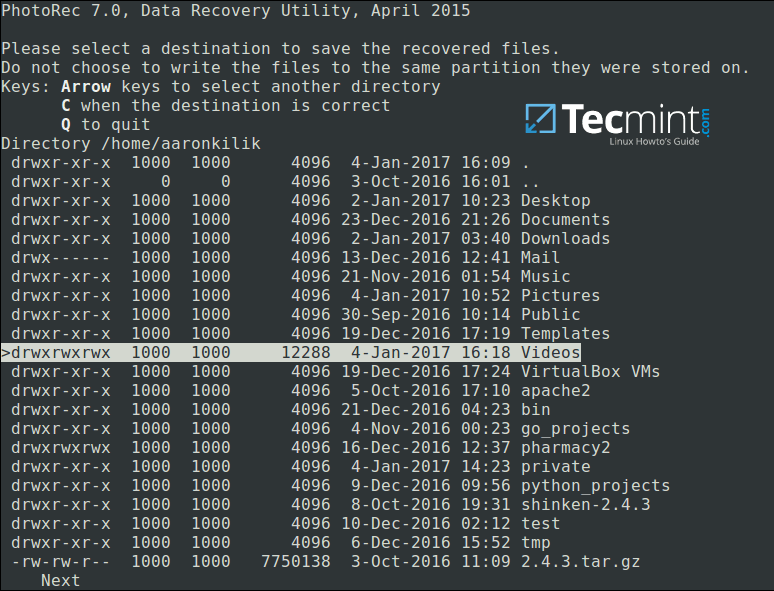
选择一个目录用于存储将要恢复的文件,选择完成之后,按 `C` 键继续。选择不同分区的目录,以避免当更多的文件存储在这个分区时覆盖掉已删除的文件。
|
||
|
||
按向左箭头返回到根分区下。
|
||
|
||
[
|
||
|
||
][10]
|
||
|
||
*选择要保存恢复文件的目录*
|
||
|
||
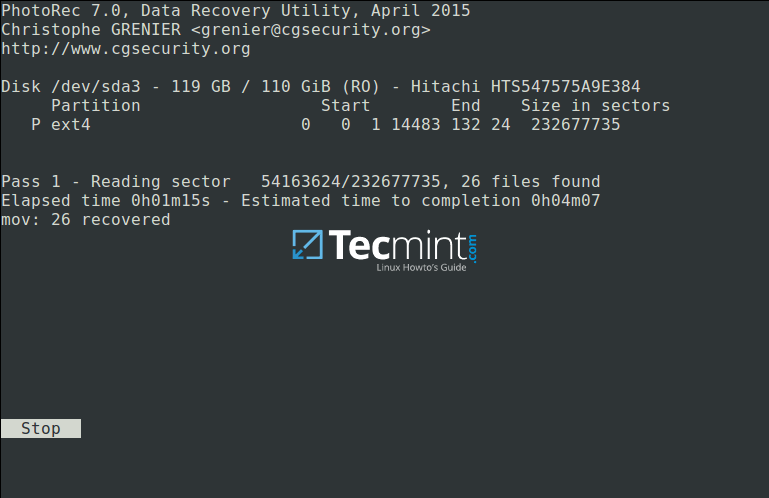
下图显示正在被恢复的指定类型的已删除文件。你可以按回车键来停止操作。
|
||
|
||
**注意**:在恢复的过程中,你的系统会变得很慢,很可能会卡住一段时间,请耐心等待直至恢复完成。
|
||
|
||
[
|
||
|
||
][11]
|
||
|
||
*在 Linux 系统中恢复已删除的文件*
|
||
|
||
最后, **Photorec** 工具将会显示出已恢复文件的数量及保存的路径。
|
||
|
||
[
|
||

|
||
][12]
|
||
|
||
*Linux 文件恢复情况汇总*
|
||
|
||
默认情况下,已恢复的文件将会以 root 账号权限保存,因此,你需要以提升权限的方式打开文件管理器来访问这些文件。
|
||
|
||
使用如下命令(指定你的文件管理器):
|
||
|
||
```
|
||
$ gksudo nemo
|
||
or
|
||
$ gksudo nautilus
|
||
```
|
||
|
||
想了解更多的信息,访问 PhotoRec 官网: [http://www.cgsecurity.org/wiki/PhotoRec][13]。
|
||
|
||
到此为止吧!在这篇文章中,我们阐明了使用 PhotoRec 工具来恢复磁盘中已删除或丢失文件每一个步骤。这是目前为止我使用过的最可靠和有效的恢复工具,如果你知道还有其它相似的工具,请在评论中跟大家分享。
|
||
|
||
--------------------------------------------------------------------------------
|
||
|
||
作者简介:
|
||
|
||

|
||
|
||
Aaron Kili 是一个 Linux 系统及 F.O.S.S 爱好者,即将成为一名系统管理员及 Web 开发人员,他现在是 TecMint 网站的内容创建者,他喜欢使用电脑来工作,并且他坚信分享知识是一种美德。
|
||
|
||
--------------------------------------------------------------------------------
|
||
|
||
via: http://www.tecmint.com/photorec-recover-deleted-lost-files-in-linux/
|
||
|
||
作者:[Aaron Kili][a]
|
||
译者:[rusking](https://github.com/rusking)
|
||
校对:[jasminepeng](https://github.com/jasminepeng)
|
||
|
||
本文由 [LCTT](https://github.com/LCTT/TranslateProject) 原创编译,[Linux中国](https://linux.cn/) 荣誉推出
|
||
|
||
[a]:http://www.tecmint.com/author/aaronkili/
|
||
[1]:https://linux.cn/article-7974-1.html
|
||
[2]:http://www.cgsecurity.org/wiki/TestDisk_Download
|
||
[3]:http://www.tecmint.com/wp-content/uploads/2017/01/PhotoRec-Data-Recovery-Tool.png
|
||
[4]:http://www.tecmint.com/wp-content/uploads/2017/01/Select-Partition-to-Proceed-File-Recovery.png
|
||
[5]:http://www.tecmint.com/wp-content/uploads/2017/01/Linux-File-Recovery-Options.png
|
||
[6]:http://www.tecmint.com/wp-content/uploads/2017/01/Specify-Recovery-File-Type.png
|
||
[7]:http://www.tecmint.com/wp-content/uploads/2017/01/Save-File-Recovery-Settings.png
|
||
[8]:http://www.tecmint.com/wp-content/uploads/2017/01/Select-Filesystem-to-Recover-Files.png
|
||
[9]:http://www.tecmint.com/wp-content/uploads/2017/01/Select-Filesystem-to-Analyze.png
|
||
[10]:http://www.tecmint.com/wp-content/uploads/2017/01/Select-Directory-to-Save-Recovered-Files.png
|
||
[11]:http://www.tecmint.com/wp-content/uploads/2017/01/Recover-Deleted-Files-in-Linux.png
|
||
[12]:http://www.tecmint.com/wp-content/uploads/2017/01/Linux-File-Recovery-Summary.png
|
||
[13]:http://www.cgsecurity.org/wiki/PhotoRec
|