12 KiB
Bind a cloud event to Knative
CloudEvents provides a common format to describe events and increase
interoperability.

Events have become an essential piece of modern reactive systems. Indeed, events can be used to communicate from one service to another, trigger out-of-band processing, or send a payload to a service like Kafka. The problem is that event publishers may express event messages in any number of different ways, regardless of content. For example, some messages are payloads in JSON format to serialize and deserialize messages by application. Other applications use binary formats such as Avro and Protobuf to transport payloads with metadata. This is an issue when building an event-driven architecture that aims to easily integrate external systems and reduce the complexity of message transmission.
CloudEvents is an open specification providing a common format to describe events and increase interoperability. Many cloud providers and middleware stacks, including Knative, Kogito, Debezium, and Quarkus have adopted this format after the release of CloudEvents 1.0. Furthermore, developers need to decouple relationships between event producers and consumers in serverless architectures. Knative Eventing is consistent with the CloudEvents specification, providing common formats for creating, parsing, sending, and receiving events in any programming language. Knative Eventing also enables developers to late-bind event sources and event consumers. For example, a cloud event using JSON might look like this:
{
    "specversion" : "1.0", (1)
    "id" : "11111", (2)
    "source" : "<http://localhost:8080/cloudevents>", (3)
    "type" : "knative-events-binding", (4)
    "subject" : "cloudevents", (5)
    "time" : "2021-06-04T16:00:00Z", (6)
    "datacontenttype" : "application/json", (7)
    "data" : "{\"message\": \"Knative Events\"}", (8)
}
In the above code:
(1) Which version of the CloudEvents specification to use
(2) The ID field for a specific event; combining the id and the source provides a unique identifier
(3) The Uniform Resource Identifier (URI) identifies the event source in terms of the context where it happened or the application that emitted it
(4) The type of event with any random words
(5) Additional details about the event (optional)
(6) The event creation time (optional)
(7) The content type of the data attribute (optional)
(8) The business data for the specific event
Here is a quick example of how developers can enable a CloudEvents bind with Knative and the Quarkus Funqy extension.
1. Create a Quarkus Knative event Maven project
Generate a Quarkus project (e.g., quarkus-serverless-cloudevent) to create a simple function with Funqy Knative events binding extensions:
$ mvn io.quarkus:quarkus-maven-plugin:2.0.0.CR3:create \
       -DprojectGroupId=org.acme \
       -DprojectArtifactId=quarkus-serverless-cloudevent \
       -Dextensions="funqy-knative-events" \
       -DclassName="org.acme.getting.started.GreetingResource"
2. Run the serverless event function locally
Open the CloudEventGreeting.java file in the src/main/java/org/acme/getting/started/funqy/cloudevent directory. The @funq annotation enables the myCloudEventGreeting method to map the input data to the cloud event message automatically:
private static final Logger log = Logger.getLogger(CloudEventGreeting.class);

    @Funq
    public void myCloudEventGreeting(Person input) {
        log.info("Hello " + input.getName());
    }
}
Run the function via Quarkus Dev Mode:
`$ ./mvnw quarkus:dev`
The output should look like this:
__  ____  __  _____   ___  __ ____  ______
 --/ __ \/ / / / _ | / _ \/ //_/ / / / __/
 -/ /_/ / /_/ / __ |/ , _/ ,< / /_/ /\ \
\--\\___\\_\\____/_/ |_/_/|_/_/|_|\\____/___/
INFO  [io.quarkus] (Quarkus Main Thread) quarkus-serverless-cloudevent 1.0.0-SNAPSHOT on JVM (powered by Quarkus 2.0.0.CR3) started in 1.546s. Listening on: <http://localhost:8080>
INFO  [io.quarkus] (Quarkus Main Thread) Profile dev activated. Live Coding activated.
INFO  [io.quarkus] (Quarkus Main Thread) Installed features: [cdi, funqy-knative-events, smallrye-context-propagation]

\--
Tests paused, press [r] to resume
Note: Quarkus 2.x provides a continuous testing feature so that you can keep testing your code when you add or update code by pressing r in the terminal.
Now the CloudEvents function is running in your local development environment. So, send a cloud event to the function over the HTTP protocol:
curl -v <http://localhost:8080> \
  -H "Content-Type:application/json" \
  -H "Ce-Id:1" \
  -H "Ce-Source:cloud-event-example" \
  -H "Ce-Type:myCloudEventGreeting" \
  -H "Ce-Specversion:1.0" \
  -d "{\"name\": \"Daniel\"}"
The output should end with:
`HTTP/1.1 204 No Content`
Go back to the terminal, and the log should look like this:
`INFO [org.acm.get.sta.fun.clo.CloudEventGreeting] (executor-thread-0) Hello Daniel`
3. Deploy the serverless event function to Knative
Add a container-image-docker extension to the Quarkus Funqy project. The extension enables you to build a container image based on the serverless event function and then push it to an external container registry (e.g., Docker Hub, Quay.io):
`$ ./mvnw quarkus:add-extension -Dextensions="container-image-docker"`
Open the application.properties file in the src/main/resources/ directory. Then add the following variables to configure Knative and Kubernetes resources (make sure to replace yourAccountName with your container registry's account name, e.g., your username in Docker Hub):
quarkus.container-image.build=true
quarkus.container-image.push=true
quarkus.container-image.builder=docker
quarkus.container-image.image=docker.io/yourAccountName/funqy-knative-events-codestart
Run the following command to containerize the function and then push it to the Docker Hub container registry automatically:
`$ ./mvnw clean package`
The output should end with BUILD SUCCESS.
Open the funqy-service.yaml file in the src/main/k8s directory. Then replace yourAccountName with your account information in the Docker Hub registry:
apiVersion: serving.knative.dev/v1
kind: Service
metadata:
  name: funqy-knative-events-codestart
spec:
  template:
    metadata:
      name: funqy-knative-events-codestart-v1
      annotations:
        autoscaling.knative.dev/target: "1"
    spec:
      containers:
        - image: docker.io/yourAccountName/funqy-knative-events-codestart
Assuming the container image pushed successfully, create the Knative service based on the event function using the following kubectl command-line tool (be sure to log into the Kubernetes cluster and change the namespace where you want to create the Knative service):
`$ kubectl create -f src/main/k8s/funqy-service.yaml`
The output should look like this:
`service.serving.knative.dev/funqy-knative-events-codestart created`
Create a default broker to subscribe to the event function. Use the kn Knative Serving command-line tool:
`$ kn broker create default`
Open the funqy-trigger.yaml file in the src/main/k8s directory and replace it with:
apiVersion: eventing.knative.dev/v1
kind: Trigger
metadata:
  name: my-cloudevent-greeting
spec:
  broker: default
  subscriber:
    ref:
      apiVersion: serving.knative.dev/v1
      kind: Service
      name: funqy-knative-events-codestart
Create a trigger using the kubectl command-line tool:
`$ kubectl create -f src/main/k8s/funqy-trigger.yaml`
The output should look like this:
`trigger.eventing.knative.dev/my-cloudevent-greeting created`
4. Send a cloud event to the serverless event function in Kubernetes
Find out the function's route URL and check that the output looks like this:
$ kubectl get rt
NAME URL READY REASON
funqy-knative-events-codestart  <http://funqy-knative-events-codestart-YOUR\_HOST\_DOMAIN>   True
Send a cloud event to the function over the HTTP protocol:
curl -v <http://funqy-knative-events-codestart-YOUR\_HOST\_DOMAIN> \
  -H "Content-Type:application/json" \
  -H "Ce-Id:1" \
  -H "Ce-Source:cloud-event-example" \
  -H "Ce-Type:myCloudEventGreeting" \
  -H "Ce-Specversion:1.0" \
  -d "{\"name\": \"Daniel\"}"
The output should end with:
`HTTP/1.1 204 No Content`
Once the function pod scales up, take a look at the pod logs. Use the following kubectl command to retrieve the pod's name:
`$ kubectl get pod`
The output will look like this:
NAME                                                           READY   STATUS    RESTARTS   AGE
funqy-knative-events-codestart-v1-deployment-6569f6dfc-zxsqs   2/2     Running   0          11s
Run the following kubectl command to verify that the pod's logs match the local testing's result:
`$ kubectl logs funqy-knative-events-codestart-v1-deployment-6569f6dfc-zxsqs -c user-container | grep CloudEventGreeting`
The output looks like this:
`INFO [org.acm.get.sta.fun.clo.CloudEventGreeting] (executor-thread-0) Hello Daniel`
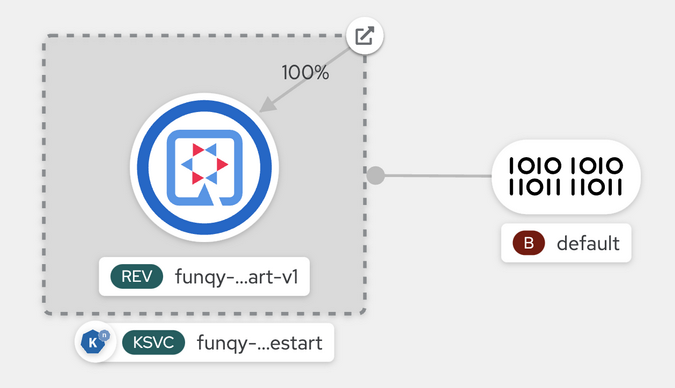
If you deploy the event function to an OpenShift Kubernetes Distribution (OKD) cluster, you will find the deployment status in the topology view:
(Daniel Oh, CC BY-SA 4.0)
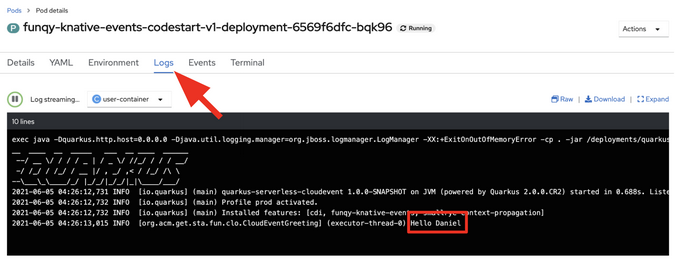
You can also find the pod's logs in the Pod details tab:
(Daniel Oh, CC BY-SA 4.0)
What's next?
Developers can bind a cloud event to Knative using Quarkus functions. Quarkus also scaffolds Kubernetes manifests, such as Knative services and triggers, to process cloud events over a channel or HTTP request.
Learn more serverless and Quarkus topics through OpenShift's interactive self-service learning portal.
via: https://opensource.com/article/21/7/cloudevents-bind-java-knative

