6.1 KiB
Install Linux with LVM
A tutorial on getting Linux Mint 20.2 working with logical volume
manager (LVM).

A couple of weeks ago, the good folks at Linux Mint released version 20.2 of their open source operating system. The installer built into the live ISO is excellent and only requires a few clicks to install the OS. You even have a built-in partitioner if you want to customize your partitions.
The installer is mainly focused on a simple install—define your partitions and install into them. For those wanting a more flexible setup—logical volume manager (LVM) is the way to go—you benefit from setting up volume groups and define your logical volumes within them.
LVM is a hard drive management system that allows you to create storage space across multiple physical drives. In other words, you could "tether" a few small drives together so your OS treats them as if they were one drive. Beyond that, it has the advantages of live resizing, file system snapshots, and much more. This article isn't a tutorial on LVM (the web is full of good information on that already.) Instead, I aim to keep this page on topic and focus solely on getting Linux Mint 20.2 working with LVM.
As a desktop OS, the installer is kept simple, and installing LM 20.2 on LVM is slightly more involved but not too complicated. If you select LVM in the installer, you get a setup that's been defined by the Linux Mint devs, and you have no control over the individual volumes at the time of install.
However, there's a solution—right there in the live ISO—and that solution only requires a few commands in the terminal to set up the LVM, after which you resume the regular installer to complete the job.
I'm using Linux Mint 20.2 with the XFCE desktop for my install, but the procedure is similar for the other LM desktops.
Partitioning the drive
In the Linux Mint live ISO, you have access to Linux command-line tools through the terminal and GUI tools. If you need to do any partition work, you can use the command-line fdisk or parted commands, or the GUI application gparted. I want to keep these instructions simple enough for anyone to follow, so I'll use GUI tools where possible and command-line tools where necessary.
Start by creating a couple of partitions for the install.
Using gparted (launched from the menu), complete the following:
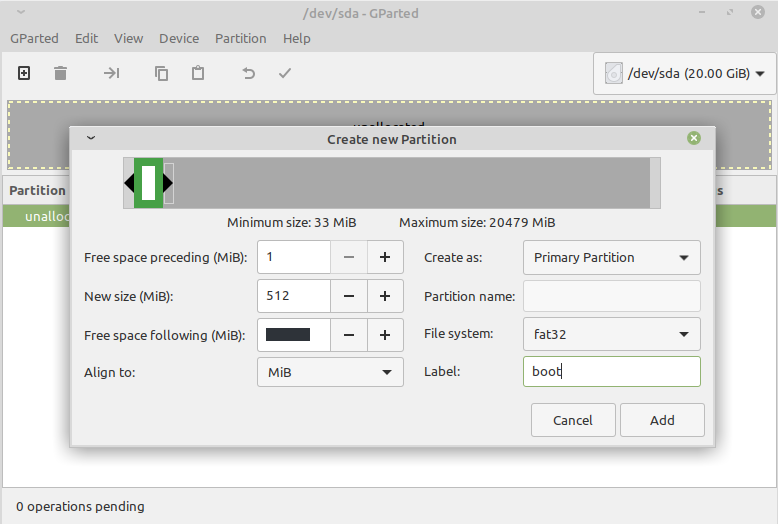
First, create a partition of 512 MB of type FAT32 (this is used to ensure the system is bootable.) 512 MB is overkill for most, and you can get away with 256 MB or even less, but with today's big disks, allocating even 512 MB is not a significant concern.
CC BY-SA Seth Kenlon
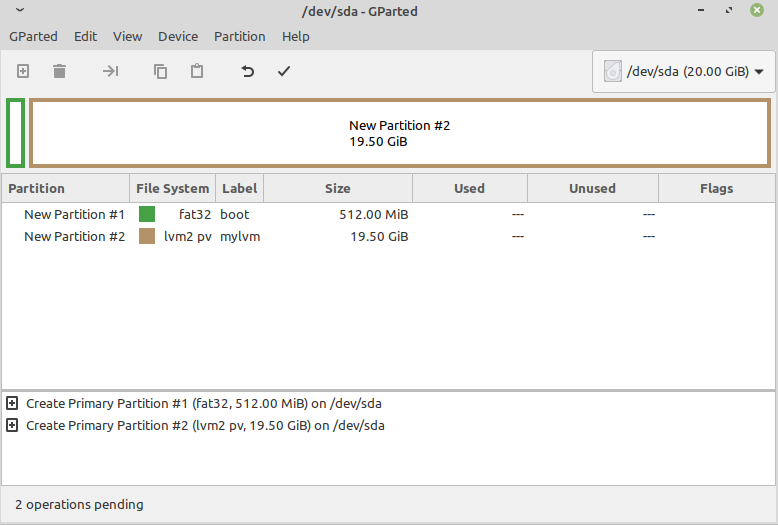
Next, create a partition of the rest of the disk of type lvm2 pv (this is where your LVM will be.)
CC BY-SA Seth Kenlon
Now open a terminal window, and escalate your privileges to root:
$ sudo -s
# whoami
root
Next, you must locate the LVM member (the big partition) you created earlier. Use one of the following commands: lsblk -f or pvs or pvscan.
# pvs
PV           VG  Fmt   [...]
/dev/sda2        lvm2  [...]
In my case, the partition is located at /dev/sda2, but you should replace this with whatever you get in your output.
Now that you know what device designation your partition has, you can create an LVM volume group there:
`# vgcreate vg /dev/sda2`
You can see the details of the volume group you created using vgs or vgscan.
Create the logical volumes you want to use during install. I'm keeping it simple by creating one for the root partition (/) and one for swap, but you can create more as needed (for example, a separate partition for /home.)
# lvcreate -L 80G -n root vg
# lvcreate -L 16G -n swap vg
The partition sizes in my examples are arbitrary and based on what I have available. Use partition sizes that make sense for your drive.
You can view the logical volumes with lvs or lvdisplay.
That's it for the terminal.
Installing Linux
Now start the installer program from the desktop icon:
- Once you get to the Installation type, select Something else.
- Edit the 512 Mb partition and change it to
EFI. - Edit the root LV and change it to
ext4(or a file system of your choice). Select to mount it as root and select to format it. - Edit the swap partition and set it as
swap. - Continue the install process normally—Linux Mint installer puts the files in the correct places and creates the mount points for you.
That's it—enjoy the power of LVM in your Linux Mint install.
If ever you need to resize partitions or do any advanced work on the system—you'll be thankful for choosing LVM.
via: https://opensource.com/article/21/8/install-linux-mint-lvm
作者:Kenneth Aaron 选题:lujun9972 译者:译者ID 校对:校对者ID

