29 KiB
Build your own SaaS on Linux with Vely
Vely makes it possible to leverage the power of C in your web applications.
Vely combines high performance and the low footprint of C with the ease of use and improved safety of languages like PHP. It's free and open source software, licensed under GPLv3 and LGPL 3 for libraries, so you can even build commercial software with it.
Using Vely for SaaS
You can use Vely to create a multitenant web application that you can run on the Internet as Software-as-a-Service (SaaS). Each user has a completely separate data space from any other.
In this example web application, a user can sign up for a notebook service to create notes and then view and delete them. It demonstrates several technology integrations in just 310 lines of code across seven source files. The technologies include:
- MariaDB
- Web browser
- Apache
- Unix sockets
How it works
Here's how the application works from a user's perspective. A code walk-through follows the images.
The app allows a user to create a new login by specifying an email address and password. You can style these any way you like, such as with CSS:
Verify the user's email:
Each user logs in with their unique username and password:
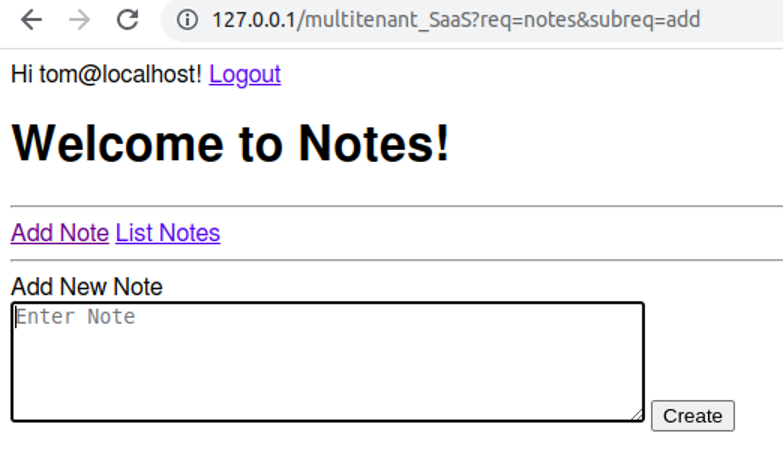
Once logged in, a user can add a note:
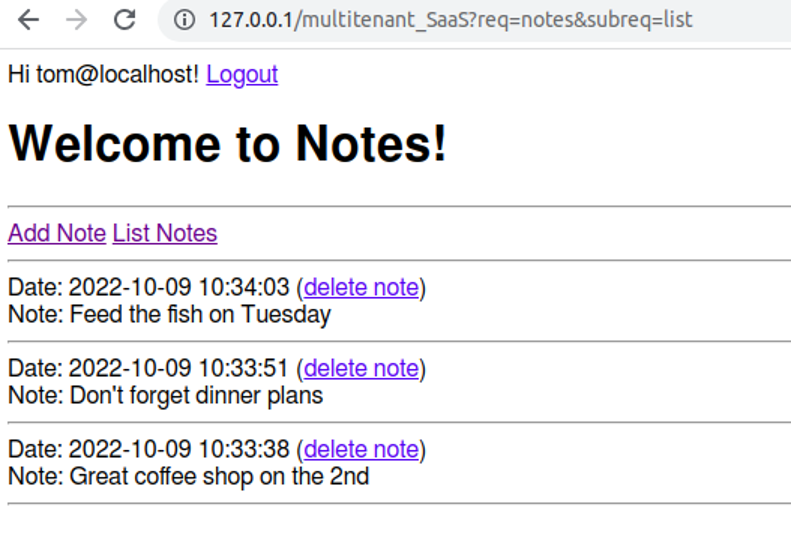
A user can get a list of notes:
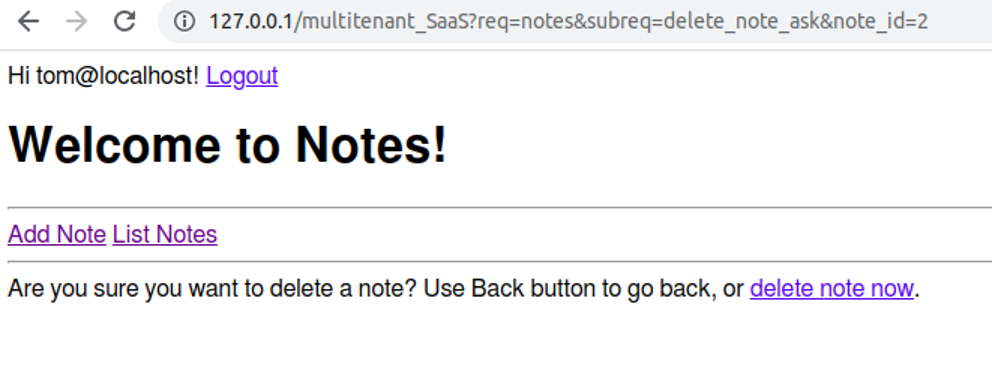
The app asks for confirmation before deleting a note:
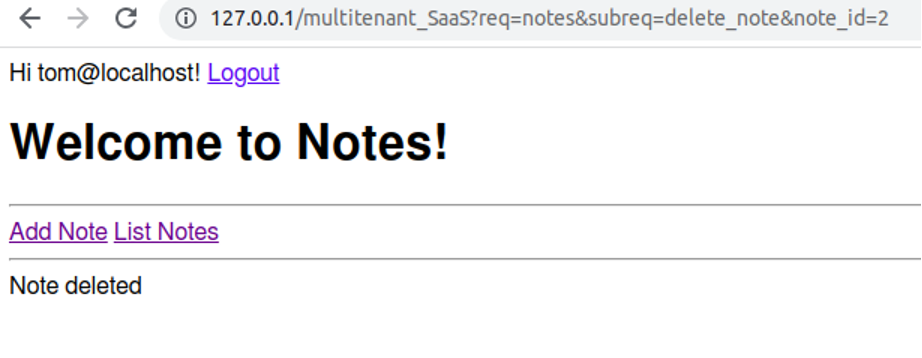
After the user confirms, the note is deleted:
Setup prerequisites
Follow the installation instructions on Vely.dev. It's a quick process that uses standard packaging tools, such as DNF, APT, Pacman, or Zypper.
Because they are part of this example, you must install Apache as a web server and MariaDB as a database.
After installing Vely, turn on syntax highlighting in Vim if you're using it:
vv -m
Get the source code
The source code for this demonstration SaaS app is part of the Vely installation. It's a good idea to create a separate source code directory for each application (and you can name it whatever you like). In this case, unpacking the source code does that for you:
$ tar xvf $(vv -o)/examples/multitenant_SaaS.tar.gz
$ cd multitenant_SaaS
By default, the application is named multitenant_SaaS, but you can call it anything (if you do that, change it everywhere).
Set up the application
The very first step is to create an application. It's simple to do with Vely's vf utility:
$ sudo vf -i-u $(whoami) multitenant_SaaS
This command creates a new application home (/var/lib/vv/multitenant_SaaS) and performs the application setup for you. Mostly, that means creating various subdirectories in the home folder and assigning privileges. In this case, only the current user (the result of whoami) owns the directories, with 0700 privileges, which ensures that no one else has access to the files.
Set up the database
Before doing any coding, you need a place to store the information used by the application. First, create a MariaDB database called db_multitenant_SaaS, owned by the user vely with password your_password. You can change any of these values, but remember to change them everywhere during this example.
Logged in as root in the MySQL utility:
CREATEDATABASEIFNOTEXISTS db_multitenant_SaaS;
CREATEUSERIFNOTEXISTS vely IDENTIFIEDBY'your_password';
GRANTCREATE,ALTER,DROP,SELECT,INSERT,DELETE,UPDATEON db_multitenant_SaaS.*TO vely;
Then create database objects (tables and records and so on) in the database:
USE db_multitenant_SaaS;
SOURCE setup.sql;
exit
Connect Vely to a database
To let Vely know where your database is and how to log into it, create a database config file named db_multitenant_SaaS. (This is the name used by the database statements in the source code, so if you change it, make sure you change it everywhere.)
Vely uses native MariaDB database connectivity, so you can specify any options that a given database lets you:
$ echo'[client]
user=vely
password=your_password
database=db_multitenant_SaaS
protocol=TCP
host=127.0.0.1
port=3306'> db_multitenant_SaaS
Build the application
Use the vv utility to make the application, using the --db option to specify the MariaDB database and the database config file:
$ vv -q--db=mariadb:db_multitenant_SaaS
Start the application server
To start the application server for your web application, use the vf FastCGI process manager. The application server uses a Unix socket to communicate with the web server (creating a reverse proxy):
$ vf -w3 multitenant_SaaS
This starts three daemon processes to serve the incoming requests. You can also start an adaptive server that increases the number of processes to serve more requests and gradually reduce the number of processes when they're not needed:
$ vf multitenant_SaaS
See vf for more options to help you achieve the best performance.
When you need to stop your application server, use the -m quit option:
$ vf -m quit multitenant_SaaS
Set up the web server
This is a web application, so the application needs a web server. This example uses Apache by way of a Unix socket listener.
1. Set up Apache
To configure Apache as a reverse proxy and connect your application to it, you need to enable FastCGI proxy support, which generally means using the proxy and proxy_fcgi modules.
For Fedora systems (or others, like Arch) enable the proxy and proxy_fcgi modules by adding (or uncommenting) the appropriate LoadModule directives in the /etc/httpd/conf/httpd.conf Apache configuration file.
For Debian, Ubuntu, and similar systems, enable the proxy and proxy_fcgi modules:
$ sudo a2enmod proxy
$ sudo a2enmod proxy_fcgi
For OpenSUSE, add these lines to the end of /etc/apache2/httpd.conf:
LoadModule proxy_module modules/mod_proxy.so
LoadModule proxy_fcgi_module modules/mod_proxy_fcgi.so
2. Configure Apache
Now you must add the proxy information to the Apache configuration file:
ProxyPass "/multitenant_SaaS" unix:///var/lib/vv/multitenant_SaaS/sock/sock|fcgi://localhost/multitenant_SaaS
The location of your configuration may vary, depending on your Linux distribution:
- Fedora, CentOS, Mageia, and Arch:
/etc/httpd/conf/httpd.conf - Debian, Ubuntu, Mint:
/etc/apache2/apache2.conf - OpenSUSE:
/etc/apache2/httpd.conf
3. Restart
Finally, restart Apache. On Fedora and similar systems, as well as Arch Linux:
$ sudo systemctl restart httpd
On Debian and Debian-based systems, as well as OpenSUSE:
$ sudo systemctl restart apache2
Set up local mail
This example uses email as a part of its function. If your server can already send email, you can skip this. Otherwise, you can use local mail (myuser@localhost) just to test it out. To do that, install Sendmail.
On Fedora and similar:
$ sudo dnf installsendmail
$ sudo systemctl start sendmail
On Debian systems (like Ubuntu):
$ sudo apt installsendmail
$ sudo systemctl start sendmail
When the application sends an email to a local user, such as OS_user@localhost, then you can verify that the email was sent by looking at /var/mail/ (the "mail spool").
Access the application server from the browser
Assuming you're running the application locally, use http://127.0.0.1/multitenant_SaaS?req=notes&action=begin to access your application server from your web browser. If you're running this on a live server on the Internet, you may need to adjust your firewall settings to allow HTTP traffic.
Source code
This example application contains seven source files. You can review the code yourself (remember, it's just 310 lines across these files), but here's an overview of each one.
SQL setup (setup.sql)
The two tables created are:
- users: Information about each user. Each user in the users table has its own unique ID (userId column) along with other information such as email address and whether it's verified. There's also a hashed password. An actual password is never stored in plain text (or otherwise); a one-way hash is used to check the password.
- notes: Notes entered by the user. The notes table contains the notes, each along with userId column that states which user owns them. The userId column's value matches the namesake column from users table. This way, every note clearly belongs to a single user.
The file contents:
CREATETABLEIFNOTEXISTS notes (dateOf datetime, noteId BIGINTAUTO_INCREMENTPRIMARYKEY, userId BIGINT, note VARCHAR(1000));
CREATETABLEIFNOTEXISTS users (userId BIGINTAUTO_INCREMENTPRIMARYKEY, email VARCHAR(100), hashed_pwd VARCHAR(100), verified SMALLINT, verify_token VARCHAR(30),SESSIONVARCHAR(100));
CREATEUNIQUEINDEXIFNOTEXISTS users1 ON users (email);
Run-time data (login.h)
To properly display the Login, Sign Up, and Logout links, you need some flags that are available anywhere in the application. Also, the application uses cookies to maintain a session, so this needs to be available anywhere, for example, to verify that the session is valid. Every request sent to the application is confirmed that way. Only requests that come with verifiable cookies are permitted.
So to that effect, you have a global_request_data type reqdata (request data) and in it there's sess_userId (ID of user) and sess_id (user's current session ID). You also have rather self-explanatory flags that help render pages:
#ifndef _VV_LOGIN
#define _VV_LOGIN

typedef struct s_reqdata {
    bool displayed_logout; // true if Logout link displayed
    bool is_logged_in; // true if session verified logged-in
    char *sess_userId; // user ID of current session
    char *sess_id; // session ID
} reqdata;

void login_or_signup ();

#endif
Session checking and session data (_before.vely)
Vely has a notion of a before_request_handler. The code you write executes before any other code that handles a request. To do this, all you need is to write this code in a file named _before.vely, and the rest is automatically handled.
Anything that a SaaS application does, such as handling requests sent to an application, must be validated for security. This way, the application knows whether the caller has the permissions needed to perform an action.
Checking for permission is done here in a before-request handler. That way, whatever other code you have handling a request, you already have the session information.
To keep session data (like session ID and user ID) available anywhere in your code, you use global_request_data. It's just a generic pointer (void*) to memory that any code that handles requests can access. This is perfect for handling sessions, as shown below:
#include "vely.h"
#include "login.h"

// _before() is a before-request-handler. It always executes before
// any other code that handles a request. It's a good place for any
// kind of request-wide setting or data initialization
void _before() {
    // Output HTTP header
    out-header default
    reqdata *rd; // this is global request data, see login.h
    // allocate memory for global request data, will be automatically deallocated
    // at the end of request
    new-mem rd size sizeof(reqdata)
    // initialize flags
    rd->displayed_logout = false;
    rd->is_logged_in = false;
    // set the data we created to be global request data, accessible
    // from any code that handles a request
    set-req data rd
    // check if session exists (based on cookies from the client)
    // this executes before any other request-handling code, making it
    // easier to just have session information ready
    _check_session ();
}
Checking if the session is valid (_check_session.vely)
One of the most important tasks in a multitenant SaaS application is to check (as soon as possible) if the session is valid by checking whether a user is logged in. It's done by getting the session ID and user ID cookies from the client (such as a web browser) and checking these against the database where sessions are stored:
#include "vely.h"
#include "login.h"


// Check if session is valid
void _check_session () {
    // Get global request data
    reqdata *rd;
    get-req data to rd
    // Get cookies from user browser
    get-cookie rd->sess_userId="sess_userId"
    get-cookie rd->sess_id="sess_id"
    if (rd->sess_id[0] != 0) {
        // Check if session ID is correct for given user ID
        char *email;
        run-query @db_multitenant_SaaS = "select email from users where userId='%s' and session='%s'" output email : rd->sess_userId, rd->sess_id row-count define rcount
            query-result email to email
        end-query
        if (rcount == 1) {
            // if correct, set logged-in flag
            rd->is_logged_in = true;
            // if Logout link not display, then display it
            if (rd->displayed_logout == false) {
                @Hi <<p-out email>>! <a href="https://opensource.com/?req=login&action=logout">Logout</a><br/>
                rd->displayed_logout = true;
            }
        } else rd->is_logged_in = false;
    }
}
Signing up, Logging in, Logging out (login.vely)
The basis of any multitenant system is the ability for a user to sign up, log in, and log out. Typically, signing up involves verifying the email address; more often than not, the same email address is used as a username. That's the case here.
There are several subrequests implemented here that are necessary to perform the functionality:
- When Signing Up a new user, display the HTML form to collect the information. The URL request signature for this is
req=login&action=newuser. - As a response to the Sign Up form, create a new user. The URL request signature is
req=login&action=createuser. The input-param signal obtains an email and pwd POST form fields. The password value is a one-way hash, and an email verification token is created as a random five-digit number. These are inserted into the users table, creating a new user. A verification email is sent, and the user is prompted to read the email and enter the code. - Verify the email by entering the verification code sent to that email. The URL request signature is
req=login&action=verify. - Display a Login form for the user to log in. The URL request signature is
req=login(for instance,actionis empty.) - Log in by verifying the email address (username) and password. The URL request signature is
req=login&action=login. - Logout at the user's request. The URL request signature is
req=login&action=logout. - Landing page for the application. The URL request signature is
req=login&action=begin. - If the user is currently logged in, go to the application's landing page.
See examples of these below:
#include "vely.h"
#include "login.h"

// Handle session maintenance, login, logout, session verification
// for any multitenant Cloud application
void login () {
    // Get URL input parameter "action"
    input-param action

    // Get global request data, we record session information in it, so it's handy
    reqdata *rd;
    get-req data to rd

    // If session is already established, the only reason why we won't proceed to
    // application home is if we're logging out
    if (rd->is_logged_in) {
        if (strcmp(action, "logout")) {
            _show_home();
            exit-request
        }
    }

    // Application screen to get started. Show links to login or signup and show
    // home screen appropriate for this
    if (!strcmp (action, "begin")) {
        _show_home();
        exit-request

    // Start creating new user. Ask for email and password, then proceed to create user
    // when this form is submitted.
    } else if (!strcmp (action, "newuser")) {
        @Create New User<hr/>
        @<form action="https://opensource.com/?req=login" method="POST">
        @<input name="action" type="hidden" value="createuser">
        @<input name="email" type="text" value="" size="50" maxlength="50" required autofocus placeholder="Email">
        @<input name="pwd" type="password" value="" size="50" maxlength="50" required placeholder="Password">
        @<input type="submit" value="Sign Up">
        @</form>

    // Verify code sent to email by user. The code must match, thus verifying email address
    } else if (!strcmp (action, "verify")) {
        input-param code
        input-param email
        // Get verify token based on email
        run-query @db_multitenant_SaaS = "select verify_token from users where email='%s'" output db_verify : email
            query-result db_verify to define db_verify
            // Compare token recorded in database with what user provided
            if (!strcmp (code, db_verify)) {
                @Your email has been verifed. Please <a href="https://opensource.com/?req=login">Login</a>.
                // If matches, update user info to indicate it's verified
                run-query @db_multitenant_SaaS no-loop = "update users set verified=1 where email='%s'" : email
                exit-request
            }
        end-query
        @Could not verify the code. Please try <a href="https://opensource.com/?req=login">again</a>.
        exit-request

    // Create user - this runs when user submits form with email and password to create a user
    } else if (!strcmp (action, "createuser")) {
        input-param email
        input-param pwd
        // create hashed (one-way) password
        hash-string pwd to define hashed_pwd
        // generate random 5 digit string for verify code
        random-string to define verify length 5 number
        // create user: insert email, hashed password, verification token. Current verify status is 0, or not verified
        begin-transaction @db_multitenant_SaaS
        run-query @db_multitenant_SaaS no-loop = "insert into users (email, hashed_pwd, verified, verify_token, session) values ('%s', '%s', '0', '%s', '')" : email, hashed_pwd, verify affected-rows define arows error define err on-error-continue
        if (strcmp (err, "0") || arows != 1) {
            // if cannot add user, it probably doesn't exist. Either way, we can't proceed.
            login_or_signup();
            @User with this email already exists.
            rollback-transaction @db_multitenant_SaaS
        } else {
            // Create email with verification code and email it to user
            write-string define msg
                @From: vely@vely.dev
                @To: <<p-out email>>
                @Subject: verify your account
                @
                @Your verification code is: <<p-out verify>>
            end-write-string
            exec-program "/usr/sbin/sendmail" args "-i", "-t" input msg status define st
            if (st != 0) {
                @Could not send email to <<p-out email>>, code is <<p-out verify>>
                rollback-transaction @db_multitenant_SaaS
                exit-request
            }
            commit-transaction @db_multitenant_SaaS
            // Inform the user to go check email and enter verification code
            @Please check your email and enter verification code here:
            @<form action="https://opensource.com/?req=login" method="POST">
            @<input name="action" type="hidden" value="verify" size="50" maxlength="50">
            @<input name="email" type="hidden" value="<<p-out email>>">
            @<input name="code" type="text" value="" size="50" maxlength="50" required autofocus placeholder="Verification code">
            @<button type="submit">Verify</button>
            @</form>
        }

    // This runs when logged-in user logs out.
    } else if (!strcmp (action, "logout")) {
        // Update user table to wipe out session, meaning no such user is logged in
        if (rd->is_logged_in) {
            run-query @db_multitenant_SaaS = "update users set session='' where userId='%s'" : rd->sess_userId no-loop affected-rows define arows
            if (arows == 1) {
                rd->is_logged_in = false; // indicate user not logged in
                @You have been logged out.<hr/>
            }
        }
        _show_home();

    // Login: this runs when user enters user name and password
    } else if (!strcmp (action, "login")) {
        input-param pwd
        input-param email
        // create one-way hash with the intention of comparing with user table - password is NEVER recorded
        hash-string pwd to define hashed_pwd
        // create random 30-long string for session ID
        random-string to rd->sess_id length 30
        // Check if user name and hashed password match
        run-query @db_multitenant_SaaS = "select userId from users where email='%s' and hashed_pwd='%s'" output sess_userId : email, hashed_pwd
            query-result sess_userId to rd->sess_userId
            // If match, update user table with session ID
            run-query @db_multitenant_SaaS no-loop = "update users set session='%s' where userId='%s'" : rd->sess_id, rd->sess_userId affected-rows define arows
            if (arows != 1) {
                @Could not create a session. Please try again. <<.login_or_signup();>> <hr/>
                exit-request
            }
            // Set user ID and session ID as cookies. User's browser will return those to us with every request
            set-cookie "sess_userId" = rd->sess_userId
            set-cookie "sess_id" = rd->sess_id
            // Display home, make sure session is correct first and set flags
            _check_session();
            _show_home();
            exit-request
        end-query
        @Email or password are not correct. <<.login_or_signup();>><hr/>

    // Login screen, asks user to enter user name and password
    } else if (!strcmp (action, "")) {
        login_or_signup();
        @Please Login:<hr/>
        @<form action="https://opensource.com/?req=login" method="POST">
        @<input name="action" type="hidden" value="login" size="50" maxlength="50">
        @<input name="email" type="text" value="" size="50" maxlength="50" required autofocus placeholder="Email">
        @<input name="pwd" type="password" value="" size="50" maxlength="50" required placeholder="Password">
        @<button type="submit">Go</button>
        @</form>
    }
}

// Display Login or Sign Up links
void login_or_signup() {
        @<a href="https://opensource.com/?req=login">Login</a> & & <a href="https://opensource.com/?req=login&action=newuser">Sign Up</a><hr/>
}
General-purpose application (_show_home.vely)
With this tutorial, you can create any multitenant SaaS application you want. The multitenant-processing module above (login.vely) calls the _show_home() function, which can house any code of yours. This example code shows the Notes application, but it could be anything. The _show_home() function calls any code you wish and is a general-purpose multitenant application plug-in:
#include "vely.h"

void _show_home() {
    notes();
    exit-request
}
Notes application (notes.vely)
The application is able to add, list, and delete any given note:
#include "vely.h"
#include "login.h"
// Notes application in a multitenant Cloud
void notes () {
// get global request data
reqdata *rd;
get-req data to rd
// If session invalid, display Login or Signup
if (!rd->is_logged_in) {
login_or_signup();
}
// Greet the user
@<h1>Welcome to Notes!</h1><hr/>
// If not logged in, exit - this ensures security verification of user's identity
if (!rd->is_logged_in) {
exit-request
}
// Get URL parameter that tells Notes what to do
input-param subreq
// Display actions that Notes can do (add or list notes)
@<a href="https://opensource.com/?req=notes&subreq=add">Add Note</a> <a href="https://opensource.com/?req=notes&subreq=list">List Notes</a><hr/>
// List all notes for this user
if (!strcmp (subreq, "list")) {
// select notes for this user ONLY
run-query @db_multitenant_SaaS = "select dateOf, note, noteId from notes where userId='%s' order by dateOf desc" : rd->sess_userId output dateOf, note, noteId
query-result dateOf to define dateOf
query-result note to define note
query-result noteId to define noteId
// change new lines to <br/> with fast cached Regex
match-regex "\n" in note replace-with "<br/>\n" result define with_breaks status define st cache
if (st == 0) with_breaks = note; // nothing was found/replaced, just use original
// Display a note
@Date: <<p-out dateOf>> (<a href="https://opensource.com/?req=notes&subreq=delete_note_ask¬e_id=%3C%3Cp-out%20noteId%3E%3E">delete note</a>)<br/>
@Note: <<p-out with_breaks>><br/>
@<hr/>
end-query
}
// Ask to delete a note
else if (!strcmp (subreq, "delete_note_ask")) {
input-param note_id
@Are you sure you want to delete a note? Use Back button to go back, or <a href="https://opensource.com/?req=notes&subreq=delete_note¬e_id=%3C%3Cp-out%20note_id%3E%3E">delete note now</a>.
}
// Delete a note
else if (!strcmp (subreq, "delete_note")) {
input-param note_id
// Delete note
run-query @db_multitenant_SaaS = "delete from notes where noteId='%s' and userId='%s'" : note_id, rd->sess_userId affected-rows define arows no-loop error define errnote
// Inform user of status
if (arows == 1) {
@Note deleted
} else {
@Could not delete note (<<p-out errnote>>)
}
}
// Add a note
else if (!strcmp (subreq, "add_note")) {
// Get URL POST data from note form
input-param note
// Insert note under this user's ID
run-query @db_multitenant_SaaS = "insert into notes (dateOf, userId, note) values (now(), '%s', '%s')" : rd->sess_userId, note affected-rows define arows no-loop error define errnote
// Inform user of status
if (arows == 1) {
@Note added
} else {
@Could not add note (<<p-out errnote>>)
}
}
// Display an HTML form to collect a note, and send it back here (with subreq="add_note" URL param)
else if (!strcmp (subreq, "add")) {
@Add New Note
@<form action="https://opensource.com/?req=notes" method="POST">
@<input name="subreq" type="hidden" value="add_note">
@<textarea name="note" rows="5" cols="50" required autofocus placeholder="Enter Note"></textarea>
@<button type="submit">Create</button>
@</form>
}
}
SaaS with C performance
Vely makes it possible to leverage the power of C in your web applications. A multitenant SaaS application is a prime example of a use case that benefits from that. Take a look at the code examples, write some code, and give Vely a try.
via: https://opensource.com/article/22/11/build-your-own-saas-vely
作者:Sergio Mijatovic 选题:lkxed 译者:译者ID 校对:校对者ID


