6.5 KiB
Use DNS over TLS
The Domain Name System (DNS) that modern computers use to find resources on the internet was designed 35 years ago without consideration for user privacy. It is exposed to security risks and attacks like DNS Hijacking. It also allows ISPs to intercept the queries.
Luckily, DNS over TLS and DNSSEC are available. DNS over TLS and DNSSEC allow safe and encrypted end-to-end tunnels to be created from a computer to its configured DNS servers. On Fedora, the steps to implement these technologies are easy and all the necessary tools are readily available.
This guide will demonstrate how to configure DNS over TLS on Fedora using systemd-resolved. Refer to the documentation for further information about the systemd-resolved service.
Step 1 : Set-up systemd-resolved
Modify /etc/systemd/resolved.conf so that it is similar to what is shown below. Be sure to enable DNS over TLS and to configure the IP addresses of the DNS servers you want to use.
$ cat /etc/systemd/resolved.conf
[Resolve]
DNS=1.1.1.1 9.9.9.9
DNSOverTLS=yes
DNSSEC=yes
FallbackDNS=8.8.8.8 1.0.0.1 8.8.4.4
#Domains=~.
#LLMNR=yes
#MulticastDNS=yes
#Cache=yes
#DNSStubListener=yes
#ReadEtcHosts=yes
A quick note about the options:
- DNS: A space-separated list of IPv4 and IPv6 addresses to use as system DNS servers
- FallbackDNS: A space-separated list of IPv4 and IPv6 addresses to use as the fallback DNS servers.
- Domains: These domains are used as search suffixes when resolving single-label host names, ~. stand for use the system DNS server defined with DNS= preferably for all domains.
- DNSOverTLS: If true all connections to the server will be encrypted. Note that this mode requires a DNS server that supports DNS-over-TLS and has a valid certificate for it’s IP.
NOTE: The DNS servers listed in the above example are my personal choices. You should decide which DNS servers you want to use; being mindful of whom you are asking IPs for internet navigation.
Step 2 : Tell NetworkManager to push info to systemd-resolved
Create a file in /etc/NetworkManager/conf.d named 10-dns-systemd-resolved.conf.
$ cat /etc/NetworkManager/conf.d/10-dns-systemd-resolved.conf
[main]
dns=systemd-resolved
The setting shown above (dns=systemd-resolved) will cause NetworkManager to push DNS information acquired from DHCP to the systemd-resolved service. This will override the DNS settings configured in Step 1. This is fine on a trusted network, but feel free to set dns=none instead to use the DNS servers configured in /etc/systemd/resolved.conf.
Step 3 : start & restart services
To make the settings configured in the previous steps take effect, start and enable systemd-resolved. Then restart NetworkManager.
CAUTION: This will lead to a loss of connection for a few seconds while NetworkManager is restarting.
$ sudo systemctl start systemd-resolved
$ sudo systemctl enable systemd-resolved
$ sudo systemctl restart NetworkManager
NOTE: Currently, the systemd-resolved service is disabled by default and its use is opt-in. There are plans to enable systemd-resolved by default in Fedora 33.
Step 4 : Check if everything is fine
Now you should be using DNS over TLS. Confirm this by checking DNS resolution status with:
$ resolvectl status
MulticastDNS setting: yes
  DNSOverTLS setting: yes
      DNSSEC setting: yes
    DNSSEC supported: yes
  Current DNS Server: 1.1.1.1
         DNS Servers: 1.1.1.1
                      9.9.9.9
Fallback DNS Servers: 8.8.8.8
                      1.0.0.1
                      8.8.4.4
/etc/resolv.conf should point to 127.0.0.53
$ cat /etc/resolv.conf
# Generated by NetworkManager
search lan
nameserver 127.0.0.53
To see the address and port that systemd-resolved is sending and receiving secure queries on, run:
$ sudo ss -lntp | grep '\(State\|:53 \)'
State     Recv-Q    Send-Q       Local Address:Port        Peer Address:Port    Process
LISTEN    0         4096         127.0.0.53%lo:53               0.0.0.0:*        users:(("systemd-resolve",pid=10410,fd=18))
To make a secure query, run:
$ resolvectl query fedoraproject.org
fedoraproject.org: 8.43.85.67                  -- link: wlp58s0
                   8.43.85.73                  -- link: wlp58s0

[..]

-- Information acquired via protocol DNS in 36.3ms.
-- Data is authenticated: yes
BONUS Step 5 : Use Wireshark to verify the configuration
First, install and run Wireshark:
$ sudo dnf install wireshark
$ sudo wireshark
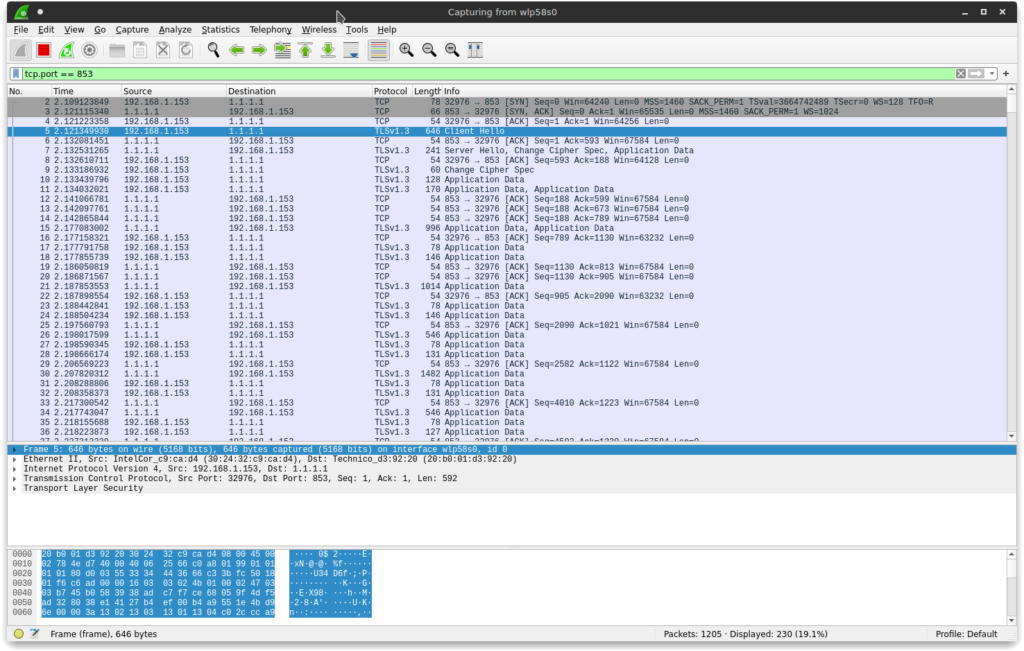
It will ask you which link device it have to begin capturing packets on. In my case, because I use a wireless interface, I will go ahead with wlp58s0. Set up a filter in Wireshark like tcp.port == 853 (853 is the DNS over TLS protocol port). You need to flush the local DNS caches before you can capture a DNS query:
$ sudo resolvectl flush-caches
Now run:
$ nslookup fedoramagazine.org
You should see a TLS-encryped exchange between your computer and your configured DNS server:
— Poster in Cover Image Approved for Release by NSA on 04-17-2018, FOIA Case # 83661 —
via: https://fedoramagazine.org/use-dns-over-tls/
作者:Thomas Bianchi 选题:lujun9972 译者:译者ID 校对:校对者ID

