15 KiB
Create a list in a Flutter mobile app
Learn how to create Flutter app screens and pass data between them.

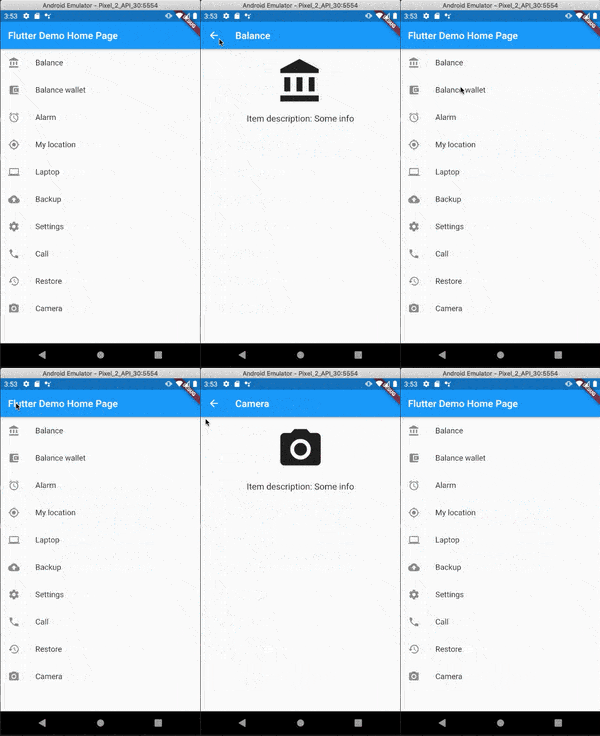
Flutter is a popular open source toolkit for building cross-platform apps. In "Create a mobile app with Flutter," I demonstrated how to install Flutter on Linux and create your first app. In this article, I'll show you how to add a list of items in your app, with each item opening a new screen. This is a common design method for mobile apps, so you've probably seen it before, but here's a screenshot to help you visualize it:
(Vitaly Kuprenko, CC BY-SA 4.0)
Flutter uses the Dart language. In some of the code snippets below, you'll see statements beginning with slashes. Two slashes (/ /) is for code comments, which explain certain pieces of code. Three slashes (/ / /) denotes Dart's documentation comments, which explain Dart classes and their properties and other useful information.
Examine a Flutter app's main parts
A typical entry point for a Flutter application is a main() function, usually found in a file called lib/main.dart:
void main() {
 runApp(MyApp());
}
This method is called when the app is launched. It runs MyApp(), a StatelessWidget containing all necessary app settings in the MaterialApp() widget (app theme, initial page to open, and so on):
class MyApp extends StatelessWidget {
 @override
 Widget build(BuildContext context) {
   return MaterialApp(
     title: 'Flutter Demo',
     theme: ThemeData(
       primarySwatch: Colors.blue,
       visualDensity: VisualDensity.adaptivePlatformDensity,
     ),
     home: MyHomePage(title: 'Flutter Demo Home Page'),
   );
 }
}
The initial page generated is called MyHomePage(). It's a stateful widget that contains variables that can be passed to a widget constructor parameter (take a look at the code above, where you pass the variable title to the page constructor):
class MyHomePage extends StatefulWidget {
  MyHomePage({[Key][7] key, this.title}) : super(key: key);

  final [String][8] title;

  @override
  _MyHomePageState createState() => _MyHomePageState();
}
StatefulWidget means that this page has its own state: _MyHomePageState. It lets you call the setState() method there to rebuild the page's user interface (UI):
class _MyHomePageState extends State<MyHomePage> {
 int _counter = 0; // Number of taps on + button.

 void _incrementCounter() { // Increase number of taps and update UI by calling setState().
   setState(() {
     _counter++;
   });
 }
 ...
}
A build() function in stateful and stateless widgets is responsible for UI appearance:
@override
Widget build(BuildContext context) {
 return Scaffold( // Page widget.
   appBar: AppBar( // Page app bar with title and back button if user can return to previous screen.
     title: Text(widget.title), // Text to display page title.
   ),
   body: Center( // Widget to center child widget.
     child: Column( // Display children widgets in column.
       mainAxisAlignment: MainAxisAlignment.center,
       children: <Widget>[
         Text( // Static text.
           'You have pushed the button this many times:',
         ),
         Text( // Text with our taps number.
           '$_counter', // $ sign allows us to use variables inside a string.
           style: Theme.of(context).textTheme.headline4,// Style of the text, “Theme.of(context)” takes our context and allows us to access our global app theme.
         ),
       ],
     ),
   ),
        // Floating action button to increment _counter number.
   floatingActionButton: FloatingActionButton(
     onPressed: _incrementCounter,
     tooltip: 'Increment',
     child: [Icon][9](Icons.add),
   ),
 );
}
Modify your app
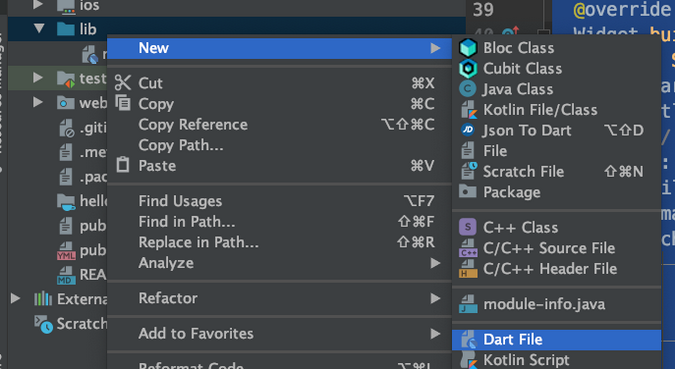
It's good practice to separate the main() method and other pages' code into different files. To do so, you need to create a new .dart file by right-clicking on the lib folder then selecting New > Dart File:
(Vitaly Kuprenko, CC BY-SA 4.0)
Name the file items_list_page.
Switch back to your main.dart file, cut the MyHomePage and _MyHomePageState code, and paste it into your new file. Next, set your cursor on StatefulWidget (underlined below in red), press Alt+Enter, and select package:flutter/material.dart:
(Vitaly Kuprenko, CC BY-SA 4.0)
This adds flutter/material.dart to your file so that you can use the default material widgets Flutter provides.
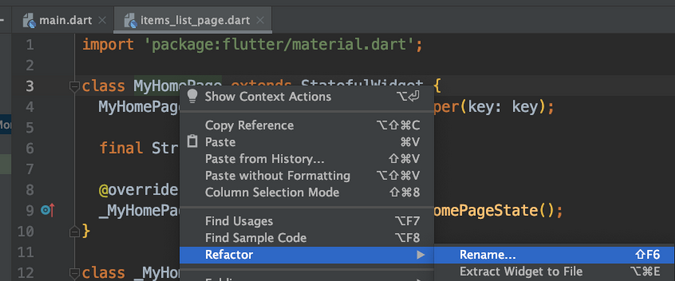
Then, right-click on MyHomePage class > Refactor > Rename… and rename this class to ItemsListPage:
(Vitaly Kuprenko, CC BY-SA 4.0)
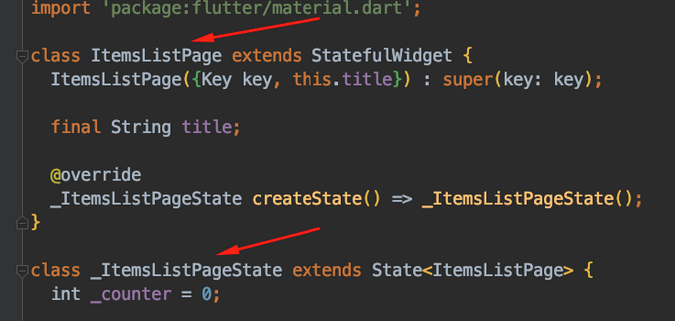
Flutter recognizes that you renamed the StatefulWidget class and automatically renames its State class:
(Vitaly Kuprenko, CC BY-SA 4.0)
Return to the main.dart file and change the name MyHomePage to ItemsListPage. Once you start typing, your Flutter integrated development environment (probably IntelliJ IDEA Community Edition, Android Studio, and VS Code or VSCodium) suggests how to autocomplete your code:
(Vitaly Kuprenko, CC BY-SA 4.0)
Press Enter to complete your input. It will add the missing import to the top of the file automatically:
(Vitaly Kuprenko, CC BY-SA 4.0)
You've completed your initial setup. Now you need to create a new .dart file in the lib folder and name it item_model. (Note that classes have UpperCamelCase names, but files have snake_case names.) Paste this code into the new file:
/// Class that stores list item info:
/// [id] - unique identifier, number.
/// [icon] - icon to display in UI.
/// [title] - text title of the item.
/// [description] - text description of the item.
class ItemModel {
 // class constructor
 ItemModel(this.id, this.icon, this.title, this.description);

 // class fields
 final int id;
 final IconData icon;
 final [String][8] title;
 final [String][8] description;
}
Return to items_list_page.dart, and replace the existing _ItemsListPageState code with:
class _ItemsListPageState extends State<ItemsListPage> {

// Hard-coded list of [ItemModel] to be displayed on our page.
 final List<ItemModel> _items = [
   ItemModel(0, Icons.account_balance, 'Balance', 'Some info'),
   ItemModel(1, Icons.account_balance_wallet, 'Balance wallet', 'Some info'),
   ItemModel(2, Icons.alarm, 'Alarm', 'Some info'),
   ItemModel(3, Icons.my_location, 'My location', 'Some info'),
   ItemModel(4, Icons.laptop, 'Laptop', 'Some info'),
   ItemModel(5, Icons.backup, 'Backup', 'Some info'),
   ItemModel(6, Icons.settings, 'Settings', 'Some info'),
   ItemModel(7, Icons.call, 'Call', 'Some info'),
   ItemModel(8, Icons.restore, 'Restore', 'Some info'),
   ItemModel(9, Icons.camera_alt, 'Camera', 'Some info'),
 ];

 @override
 Widget build(BuildContext context) {
   return Scaffold(
       appBar: AppBar(
         title: Text(widget.title),
       ),
       body: [ListView][17].builder( // Widget which creates [ItemWidget] in scrollable list.
         itemCount: _items.length, // Number of widget to be created.
         itemBuilder: (context, itemIndex) => // Builder function for every item with index.
             ItemWidget(_items[itemIndex], () {
           _onItemTap(context, itemIndex);
         }),
       ));
 }

 // Method which uses BuildContext to push (open) new MaterialPageRoute (representation of the screen in Flutter navigation model) with ItemDetailsPage (StateFullWidget with UI for page) in builder.
 _onItemTap(BuildContext context, int itemIndex) {
   Navigator.of(context).push(MaterialPageRoute(
       builder: (context) => ItemDetailsPage(_items[itemIndex])));
 }
}

// StatelessWidget with UI for our ItemModel-s in ListView.
class ItemWidget extends StatelessWidget {
 const ItemWidget(this.model, this.onItemTap, {[Key][7] key}) : super(key: key);

 final ItemModel model;
 final Function onItemTap;

 @override
 Widget build(BuildContext context) {
   return InkWell( // Enables taps for child and add ripple effect when child widget is long pressed.
     onTap: onItemTap,
     child: ListTile( // Useful standard widget for displaying something in ListView.
       leading: [Icon][9](model.icon),
       title: Text(model.title),
     ),
   );
 }
}
Consider moving ItemWidget to a separate file in the lib folder to improve the readability of your code.
The only thing missing is the ItemDetailsPage class. Create a new file in the lib folder and name it item_details_page. Then copy and paste this code there:
import 'package:flutter/material.dart';

import 'item_model.dart';

/// Widget for displaying detailed info of [ItemModel]
class ItemDetailsPage extends StatefulWidget {
 final ItemModel model;

 const ItemDetailsPage(this.model, {[Key][7] key}) : super(key: key);

 @override
 _ItemDetailsPageState createState() => _ItemDetailsPageState();
}

class _ItemDetailsPageState extends State<ItemDetailsPage> {
 @override
 Widget build(BuildContext context) {
   return Scaffold(
     appBar: AppBar(
       title: Text(widget.model.title),
     ),
     body: Center(
       child: Column(
         children: [
           const SizedBox(height: 16),
           [Icon][9](
             widget.model.icon,
             size: 100,
           ),
           const SizedBox(height: 16),
           Text(
             'Item description: ${widget.model.description}',
             style: TextStyle(fontSize: 18),
           )
         ],
       ),
     ),
   );
 }
}
Almost nothing new here. Notice that _ItemDetailsPageState is using the widget.item.title code. It enables referring to the StatefulWidget fields in its State class.
Add some animation
Now, it's time to add some basic animation:
- Go to
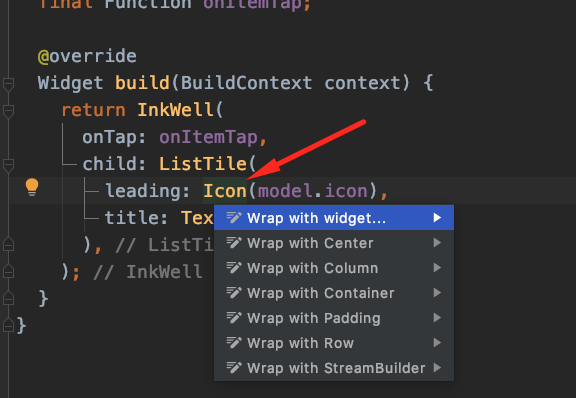
ItemWidgetcode. - Put the cursor on the
Icon()widget in thebuild()method. - Press Alt+Enter and select "Wrap with widget…"
(Vitaly Kuprenko, CC BY-SA 4.0)
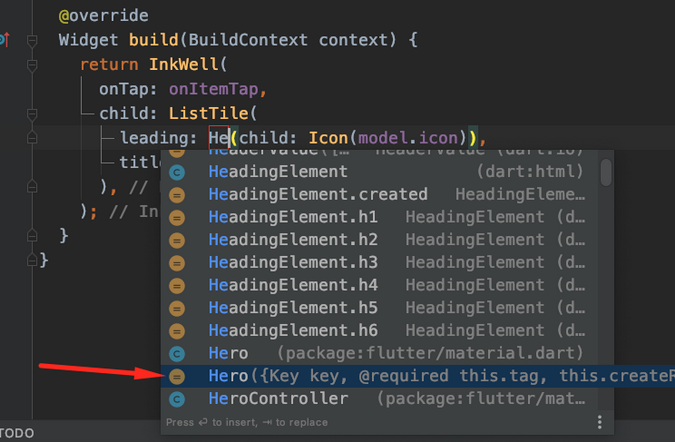
Start typing "Hero" and select the suggestion for Hero((Key key, @required this, tag, this.create)):
(Vitaly Kuprenko, CC BY-SA 4.0)
Next, add the tag property tag: model.id to the Hero widget:
(Vitaly Kuprenko, CC BY-SA 4.0)
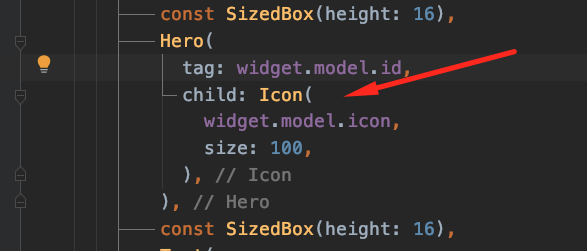
And the final step is to make the same change in the item_details_page.dart file:
(Vitaly Kuprenko, CC BY-SA 4.0)
The previous steps wrapped the Icon() widget with the Hero() widget. Do you remember in ItemModel you added the id field but didn't use it anywhere? The Hero widget takes a unique tag for the child widget. If Hero detects that different app screens (MaterialPageRoute) have a Hero widget with the same tag, it'll automatically animate the transition between these pages.
Test it out by running the app on an Android emulator or physical device. When you open and close the item details page, you'll see a nice animation of the icon:
(Vitaly Kuprenko, CC BY-SA 4.0)
Wrapping up
In this tutorial, you learned:
- The components of a standard, automatically created app
- How to add several pages that pass data among each other
- How to add a simple animation for those pages
If you want to learn more, check out Flutter's docs (with links to sample projects, videos, and "recipes" for creating Flutter apps) and the source code, which is open source under a BSD 3-Clause License.
via: https://opensource.com/article/20/11/flutter-lists-mobile-app
作者:Vitaly Kuprenko 选题:lujun9972 译者:译者ID 校对:校对者ID
