18 KiB
Make Conway's Game of Life in WebAssembly
WebAssembly is a good option for computationally expensive tasks due to
its predefined execution environment and memory granularity.

Conway's Game of Life is a popular programming exercise to create a cellular automaton, a system that consists of an infinite grid of cells. You don't play the game in the traditional sense; in fact, it is sometimes referred to as a game for zero players.
Once you start the Game of Life, the game plays itself to multiply and sustain "life." In the game, digital cells representing lifeforms are allowed to change states as defined by a set of rules. When the rules are applied to cells through multiple iterations, they exhibit complex behavior and interesting patterns.
The Game of Life simulation is a very good candidate for a WebAssembly implementation because of how computationally expensive it can be; every cell's state in the entire grid must be calculated for every iteration. WebAssembly excels at computationally expensive tasks due to its predefined execution environment and memory granularity, among many other features.
Compiling to WebAssembly
Although it's possible to write WebAssembly by hand, it is very unintuitive and error-prone as complexity increases. Most importantly, it's not intended to be written that way. It would be the equivalent of manually writing assembly language instructions.
Here's a simple WebAssembly function to add two numbers:
(func $Add (param $0 i32) (param $1 i32) (result i32)
    local.get $0
    local.get $1
    i32.add
)
It is possible to compile WebAssembly modules using many existing languages, including C, C++, Rust, Go, and even interpreted languages like Lua and Python. This list is only growing.
One of the problems with using existing languages is that WebAssembly does not have much of a runtime. It does not know what it means to free a pointer or what a closure is. All these language-specific runtimes have to be included in the resulting WebAssembly binaries. Runtime size varies by language, but it has an impact on module size and execution time.
AssemblyScript
AssemblyScript is one language that is trying to overcome some of these challenges with a different approach. AssemblyScript is designed specifically for WebAssembly, with a focus on providing low-level control, producing smaller binaries, and reducing the runtime overhead.
AssemblyScript uses a strictly typed variant of TypeScript, a superset of JavaScript. Developers familiar with TypeScript do not have to go through the trouble of learning an entirely new language.
Getting started
The AssemblyScript compiler can easily be installed through Node,js. Start by initializing a new project in an empty directory:
npm init
npm install --save-dev assemblyscript
If you don't have Node installed locally, you can play around with AssemblyScript on your browser using the nifty WebAssembly Studio application.
AssemblyScript comes with asinit, which should be installed when you run the installation command above. It is a helpful utility to quickly set up an AssemblyScript project with the recommended directory structure and configuration files:
`npx asinit .`
The newly created assembly directory will contain all the AssemblyScript code, a simple example function in assembly/index.ts, and the asbuild command inside package.json. asbuild, which compiles the code into WebAssembly binaries.
When you run npm run asbuild to compile the code, it creates files inside build. The .wasm files are the generated WebAssembly modules. The .wat files are the modules in text format and are generally used for debugging and inspection.
You have to do a little bit of work to get the binaries to run on a browser.
First, create a simple HTML file, index.html:
<[html][12]>
    <[head][13]>
        <[meta][14] charset=utf-8>
        <[title][15]>Game of life</[title][15]>
    </[head][13]>

    <[body][16]>
        <[script][17] src='./index.js'></[script][17]>
    </[body][16]>
</[html][12]>
Next, replace the contents of index.js with the code snippet below to load the WebAssembly modules:
const runWasm = async () => {
  const module = await WebAssembly.instantiateStreaming(fetch('./build/optimized.wasm'));
  const exports = module.instance.exports;

  console.log('Sum = ', exports.add(20, 22));
};

runWasm();
This fetches the binary and passes it to WebAssembly.instantiateStreaming, the browser API that compiles a module into a ready-to-use instance. This is an asynchronous operation, so it is run inside an async function so that await can be used to wait for it to finish compiling.
The module.instance.exports object contains all the functions exported by AssemblyScript. Use the example function in assembly/index.ts and log the result.
You will need a simple development server to host these files. There are a lot of options listed in this gist. I used node-static:
npm install -g node-static
static
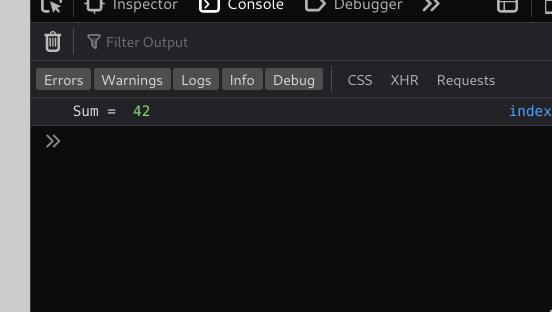
You can view the result by pointing your browser to localhost:8080 and opening the console.
(Mohammed Saud, CC BY-SA 4.0)
Drawing to a canvas
You will be drawing all the cells onto a <canvas> element:
<[body][16]>
    <[canvas][22] id=canvas></[canvas][22]>

    ...
</[body][16]>
Add some CSS:
<[head][13]>
    ...

    <[style][23] type=text/css>
    body {
      background: #ccc;
    }
    canvas {
      display: block;
      padding: 0;
      margin: auto;
      width: 40%;

      image-rendering: pixelated;
      image-rendering: crisp-edges;
    }
    </[style][23]>
</[head][13]>
The image-rendering styles are used to prevent the canvas from smoothing and blurring out pixelated images.
You will need a canvas drawing context in index.js:
const canvas = document.getElementById('canvas');
const ctx = canvas.getContext('2d');
There are many functions in the Canvas API that you could use for drawing—but you need to draw using WebAssembly, not JavaScript.
Remember that WebAssembly does NOT have access to the browser APIs that JavaScript has, and any call that needs to be made should be interfaced through JavaScript. This also means that your WebAssembly module will run the fastest if there is as little communication with JavaScript as possible.
One method is to create ImageData (a data type for the underlying pixel data of a canvas), fill it up with the WebAssembly module's memory, and draw it on the canvas. This way, if the memory buffer is updated inside WebAssembly, it will be immediately available to the ImageData.
Define the pixel count of the canvas and create an ImageData object:
const WIDTH = 10, HEIGHT = 10;

const runWasm = async () => {
...

canvas.width = WIDTH;
canvas.height = HEIGHT;

const ctx = canvas.getContext('2d');
const memoryBuffer = exports.memory.buffer;
const memoryArray = new Uint8ClampedArray(memoryBuffer)

const imageData = ctx.createImageData(WIDTH, HEIGHT);
imageData.data.set(memoryArray.slice(0, WIDTH * HEIGHT * 4));
ctx.putImageData(imageData, 0, 0);
The memory of a WebAssembly module is provided in exports.memory.buffer as an ArrayBuffer. You need to use it as an array of 8-bit unsigned integers or Uint8ClampedArray. Now you can fill up the module's memory with some pixels. In assembly/index.ts, you first need to grow the available memory:
`memory.grow(1);`
WebAssembly does not have access to memory by default and needs to request it from the browser using the memory.grow function. Memory grows in chunks of 64Kb, and the number of required chunks can be specified when calling it. You will not need more than one chunk for now.
Keep in mind that memory can be requested multiple times, whenever needed, and once acquired, memory cannot be freed or given back to the browser.
Writing to the memory:
`store<u32>(0, 0xff101010);`
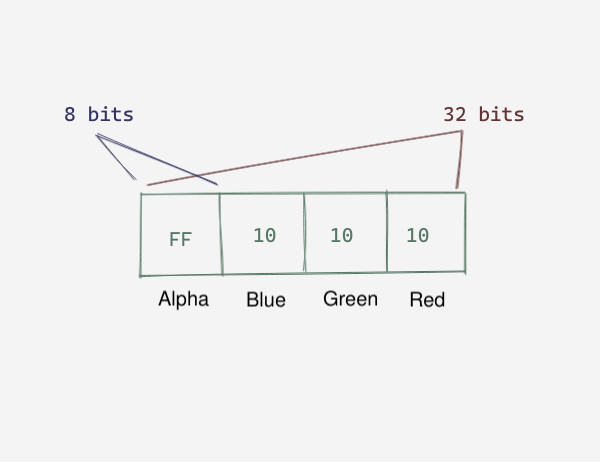
A pixel is represented by 32 bits, with the RGBA values taking up 8 bits each. Here, RGBA is defined in reverse—ABGR—because WebAssembly is little-endian.
The store function stores the value 0xff101010 at index 0, taking up 32 bits. The alpha value is 0xff so that the pixel is fully opaque.
(Mohammed Saud, CC BY-SA 4.0)
Build the module again with npm run asbuild before refreshing the page to see your first pixel on the top-left of the canvas.
Implementing rules
Let's review the rules. The Game of Life Wikipedia page summarizes them nicely:
- Any live cell with fewer than two live neighbors dies, as if by underpopulation.
- Any live cell with two or three live neighbors lives on to the next generation.
- Any live cell with more than three live neighbors dies, as if by overpopulation.
- Any dead cell with exactly three live neighbors becomes a live cell, as if by reproduction.
You need to iterate through all the rows, implementing these rules on each cell. You do not know the width and height of the grid, so write a little function to initialize the WebAssembly module with this information:
let universe_width: u32;
let universe_height: u32;
let alive_color: u32;
let dead_color: u32;
let chunk_offset: u32;

export function init(width: u32, height: u32): void {
  universe_width = width;
  universe_height = height;
  chunk_offset = width * height * 4;

  alive_color = 0xff101010;
  dead_color = 0xffefefef;
}
Now you can use this function in index.js to provide data to the module:
`exports.init(WIDTH, HEIGHT);`
Next, write an update function to iterate over all the cells, count the number of active neighbors for each, and set the current cell's state accordingly:
export function update(): void {
  for (let x: u32 = 0; x < universe_width; x++) {
    for (let y: u32 = 0; y < universe_height; y++) {

      const neighbours = countNeighbours(x, y);

      if (neighbours < 2) {
        // less than 2 neighbours, cell is no longer alive
        setCell(x, y, dead_color);
      } else if (neighbours == 3) {
        // cell will be alive
        setCell(x, y, alive_color);
      } else if (neighbours > 3) {
        // cell dies due to overpopulation
        setCell(x, y, dead_color);
      }
    }
  }

  copyToPrimary();
}
You have two copies of cell arrays, one representing the current state and the other for calculating and temporarily storing the next state. After the calculation is done, the second array is copied to the first for rendering.
The rules are fairly straightforward, but the countNeighbours() function looks interesting. Take a closer look:
function countNeighbours(x: u32, y: u32): u32 {
  let neighbours = 0;

  const max_x = universe_width - 1;
  const max_y = universe_height - 1;

  const y_above = y == 0 ? max_y : y - 1;
  const y_below = y == max_y ? 0 : y + 1;
  const x_left = x == 0 ? max_x : x - 1;
  const x_right = x == max_x ? 0 : x + 1;

  // top left
  if(getCell(x_left, y_above) == alive_color) {
    neighbours++;
  }

  // top
  if(getCell(x, y_above) == alive_color) {
    neighbours++;
  }

  // top right
  if(getCell(x_right, y_above) == alive_color) {
    neighbours++;
  }

  ...

  return neighbours;
}
(Mohammed Saud, CC BY-SA 4.0)
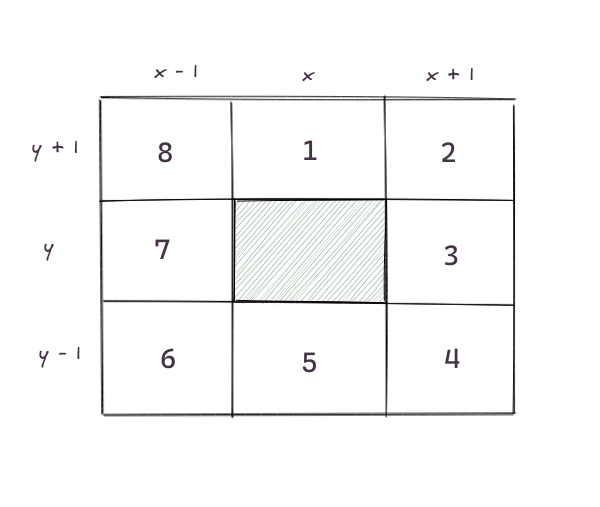
Every cell has eight neighbors, and you can check if each one is in the alive_color state. The important situation handled here is if a cell is exactly on the edge of the grid. Cellular automata are generally assumed to be on an infinite space, but since infinitely large displays haven't been invented yet, stick to warping at the edges. This means when a cell goes off the top, it comes back in its corresponding position on the bottom. This is commonly known as toroidal space.
The getCell and setCell functions are wrappers to the store and load functions to make it easier to interact with memory using 2D coordinates:
@inline
function getCell(x: u32, y: u32): u32 {
  return load<u32>((x + y * universe_width) << 2);
}

@inline
function setCell(x: u32, y: u32, val: u32): void {
  store<u32>(((x + y * universe_width) << 2) + chunk_offset, val);
}

function copyToPrimary(): void {
  memory.copy(0, chunk_offset, chunk_offset);
}
The @inline is an annotation that requests that the compiler convert calls to the function with the function definition itself.
Call the update function on every iteration from index.js and render the image data from the module memory:
const FPS = 5;

const runWasm = async () => {
  ...

  const step = () => {
    exports.update();

    imageData.data.set(memoryArray.slice(0, WIDTH * HEIGHT * 4));
    ctx.putImageData(imageData, 0, 0);

    setTimeout(step, 1000 / FPS);
  };
  step();
At this point, if you compile the module and load the page, it shows nothing. The code works fine, but since you don't have any living cells initially, there are no new cells coming up.
Create a new function to randomly add cells during initialization:
function fillUniverse(): void {
  for (let x: u32 = 0; x < universe_width; x++) {
    for (let y: u32 = 0; y < universe_height; y++) {
      setCell(x, y, Math.random() > 0.5 ? alive_color : dead_color);
    }
  }

  copyToPrimary();
}

export function init(width: u32, height: u32): void {
  ...

  fillUniverse();
Since Math.random is used to determine the initial state of a cell, the WebAssembly module needs a seed function to derive a random number from.
AssemblyScript provides a convenient module loader that does this and a lot more, like wrapping the browser APIs for module loading and providing functions for more fine-grained memory control. You will not be using it here since it abstracts away many details that would otherwise help in learning the inner workings of WebAssembly, so pass in a seed function instead:
  const importObject = {
    env: {
      seed: Date.now,
      abort: () => console.log('aborting!')
    }
  };
  const module = await WebAssembly.instantiateStreaming(fetch('./build/optimized.wasm'), importObject);
instantiateStreaming can be called with an optional second parameter, an object that exposes JavaScript functions to WebAssembly modules. Here, use Date.now as the seed to generate random numbers.
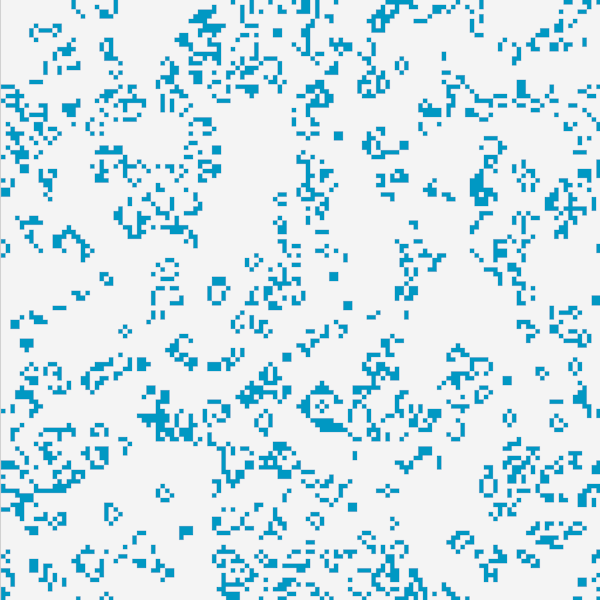
It should now be possible to run the fillUniverse function and finally have life on your grid!
You can also play around with different WIDTH, HEIGHT, and FPS values and use different cell colors.
(Mohammed Saud, CC BY-SA 4.0)
Try the game
If you use large sizes, make sure to grow the memory accordingly.
Here's the complete code.
via: https://opensource.com/article/21/4/game-life-simulation-webassembly
作者:Mohammed Saud 选题:lujun9972 译者:译者ID 校对:校对者ID


