15 KiB
Make Linux stronger with firewalls
Learn how firewalls work and which settings to tweak for better Linux
security.

Everyone's heard of firewalls, even if only as a plot device in a TV cybercrime drama. Many people also know that their computer is (likely) running a firewall, but fewer people understand how to take control of their firewall when necessary.
Firewalls block unwanted network traffic, but different networks have different threat levels. For instance, if you're at home, you probably trust the other computers and devices on your network a lot more than when you're out at the local café using public WiFi. You can hope your computer differentiates between a trusted network and an untrusted one, or you can learn to manage, or at least verify, your security settings yourself.
How firewalls work
Communication between devices on a network happens through gateways called ports. Port, in this context, doesn't mean a physical connection like a USB port or an HDMI port. In network lingo, a port is an entirely virtual concept representing pathways for a specific type of data to either arrive at or depart from a computer. This system could have been called anything, like "connections" or "doorways," but they were named ports at least as early as 1981, and that's the name in use today. The point is, there's nothing special about any port; they're just a way to designate an address where data transference may happen.
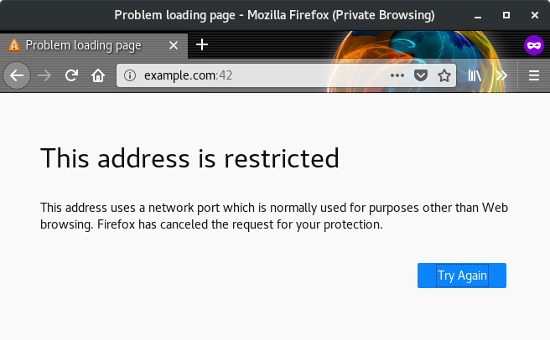
Back in 1972, a list of port numbers (then called "sockets") was published, and this has since evolved into a set of well-known standard port numbers that help manage specific kinds of traffic. For instance, you access ports 80 and 443 on a daily basis when you visit a website, because most everyone on the internet has agreed, implicitly or explicitly, that data is transferred from web servers over those ports. You can test this theory by opening a web browser and navigating to a website with a nonstandard port appended to the URL. For instance, if you navigate to example.com:42, your request is denied because example.com does not serve a website at port 42.
If you revisit the same website at port 80, you get a website, as expected. You can specify port 80 with :80 at the end of the URL, but because port 80 is the standard port for HTTP traffic, your web browser assumes port 80 by default.
When a computer, like a web server, expects traffic at a specific port, it's acceptable (and necessary) to have the port open for traffic. The danger is leaving ports open that you have no reason to expect traffic on, and that's exactly what a firewall is for.
Install firewalld
There are many interfaces for firewall configuration. This article covers firewalld, which integrates with Network Manager on the desktop and firewall-cmd in the terminal. Many Linux distributions ship with these tools installed. If yours doesn't, you can either take this article as general advice for firewall management and apply it to what you use, or you can install firewalld.
On Ubuntu, for instance, you must enable the universe repository, deactivate the default ufw firewall, and then install firewalld:
$ sudo systemctl disable ufw
$ sudo add-apt-repository universe
$ sudo apt install firewalld
Fedora, CentOS, RHEL, OpenSUSE, and many others include firewalld by default.
Regardless of your distribution, for a firewall to be effective, it must be active and set to be loaded at boot. The less you have to think about firewall maintenance, the better.
`$ sudo systemctl enable --now firewalld`
Choose your zone with Network Manager
You probably connect to many different networks every day. You're on one network at work, another at the café, and yet another at home. Your computer can detect which network you use more frequently than others, but it doesn't know which you trust.
A firewall zone contains presets deciding what ports to open and close. Using zones, you can choose a policy that makes the most sense for the network you're currently on.
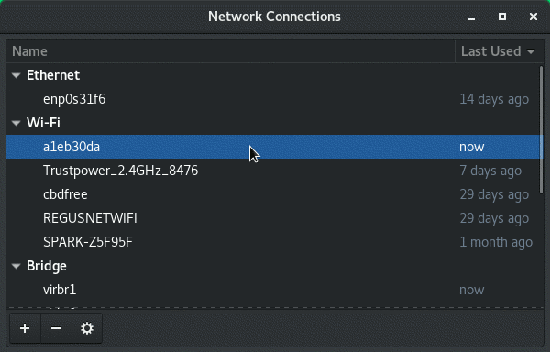
To see a list of available zones, open the Network Manager Connection Editor, found in your Applications menu, or with the nm-connection-editor & command.
From the list of network connections, double-click on your current network.
In the network configuration window that appears, click the General tab.
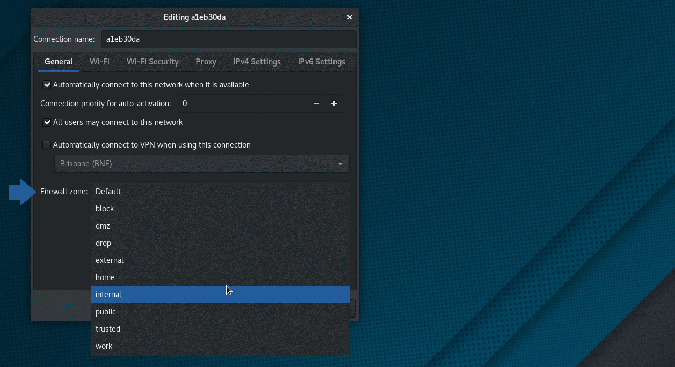
In the General panel, click the drop-down menu next to Firewall Zone for a list of all available zones.
You can get this same list with this terminal command:
`$ sudo firewall-cmd --get-zones`
The zone titles indicate what their designers had in mind when creating them, but you can get the specifics of any zone with this terminal command:
$ sudo firewall-cmd --zone work --list-all
work
  target: default
  icmp-block-inversion: no
  interfaces:
  sources:
  services: ssh dhcpv6-client
  ports:
  protocols:
  [...]
In this example, the work zone is configured to permit SSH and DHCPv6-client incoming traffic but drops any other incoming traffic not explicitly requested by the user. (In other words, the work zone doesn't block HTTP response traffic when you visit a website, but it does deny an HTTP request on your port 80.)
View each zone to get familiar with the traffic each one allows. The most common ones are:
- Work: Use this one when on a network you mostly trust. SSH, DHCPv6, and mDNS are permitted, and you can add more as needed. This zone is meant to be a starting point for a custom work environment based on your daily office requirements.
- Public: For networks you do not trust. This zone is the same as the work zone, but presumably, you would not add the same exceptions as your work zone.
- Drop: All incoming connections are dropped with no response given. This is as close to a stealth mode as you can get without shutting off networking entirely because only outgoing network connections are possible (even a casual port scanner could detect your computer from outgoing traffic, though, so don't mistake this zone for a cloaking device). This is arguably the safest zone when on public WiFi, and definitely the best when you have reason to believe a network is hostile.
- Block: All incoming connections are rejected with a message declaring that the requested port is prohibited. Only network connections you initiate are possible. This is a "friendly" version of the drop zone because, even though no port is open for incoming traffic, a port verbosely declines an uninitiated connection.
- Home: Use this when you trust other computers on the network. Only selected incoming connections are accepted, and you can add more as needed.
- Internal: Similar to the work zone, this is intended for internal networks where you mostly trust the other computers. You can open more ports and services as needed but still maintain a different rule set than you have on your work zone.
- Trusted: All network connections are accepted. Good for troubleshooting or on networks you absolutely trust.
Assigning a zone to a network
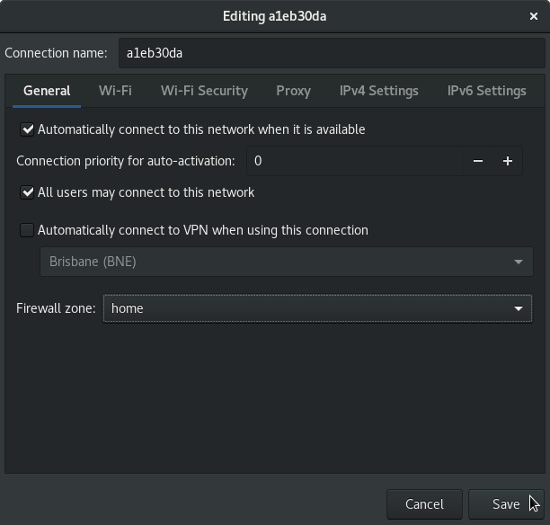
You can assign a zone to any network connection you make. Furthermore, you can assign a different zone to each network interface (Ethernet cable, WiFi, and so on) that attaches to each network.
Select the zone you want and click the Save button to commit the change.
The easiest way to get into the habit of assigning a zone to a network interface is to tend to the networks you use most often. Assign the home zone to your home network, the work zone to your work network, and the public network to your favorite library or café network.
Once you have assigned a zone to all your usual networks, make an effort to assign a zone to the next new network you join, whether it's a new café or your mate's home network. Assigning zones is the best way to reinforce your own awareness that networks are not all equal and that you're not any more secure than anybody else just because you run Linux.
Default zone
Rather than prompting you for a zone every time you join a new network, firewalld assigns any unknown network a default zone. Open a terminal and type this command to get your default zone:
$ sudo firewall-cmd --get-default
public
In this example, the public zone is the default. It's expected that you will keep the public zone highly restrictive, so it's a pretty safe zone to assign unknown networks. However, you can set your own default instead.
For instance, if you're more paranoid than most, or if you know that you frequent networks you have reason to distrust, you can assign a highly restrictive zone as default:
$ sudo firewall-cmd --set-default-zone drop
success
$ sudo firewall-cmd --get-default
drop
Now any new network you join will be subject to the drop zone rules unless you manually change it to something less restrictive.
Customizing zones by opening ports and services
Firewalld's developers don't intend for their zone definitions to satisfy the needs of all the different networks and levels of trust in existence. They're just starting points for you to use and customize.
You don't have to know much about firewalls to be able to open and close ports based on the kinds of network activity you know you generate.
Predefined services
The simplest way to add permissions to your firewall is to add a predefined service. Strictly speaking, there's no such thing as a "service" as far as your firewall knows, because firewalls understand port numbers and protocol types. However, firewalld provides collections of ports and protocols based on standards and conventions.
For example, if you're a web developer and want to open your computer up on your local network so your colleagues can see the website you're building, you would add the http and https services. If you're a gamer and you're running the open source murmur voice-chat server for your guild, then you'd add the murmur service. There are many other services available, which you can view with this command:
$ sudo firewall-cmd --get-services
amanda-client amanda-k5-client bacula bacula-client \
bgp bitcoin bitcoin-rpc ceph cfengine condor-collector \
ctdb dhcp dhcpv6 dhcpv6-client dns elasticsearch \
freeipa-ldap freeipa-ldaps ftp [...]
If you see a service you need, add it to your current firewall configuration, for example:
`$ sudo firewall-cmd --add-service murmur`
This command opens all the ports and protocols needed for a particular service within your default zone, but only until you reboot your computer or restart your firewall. To make your changes permanent, use the --permanent flag:
`$ sudo firewall-cmd --add-service murmur --permanent`
You can also issue the command for a zone other than your default:
`$ sudo firewall-cmd --add-service murmur --permanent --zone home`
Ports
Sometimes you want to allow traffic for something that just isn't defined by firewalld's services. Maybe you're setting up a nonstandard port for a common service or you need to open an arbitrary port.
For example, maybe you're running the open source virtual tabletop software MapTool. Since you're running the MapTool server and there's no industry standard governing which port MapTool runs on, you can decide what port it uses and then "poke a hole" in your firewall to allow traffic on that port.
The process is basically the same as for services:
`$ sudo firewall-cmd --add-port 51234/tcp`
This command opens port 51234 to incoming TCP connections in your default zone, but only until you reboot your computer or restart your firewall. To make your changes permanent, use the --permanent flag:
`$ sudo firewall-cmd --add-port 51234/tcp --permanent`
You can also issue the command for a zone other than your default:
`$ sudo firewall-cmd --add-port 51234/tcp --permanent --zone home`
Allowing traffic through your computer is different from letting traffic through your router"s firewall. Your router probably has a different interface for its own embeded firewall (though the principle is the same), which is outside the scope of this article.
Removing ports and services
If you decide a service or a port is no longer needed, you can restart your firewall to clear your changes, unless you use the --permanent flag.
If you made your changes permanent, use the --remove-port or --remove-service flag:
`$ sudo firewall-cmd --remove-port 51234/tcp --permanent`
You can remove ports and services from a zone other than your default zone by specifying a zone in your command:
`$ sudo firewall-cmd --remove-service murmur --permanent --zone home`
Custom zones
You can use and abuse the default zones provided by firewalld, but you also have the freedom to create your own. For instance, if it makes sense for you to have a zone specific to gaming, then you can create one and switch over to it only while gaming.
To create a new, empty zone, create a new zone called game and reload the firewall rules so that your new zone becomes active:
$ sudo firewall-cmd --new-zone game --permanent
success
$ sudo firewall-cmd --reload
Once it's created and active, you can customize it with all the services and ports you need to have open for game night.
Diligence
Start thinking about your firewall strategy today. Start slow, and build up some sane defaults that make sense for you. It may take time before you make it a habit to think about your firewall and understand which network services you use, but with a little exploration, you can strengthen your Linux workstation no matter what your environment.
via: https://opensource.com/article/19/7/make-linux-stronger-firewalls
作者:Seth Kenlon 选题:lujun9972 译者:译者ID 校对:校对者ID


