8.3 KiB
How to Remove Software Repositories from Ubuntu
You can add external repositories in Ubuntu to access packages unavailable in the official repositories.
For example, if you install Brave browser in Ubuntu, you add its repository to your system. If you add a PPA, that is added as an external repository too.
When you don't need the specific software, you remove it. However, the external repository is still added. You can, and you should also remove it to keep your system pristine.
Ubuntu lets you remove a software repository easily. There are different ways to do that:
- Using apt-add-repository command to remove the repository
- Using GUI to remove the repository (for desktop users)
- By modifying the file contents of the /etc/apt/sources.list file (for experts)
But before that, I highly advise getting familiar with the concept of package managers and repositories if you are new to this concept.
Method 1. Remove the repository using apt 🤖
Did you know you can also use the apt command to remove repositories? Well, technically, it's not part of the core apt command but it works in similar fashion.
You can use the add-apt-repository or apt-add-repository commands (both represent the same command) while dealing with external repositories.
First, list the added repositories using the following command:
apt-add-repository --list
Once done, you can use the apt-add-repository command with the -r flag in shown manner to remove the directory:
sudo apt-add-repository -r repo_name
For example, if I want to remove the yarn repository, I would have to use the following command:
sudo add-apt-repository -r deb https://dl.yarnpkg.com/debian/ stable main
Press the Enter key for confirmation.
Next, update the repositories using the following:
sudo apt update
And now, if you list enabled repositories, you won't find the removed repository here:
apt-add-repository --list
There you have it!
Method 2. Remove the software repository in Ubuntu using GUI 🖥️
🚧 Removing a repository you know nothing about is not recommended as it may restrict you from installing your favorite package in the future, so make sure you know what you are up to.
Being one of the best distros for beginners, You can use GUI to remove the repository without needing the terminal.
To do so, first, open the software and updates the app from the system menu:
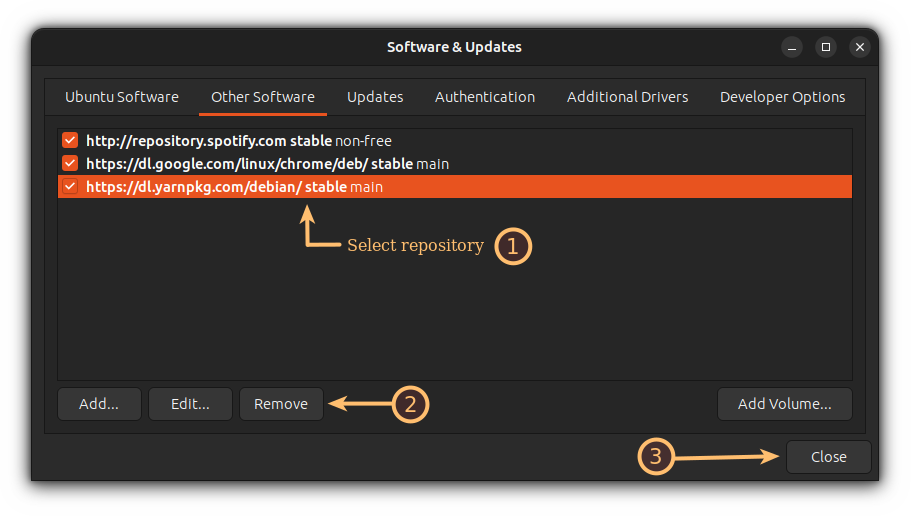
Now, click on Other Software section, and it will list PPAs and external repositories in your system.
The ones listed as checked ✅ are enabled ones.
To remove a repository, you'd have to follow three simple steps:
- Select a repository that needs to be removed
- Click on the remove button
- And finally, hit the close button
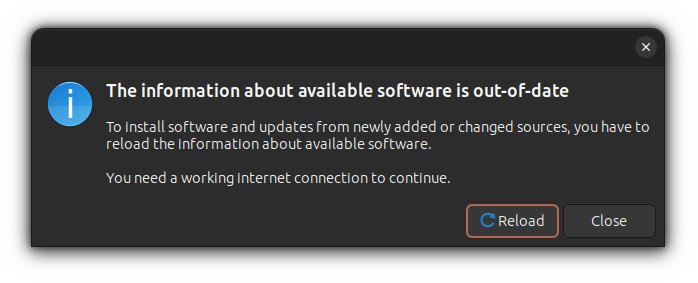
Once you click on the close button, it will open a prompt asking you to update the information as you make changes.
Simply click on the Reload button:
Alternatively, you can update the repository from the command line to take effect from the changes:
sudo apt update
Method 3. Remove the repository by removing its directory (for experts 🧑💻)
Previously, I explained how you could use tools (GUI and CLI) to remove a repository; here, you will modify the system directory (/etc/apt/sources.list.d) responsible for managing repositories.
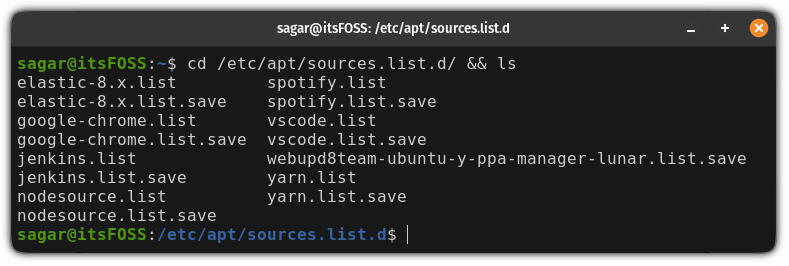
So first, change your working directory to sources.list.d and list its contents:
cd /etc/apt/sources.list.d/ && ls
Here, you will find the list of all the repositories.
If you notice carefully, there will be two files for one repo. Once with the .list extension and one with the .save extension.
You will have to remove the one having the .list extension:
sudo rm Repo_name.list
For example, here, I removed the node repo using the command below:
sudo rm nodesource.list
To take effect from the changes, update the repository index with:
sudo apt update
Want to know more about the sources.list? Read this article.
Additional Step: Remove GPG keys after removing the repository (for advanced users)
If you wish to remove the GPG keys after removing the repository, here's how you do it.
First, list the existing GPG keys using the following command:
apt-key list
Now, the output may seem confusing to some users.
Here's what to remember:
- The GPG key name will be placed above the dashed line (----)
- The public key is in the second line
For example, here's the relevant data of the Chrome GPG key:
To remove the GPG key, you can use the last two strings of the public key (without any space).
For example, here's how I will remove the GPG key of the Chrome browser using the last two strings of its public key (D38B 4796):
sudo apt-key del D38B4796
Similarly, you can also use the entire public key. But this time, you have to include spaces between two strings, as shown:
sudo apt-key del "72EC F46A 56B4 AD39 C907 BBB7 1646 B01B 86E5 0310"
Careful with what you add and what you remove
Especially when you are a new Linux user, you will encounter many exciting things and repositories you will add and remove.
While it is good to experiment, you should always be careful about anything you add/remove to your system. You should keep some things in mind, like: Does it include updated packages? Is it a trusted or maintained repository?
Being cautious will keep your system free from unnecessary repositories and packages.
I hope this guide helps you remove the repository you do not want!
Feel free to let me know if you face any issues in the comments below, and consider joining our It's FOSS Community forum to get faster help!
via: https://itsfoss.com/remove-software-repositories-ubuntu/
作者:Sagar Sharma 选题:lkxed 译者:译者ID 校对:校对者ID


