mirror of
https://github.com/LCTT/TranslateProject.git
synced 2024-12-26 21:30:55 +08:00
208 lines
6.6 KiB
Markdown
208 lines
6.6 KiB
Markdown
[#]: collector: (lujun9972)
|
||
[#]: translator: (geekpi)
|
||
[#]: reviewer: (wxy)
|
||
[#]: publisher: (wxy)
|
||
[#]: url: (https://linux.cn/article-11505-1.html)
|
||
[#]: subject: (How to Configure Rsyslog Server in CentOS 8 / RHEL 8)
|
||
[#]: via: (https://www.linuxtechi.com/configure-rsyslog-server-centos-8-rhel-8/)
|
||
[#]: author: (James Kiarie https://www.linuxtechi.com/author/james/)
|
||
|
||
如何在 CentOS8/RHEL8 中配置 Rsyslog 服务器
|
||
======
|
||
|
||

|
||
|
||
Rsyslog 是一个自由开源的日志记录程序,在 CentOS 8 和 RHEL 8 系统上默认可用。它提供了一种从客户端节点到单个中央服务器的“集中日志”的简单有效的方法。日志集中化有两个好处。首先,它简化了日志查看,因为系统管理员可以在一个中心节点查看远程服务器的所有日志,而无需登录每个客户端系统来检查日志。如果需要监视多台服务器,这将非常有用,其次,如果远程客户端崩溃,你不用担心丢失日志,因为所有日志都将保存在中心的 Rsyslog 服务器上。rsyslog 取代了仅支持 UDP 协议的 syslog。它以优异的功能扩展了基本的 syslog 协议,例如在传输日志时支持 UDP 和 TCP 协议,增强的过滤功能以及灵活的配置选项。让我们来探讨如何在 CentOS 8 / RHEL 8 系统中配置 Rsyslog 服务器。
|
||
|
||
![configure-rsyslog-centos8-rhel8][2]
|
||
|
||
### 预先条件
|
||
|
||
我们将搭建以下实验环境来测试集中式日志记录过程:
|
||
|
||
* Rsyslog 服务器 CentOS 8 Minimal IP 地址: 10.128.0.47
|
||
* 客户端系统 RHEL 8 Minimal IP 地址: 10.128.0.48
|
||
|
||
通过上面的设置,我们将演示如何设置 Rsyslog 服务器,然后配置客户端系统以将日志发送到 Rsyslog 服务器进行监视。
|
||
|
||
让我们开始!
|
||
|
||
### 在 CentOS 8 上配置 Rsyslog 服务器
|
||
|
||
默认情况下,Rsyslog 已安装在 CentOS 8 / RHEL 8 服务器上。要验证 Rsyslog 的状态,请通过 SSH 登录并运行以下命令:
|
||
|
||
```
|
||
$ systemctl status rsyslog
|
||
```
|
||
|
||
示例输出:
|
||
|
||

|
||
|
||
如果由于某种原因 Rsyslog 不存在,那么可以使用以下命令进行安装:
|
||
|
||
```
|
||
$ sudo yum install rsyslog
|
||
```
|
||
|
||
接下来,你需要修改 Rsyslog 配置文件中的一些设置。打开配置文件:
|
||
|
||
```
|
||
$ sudo vim /etc/rsyslog.conf
|
||
```
|
||
|
||
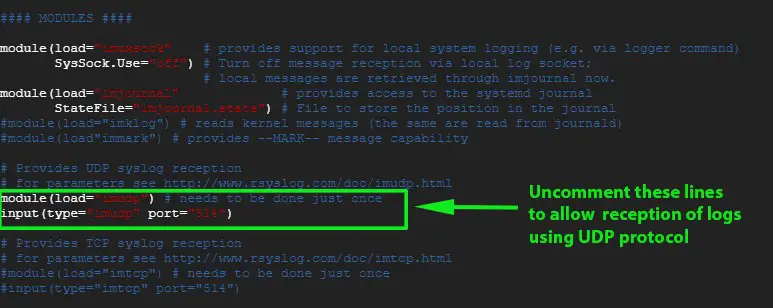
滚动并取消注释下面的行,以允许通过 UDP 协议接收日志:
|
||
|
||
```
|
||
module(load="imudp") # needs to be done just once
|
||
input(type="imudp" port="514")
|
||
```
|
||
|
||

|
||
|
||
同样,如果你希望启用 TCP rsyslog 接收,请取消注释下面的行:
|
||
|
||
```
|
||
module(load="imtcp") # needs to be done just once
|
||
input(type="imtcp" port="514")
|
||
```
|
||
|
||

|
||
|
||
保存并退出配置文件。
|
||
|
||
要从客户端系统接收日志,我们需要在防火墙上打开 Rsyslog 默认端口 514。为此,请运行:
|
||
|
||
```
|
||
# sudo firewall-cmd --add-port=514/tcp --zone=public --permanent
|
||
```
|
||
|
||
接下来,重新加载防火墙保存更改:
|
||
|
||
```
|
||
# sudo firewall-cmd --reload
|
||
```
|
||
|
||
示例输出:
|
||
|
||

|
||
|
||
接下来,重启 Rsyslog 服务器:
|
||
|
||
```
|
||
$ sudo systemctl restart rsyslog
|
||
```
|
||
|
||
要在启动时运行 Rsyslog,运行以下命令:
|
||
|
||
```
|
||
$ sudo systemctl enable rsyslog
|
||
```
|
||
|
||
要确认 Rsyslog 服务器正在监听 514 端口,请使用 `netstat` 命令,如下所示:
|
||
|
||
```
|
||
$ sudo netstat -pnltu
|
||
```
|
||
|
||
示例输出:
|
||
|
||

|
||
|
||
完美!我们已经成功配置了 Rsyslog 服务器来从客户端系统接收日志。
|
||
|
||
要实时查看日志消息,请运行以下命令:
|
||
|
||
```
|
||
$ tail -f /var/log/messages
|
||
```
|
||
|
||
现在开始配置客户端系统。
|
||
|
||
### 在 RHEL 8 上配置客户端系统
|
||
|
||
与 Rsyslog 服务器一样,登录并通过以下命令检查 rsyslog 守护进程是否正在运行:
|
||
|
||
```
|
||
$ sudo systemctl status rsyslog
|
||
```
|
||
|
||
示例输出:
|
||
|
||

|
||
|
||
接下来,打开 rsyslog 配置文件:
|
||
|
||
```
|
||
$ sudo vim /etc/rsyslog.conf
|
||
```
|
||
|
||
在文件末尾,添加以下行:
|
||
|
||
```
|
||
*.* @10.128.0.47:514 # Use @ for UDP protocol
|
||
*.* @@10.128.0.47:514 # Use @@ for TCP protocol
|
||
```
|
||
|
||
保存并退出配置文件。就像 Rsyslog 服务器一样,打开 514 端口,这是防火墙上的默认 Rsyslog 端口:
|
||
|
||
```
|
||
$ sudo firewall-cmd --add-port=514/tcp --zone=public --permanent
|
||
```
|
||
|
||
接下来,重新加载防火墙以保存更改:
|
||
|
||
```
|
||
$ sudo firewall-cmd --reload
|
||
```
|
||
|
||
接下来,重启 rsyslog 服务:
|
||
|
||
```
|
||
$ sudo systemctl restart rsyslog
|
||
```
|
||
|
||
要在启动时运行 Rsyslog,请运行以下命令:
|
||
|
||
```
|
||
$ sudo systemctl enable rsyslog
|
||
```
|
||
|
||
### 测试日志记录操作
|
||
|
||
已经成功安装并配置 Rsyslog 服务器和客户端后,就该验证你的配置是否按预期运行了。
|
||
|
||
在客户端系统上,运行以下命令:
|
||
|
||
```
|
||
# logger "Hello guys! This is our first log"
|
||
```
|
||
|
||
现在进入 Rsyslog 服务器并运行以下命令来实时查看日志消息:
|
||
|
||
```
|
||
# tail -f /var/log/messages
|
||
```
|
||
|
||
客户端系统上命令运行的输出显示在了 Rsyslog 服务器的日志中,这意味着 Rsyslog 服务器正在接收来自客户端系统的日志:
|
||
|
||

|
||
|
||
就是这些了!我们成功设置了 Rsyslog 服务器来接收来自客户端系统的日志信息。
|
||
|
||
--------------------------------------------------------------------------------
|
||
|
||
via: https://www.linuxtechi.com/configure-rsyslog-server-centos-8-rhel-8/
|
||
|
||
作者:[James Kiarie][a]
|
||
选题:[lujun9972][b]
|
||
译者:[geekpi](https://github.com/geekpi)
|
||
校对:[wxy](https://github.com/wxy)
|
||
|
||
本文由 [LCTT](https://github.com/LCTT/TranslateProject) 原创编译,[Linux中国](https://linux.cn/) 荣誉推出
|
||
|
||
[a]: https://www.linuxtechi.com/author/james/
|
||
[b]: https://github.com/lujun9972
|
||
[1]: data:image/gif;base64,R0lGODlhAQABAIAAAAAAAP///yH5BAEAAAAALAAAAAABAAEAAAIBRAA7
|
||
[2]: https://www.linuxtechi.com/wp-content/uploads/2019/10/configure-rsyslog-centos8-rhel8.jpg
|