mirror of
https://github.com/LCTT/TranslateProject.git
synced 2025-01-19 22:51:41 +08:00
166 lines
6.6 KiB
Markdown
166 lines
6.6 KiB
Markdown
[#]: collector: (lujun9972)
|
||
[#]: translator: (lxbwolf)
|
||
[#]: reviewer: (wxy)
|
||
[#]: publisher: (wxy)
|
||
[#]: url: (https://linux.cn/article-12181-1.html)
|
||
[#]: subject: (Three Methods Boot CentOS/RHEL 7/8 Systems in Single User Mode)
|
||
[#]: via: (https://www.2daygeek.com/boot-centos-7-8-rhel-7-8-single-user-mode/)
|
||
[#]: author: (Magesh Maruthamuthu https://www.2daygeek.com/author/magesh/)
|
||
|
||
以单用户模式启动 CentOS/RHEL 7/8 的三种方法
|
||
======
|
||
|
||

|
||
|
||
单用户模式,也被称为维护模式,超级用户可以在此模式下恢复/修复系统问题。
|
||
|
||
通常情况下,这类问题在多用户环境中修复不了。系统可以启动但功能不能正常运行或者你登录不了系统。
|
||
|
||
在基于 [Red Hat][1](RHEL)7/8 的系统中,使用 `runlevel1.target` 或 `rescue.target` 来实现。
|
||
|
||
在此模式下,系统会挂载所有的本地文件系统,但不开启网络接口。
|
||
|
||
系统仅启动特定的几个服务和修复系统必要的尽可能少的功能。
|
||
|
||
当你想运行文件系统一致性检查来修复损坏的文件系统,或忘记 root 密码后重置密码,或要修复系统上的一个挂载点问题时,这个方法会很有用。
|
||
|
||
你可以用下面三种方法以单用户模式启动 [CentOS][2]/[RHEL][3] 7/8 系统。
|
||
|
||
* 方法 1:通过向内核添加 `rd.break` 参数来以单用户模式启动 CentOS/RHEL 7/8 系统
|
||
* 方法 2:通过用 `init=/bin/bash` 或 `init=/bin/sh` 替换内核中的 `rhgb quiet` 语句来以单用户模式启动 CentOS/RHEL 7/8 系统
|
||
* 方法 3:通过用 `rw init=/sysroot/bin/sh` 参数替换内核中的 `ro` 语句以单用户模式启动 CentOS/RHEL 7/8 系统
|
||
|
||
### 方法 1
|
||
|
||
通过向内核添加 `rd.break` 参数来以单用户模式启动 CentOS/RHEL 7/8 系统。
|
||
|
||
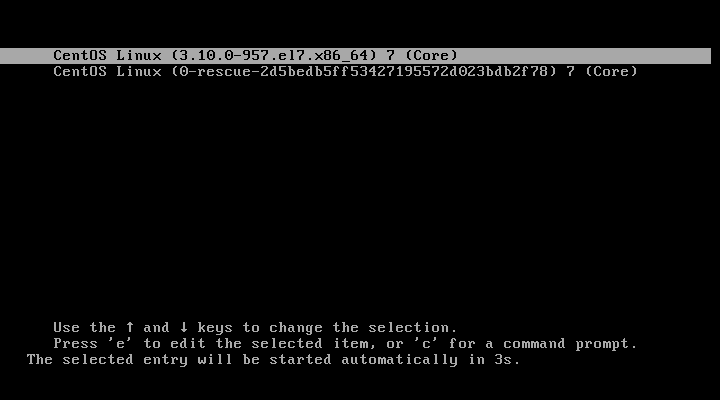
重启你的系统,在 GRUB2 启动界面,按下 `e` 键来编辑选中的内核。你需要选中第一行,第一个是最新的内核,然而如果你想用旧的内核启动系统你也可以选择其他的行。
|
||
|
||
|
||
|
||
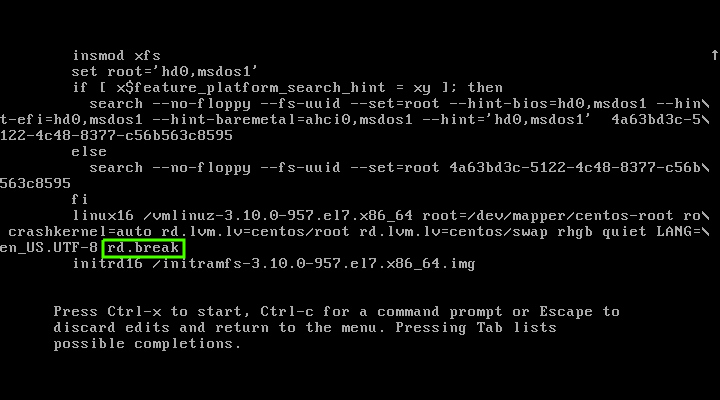
根据你的 RHEL/CentOS 版本,找到 `linux16` 或 `linux` 语句,按下键盘上的 `End` 键,跳到行末,像下面截图中展示的那样添加关键词 `rd.break`,按下 `Ctrl+x` 或 `F10` 来进入单用户模式。
|
||
|
||
如果你的系统是 RHEL/CentOS 7,你需要找 `linux16`,如果你的系统是 RHEL/CentOS 8,那么你需要找 `linux`。
|
||
|
||
|
||
|
||
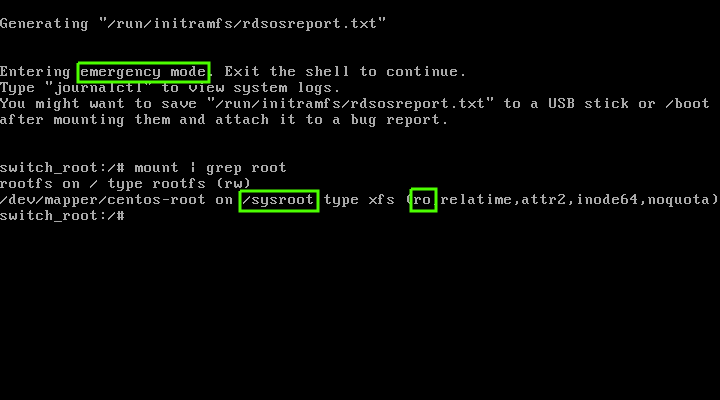
这个修改会让你的 root 文件系统以 “只读(`ro`)” 模式挂载。你可以用下面的命令来验证下。下面的输出也明确地告诉你当前是在 “<ruby>紧急模式<rt>Emergency Mode</rt></ruby>”。
|
||
|
||
```
|
||
# mount | grep root
|
||
```
|
||
|
||
|
||
|
||
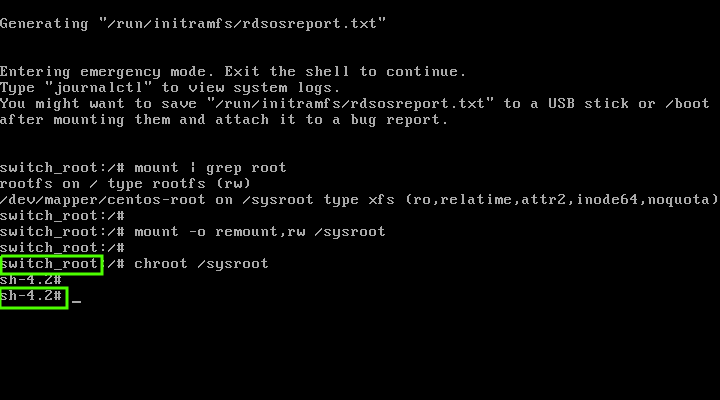
为了修改 `sysroot` 文件系统,你需要用读写模式(`rw`)重新挂载它。
|
||
|
||
```
|
||
# mount -o remount,rw /sysroot
|
||
```
|
||
|
||
运行下面的命令修改环境,这就是大家熟知的 “监禁目录” 或 “chroot 监狱”。
|
||
|
||
```
|
||
# chroot /sysroot
|
||
```
|
||
|
||
|
||
|
||
现在,单用户模式已经完全准备好了。当你修复了你的问题要退出单用户模式时,执行下面的步骤。
|
||
|
||
CentOS/RHEL 7/8 默认使用 SELinux,因此创建下面的隐藏文件,这个文件会在下一次启动时重新标记所有文件。
|
||
|
||
```
|
||
# touch /.autorelabel
|
||
```
|
||
|
||
最后,用下面的命令重启系统。你也可以输入两次 `exit` 命令来重启你的系统。
|
||
|
||
```
|
||
# reboot -f
|
||
```
|
||
|
||
### 方法 2
|
||
|
||
通过用 `init=/bin/bash` 或 `init=/bin/sh` 替换内核中的 `rhgb quiet` 语句来以单用户模式启动 CentOS/RHEL 7/8 系统。
|
||
|
||
重启你的系统,在 GRUB2 启动界面,按下 `e` 键来编辑选中的内核。
|
||
|
||

|
||
|
||
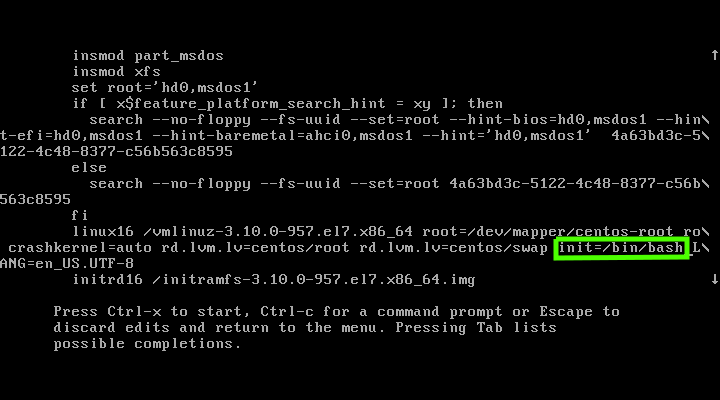
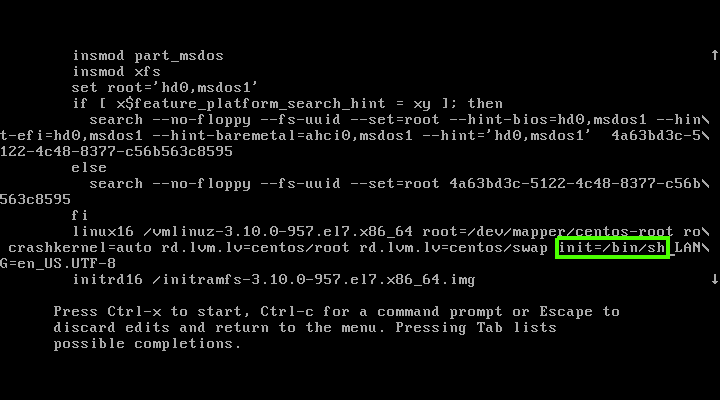
找到语句 `rhgb quiet`,用 `init=/bin/bash` 或 `init=/bin/sh` 替换它,然后按下 `Ctrl+x` 或 `F10` 来进入单用户模式。
|
||
|
||
`init=/bin/bash` 的截图。
|
||
|
||
|
||
|
||
`init=/bin/sh` 的截图。
|
||
|
||
|
||
|
||
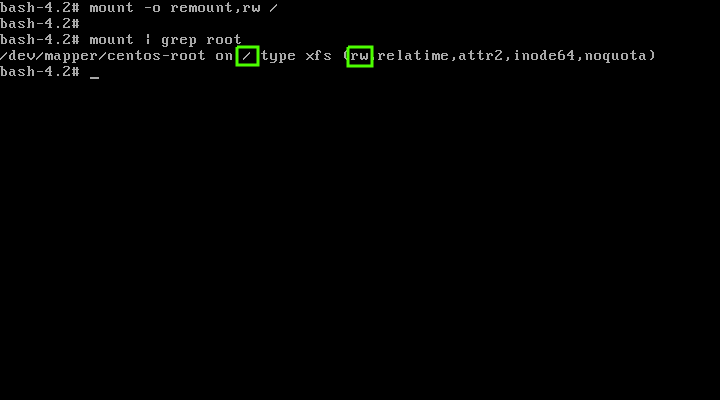
默认情况下,上面的操作会以只读(`ro`)模式挂载你的 `/` 分区,因此你需要以读写(`rw`)模式重新挂载 `/` 文件系统,这样才能修改它。
|
||
|
||
```
|
||
# mount -o remount,rw /
|
||
```
|
||
|
||
|
||
|
||
现在你可以执行你的任务了。当结束时,执行下面的命令来开启重启时的 SELinux 重新标记。
|
||
|
||
```
|
||
# touch /.autorelabel
|
||
```
|
||
|
||
最后,重启系统。
|
||
|
||
```
|
||
# exec /sbin/init 6
|
||
```
|
||
|
||
### 方法 3
|
||
|
||
通过用 `rw init=/sysroot/bin/sh` 参数替换内核中的 `ro` 单词,以单用户模式启动 CentOS/RHEL 7/8 系统。
|
||
|
||
为了中断自动启动的过程,重启你的系统并在 GRUB2 启动界面按下任意键。
|
||
|
||
现在会展示你系统上所有可用的内核,选择最新的内核,按下 `e` 键来编辑选中的内核参数。
|
||
|
||
找到以 `linux` 或 `linux16` 开头的语句,用 `rw init=/sysroot/bin/sh` 替换 `ro`。替换完后按下 `Ctrl+x` 或 `F10` 来进入单用户模式。
|
||
|
||
运行下面的命令把环境切换为 “chroot 监狱”。
|
||
|
||
```
|
||
# chroot /sysroot
|
||
```
|
||
|
||
如果需要,做出必要的修改。修改完后,执行下面的命令来开启重启时的 SELinux 重新标记。
|
||
|
||
```
|
||
# touch /.autorelabel
|
||
```
|
||
|
||
最后,重启系统。
|
||
|
||
```
|
||
# reboot -f
|
||
```
|
||
|
||
--------------------------------------------------------------------------------
|
||
|
||
via: https://www.2daygeek.com/boot-centos-7-8-rhel-7-8-single-user-mode/
|
||
|
||
作者:[Magesh Maruthamuthu][a]
|
||
选题:[lujun9972][b]
|
||
译者:[lxbwolf](https://github.com/lxbwolf)
|
||
校对:[wxy](https://github.com/wxy)
|
||
|
||
本文由 [LCTT](https://github.com/LCTT/TranslateProject) 原创编译,[Linux中国](https://linux.cn/) 荣誉推出
|
||
|
||
[a]: https://www.2daygeek.com/author/magesh/
|
||
[b]: https://github.com/lujun9972
|
||
[1]: https://www.2daygeek.com/category/red-hat/
|
||
[2]: https://www.2daygeek.com/category/centos/
|
||
[3]: https://www.2daygeek.com/category/rhel/
|
||
[4]: data:image/gif;base64,R0lGODlhAQABAIAAAAAAAP///yH5BAEAAAAALAAAAAABAAEAAAIBRAA7
|