8.6 KiB
How to Make a YouTube Instructional Screencast Video on Linux
A picture is worth a thousand words, and a well-crafted how-to video is darned near priceless. Linux has all the tools you need to make high-quality and useful instructional videos. We shall make a simple screencast with the wonderful Kdenlive video editor and the Audacity audio recorder and editor, and learn how to share this splendid screencast on YouTube.
All you need is your nice Linux PC with Kdenlive and Audacity installed, a good-quality microphone or headset, and a YouTube account. (Yes, there are many other free video-sharing services, and you are welcome to explore them.) YouTube is owned by Google, so Google tries to entice you into rampant sharing with everything and everyone in the world. Just say no if this is not what you want to do.
Our workflow goes like this:
- Capture screencast with Kdenlive
- Record soundtrack with Audacity
- Add soundtrack to Kdenlive
- Upload to YouTube
- The world views your video and is happy.
Kdenlive supports most popular digital video formats, including AVI, MP4, H.264, and MOV. It supports image files such as GIF, PNG, SVG, and TIFF, and audio file formats including uncompressed PCM, Vorbis, WAV, MP3 and AC3. You can even read and edit Flash files. In short, it should handle pretty much anything you throw at it.
Your soundtrack is just as important as your video track. Please, I beg you, pay attention to your audio. Keep it clean and simple, and keep the rambling digressions, verbal tics, and distracting background noises to a minimum. I prefer a good-quality headset for making narrations because you don't have to worry about microphone placement, and you can listen to yourself over and over without driving bystanders insane.
The Kdenlive documention is outdated and tells you that you need RecordMyDesktop to make screencasts. I have Kdenlive 0.9.4, and it does not need RecordMyDesktop.
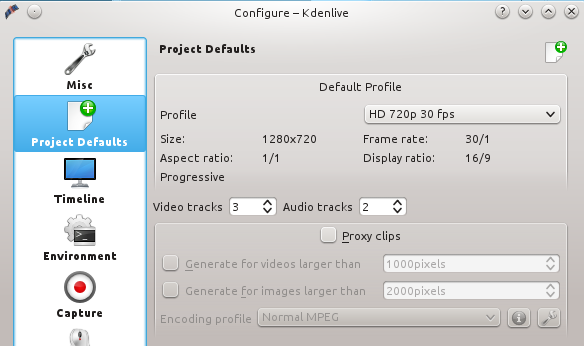
Figure 1: Default profile settings.
Making the Screencast
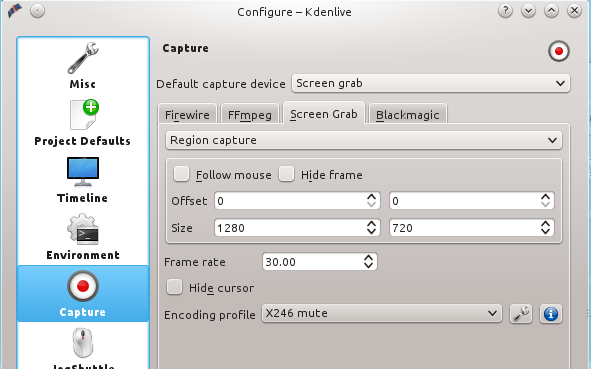
If you're installing Kdenlive for the first time you'll get a configuration wizard at first run. Don't worry too much about the default settings because you can change them anytime. These are the settings I use for my screencasts: HD 720p 30 fps, 1280x720 screen size. How do you know what settings to use? YouTube tells you. To set these values go to Settings > Configure Kdenlive > Project Defaults > Default Profile > HD 720p 30fps (figure 1), and set the size of your screen capture in Settings > Configure Kdenlive > Capture > Screen Grab (figure 2). You may also choose a Full Screen Capture, though it's better to stick with the dimensions specified by YouTube, because if they're different YouTube adds pillarboxes to make them fit. Your eager viewers want to see a screen filled with glorious content, not pillarboxes.
Figure 2: Screencast screen size.
The default YouTube video player size is 640x360 at 320p, which is small and blurry. The player has controls for small, larger, and full-screen, plus multiple quality levels. These are for your viewers only, and you can't change the defaults, which is sad because nothing looks good at 640x360 at 320p. But you still want to make videos with the higher quality settings, and you can always add some text to remind your viewers to try the better settings.
Save Your Project
Before you do anything else go to File > Save as to save your project, and remember to save it periodically.
Screen Grab
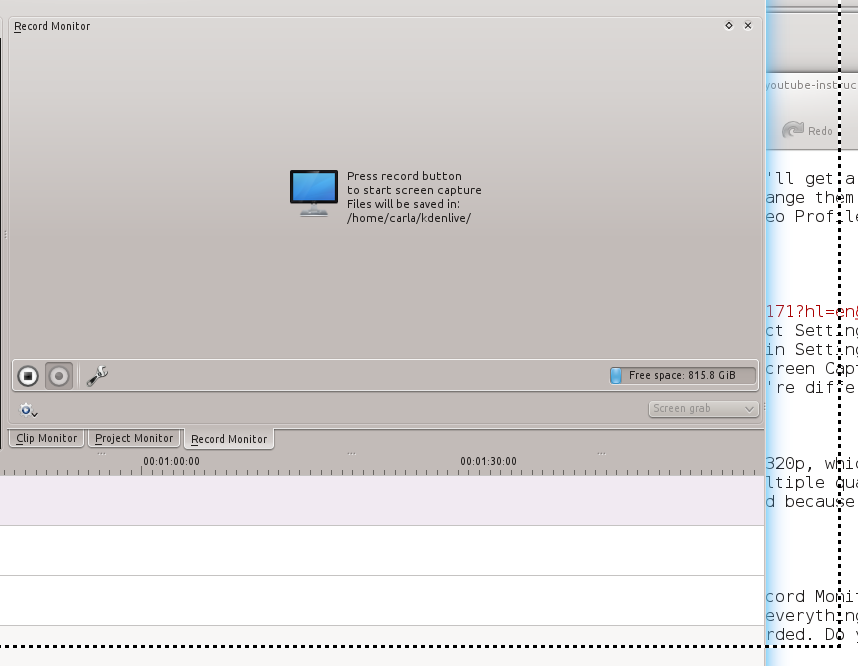
Making your screen capture is easy as pie. Go to the Record Monitor, select Screen Grab, and then hit the Record button. This opens a box with dotted borders on your screen, and everything inside this box is recorded. So all you have to do is move and size the window you want recorded inside the box. Do your thing, then when you're finished click the stop button (figure 3).
Figure 3: Making the screen grab.
Clicking Stop automatically opens the Clip Monitor so you can preview your new clip. If you like it, drag it from the Project Tree to the Video 1 track. Now you can edit your new video. There are always bits you'll want to trim; a fast way to do this is to play your clip in the Project Monitor until you get to the end of the part you want to remove. Then Pause, then press Shift+r. This cuts your clip at the point on the timeline that you stopped, so now you have two clips. Click on the one you want to delete and press the Delete key, and poof! It is gone.
You'll want to drag your remaining clip to whatever point on the timeline you want it to start, and you might want to add some nice transitions. Some simple fades are good; simply right-click on your clip and click Add Effect > Fade > Fade from black and Fade to black, and Kdenlive will automatically place them at the beginning and end.
Adding a Soundtrack
Please see Whirlwind Intro to Audacity on Linux: From Recording to CD in One Lesson to learn the basics of recording with Audacity. Export your recording as a 16-bit WAV file and then import it into Kdenlive via Project > Add Clip. Drag your new audio clip down to one of the Audio tracks. An easy way to make your narration is to play your video track and talk as it plays. With a little luck you won't have to do a lot of cleanup, and your commentary will be in sync with the video.
Fig 4: Cut your track with Shift+r and drag one of the clips away from the cut to create a silent gap.
If you're a fast talker and get ahead of your video, you can easily add a space in the audio track. Simply cut your track with Shift+r, and drag one of the clips away from the cut to create a silent gap (figure 4).
Rendering Your Project
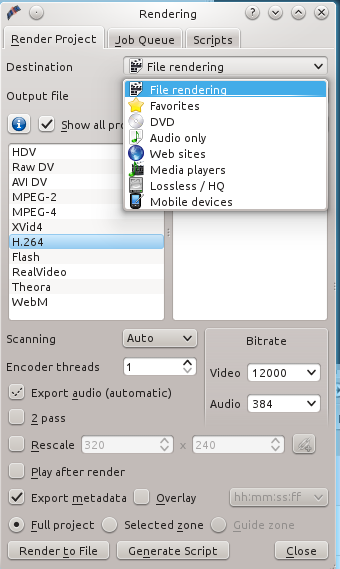
When you're happy with your edits and ready to export to your final format, click the Render button. This takes a few minutes depending on the speed of your computer and size of your project. There are presets for Web, and if you choose File Rendering you can tweak your settings (figure 5). I've gotten good results with File Rendering > H.264, Video bitrate 12000, and audio 384. H.264 is a super-compressed MPEG-4 format that delivers small file sizes and good quality.
Fig. 5: Choose File Rendering to tweak your Web settings.
YouTube Bound
Play your new video in VLC or MPlayer or whatever you like, and if it looks good then you're ready to upload to your YouTube account. In typical Google fashion your dashboard and video manager are disorganized and complicated, but keep poking around and you'll figure it out. Before you can do anything you'll have to put your account in good standing, which means getting a code number from Google via text or email. When you prove you're not a bot by entering the code number you'll be able to upload videos.
You can upload your videos and mark them as either private or public. Google has some editing tools you might like, such as auto-fix and music soundtracks, though in my nearly-humble opinion hardly anyone does background music correctly so it's just annoying. But you might be the first to do it right!
The most useful editing tool is automatic closed-captioning. I recommend using this on all of your videos, not only for people who can't hear very well but for anyone who has to keep the volume low, and to make sure everyone understands what you're saying. The captioning tool also creates a transcript.
Another useful tool is the annotations tool, which supports speech bubbles, titles, spotlights, and labels. Of course you can do all this in Kdenlive, so you can try both.
Well, here we are at the end and it seems we've barely begun. Please share your videos and YouTube tips and tricks in the comments. And while you're at it, please share your new video tutorial with us on video.linux.com and join the 100 Linux Tutorials Campaign.


