mirror of
https://github.com/LCTT/TranslateProject.git
synced 2025-01-10 22:21:11 +08:00
140 lines
7.8 KiB
Markdown
140 lines
7.8 KiB
Markdown
如何在 Amazon AWS 上设置一台 Linux 服务器
|
||
============================================================
|
||
|
||
AWS(Amazon Web Services)是全球领先的云服务器提供商之一。你可以使用 AWS 平台在一分钟内设置完服务器。在 AWS 上,你可以微调服务器的许多技术细节,如 CPU 数量,内存和磁盘空间,磁盘类型(更快的 SSD 或者经典的 IDE)等。关于 AWS 最好的一点是,你只需要为你使用到的服务付费。在开始之前,AWS 提供了一个名为 “Free Tier” 的特殊帐户,你可以免费使用一年的 AWS 技术服务,但会有一些小限制,例如,你每个月使用服务器时长不能超过 750 小时,超过这个他们就会向你收费。你可以在 [aws 官网][3]上查看所有相关的规则。
|
||
|
||
因为我的这篇文章是关于在 AWS 上创建 Linux 服务器,因此拥有 “Free Tier” 帐户是先决条件。要注册帐户,你可以使用此[链接][4]。请注意,你需要在创建帐户时输入信用卡详细信息。
|
||
|
||
让我们假设你已经创建了 “Free Tier” 帐户。
|
||
|
||
在继续之前,你必须了解 AWS 中的一些术语以了解设置:
|
||
|
||
1. EC2(弹性计算云):此术语用于虚拟机。
|
||
2. AMI(Amazon 机器镜像):表示操作系统实例。
|
||
3. EBS(弹性块存储):AWS 中的一种存储环境类型。
|
||
|
||
通过以下链接登录 AWS 控制台:[https://console.aws.amazon.com/][5] 。
|
||
|
||
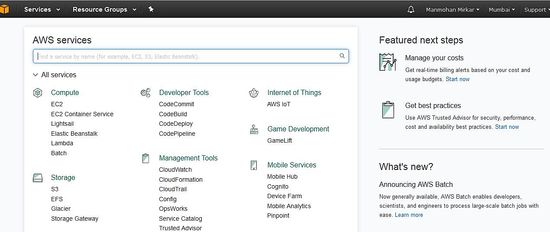
AWS 控制台将如下所示:
|
||
|
||
[
|
||
|
||
][6]
|
||
|
||
### 在 AWS 中设置 Linux VM
|
||
|
||
1、 创建一个 EC2(虚拟机)实例:在开始安装系统之前,你必须在 AWS 中创建一台虚拟机。要创建虚拟机,在“<ruby>计算<rt>compute</rt></ruby>”菜单下点击 EC2:
|
||
|
||
[
|
||

|
||
][7]
|
||
|
||
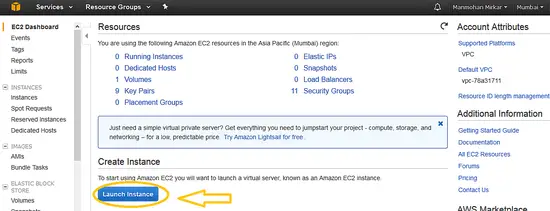
2、 现在在<ruby>创建实例<rt>Create instance</rt></ruby>下点击<ruby>“启动实例”<rt>Launch Instance</rt></ruby>按钮。
|
||
|
||
[
|
||
|
||
][8]
|
||
|
||
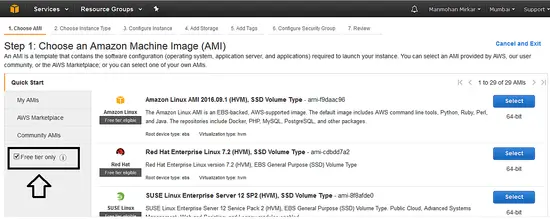
3、 现在,当你使用的是一个 “Free Tier” 帐号,接着最好选择 “Free Tier” 单选按钮以便 AWS 可以过滤出可以免费使用的实例。这可以让你不用为使用 AWS 的资源而付费。
|
||
|
||
[
|
||
|
||
][9]
|
||
|
||
4、 要继续操作,请选择以下选项:
|
||
|
||
a、 在经典实例向导中选择一个 AMI(Amazon Machine Image),然后选择使用 **Red Hat Enterprise Linux 7.2(HVM),SSD 存储**
|
||
|
||
b、 选择 “**t2.micro**” 作为实例详细信息。
|
||
|
||
c、 **配置实例详细信息**:不要更改任何内容,只需单击下一步。
|
||
|
||
d、 **添加存储**:不要更改任何内容,只需点击下一步,因为此时我们将使用默认的 10(GiB)硬盘。
|
||
|
||
e、 **添加标签**:不要更改任何内容只需点击下一步。
|
||
|
||
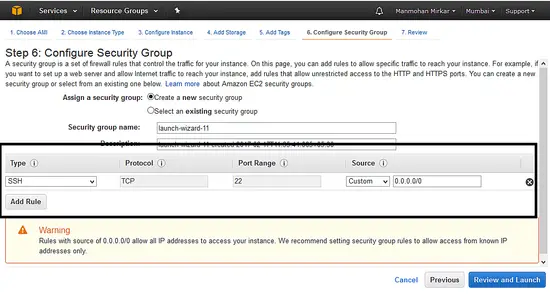
f、 **配置安全组**:现在选择用于 ssh 的 22 端口,以便你可以在任何地方访问此服务器。
|
||
|
||
[
|
||
|
||
][10]
|
||
|
||
g、 选择“<ruby>查看并启动<rt>Review and Launch</rt></ruby>”按钮。
|
||
|
||
h、 如果所有的详情都无误,点击 “<ruby>启动<rt>Launch</rt></ruby>”按钮。
|
||
|
||
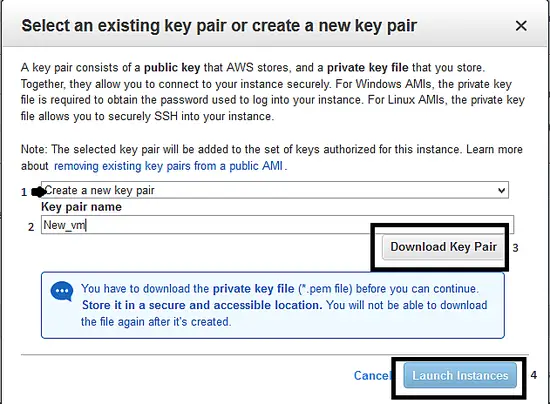
i、 单击“<ruby>启动<rt>Launch</rt></ruby>”按钮后,系统会像下面那样弹出一个窗口以创建“密钥对”:选择选项“<ruby>创建密钥对<rt>create a new key pair</rt></ruby>”,并给密钥对起个名字,然后下载下来。在使用 ssh 连接到服务器时,需要此密钥对。最后,单击“<ruby>启动实例<rt>Launch Instance</rt></ruby>”按钮。
|
||
|
||
[
|
||
|
||
][11]
|
||
|
||
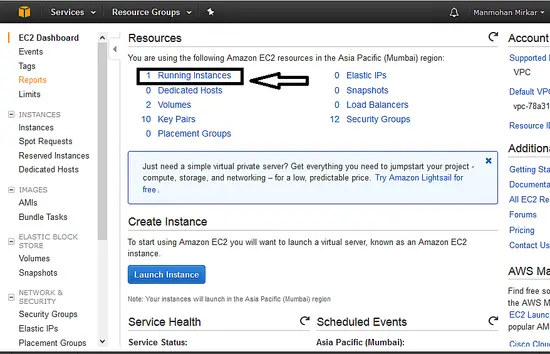
j、 点击“<ruby>启动实例<rt>Launch Instance</rt></ruby>”按钮后,转到左上角的服务。选择“<ruby>计算<rt>compute</rt></ruby>”--> “EC2”。现在点击“<ruby>运行实例<rt>Running Instances</rt></ruby>”:
|
||
|
||
[
|
||
|
||
][12]
|
||
|
||
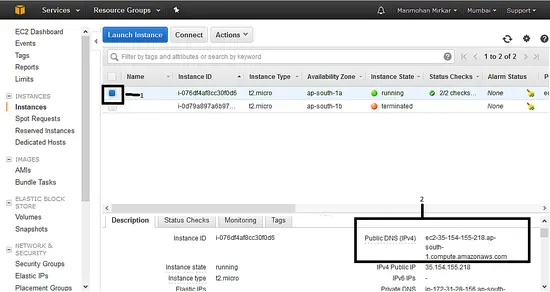
k、 现在你可以看到,你的新 VM 的状态是 “<ruby>运行中<rt>running</rt></ruby>”。选择实例,请记下登录到服务器所需的 “<ruby>公开 DNS 名称<rt>Public DNS</rt></ruby>”。
|
||
|
||
[
|
||
|
||
][13]
|
||
|
||
现在你已完成创建一台运行 Linux 的 VM。要连接到服务器,请按照以下步骤操作。
|
||
|
||
### 从 Windows 中连接到 EC2 实例
|
||
|
||
1、 首先,你需要有 putty gen 和 Putty exe 用于从 Windows 连接到服务器(或 Linux 上的 SSH 命令)。你可以通过下面的[链接][14]下载 putty。
|
||
|
||
2、 现在打开 putty gen :`puttygen.exe`。
|
||
|
||
3、 你需要单击 “Load” 按钮,浏览并选择你从亚马逊上面下载的密钥对文件(pem 文件)。
|
||
|
||
4、 你需要选择 “ssh2-RSA” 选项,然后单击保存私钥按钮。请在下一个弹出窗口中选择 “yes”。
|
||
|
||
5、 将文件以扩展名 `.ppk` 保存。
|
||
|
||
6、 现在你需要打开 `putty.exe`。在左侧菜单中点击 “connect”,然后选择 “SSH”,然后选择 “Auth”。你需要单击浏览按钮来选择我们在步骤 4 中创建的 .ppk 文件。
|
||
|
||
7、 现在点击 “session” 菜单,并在“host name” 中粘贴在本教程中 “k” 步骤中的 DNS 值,然后点击 “open” 按钮。
|
||
|
||
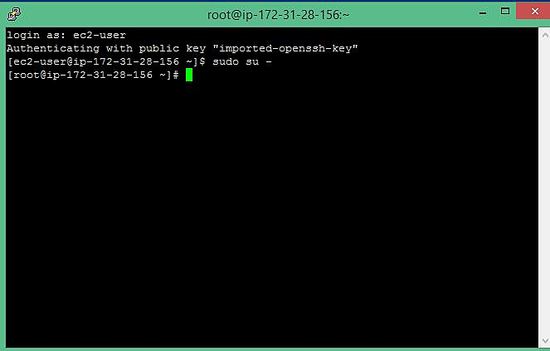
8、 在要求用户名和密码时,输入 `ec2-user` 和空白密码,然后输入下面的命令。
|
||
|
||
```
|
||
$ sudo su -
|
||
```
|
||
|
||
哈哈,你现在是在 AWS 云上托管的 Linux 服务器上的主人啦。
|
||
|
||
[
|
||
|
||
][15]
|
||
|
||
--------------------------------------------------------------------------------
|
||
|
||
via: https://www.howtoforge.com/tutorial/how-to-setup-linux-server-with-aws/
|
||
|
||
作者:[MANMOHAN MIRKAR][a]
|
||
译者:[geekpi](https://github.com/geekpi)
|
||
校对:[jasminepeng](https://github.com/jasminepeng)
|
||
|
||
本文由 [LCTT](https://github.com/LCTT/TranslateProject) 原创编译,[Linux中国](https://linux.cn/) 荣誉推出
|
||
|
||
[a]:https://www.howtoforge.com/tutorial/how-to-setup-linux-server-with-aws/
|
||
[1]:https://www.howtoforge.com/tutorial/how-to-setup-linux-server-with-aws/#setup-a-linux-vm-in-aws
|
||
[2]:https://www.howtoforge.com/tutorial/how-to-setup-linux-server-with-aws/#connect-to-an-ec-instance-from-windows
|
||
[3]:http://aws.amazon.com/free/
|
||
[4]:http://aws.amazon.com/ec2/
|
||
[5]:https://console.aws.amazon.com/
|
||
[6]:https://www.howtoforge.com/images/how_to_setup_linux_server_with_aws/big/aws_console.JPG
|
||
[7]:https://www.howtoforge.com/images/how_to_setup_linux_server_with_aws/big/aws_console_ec21.png
|
||
[8]:https://www.howtoforge.com/images/how_to_setup_linux_server_with_aws/big/aws_launch_ec2.png
|
||
[9]:https://www.howtoforge.com/images/how_to_setup_linux_server_with_aws/big/aws_free_tier_radio1.png
|
||
[10]:https://www.howtoforge.com/images/how_to_setup_linux_server_with_aws/big/aws_ssh_port1.png
|
||
[11]:https://www.howtoforge.com/images/how_to_setup_linux_server_with_aws/big/aws_key_pair.png
|
||
[12]:https://www.howtoforge.com/images/how_to_setup_linux_server_with_aws/big/aws_running_instance.png
|
||
[13]:https://www.howtoforge.com/images/how_to_setup_linux_server_with_aws/big/aws_dns_value.png
|
||
[14]:http://www.chiark.greenend.org.uk/~sgtatham/putty/latest.html
|
||
[15]:https://www.howtoforge.com/images/how_to_setup_linux_server_with_aws/big/aws_putty1.JPG
|