13 KiB
MAKE MORE with Inkscape – G-Code Tools
Inkscape, the most used and loved tool of Fedora’s Design Team, is not just a program for doing nice vector graphics. With vector graphics (in our case SVG) a lot more can be done. Many programs can import this format. Inkscape can also do a lot more than just graphics. This series will show you some things you can do besides graphics with Inkscape. This first article of the series will show how Inkscape’s G-Code Tools extension can be used to produce G-Code. G-Code , in turn, is useful for programming machines such as plotters and laser engravers.
What is G-Code and what is it used for
The construction of machines for the hobby sector is booming. The publication of the source code for RepRap 3D printers for self-construction and the availability of electronic components, such as Arduino or Raspberry Pi are probably some of the causes for this boom. Mechanical engineering as a hobby is finding more and more adopters. This trend hasn’t stopped with 3D printers. There are also CNC milling machines, plotters, laser engravers, cutters and and even machines that you can build yourself.
You don’t have to design or build these machines yourself. You can purchase such machines relatively cheaply as a kit or already assembled. All these machines have one thing in common – they are computer-controlled. Computer Aided Manufacturing (CAM), which has been widespread in the manufacturing industry, is now also taking place at home.
G-Code or G programming language
The most widespread language for programming CAM machines is G-Code. G-Code is also known as the G programming language. This language was developed at MIT in the 1950s. Since then, various organizations have developed versions of this programming language. Keep this in mind when you work with it. Different countries have different standards for this language. The name comes from the fact that many instructions in this code begin with the letter G. This letter is used to transmit travel or path commands to the machine.
The commands go, in the truest sense of the word, from A (absolute or incremental position around the X-axis; turning around X) to Z (absolute or incrementing in the direction of the Z-axis). Commands prefixed with M (miscellaneous) transmit other instructions to the machine. Switching coolant on/off is an example of an M command. If you want a more complete list of G-Code commands there is a table on Wikipedia.
%
G00 X0 Y0 F70
G01 Z-1 F50
G01 X0 Y20 F50
G02 X20 Y0 J-20
G01 X0 Y0
G00 Z0 F70
M30
%
This small example would mill a square. You could write this G-Code in any editor of your choice. But when it comes to more complex things, you typically won’t do this sort of low-level coding by hand. When it comes to 3D-Printing the slicer writes the G-Code for you. But what about when you want to use a plotter or a laser engraver?
Other Software for writing G-Code
So you will need a program to do this job for you. Sure, some CAD programs can write G-Code. But not all open source CAD programs can do this. Here are some other open source solutions for this:
- dxf2gcode, normally a command line tool but has a Python implemented GUI
- dmap2gcode, can import raster graphics and convert them
- Millcrum, a browser-based tool
- LinuxCNC, can import raster graphics and converts them to G-Code
- TrueTypeTracer or F-Engrave if you want to engrave fonts
As you can see, there is no problem finding a tool for doing this. What I dislike is the use of raster graphics. I use a CNC machine because it works more precisely than I would be able to by hand. Using raster graphics and tracing it to make a path for G-Code is not precise anymore. I find that the use of vector graphics, which has paths anyway, is much more precise.
Inkscape and G-Code Tools installation
When it comes to vector graphics, there is no way around Inkscape; at least not if you use Linux. There are a few other programs. But they do not have anywhere near the capability that Inkscape has. Or they are designed for other purposes. So the question is, “Can Inkscape be used for creating G-Code?” And the answer is, “Yes!” Since version 0.91, Inkscape has been packaged with an extension called GCode Tools. This extension does exactly what we want – it converts paths to G-Code.
So all you have to do, if you have not already done it, is install Inkscape:
$ sudo dnf install Inkscape
One thing to note from the start (where light is, is also shadow) – the GCode Tools extension has a lot of functionality that is not well documented. The developer thinks it’s a good idea to use a forum for documentation. Also, basic knowledge about G-Code and CAM is necessary to understand the functions.
Another point to be aware of is that the development isn’t as vibrant as it was at the time the GCode Tools were packaged with Inkscape.
Getting started with Inkscape’s G-Code Tools extension
The first step is the same as when you would make any other thing in Inkscape – adjust your document properties. So open the document settings with Shift + Ctrl + D or by a clicking on the icon on the command bar and set the document properties to the size of your work piece.
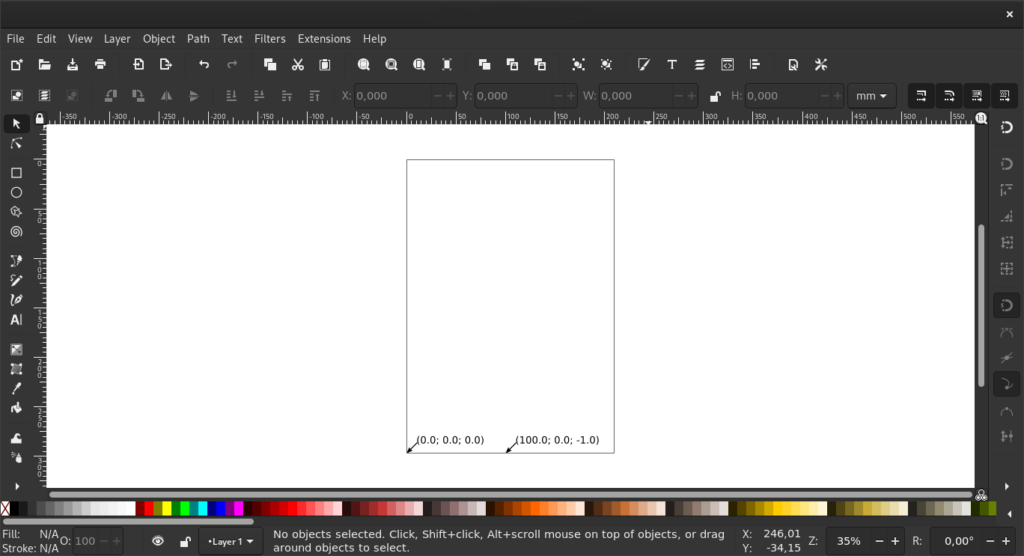
Next, set the orientation points by going to Extensions > Gcodetools > Orientation points. You can use the default settings. The default settings will probably give you something similar to what is shown below.
The Tool library
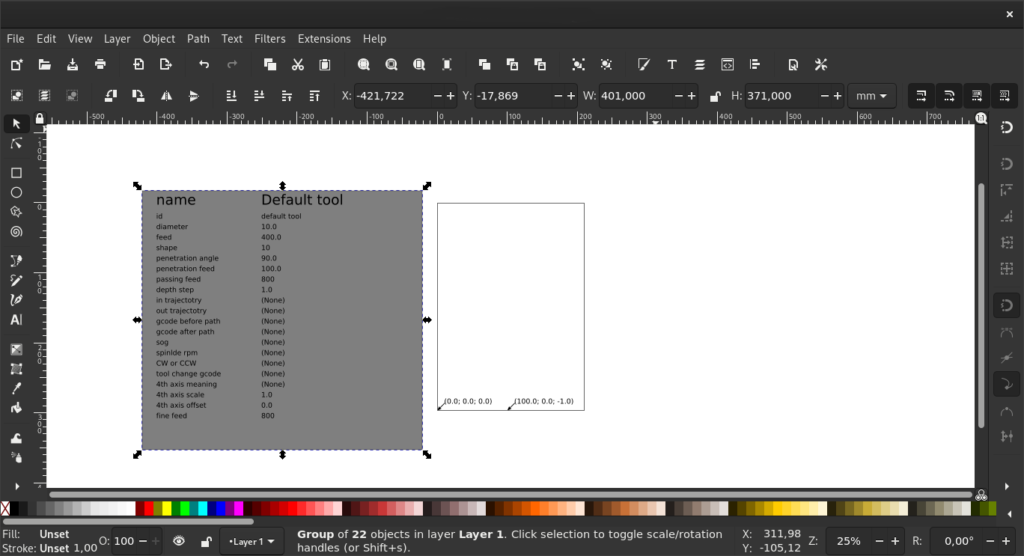
The next step is to edit the tool library (Extensions > Gcodetools > Tools library). This will open the dialog window for the tool setting. There you choose the tool you will use. The default tool is fine. After you have chosen the tool and hit Apply, a rectangle will be on the canvas with the settings for the tool. These settings can be edited with the text tool (T). But this is a bit tricky.
The G-Code Tools extension will use these settings later. These tool settings are grouped together with an identifiable name. If you de-group these settings, this name will be lost.
There are two possibilities to avoid losing the identifier if you ungroup the tool settings. You can use the de-group with 4 clicks with the activated selection tool. Or you can de-group it by using Shift + Ctrl + G and then give the group a name later using the XML-editor.
In the first case you should watch that the group is restored before you draw anything new. Otherwise the newly drawn object will be added to this group.
Now you can draw the paths you want to later convert to G-Code. Objects like rectangles, circles, stars and polygons as well text must be converted to paths (Path > Object to Path or Shift + Ctrl + C).
Keep in mind that this function often does not produce clean paths. You will have to control it and clean it afterwards. You can find an older article here, that describes the process.
Hershey Fonts or Stroke Fonts
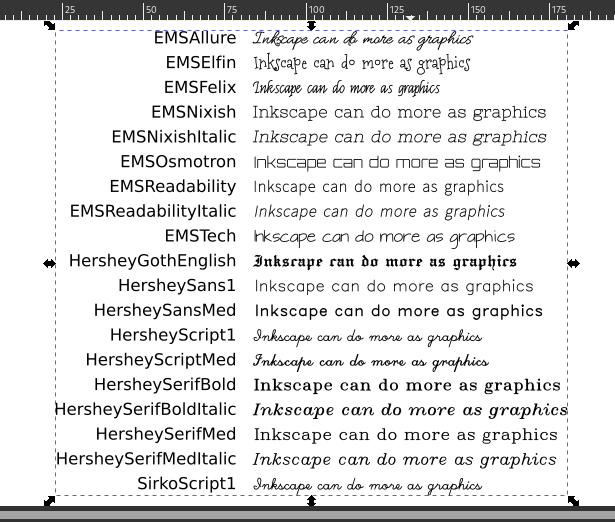
Regarding fonts, keep in mind that TTF and OTF are so called Outline Fonts. This means the contour of the single character is defined and it will be engraved or cut as such. If you do not want this and want to use, for example, a script font then you have to use Stroke Fonts instead. Inkscape itself brings a small collection of them by default (see Extensions > Text > Hershey text).
Another article about how make your own Stroke Fonts will follow. They are not only useful for engraving, but also for embroidery.
The Area Fill Functions
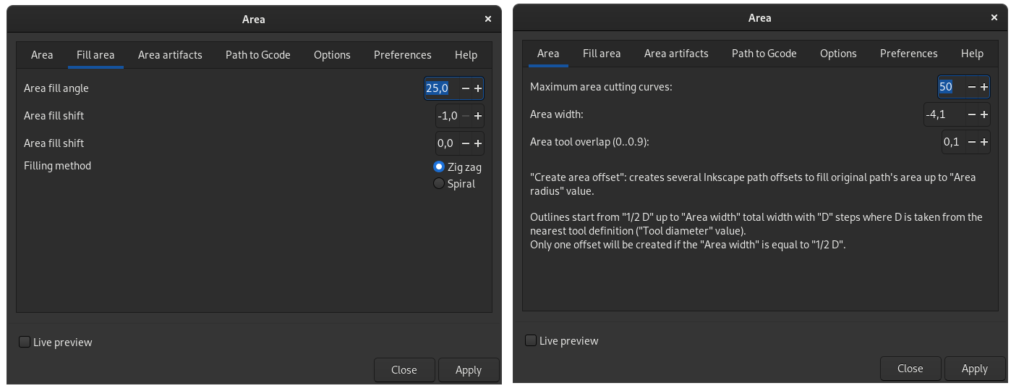
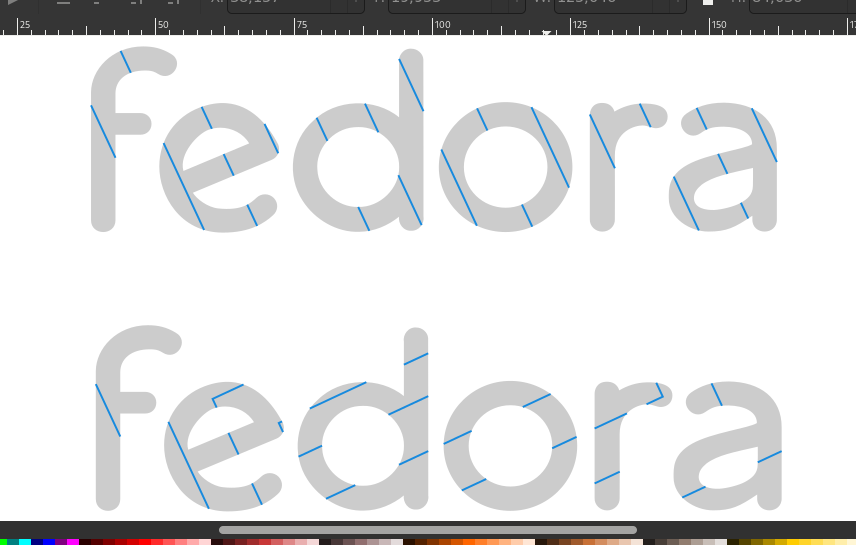
In some cases it might be necessary to fill paths with a pattern. The G-Code Tools extension has a function which offers two ways to fill objects with patterns – zig zag and spiral. There is another function which currently is not working (Inkscape changed some parts for the extensions with the release of version 1.0). The latter function would fill the object with the help of the offset functions in Inkscape. These functions are under Extensions > Gcodetools > Area.
With more and different area fillings you will often have to draw the paths by hand (about 90% of the time). The EggBot extension has a function for filling regions with hatches. You also can use the classical hatch patterns. But you will have to convert the fill pattern back to an object. Otherwise the G-Code Tools extension can not convert it. Besides these, Evilmadscientist has a good wiki page describing fill methods.
Converting paths to G-Code
To convert drawn paths to G-Code, use the function Extensions > Gcodetools > Paths to G-Code. This function will be run on the selected objects. If no object is selected, then on all paths in the document will be converted.
There is currently no functionality to save G-Code using the file menu. This must be done from within the G-Code Tools extension dialog box when you convert the paths to G-Code. On the Preferences tab, you have to specify the path and the name for the output file.
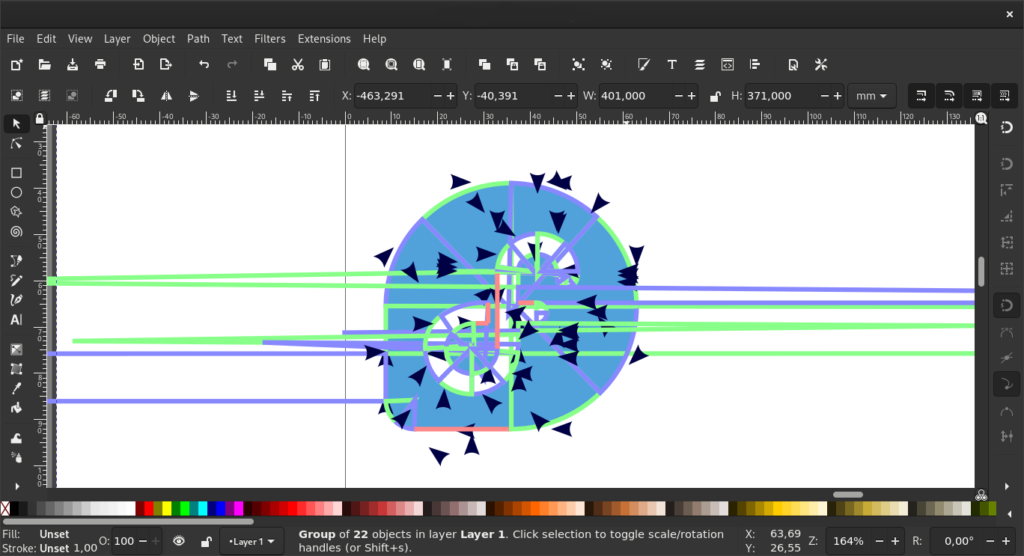
On the canvas, different colored lines and arrows will be rendered. Blue and green lines show curves (G02 and G03). Red lines show straight lines (G01). When you see this styling, then you know that you are working with G-Code.
Conclusion
Opinions differ as to whether Inkscape is the right tool for creating G-Code. If you keep in mind that Inkscape works only in two dimensions and don’t expect too much, you can create G-Code with it. For simple jobs like plotting some lettering or logos, it is definitely enough. The main disadvantage of the G-Code Tools extension is that its documentation is lacking. This makes it difficult to get started with G-Code Tools. Another disadvantage is that there is not currently much active development of G-Code Tools. There are other extensions for Inkscape that also targeted G-Code. But they are already history or are also not being actively developed. The Makerbot Unicorn GCode Output extension and the GCode Plot extension are a few examples of the latter case. The need for an easy way to export G-Code directly definitely exists.
via: https://fedoramagazine.org/make-more-with-inkscape-g-code-tools/
作者:Sirko Kemter 选题:lujun9972 译者:译者ID 校对:校对者ID
