mirror of
https://github.com/LCTT/TranslateProject.git
synced 2025-02-28 01:01:09 +08:00
178 lines
8.1 KiB
Markdown
178 lines
8.1 KiB
Markdown
PhotoRec – Recover Deleted or Lost Files in Linux
|
||
============================================================
|
||
在 Linux 系统下使用 PhotoRec 工具来恢复已删除或丢失的文件
|
||
|
||
当你在系统中有意或无意地使用 'shift + delete‘ 组合键或者删除选项或是清空回收站的方式来删除一个文件时,该文件的内容并没有从硬盘(或是其它存储设备)上直接销毁。
|
||
|
||
它仅仅是从系统的目录结构中被移除,然后你在删除文件的目录下就看不到该文件了,但是这个文件仍然存在你磁盘中的某个位置上。
|
||
|
||
如果你有一个合适的工具和相关的专业知识,你就可以[从电脑中恢复已丢失的文件][1]。然而,随着你存储的文件越来越多,删除的文件将会被覆盖,你只能恢复最近删除的文件。
|
||
|
||
在这篇文章中,我们将阐明如何在 Linux 系统中使用磁盘分区修复工具来恢复硬盘上已删除或丢失的文件,这个非常优秀的免费修复工具叫做 PhotoRec 。
|
||
|
||
PhoteRec 工具用于从存储介质比如硬盘,数码相机和 cdrom 设备中恢复丢失的文件。
|
||
|
||
### 在 Linux 系统中安装磁盘分区修复工具(PhotoRec)
|
||
|
||
在系统中执行以下相关的命令来安装磁盘分区修复工具:
|
||
|
||
```
|
||
------- On Debian/Ubuntu/Linux Mint -------
|
||
$ sudo apt-get install testdisk
|
||
------- On CentOS/RHEL/Fedora -------
|
||
$ sudo yum install testdisk
|
||
------- On Fedora 22+ -------
|
||
$ sudo dnf install testdisk
|
||
------- On Arch Linux -------
|
||
$ pacman -S testdisk
|
||
------- On Gentoo -------
|
||
$ emerge testdisk
|
||
```
|
||
|
||
如果你的 Linux 系统 yum 源仓库中没有这个安装包,可以从 [这里][2] 下载然后在 Live CD 中运行即可。
|
||
|
||
这个安装包也可以在其它应急修复 CD 工具中找到,比如 Gparted LiveCD 、 Parted Magic 、 Ubuntu Boot CD 、 Ubuntu-Rescue-Remix 及其它工具中也有。
|
||
|
||
安装完成之后,使用 root 账号权限打开控制台界面,启动 PhotoRec 工具,并指定已删除文件的分区:
|
||
|
||
```
|
||
$ sudo photorec /dev/sda3
|
||
```
|
||
|
||
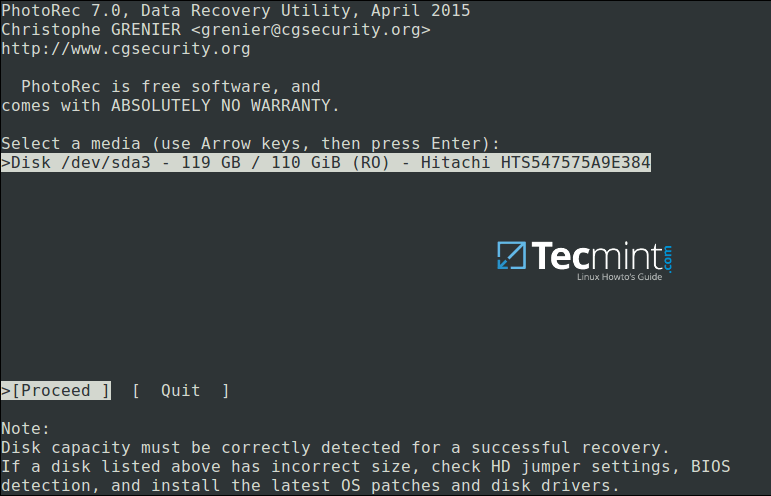
你将会看到下面的交互界面:
|
||
|
||
[
|
||
|
||
][3]
|
||
|
||
Linux 系统 PhotoRec 数据恢复工具
|
||
|
||
使用左右箭头选择菜单选项,按 Enter 键确认。要继续恢复操作,选择 '[继续]' 并单击 Enter。
|
||
|
||
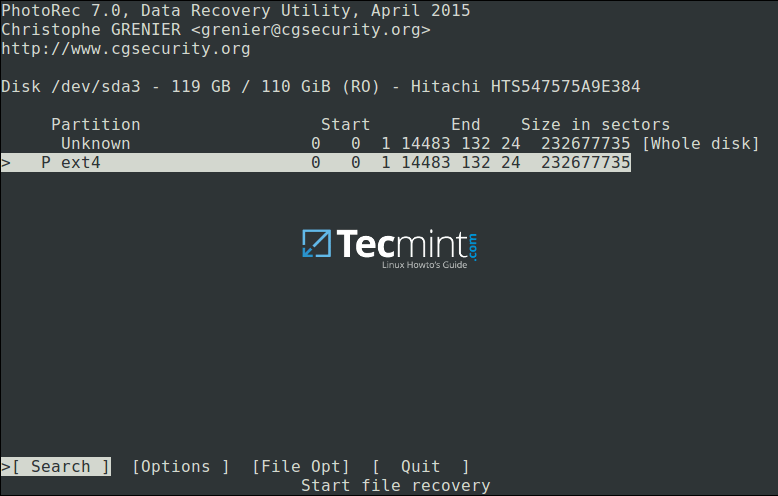
你将看到下面的界面:
|
||
|
||
[
|
||
|
||
][4]
|
||
|
||
选择分区进行文件恢复
|
||
|
||
选择 '[选项]' 来查看可用的恢复选项,如下图所示:
|
||
|
||
[
|
||

|
||
][5]
|
||
|
||
Linux 系统文件恢复选项
|
||
|
||
按 `Q` 返回,在下图界面,你可以指定你想要查询并恢复的文件扩展名。因此,选择 '[文件选项]' ,按 Enter 键确认。
|
||
|
||
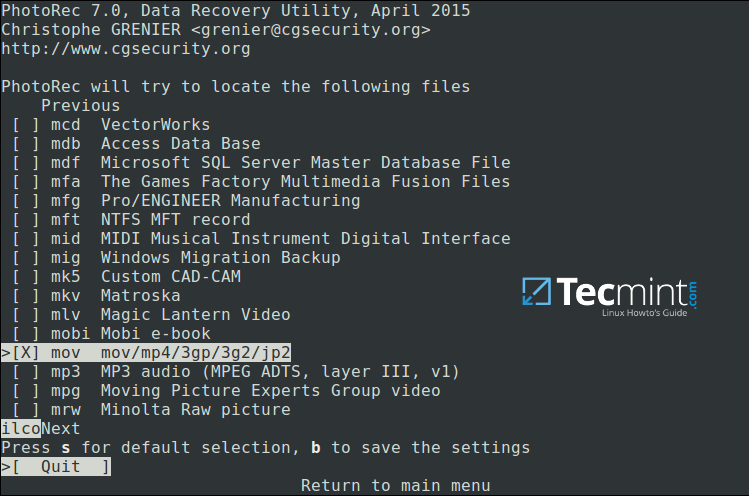
按 's' 停止或启用所有文件扩展名,如果你已经停止所有文件扩展,只需要使用向右箭头选择你想要恢复的文件类型即可(或者按向左箭头取消选择)。
|
||
|
||
例如,我想恢复所有系统中丢失的 ’.mov‘ 类型的文件:
|
||
|
||
[
|
||
|
||
][6]
|
||
|
||
指定恢复文件类型
|
||
|
||
按 ‘b’ 键保存设置,之后你应该看到如下图所示信息。单击 Enter 键返回(或者按 ‘Q' 键),再将按 ’Q' 键返回到主界面。
|
||
|
||
[
|
||

|
||
][7]
|
||
|
||
保存文件恢复设置
|
||
|
||
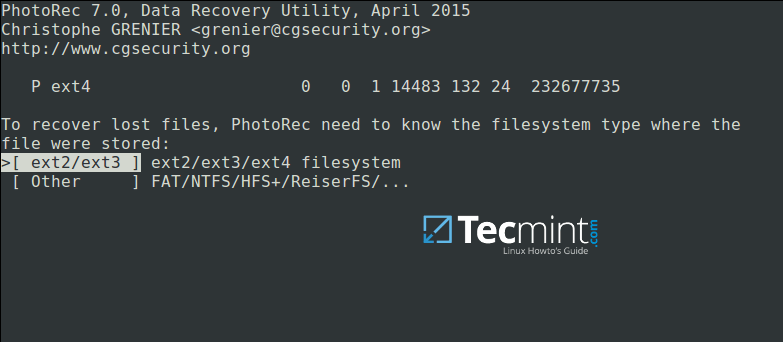
现在选择 '[查询]' 开始文件恢复。在下图中,选择存储文件分区的文件系统类型,然后按 Enter 键。
|
||
|
||
[
|
||
|
||
][8]
|
||
|
||
选择文件系统类型来恢复删除的文件
|
||
|
||
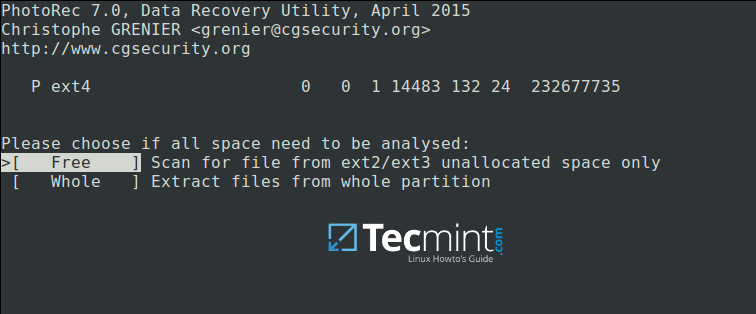
下一步,如下图所示,选择是否对空闲空间或者是整个分区进行分析。注意选择整个分区将会让操作过程变得更长更慢。选择合适的选项后,按 Enter 键继续。
|
||
|
||
[
|
||
|
||
][9]
|
||
|
||
选择文件系统进行分析
|
||
|
||
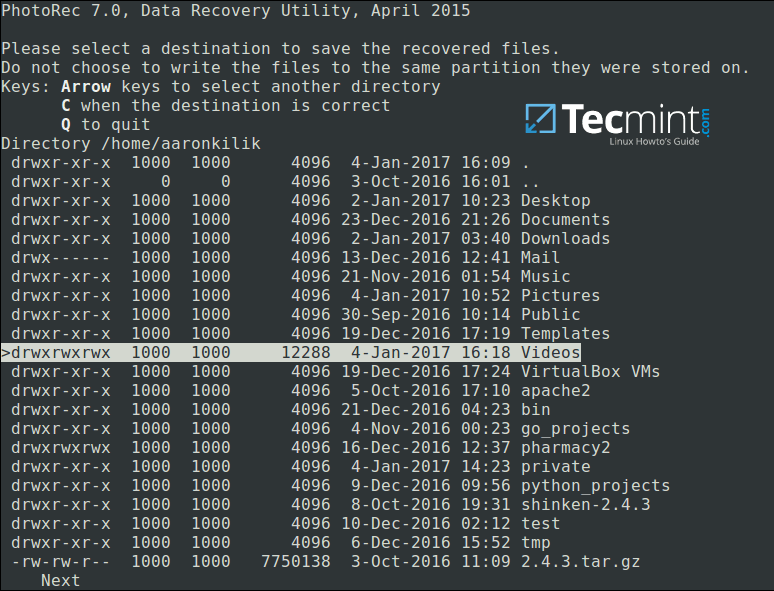
注意选择一个目录用于存储将要恢复的文件,选择完成之后,按 ’C' 键继续。选择不同分区的目录以避免当更多的文件存储在这个分区时覆盖掉已删除的文件。
|
||
|
||
按向左箭头返回到根分区下。
|
||
|
||
[
|
||
|
||
][10]
|
||
|
||
选择要保存恢复文件的目录
|
||
|
||
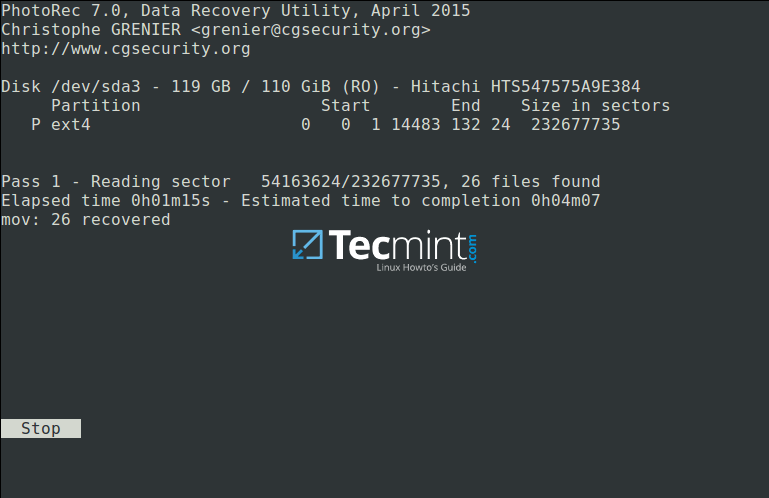
下图显示正在被恢复的指定类型的已删除文件。你可以按 Enter 键来停止操作。
|
||
|
||
注意:在恢复的过程中,你的系统会变得很慢,很可能会卡住一段时间,请耐心等待直至恢复完成。
|
||
|
||
[
|
||
|
||
][11]
|
||
|
||
在 Linux 系统中恢复已删除的文件
|
||
|
||
最后, Photorec 工具将会显示出已恢复文件的数量及保存的路径。
|
||
|
||
[
|
||

|
||
][12]
|
||
|
||
Linux 文件恢复总结
|
||
|
||
默认情况下,已恢复的文件将会以 root 账号权限被保存,因此,你需要以提升权限的方式打开文件管理器来访问这些文件。
|
||
|
||
使用如下命令(指定你的文件管理器):
|
||
|
||
```
|
||
$ gksudo nemo
|
||
or
|
||
$ gksudo nautilus
|
||
```
|
||
|
||
想了解更多的信息,访问 PhotoRec 官网: [http://www.cgsecurity.org/wiki/PhotoRec][13]。
|
||
|
||
到此为止吧!在这篇文章中,我们阐明了使用 PhotoRec 工具来恢复磁盘中已删除或丢失文件每一个步骤。这是目前为止我使用过的最可靠和有效的恢复工具,如果你知道还有其它相似的工具,请在评论中跟大家分享。
|
||
|
||
--------------------------------------------------------------------------------
|
||
|
||
作者简介:
|
||
|
||

|
||
|
||
Aaron Kili 是一个 Linux 系统及 F.O.S.S 爱好者,即将成为一名系统管理员及 Web 开发人员,他现在是 TecMint 网站的内容创建者,他喜欢使用电脑来工作,并且他坚信分享知识是一种美德。
|
||
|
||
--------------------------------------------------------------------------------
|
||
|
||
via: http://www.tecmint.com/photorec-recover-deleted-lost-files-in-linux/
|
||
|
||
作者:[Aaron Kili][a]
|
||
译者:[rusking](https://github.com/rusking)
|
||
校对:[校对者ID](https://github.com/校对者ID)
|
||
|
||
本文由 [LCTT](https://github.com/LCTT/TranslateProject) 原创编译,[Linux中国](https://linux.cn/) 荣誉推出
|
||
|
||
[a]:http://www.tecmint.com/author/aaronkili/
|
||
[1]:http://www.tecmint.com/recover-deleted-file-in-linux/
|
||
[2]:http://www.cgsecurity.org/wiki/TestDisk_Download
|
||
[3]:http://www.tecmint.com/wp-content/uploads/2017/01/PhotoRec-Data-Recovery-Tool.png
|
||
[4]:http://www.tecmint.com/wp-content/uploads/2017/01/Select-Partition-to-Proceed-File-Recovery.png
|
||
[5]:http://www.tecmint.com/wp-content/uploads/2017/01/Linux-File-Recovery-Options.png
|
||
[6]:http://www.tecmint.com/wp-content/uploads/2017/01/Specify-Recovery-File-Type.png
|
||
[7]:http://www.tecmint.com/wp-content/uploads/2017/01/Save-File-Recovery-Settings.png
|
||
[8]:http://www.tecmint.com/wp-content/uploads/2017/01/Select-Filesystem-to-Recover-Files.png
|
||
[9]:http://www.tecmint.com/wp-content/uploads/2017/01/Select-Filesystem-to-Analyze.png
|
||
[10]:http://www.tecmint.com/wp-content/uploads/2017/01/Select-Directory-to-Save-Recovered-Files.png
|
||
[11]:http://www.tecmint.com/wp-content/uploads/2017/01/Recover-Deleted-Files-in-Linux.png
|
||
[12]:http://www.tecmint.com/wp-content/uploads/2017/01/Linux-File-Recovery-Summary.png
|
||
[13]:http://www.cgsecurity.org/wiki/PhotoRec
|