24 KiB
用 Git 帮助写作者更好地完成工作
如果你是一名写作者,你也能从使用 Git 中受益。在我们的系列文章中了解有关 Git 鲜为人知的用法。
Git 是一个少有的能将如此多的现代计算封装到一个程序之中的应用程序,它可以用作许多其他应用程序的计算引擎。虽然它以跟踪软件开发中的源代码更改而闻名,但它还有许多其他用途,可以让你的生活更轻松、更有条理。在这个 Git 系列中,我们将分享七种鲜为人知的使用 Git 的方法。
今天我们来看看写作者如何使用 Git 更好的地完成工作。
写作者的 Git
有些人写小说,也有人撰写学术论文、诗歌、剧本、技术手册或有关开源的文章。许多人都在做一点各种写作。相同的是,如果你是一名写作者,则或许能从使用 Git 中受益。尽管 Git 是著名的计算机程序员所使用的高度技术性工具,但它也是现代写作者的理想之选,本文将向你演示如何改变你的书写方式以及为什么要这么做的原因。
但是,在谈论 Git 之前,重要的是先谈谈“副本”(或者叫“内容”,对于数字时代而言)到底是什么,以及为什么它与你的交付媒介不同。这是 21 世纪,大多数写作者选择的工具是计算机。尽管计算机看似擅长将副本的编辑和布局等过程结合在一起,但写作者还是(重新)发现将内容与样式分开是一个好主意。这意味着你应该在计算机上像在打字机上而不是在文字处理器中进行书写。以计算机术语而言,这意味着以纯文本形式写作。
以纯文本写作
这个假设曾经是毫无疑问的:你知道自己的写作所要针对的市场,你可以为书籍、网站或软件手册等不同市场编写内容。但是,近来各种市场趋于扁平化:你可能决定在纸质书中使用为网站编写的内容,并且纸质书可能会在以后发布 EPUB 版本。对于你的内容的数字版本,读者才是最终控制者:他们可以在你发布内容的网站上阅读你的文字,也可以点击 Firefox 出色的阅读视图,还可能会打印到纸张上,或者可能会使用 Lynx 将网页转储到文本文件中,甚至可能因为使用屏幕阅读器而根本看不到你的内容。
你只需要逐字写下你的内容,而将交付工作留给发布者。即使你是自己发布,将字词作为写作作品的一种源代码也是一种更聪明、更有效的工作方式,因为在发布时,你可以使用相同的源(你的纯文本)生成适合你的目标输出(用于打印的 PDF、用于电子书的 EPUB、用于网站的 HTML 等)。
用纯文本编写不仅意味着你不必担心布局或文本样式,而且也不再需要专门的工具。无论是手机或平板电脑上的基本记事本应用程序、计算机附带的文本编辑器,还是从互联网上下载的免费编辑器,任何能够产生文本内容的工具对你而言都是有效的“文字处理器”。无论你身在何处或在做什么,几乎可以在任何设备上书写,并且所生成的文本可以与你的项目完美集成,而无需进行任何修改。
而且,Git 专门用来管理纯文本。
Atom 编辑器
当你以纯文本形式书写时,文字处理程序会显得过于庞大。使用文本编辑器更容易,因为文本编辑器不会尝试“有效地”重组输入内容。它使你可以将脑海中的单词输入到屏幕中,而不会受到干扰。更好的是,文本编辑器通常是围绕插件体系结构设计的,这样应用程序本身就很基础(它用来编辑文本),但是你可以围绕它构建一个环境来满足你的各种需求。
Atom 编辑器就是这种设计理念的一个很好的例子。这是一个具有内置 Git 集成的跨平台文本编辑器。如果你不熟悉纯文本格式,也不熟悉 Git,那么 Atom 是最简单的入门方法。
安装 Git 和 Atom
首先,请确保你的系统上已安装 Git。如果运行 Linux 或 BSD,则 Git 在软件存储库或 ports 树中可用。你使用的命令将根据你的发行版而有所不同。例如在 Fedora 上:
$ sudo dnf install git
你也可以下载并安装适用于 Mac 和 Windows 的 Git。
你不需要直接使用 Git,因为 Atom 会充当你的 Git 界面。下一步是安装 Atom。
如果你使用的是 Linux,请通过软件安装程序或适当的命令从软件存储库中安装 Atom,例如:
$ sudo dnf install atom
Atom 当前没有在 BSD 上构建。但是,有很好的替代方法,例如 GNU Emacs。对于 Mac 和 Windows 用户,可以在 Atom 网站上找到安装程序。
安装完成后,启动 Atom 编辑器。
快速指导
如果要使用纯文本和 Git,则需要适应你的编辑器。Atom 的用户界面可能比你习惯的更加动态。实际上,你可以将它视为 Firefox 或 Chrome,而不是文字处理程序,因为它具有可以根据需要打开和关闭的选项卡和面板,甚至还可以安装和配置附件。尝试全部掌握 Atom 如许之多的功能是不切实际的,但是你至少可以知道有什么功能。
当 Atom 打开时,它将显示一个欢迎屏幕。如果不出意外,此屏幕很好地介绍了 Atom 的选项卡式界面。你可以通过单击 Atom 窗口顶部选项卡上的“关闭”图标来关闭欢迎屏幕,并使用“文件 > 新建文件”创建一个新文件。
使用纯文本格式与使用文字处理程序有点不同,因此这里有一些技巧,以人可以连接的方式编写内容,并且 Git 和计算机可以解析,跟踪和转换。
用 Markdown 书写
如今,当人们谈论纯文本时,大多是指 Markdown。Markdown 与其说是格式,不如说是样式,这意味着它旨在为文本提供可预测的结构,以便计算机可以检测自然的模式并智能地转换文本。Markdown 有很多定义,但是最好的技术定义和备忘单在 CommonMark 的网站上。
# Chapter 1
This is a paragraph with an *italic* word and a **bold** word in it.
And it can even reference an image.

从示例中可以看出,Markdown 读起来感觉不像代码,但可以将其视为代码。如果你遵循 CommonMark 定义的 Markdown 规范,那么一键就可以可靠地将 Markdown 的文字转换为 .docx、.epub、.html、MediaWiki、.odt、.pdf、.rtf 和各种其他的格式,而不会失去格式。
你可以认为 Markdown 有点像文字处理程序的样式。如果你曾经为出版社撰写过一套样式来控制章节标题和章节标题的样式,那基本上就是一回事,除了不是从下拉菜单中选择样式以外,你要给你的文字添加一些小记号。对于任何习惯“以文字交谈”的现代阅读者来说,这些表示法都是很自然的,但是在呈现文本时,它们会被精美的文本样式替换掉。实际上,这是文字处理程序在后台秘密进行的操作。文字处理器显示粗体文本,但是如果你可以看到使文本变为粗体的生成代码,则它与 Markdown 很像(实际上,它是更复杂的 XML)。使用 Markdown 可以消除这种代码和样式之间的阻隔,一方面看起来更可怕,但另一方面,你可以在几乎所有可以生成文本的东西上书写 Markdown 而不会丢失任何格式信息。
Markdown 文件流行d 文件扩展名是 .md。如果你使用的平台不知道 .md 文件是什么,则可以手动将扩展名与 Atom 关联,或者仅使用通用的 .txt 扩展名。文件扩展名不会更改文件的性质。它只会改变你的计算机决定如何处理它的方式。Atom 和某些平台足够聪明,可以知道该文件是纯文本格式,无论你给它以什么扩展名。
实时预览
Atom 具有 “Markdown 预览” 插件,该插件可以向你显示正在编写的纯文本 Markdown 及其(通常)呈现的方式。
要激活此预览窗格,请选择“包 > Markdown 预览 > 切换预览” 或按 Ctrl + Shift + M。
此视图为你提供了两全其美的方法。无需承担为你的文本添加样式的负担,就可以写作,而你也可以看到一个通用的示例外观,至少是以典型的数字化格式显示了文本的外观。当然,关键是你无法控制文本的最终呈现方式,因此不要试图调整 Markdown 来强制以某种方式显示呈现的预览。
每行一句话
你的高中写作老师不会看你的 Markdown。
一开始它并那么自然,但是在数字世界中,保持每行一个句子更有意义。Markdown 忽略单个换行符(当你按下 Return 或 Enter 键时),并且只在单个空行之后才会创建一个新段落。
每行写一个句子的好处是你的工作更容易跟踪。也就是说,如果你在段落的开头更改了一个单词,那么如果更改仅限于一行而不是一个长的段落中的一个单词,那么 Atom、Git 或任何应用程序很容易以有意义的方式突出显示该更改。换句话说,对一个句子的更改只会影响该句子,而不会影响整个段落。
你可能会想:“许多文字处理器也可以跟踪更改,它们可以突出显示已更改的单个单词。”但是这些修订跟踪器绑定到该字处理器的界面上,这意味着你必须先打开该字处理器才能浏览修订。在纯文本工作流程中,你可以以纯文本形式查看修订,这意味着无论手头有什么,只要该设备可以处理纯文本(大多数都可以),就可以进行编辑或批准编辑。
诚然,写作者通常不会考虑行号,但它对于计算机有用,并且通常是一个很好的参考点。默认情况下,Atom 为文本文档的行进行编号。按下 Enter 键或 Return 键后,一行就是一行。
如果一行中有一个点而不是一个数字,则表示它是上一行折叠的一部分,因为它不超出了你的屏幕。
主题
If you're a visual person, you might be very particular about the way your writing environment looks. Even if you are writing in plain Markdown, it doesn't mean you have to write in a programmer's font or in a dark window that makes you look like a coder. The simplest way to modify what Atom looks like is to use theme packages. It's conventional for theme designers to differentiate dark themes from light themes, so you can search with the keyword Dark or Light, depending on what you want.
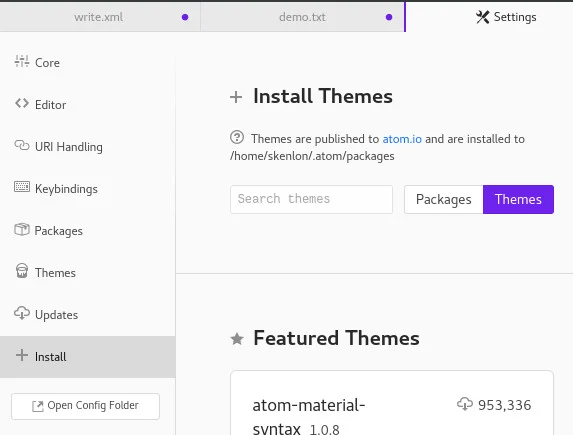
To install a theme, select Edit > Preferences. This opens a new tab in the Atom interface. Yes, tabs are used for your working documents and for configuration and control panels. In the Settings tab, click on the Install category.
In the Install panel, search for the name of the theme you want to install. Click the Themes button on the right of the search field to search only for themes. Once you've found your theme, click its Install button.
To use a theme you've installed or to customize a theme to your preference, navigate to the Themes category in your Settings tab. Pick the theme you want to use from the drop-down menu. The changes take place immediately, so you can see exactly how the theme affects your environment.
You can also change your working font in the Editor category of the Settings tab. Atom defaults to monospace fonts, which are generally preferred by programmers. But you can use any font on your system, whether it's serif or sans or gothic or cursive. Whatever you want to spend your day staring at, it's entirely up to you.
On a related note, by default Atom draws a vertical marker down its screen as a guide for people writing code. Programmers often don't want to write long lines of code, so this vertical line is a reminder to them to simplify things. The vertical line is meaningless to writers, though, and you can remove it by disabling the wrap-guide package.
To disable the wrap-guide package, select the Packages category in the Settings tab and search for wrap-guide. When you've found the package, click its Disable button.
Dynamic structure
When creating a long document, I find that writing one chapter per file makes more sense than writing an entire book in a single file. Furthermore, I don't name my chapters in the obvious syntax chapter-1.md or 1.example.md , but by chapter titles or keywords, such as example.md. To provide myself guidance in the future about how the book is meant to be assembled, I maintain a file called toc.md (for "Table of Contents") where I list the (current) order of my chapters.
I do this because, no matter how convinced I am that chapter 6 just couldn't possibly happen before chapter 1, there's rarely a time that I don't swap the order of one or two chapters or sections before I'm finished with a book. I find that keeping it dynamic from the start helps me avoid renaming confusion, and it also helps me treat the material less rigidly.
Git in Atom
Two things every writer has in common is that they're writing for keeps and their writing is a journey. You don't sit down to write and finish with a final draft; by definition, you have a first draft. And that draft goes through revisions, each of which you carefully save in duplicate and triplicate just in case one of your files turns up corrupted. Eventually, you get to what you call a final draft, but more than likely you'll be going back to it one day, either to resurrect the good parts or to fix the bad.
The most exciting feature in Atom is its strong Git integration. Without ever leaving Atom, you can interact with all of the major features of Git, tracking and updating your project, rolling back changes you don't like, integrating changes from a collaborator, and more. The best way to learn it is to step through it, so here's how to use Git within the Atom interface from the beginning to the end of a writing project.
First thing first: Reveal the Git panel by selecting View > Toggle Git Tab. This causes a new tab to open on the right side of Atom's interface. There's not much to see yet, so just keep it open for now.
Starting a Git project
You can think of Git as being bound to a folder. Any folder outside a Git directory doesn't know about Git, and Git doesn't know about it. Folders and files within a Git directory are ignored until you grant Git permission to keep track of them.
You can create a Git project by creating a new project folder in Atom. Select File > Add Project Folder and create a new folder on your system. The folder you create appears in the left Project Panel of your Atom window.
Git add
Right-click on your new project folder and select New File to create a new file in your project folder. If you have files you want to import into your new project, right-click on the folder and select Show in File Manager to open the folder in your system's file viewer (Dolphin or Nautilus on Linux, Finder on Mac, Explorer on Windows), and then drag-and-drop your files.
With a project file (either the empty one you created or one you've imported) open in Atom, click the Create Repository button in the Git tab. In the pop-up dialog box, click Init to initialize your project directory as a local Git repository. Git adds a .git directory (invisible in your system's file manager, but visible to you in Atom) to your project folder. Don't be fooled by this: The .git directory is for Git to manage, not you, so you'll generally stay out of it. But seeing it in Atom is a good reminder that you're working in a project actively managed by Git; in other words, revision history is available when you see a .git directory.
In your empty file, write some stuff. You're a writer, so type some words. It can be any set of words you please, but remember the writing tips above.
Press Ctrl+S to save your file and it will appear in the Unstaged Changes section of the Git tab. That means the file exists in your project folder but has not yet been committed over to Git's purview. Allow Git to keep track of your file by clicking on the Stage All button in the top-right of the Git tab. If you've used a word processor with revision history, you can think of this step as permitting Git to record changes.
Git commit
Your file is now staged. All that means is Git is aware that the file exists and is aware that it has been changed since the last time Git was made aware of it.
A Git commit sends your file into Git's internal and eternal archives. If you're used to word processors, this is similar to naming a revision. To create a commit, enter some descriptive text in the Commit message box at the bottom of the Git tab. You can be vague or cheeky, but it's more useful if you enter useful information for your future self so that you know why the revision was made.
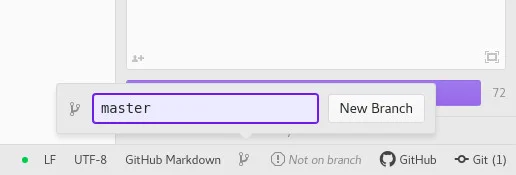
The first time you make a commit, you must create a branch. Git branches are a little like alternate realities, allowing you to switch from one timeline to another to make changes that you may or may not want to keep forever. If you end up liking the changes, you can merge one experimental branch into another, thereby unifying different versions of your project. It's an advanced process that's not worth learning upfront, but you still need an active branch, so you have to create one for your first commit.
Click on the Branch icon at the very bottom of the Git tab to create a new branch.
It's customary to name your first branch master. You don't have to; you can name it firstdraft or whatever you like, but adhering to the local customs can sometimes make talking about Git (and looking up answers to questions) a little easier because you'll know that when someone mentions master , they really mean master and not firstdraft or whatever you called your branch.
On some versions of Atom, the UI may not update to reflect that you've created a new branch. Don't worry; the branch will be created (and the UI updated) once you make your commit. Press the Commit button, whether it reads Create detached commit or Commit to master.
Once you've made a commit, the state of your file is preserved forever in Git's memory.
History and Git diff
A natural question is how often you should make a commit. There's no one right answer to that. Saving a file with Ctrl+S and committing to Git are two separate processes, so you will continue to do both. You'll probably want to make commits whenever you feel like you've done something significant or are about to try out a crazy new idea that you may want to back out of.
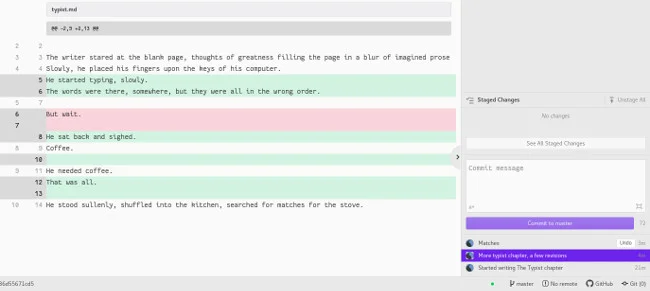
To get a feel for what impact a commit has on your workflow, remove some text from your test document and add some text to the top and bottom. Make another commit. Do this a few times until you have a small history at the bottom of your Git tab, then click on a commit to view it in Atom.
When viewing a past commit, you see three elements:
- Text in green was added to a document when the commit was made.
- Text in red was removed from the document when the commit was made.
- All other text was untouched.
Remote backup
One of the advantages of using Git is that, by design, it is distributed, meaning you can commit your work to your local repository and push your changes out to any number of servers for backup. You can also pull changes in from those servers so that whatever device you happen to be working on always has the latest changes.
For this to work, you must have an account on a Git server. There are several free hosting services out there, including GitHub, the company that produces Atom but oddly is not open source, and GitLab, which is open source. Preferring open source to proprietary, I'll use GitLab in this example.
If you don't already have a GitLab account, sign up for one and start a new project. The project name doesn't have to match your project folder in Atom, but it probably makes sense if it does. You can leave your project private, in which case only you and anyone you give explicit permissions to can access it, or you can make it public if you want it to be available to anyone on the internet who stumbles upon it.
Do not add a README to the project.
Once the project is created, it provides you with instructions on how to set up the repository. This is great information if you decide to use Git in a terminal or with a separate GUI, but Atom's workflow is different.
Click the Clone button in the top-right of the GitLab interface. This reveals the address you must use to access the Git repository. Copy the SSH address (not the https address).
In Atom, click on your project's .git directory and open the config. Add these configuration lines to the file, adjusting the seth/example.git part of the url value to match your unique address.
[remote "origin"]
url = [git@gitlab.com][16]:seth/example.git
fetch = +refs/heads/*:refs/remotes/origin/*
[branch "master"]
remote = origin
merge = refs/heads/master
At the bottom of the Git tab, a new button has appeared, labeled Fetch. Since your server is brand new and therefore has no data for you to fetch, right-click on the button and select Push. This pushes your changes to your Gitlab account, and now your project is backed up on a Git server.
Pushing changes to a server is something you can do after each commit. It provides immediate offsite backup and, since the amount of data is usually minimal, it's practically as fast as a local save.
Writing and Git
Git is a complex system, useful for more than just revision tracking and backups. It enables asynchronous collaboration and encourages experimentation. This article has covered the basics, but there are many more articles—and entire books—on Git and how to use it to make your work more efficient, more resilient, and more dynamic. It all starts with using Git for small tasks. The more you use it, the more questions you'll find yourself asking, and eventually the more tricks you'll learn.
via: https://opensource.com/article/19/4/write-git
作者:Seth Kenlon 选题:lujun9972 译者:译者ID 校对:校对者ID


