mirror of
https://github.com/LCTT/TranslateProject.git
synced 2025-01-13 22:30:37 +08:00
276 lines
12 KiB
Markdown
276 lines
12 KiB
Markdown
RHCSA 系列(十四): 在 RHEL 7 中设置基于 LDAP 的认证
|
||
================================================================================
|
||
在这篇文章中,我们将首先罗列一些 LDAP 的基础知识(它是什么,它被用于何处以及为什么会被这样使用),然后向你展示如何使用 RHEL 7 系统来设置一个 LDAP 服务器以及配置一个客户端来使用它达到认证的目的。
|
||
|
||

|
||
|
||
*RHCSA 系列:设置 LDAP 服务器及客户端认证 – Part 14*
|
||
|
||
正如你将看到的那样,关于认证,还存在其他可能的应用场景,但在这篇指南中,我们将只关注基于 LDAP 的认证。另外,请记住,由于这个话题的广泛性,在这里我们将只涵盖它的基础知识,但你可以参考位于总结部分中列出的文档,以此来了解更加深入的细节。
|
||
|
||
基于相同的原因,你将注意到:为了简洁起见,我已经决定省略了几个位于 man 页中 LDAP 工具的参考,但相应命令的解释是近在咫尺的(例如,输入 man ldapadd)。
|
||
|
||
那还是让我们开始吧。
|
||
|
||
**我们的测试环境**
|
||
|
||
我们的测试环境包含两台 RHEL 7机器:
|
||
|
||
Server: 192.168.0.18. FQDN: rhel7.mydomain.com
|
||
Client: 192.168.0.20. FQDN: ldapclient.mydomain.com
|
||
|
||
如若你想,你可以使用在 [RHCSA 系列(十二): 使用 Kickstart 完成 RHEL 7 的自动化安装][1] 中使用 Kickstart 安装的机子来作为客户端。
|
||
|
||
#### LDAP 是什么? ####
|
||
|
||
LDAP 代表轻量级目录访问协议(Lightweight Directory Access Protocol),并包含在一系列协议之中,这些协议允许一个客户端通过网络去获取集中存储的信息(例如所登录的 shell 的路径,家目录的绝对路径,或者其他典型的系统用户信息),而这些信息可以从不同的地方访问到或被很多终端用户获取到(另一个例子是含有某个公司所有雇员的家庭地址和电话号码的目录)。
|
||
|
||
对于那些被赋予了权限可以使用这些信息的人来说,将这些信息进行集中管理意味着可以更容易地维护和获取。
|
||
|
||
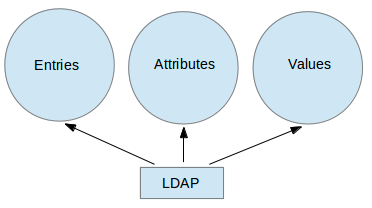
下面的图表提供了一个简化了的关于 LDAP 的示意图,在下面将会进行更多的描述:
|
||
|
||

|
||
|
||
*LDAP 示意图*
|
||
|
||
下面是对上面示意图的一个详细解释。
|
||
|
||
- 在一个 LDAP 目录中,一个条目(entry)代表一个独立单元或信息,被所谓的 Distinguished Name(DN,区别名) 唯一识别。
|
||
- 一个属性(attribute)是一些与某个条目相关的信息(例如地址,有效的联系电话号码和邮箱地址)。
|
||
- 每个属性被分配有一个或多个值(value),这些值被包含在一个以空格为分隔符的列表中。每个条目中那个唯一的值被称为一个 Relative Distinguished Name(RDN,相对区别名)。
|
||
|
||
接下来,就让我们进入到有关服务器和客户端安装的内容。
|
||
|
||
### 安装和配置一个 LDAP 服务器和客户端 ###
|
||
|
||
在 RHEL 7 中, LDAP 由 OpenLDAP 实现。为了安装服务器和客户端,分别使用下面的命令:
|
||
|
||
# yum update && yum install openldap openldap-clients openldap-servers
|
||
# yum update && yum install openldap openldap-clients nss-pam-ldapd
|
||
|
||
一旦安装完成,我们还需要关注一些事情。除非显示地提示,下面的步骤都只在服务器上执行:
|
||
|
||
**1. 在服务器和客户端上,为了确保 SELinux 不会妨碍挡道,长久地开启下列的布尔值:**
|
||
|
||
# setsebool -P allow_ypbind=0 authlogin_nsswitch_use_ldap=0
|
||
|
||
其中 `allow_ypbind` 为基于 LDAP 的认证所需要,而 `authlogin_nsswitch_use_ldap`则可能会被某些应用所需要。
|
||
|
||
**2. 开启并启动服务:**
|
||
|
||
# systemctl enable slapd.service
|
||
# systemctl start slapd.service
|
||
|
||
记住你也可以使用 [systemctl][2] 来禁用,重启或停止服务:
|
||
|
||
# systemctl disable slapd.service
|
||
# systemctl restart slapd.service
|
||
# systemctl stop slapd.service
|
||
|
||
**3. 由于 slapd 服务是由 ldap 用户来运行的(你可以使用 `ps -e -o pid,uname,comm | grep slapd` 来验证),为了使得服务器能够更改由管理工具创建的条目,该用户应该有目录 `/var/lib/ldap` 的所有权,而这些管理工具仅可以由 root 用户来运行(紧接着有更多这方面的内容)。**
|
||
|
||
在递归地更改这个目录的所有权之前,将 slapd 的示例数据库配置文件复制进这个目录:
|
||
|
||
# cp /usr/share/openldap-servers/DB_CONFIG.example /var/lib/ldap/DB_CONFIG
|
||
# chown -R ldap:ldap /var/lib/ldap
|
||
|
||
**4. 设置一个 OpenLDAP 管理用户并设置密码:**
|
||
|
||
# slappasswd
|
||
|
||
正如下一幅图所展示的那样:
|
||
|
||

|
||
|
||
*设置 LDAP 管理密码*
|
||
|
||
然后以下面的内容创建一个 LDIF 文件(`ldaprootpasswd.ldif`):
|
||
|
||
dn: olcDatabase={0}config,cn=config
|
||
changetype: modify
|
||
add: olcRootPW
|
||
olcRootPW: {SSHA}PASSWORD
|
||
|
||
其中:
|
||
|
||
- PASSWORD 是先前得到的经过哈希处理的字符串。
|
||
- cn=config 指的是全局配置选项。
|
||
- olcDatabase 指的是一个特定的数据库实例的名称,并且通常可以在 `/etc/openldap/slapd.d/cn=config` 目录中发现。
|
||
|
||
根据上面提供的理论背景,`ldaprootpasswd.ldif` 文件将添加一个条目到 LDAP 目录中。在那个条目中,每一行代表一个属性键值对(其中 dn,changetype,add 和 olcRootPW 为属性,每个冒号右边的字符串为相应的键值)。
|
||
|
||
随着我们的进一步深入,请记住上面的这些,并注意到在这篇文章的余下部分,我们使用相同的 Common Names(通用名) `(cn=)`,而这些余下的步骤中的每一步都将与其上一步相关。
|
||
|
||
**5. 现在,通过特别指定相对于 ldap 服务的 URI ,添加相应的 LDAP 条目,其中只有 protocol/host/port 这几个域被允许使用。**
|
||
|
||
# ldapadd -H ldapi:/// -f ldaprootpasswd.ldif
|
||
|
||
上面命令的输出应该与下面的图像相似:
|
||
|
||

|
||
|
||
*LDAP 配置*
|
||
|
||
接着从 `/etc/openldap/schema` 目录导入一个基本的 LDAP 定义:
|
||
|
||
# for def in cosine.ldif nis.ldif inetorgperson.ldif; do ldapadd -H ldapi:/// -f /etc/openldap/schema/$def; done
|
||
|
||

|
||
|
||
*LDAP 定义*
|
||
|
||
**6. 让 LDAP 在它的数据库中使用你的域名。**
|
||
|
||
以下面的内容创建另一个 LDIF 文件,我们称之为 `ldapdomain.ldif`, 然后酌情替换这个文件中的域名(在域名部分(Domain Component) dc=) 和密码:
|
||
|
||
dn: olcDatabase={1}monitor,cn=config
|
||
changetype: modify
|
||
replace: olcAccess
|
||
olcAccess: {0}to * by dn.base="gidNumber=0+uidNumber=0,cn=peercred,cn=external,cn=auth"
|
||
read by dn.base="cn=Manager,dc=mydomain,dc=com" read by * none
|
||
|
||
dn: olcDatabase={2}hdb,cn=config
|
||
changetype: modify
|
||
replace: olcSuffix
|
||
olcSuffix: dc=mydomain,dc=com
|
||
|
||
dn: olcDatabase={2}hdb,cn=config
|
||
changetype: modify
|
||
replace: olcRootDN
|
||
olcRootDN: cn=Manager,dc=mydomain,dc=com
|
||
|
||
dn: olcDatabase={2}hdb,cn=config
|
||
changetype: modify
|
||
add: olcRootPW
|
||
olcRootPW: {SSHA}PASSWORD
|
||
|
||
dn: olcDatabase={2}hdb,cn=config
|
||
changetype: modify
|
||
add: olcAccess
|
||
olcAccess: {0}to attrs=userPassword,shadowLastChange by
|
||
dn="cn=Manager,dc=mydomain,dc=com" write by anonymous auth by self write by * none
|
||
olcAccess: {1}to dn.base="" by * read
|
||
olcAccess: {2}to * by dn="cn=Manager,dc=mydomain,dc=com" write by * read
|
||
|
||
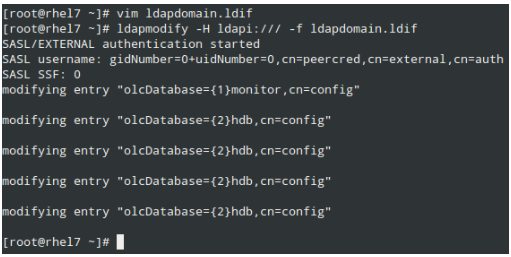
接着使用下面的命令来加载:
|
||
|
||
# ldapmodify -H ldapi:/// -f ldapdomain.ldif
|
||
|
||

|
||
|
||
*LDAP 域名配置*
|
||
|
||
**7. 现在,该是添加一些条目到我们的 LDAP 目录的时候了。在下面的文件中,属性和键值由一个冒号`(:)` 所分隔,这个文件我们将命名为 `baseldapdomain.ldif`:**
|
||
|
||
dn: dc=mydomain,dc=com
|
||
objectClass: top
|
||
objectClass: dcObject
|
||
objectclass: organization
|
||
o: mydomain com
|
||
dc: mydomain
|
||
|
||
dn: cn=Manager,dc=mydomain,dc=com
|
||
objectClass: organizationalRole
|
||
cn: Manager
|
||
description: Directory Manager
|
||
|
||
dn: ou=People,dc=mydomain,dc=com
|
||
objectClass: organizationalUnit
|
||
ou: People
|
||
|
||
dn: ou=Group,dc=mydomain,dc=com
|
||
objectClass: organizationalUnit
|
||
ou: Group
|
||
|
||
添加条目到 LDAP 目录中:
|
||
|
||
# ldapadd -x -D cn=Manager,dc=mydomain,dc=com -W -f baseldapdomain.ldif
|
||
|
||

|
||
|
||
*添加 LDAP 域名,属性和键值*
|
||
|
||
**8. 创建一个名为 ldapuser 的 LDAP 用户(`adduser ldapuser`),然后在`ldapgroup.ldif` 中为一个 LDAP 组创建定义。**
|
||
|
||
# adduser ldapuser
|
||
# vi ldapgroup.ldif
|
||
|
||
添加下面的内容:
|
||
|
||
dn: cn=Manager,ou=Group,dc=mydomain,dc=com
|
||
objectClass: top
|
||
objectClass: posixGroup
|
||
gidNumber: 1004
|
||
|
||
其中 gidNumber 是 ldapuser 在 `/etc/group` 中的 GID,然后加载这个文件:
|
||
|
||
# ldapadd -x -W -D "cn=Manager,dc=mydomain,dc=com" -f ldapgroup.ldif
|
||
|
||
**9. 为用户 ldapuser 添加一个带有定义的 LDIF 文件(`ldapuser.ldif`):**
|
||
|
||
dn: uid=ldapuser,ou=People,dc=mydomain,dc=com
|
||
objectClass: top
|
||
objectClass: account
|
||
objectClass: posixAccount
|
||
objectClass: shadowAccount
|
||
cn: ldapuser
|
||
uid: ldapuser
|
||
uidNumber: 1004
|
||
gidNumber: 1004
|
||
homeDirectory: /home/ldapuser
|
||
userPassword: {SSHA}fiN0YqzbDuDI0Fpqq9UudWmjZQY28S3M
|
||
loginShell: /bin/bash
|
||
gecos: ldapuser
|
||
shadowLastChange: 0
|
||
shadowMax: 0
|
||
shadowWarning: 0
|
||
|
||
并加载它:
|
||
|
||
# ldapadd -x -D cn=Manager,dc=mydomain,dc=com -W -f ldapuser.ldif
|
||
|
||

|
||
|
||
*LDAP 用户配置*
|
||
|
||
相似地,你可以删除你刚刚创建的用户条目:
|
||
|
||
# ldapdelete -x -W -D cn=Manager,dc=mydomain,dc=com "uid=ldapuser,ou=People,dc=mydomain,dc=com"
|
||
|
||
**10. 允许有关 ldap 的通信通过防火墙:**
|
||
|
||
# firewall-cmd --add-service=ldap
|
||
|
||
**11. 最后,但并非最不重要的是使用 LDAP 开启客户端的认证。**
|
||
|
||
为了在最后一步中对我们有所帮助,我们将使用 authconfig 工具(一个配置系统认证资源的界面)。
|
||
|
||
使用下面的命令,在通过 LDAP 服务器认证成功后,假如请求的用户的家目录不存在,则将会被创建:
|
||
|
||
# authconfig --enableldap --enableldapauth --ldapserver=rhel7.mydomain.com --ldapbasedn="dc=mydomain,dc=com" --enablemkhomedir --update
|
||
|
||

|
||
|
||
*LDAP 客户端认证*
|
||
|
||
### 总结 ###
|
||
|
||
在这篇文章中,我们已经解释了如何利用一个 LDAP 服务器来设置基本的认证。若想对当前这个指南里描述的设置进行更深入的配置,请参考位于 RHEL 系统管理员指南里的 [第 13 章 – LDAP 的配置][3],并特别注意使用 TLS 来进行安全设定。
|
||
|
||
请随意使用下面的评论框来留下你的提问。
|
||
|
||
--------------------------------------------------------------------------------
|
||
|
||
via: http://www.tecmint.com/setup-ldap-server-and-configure-client-authentication/
|
||
|
||
作者:[Gabriel Cánepa][a]
|
||
译者:[FSSlc](https://github.com/FSSlc)
|
||
校对:[wxy](https://github.com/wxy)
|
||
|
||
本文由 [LCTT](https://github.com/LCTT/TranslateProject) 原创翻译,[Linux中国](https://linux.cn/) 荣誉推出
|
||
|
||
[a]:http://www.tecmint.com/author/gacanepa/
|
||
[1]:https://linux.cn/article-6335-1.html
|
||
[2]:http://www.tecmint.com/manage-services-using-systemd-and-systemctl-in-linux/
|
||
[3]:https://access.redhat.com/documentation/en-US/Red_Hat_Enterprise_Linux/7/html/System_Administrators_Guide/ch-Directory_Servers.html
|