mirror of
https://github.com/LCTT/TranslateProject.git
synced 2024-12-26 21:30:55 +08:00
385 lines
13 KiB
Markdown
385 lines
13 KiB
Markdown
Samba 系列(十五):用 SSSD 和 Realm 集成 Ubuntu 到 Samba4 AD DC
|
||
============================================================
|
||
|
||
本教程将告诉你如何将 Ubuntu 桌面版机器加入到带有 SSSD 和 Realm 服务的 Samba4 活动目录域中,以在活动目录中认证用户。
|
||
|
||
### 要求:
|
||
|
||
1. [在 Ubuntu 上用 Samba4 创建一个活动目录架构][1]
|
||
|
||
### 第 1 步:初始配置
|
||
|
||
1、 在把 Ubuntu 加入活动目录前确保主机名被正确设置了。使用 `hostnamectl` 命令设置机器名字或者手动编辑 `/etc/hostname` 文件。
|
||
|
||
```
|
||
$ sudo hostnamectl set-hostname your_machine_short_hostname
|
||
$ cat /etc/hostname
|
||
$ hostnamectl
|
||
```
|
||
|
||
2、 接下来,编辑机器网络接口设置并且添加合适的 IP 设置,并将正确的 DNS IP 服务器地址指向 Samba 活动目录域控制器,如下图所示。
|
||
|
||
如果你已经配置了 DHCP 服务来为局域网机器自动分配包括合适的 AD DNS IP 地址的 IP 设置,那么你可以跳过这一步。
|
||
|
||
[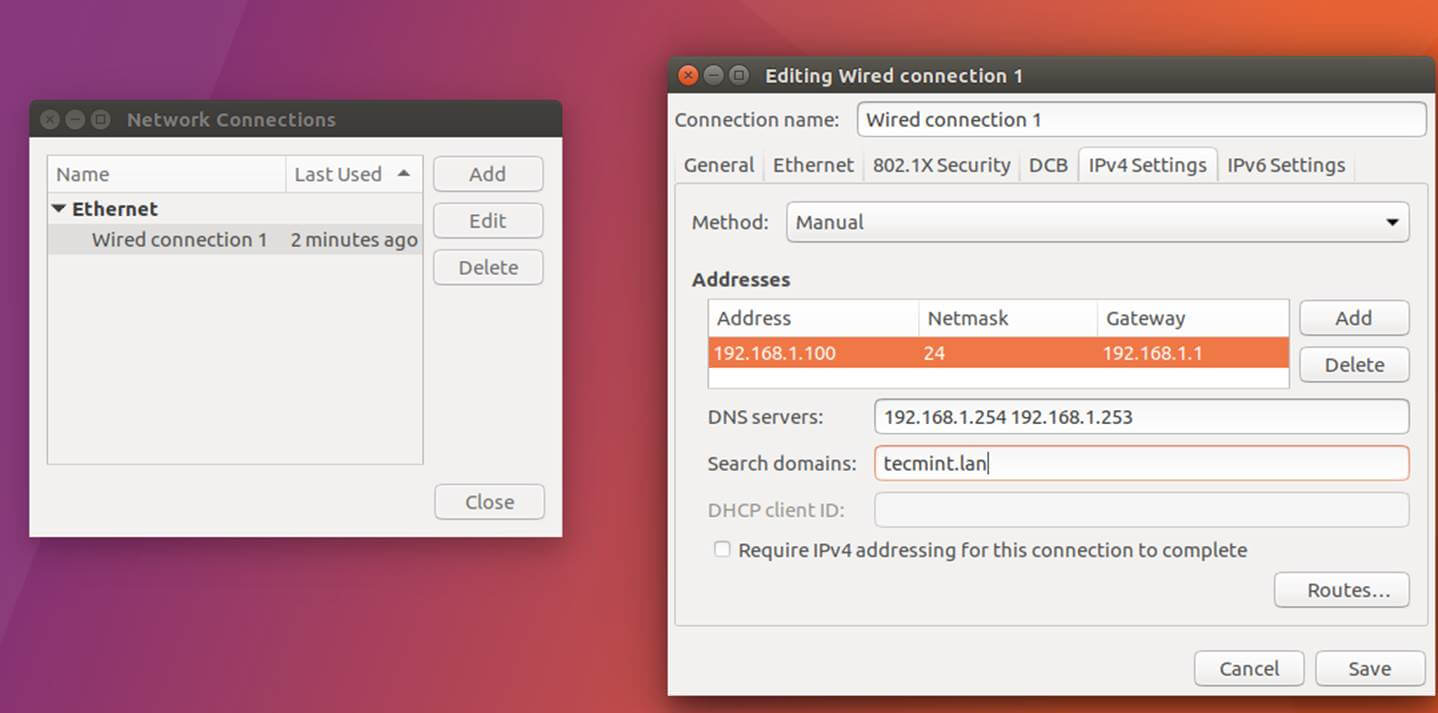][2]
|
||
|
||
*设置网络接口*
|
||
|
||
上图中,`192.168.1.254` 和 `192.168.1.253` 代表 Samba4 域控制器的 IP 地址。
|
||
|
||
3、 用 GUI(图形用户界面)或命令行重启网络服务来应用修改,并且对你的域名发起一系列 ping 请求来测试 DNS 解析如预期工作。 也用 `host` 命令来测试 DNS 解析。
|
||
|
||
```
|
||
$ sudo systemctl restart networking.service
|
||
$ host your_domain.tld
|
||
$ ping -c2 your_domain_name
|
||
$ ping -c2 adc1
|
||
$ ping -c2 adc2
|
||
```
|
||
|
||
4、 最后, 确保机器时间和 Samba4 AD 同步。安装 `ntpdate` 包并用下列指令和 AD 同步时间。
|
||
|
||
```
|
||
$ sudo apt-get install ntpdate
|
||
$ sudo ntpdate your_domain_name
|
||
```
|
||
|
||
### 第 2 步:安装需要的包
|
||
|
||
5、 这一步将安装将 Ubuntu 加入 Samba4 活动目录域控制器所必须的软件和依赖:Realmd 和 SSSD 服务。
|
||
|
||
```
|
||
$ sudo apt install adcli realmd krb5-user samba-common-bin samba-libs samba-dsdb-modules sssd sssd-tools libnss-sss libpam-sss packagekit policykit-1
|
||
```
|
||
|
||
6、 输入大写的默认 realm 名称,然后按下回车继续安装。
|
||
|
||
[][3]
|
||
|
||
*输入 Realm 名称*
|
||
|
||
7、 接着,创建包含以下内容的 SSSD 配置文件。
|
||
|
||
```
|
||
$ sudo nano /etc/sssd/sssd.conf
|
||
```
|
||
|
||
加入下面的内容到 `sssd.conf` 文件。
|
||
|
||
```
|
||
[nss]
|
||
filter_groups = root
|
||
filter_users = root
|
||
reconnection_retries = 3
|
||
[pam]
|
||
reconnection_retries = 3
|
||
[sssd]
|
||
domains = tecmint.lan
|
||
config_file_version = 2
|
||
services = nss, pam
|
||
default_domain_suffix = TECMINT.LAN
|
||
[domain/tecmint.lan]
|
||
ad_domain = tecmint.lan
|
||
krb5_realm = TECMINT.LAN
|
||
realmd_tags = manages-system joined-with-samba
|
||
cache_credentials = True
|
||
id_provider = ad
|
||
krb5_store_password_if_offline = True
|
||
default_shell = /bin/bash
|
||
ldap_id_mapping = True
|
||
use_fully_qualified_names = True
|
||
fallback_homedir = /home/%d/%u
|
||
access_provider = ad
|
||
auth_provider = ad
|
||
chpass_provider = ad
|
||
access_provider = ad
|
||
ldap_schema = ad
|
||
dyndns_update = true
|
||
dyndsn_refresh_interval = 43200
|
||
dyndns_update_ptr = true
|
||
dyndns_ttl = 3600
|
||
```
|
||
|
||
确保你对应地替换了下列参数的域名:
|
||
|
||
```
|
||
domains = tecmint.lan
|
||
default_domain_suffix = TECMINT.LAN
|
||
[domain/tecmint.lan]
|
||
ad_domain = tecmint.lan
|
||
krb5_realm = TECMINT.LAN
|
||
```
|
||
|
||
8、 接着,用下列命令给 SSSD 配置文件适当的权限:
|
||
|
||
```
|
||
$ sudo chmod 700 /etc/sssd/sssd.conf
|
||
```
|
||
|
||
9、 现在,打开并编辑 Realmd 配置文件,输入下面这行:
|
||
|
||
```
|
||
$ sudo nano /etc/realmd.conf
|
||
```
|
||
|
||
`realmd.conf` 文件摘录:
|
||
|
||
```
|
||
[active-directory]
|
||
os-name = Linux Ubuntu
|
||
os-version = 17.04
|
||
[service]
|
||
automatic-install = yes
|
||
[users]
|
||
default-home = /home/%d/%u
|
||
default-shell = /bin/bash
|
||
[tecmint.lan]
|
||
user-principal = yes
|
||
fully-qualified-names = no
|
||
```
|
||
|
||
10、 最后需要修改的文件属于 Samba 守护进程。 打开 `/etc/samba/smb.conf` 文件编辑,然后在文件开头加入下面这块代码,在 `[global]` 之后的部分如下图所示。
|
||
|
||
```
|
||
workgroup = TECMINT
|
||
client signing = yes
|
||
client use spnego = yes
|
||
kerberos method = secrets and keytab
|
||
realm = TECMINT.LAN
|
||
security = ads
|
||
```
|
||
|
||
[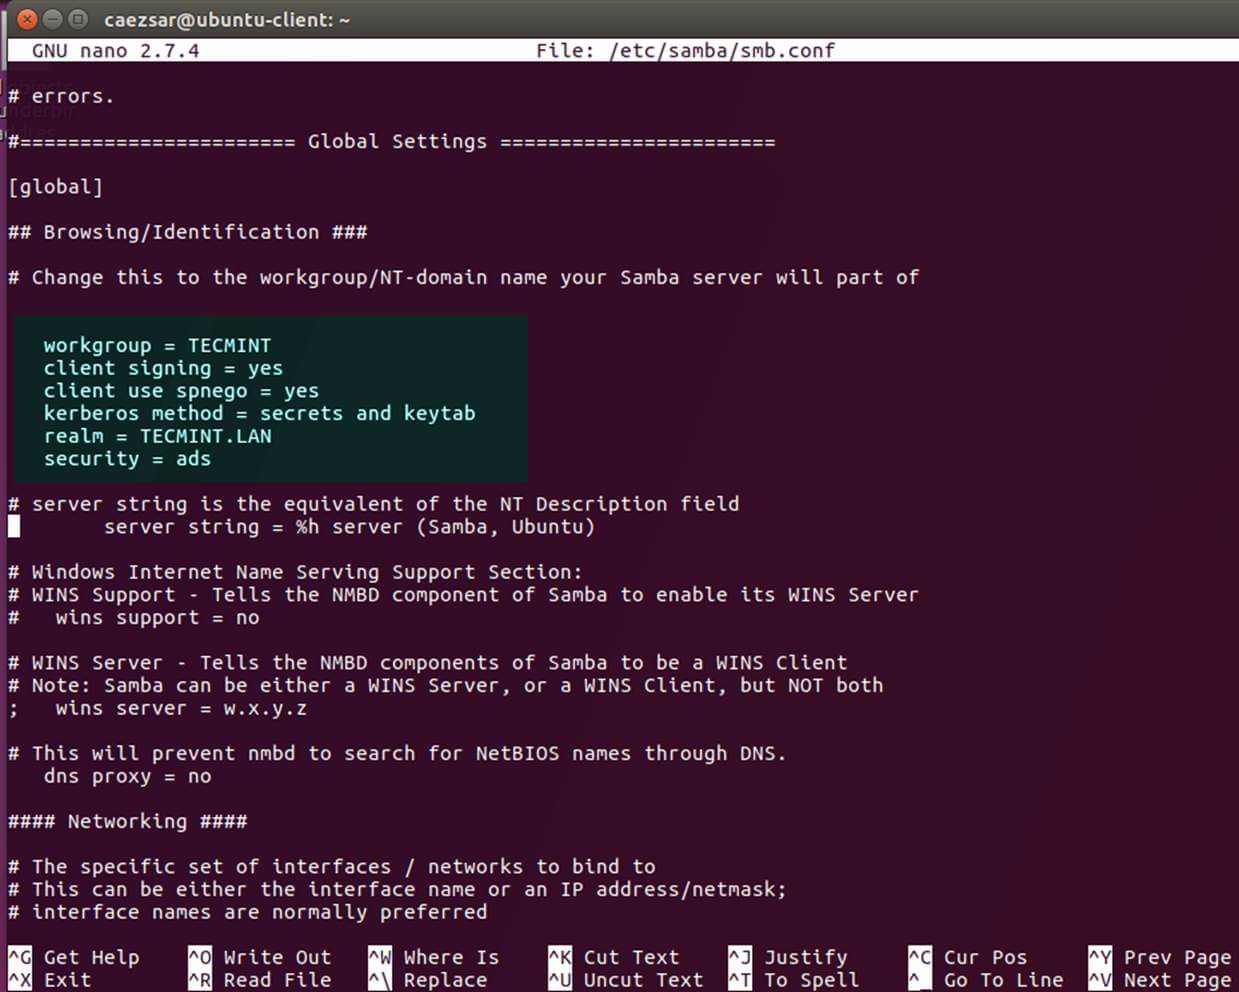][4]
|
||
|
||
*配置 Samba 服务器*
|
||
|
||
确保你替换了域名值,特别是对应域名的 realm 值,并运行 `testparm` 命令检验设置文件是否包含错误。
|
||
|
||
```
|
||
$ sudo testparm
|
||
```
|
||
|
||
[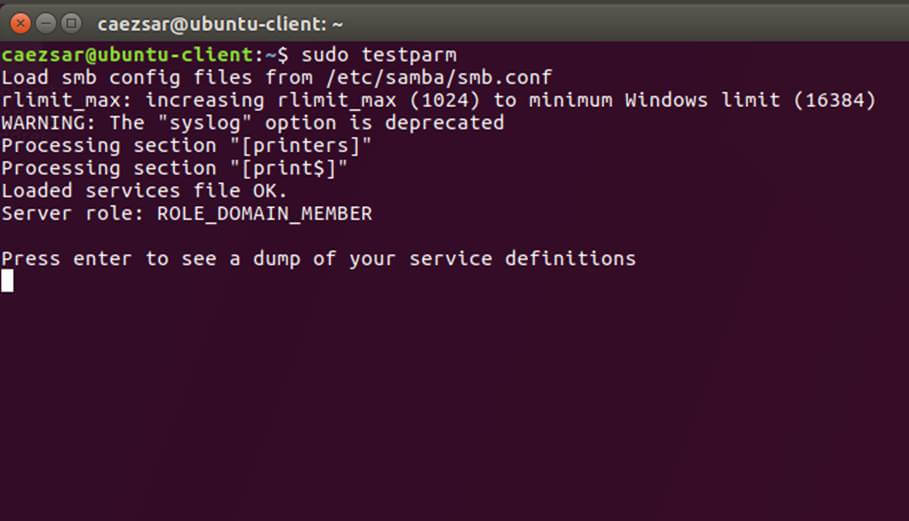][5]
|
||
|
||
*测试 Samba 配置*
|
||
|
||
11、 在做完所有必需的修改之后,用 AD 管理员帐号验证 Kerberos 认证并用下面的命令列出票据。
|
||
|
||
```
|
||
$ sudo kinit ad_admin_user@DOMAIN.TLD
|
||
$ sudo klist
|
||
```
|
||
|
||
[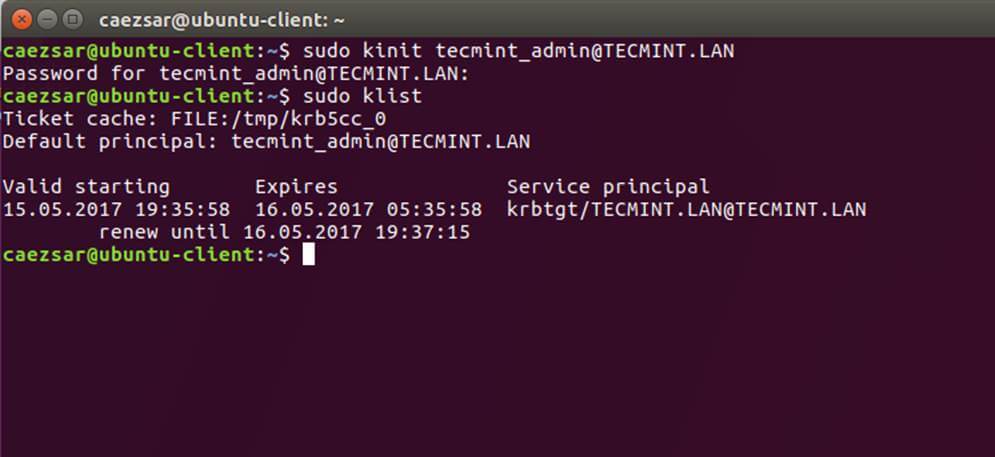][6]
|
||
|
||
*检验 Kerberos 认证*
|
||
|
||
### 第 3 步: 加入 Ubuntu 到 Samba4 Realm
|
||
|
||
12、 键入下列命令将 Ubuntu 机器加入到 Samba4 活动目录。用有管理员权限的 AD DC 账户名字,以便绑定 realm 可以如预期般工作,并替换对应的域名值。
|
||
|
||
```
|
||
$ sudo realm discover -v DOMAIN.TLD
|
||
$ sudo realm list
|
||
$ sudo realm join TECMINT.LAN -U ad_admin_user -v
|
||
$ sudo net ads join -k
|
||
```
|
||
|
||
[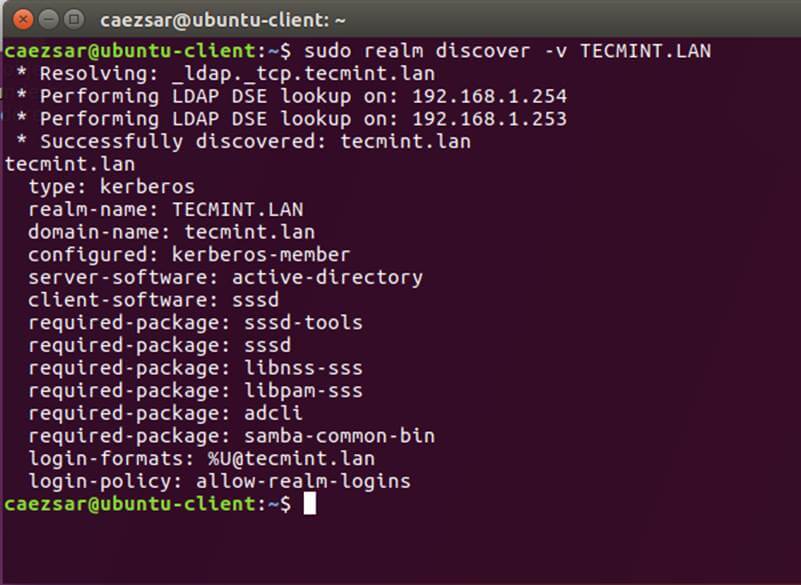][7]
|
||
|
||
*加入 Ubuntu 到 Samba4 Realm*
|
||
|
||
[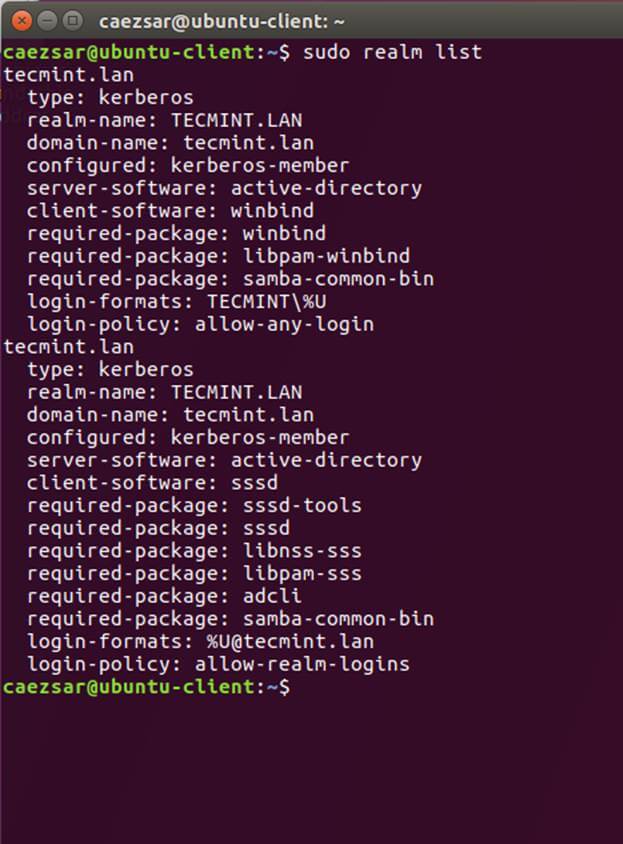][8]
|
||
|
||
*列出 Realm Domain 信息*
|
||
|
||
[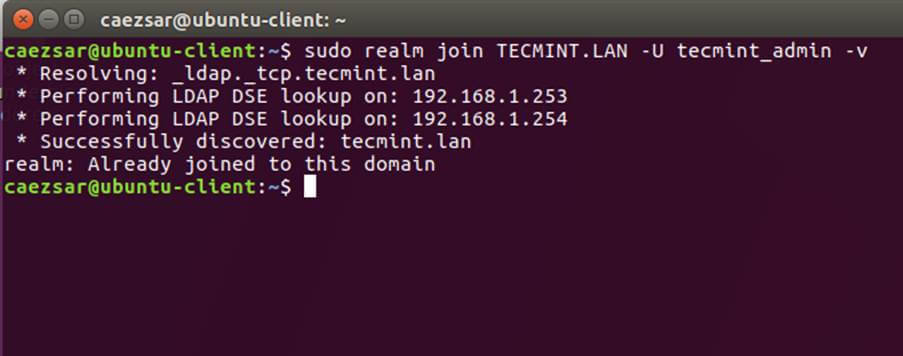][9]
|
||
|
||
*添加用户到 Realm Domain*
|
||
|
||
[][10]
|
||
|
||
*添加 Domain 到 Realm*
|
||
|
||
13、 区域绑定好了之后,运行下面的命令确保所有域账户允许在这台机器上认证。
|
||
|
||
```
|
||
$ sudo realm permit -all
|
||
```
|
||
|
||
然后你可以使用下面举例的 `realm` 命令允许或者禁止域用户帐号或群组访问。
|
||
|
||
```
|
||
$ sudo realm deny -a
|
||
$ realm permit --groups ‘domain.tld\Linux Admins’
|
||
$ realm permit user@domain.lan
|
||
$ realm permit DOMAIN\\User2
|
||
```
|
||
|
||
14、 从一个 [安装了 RSAT 工具的][11] Windows 机器上你可以打开 AD UC 并浏览“<ruby>电脑<rt>computers</rt></ruby>”容器,并检验是否有一个使用你机器名的对象帐号已经创建。
|
||
|
||
[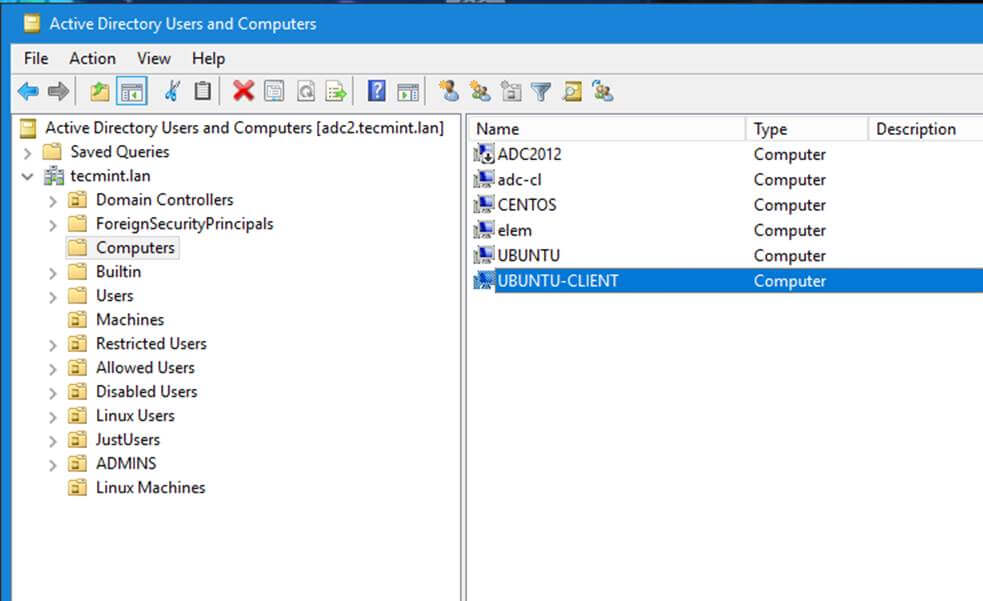][12]
|
||
|
||
*确保域被加入 AD DC*
|
||
|
||
### 第 4 步:配置 AD 账户认证
|
||
|
||
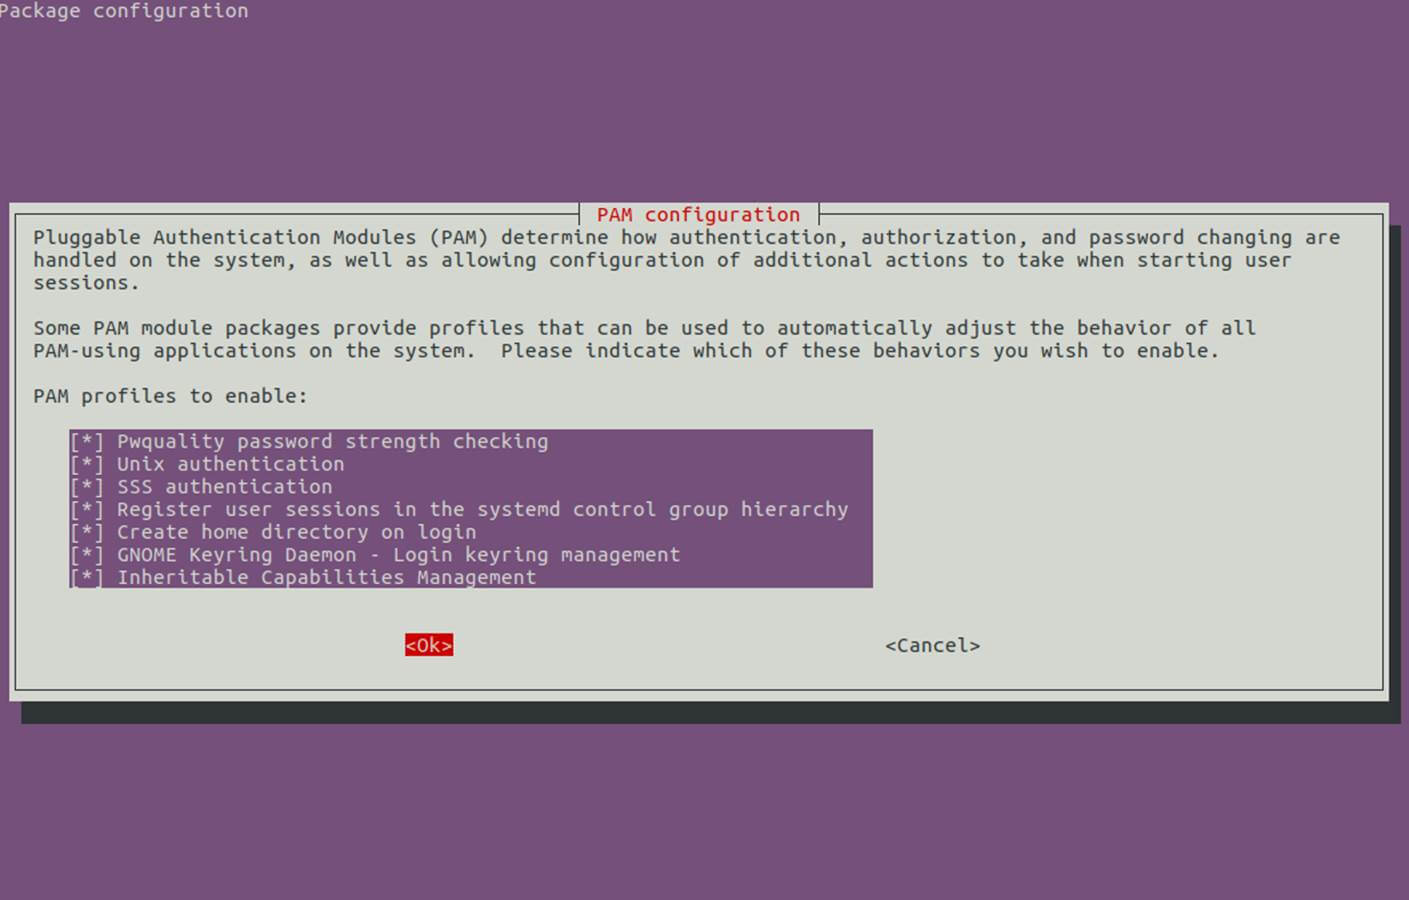
15、 为了在 Ubuntu 机器上用域账户认证,你需要用 root 权限运行 `pam-auth-update` 命令并允许所有 PAM 配置文件,包括为每个域账户在第一次注册的时候自动创建家目录的选项。
|
||
|
||
按 [空格] 键检验所有配置项并点击 ok 来应用配置。
|
||
|
||
```
|
||
$ sudo pam-auth-update
|
||
```
|
||
|
||
[][13]
|
||
|
||
*PAM 配置*
|
||
|
||
16、 在系统上手动编辑 `/etc/pam.d/common-account` 文件,下面这几行是为了给认证过的域用户自动创建家目录。
|
||
|
||
```
|
||
session required pam_mkhomedir.so skel=/etc/skel/ umask=0022
|
||
```
|
||
|
||
17、 如果活动目录用户不能用 linux 命令行修改他们的密码,打开 `/etc/pam.d/common-password` 文件并在 `password` 行移除 `use_authtok` 语句,最后如下:
|
||
|
||
```
|
||
password [success=1 default=ignore] pam_winbind.so try_first_pass
|
||
```
|
||
|
||
18、 最后,用下面的命令重启并启用以应用 Realmd 和 SSSD 服务的修改:
|
||
|
||
```
|
||
$ sudo systemctl restart realmd sssd
|
||
$ sudo systemctl enable realmd sssd
|
||
```
|
||
|
||
19、 为了测试 Ubuntu 机器是是否成功集成到 realm ,安装 winbind 包并运行 `wbinfo` 命令列出域账户和群组,如下所示。
|
||
|
||
```
|
||
$ sudo apt-get install winbind
|
||
$ wbinfo -u
|
||
$ wbinfo -g
|
||
```
|
||
|
||
[][14]
|
||
|
||
*列出域账户*
|
||
|
||
20、 同样,也可以针对特定的域用户或群组使用 `getent` 命令检验 Winbind nsswitch 模块。
|
||
|
||
```
|
||
$ sudo getent passwd your_domain_user
|
||
$ sudo getent group ‘domain admins’
|
||
```
|
||
|
||
[][15]
|
||
|
||
*检验 Winbind Nsswitch*
|
||
|
||
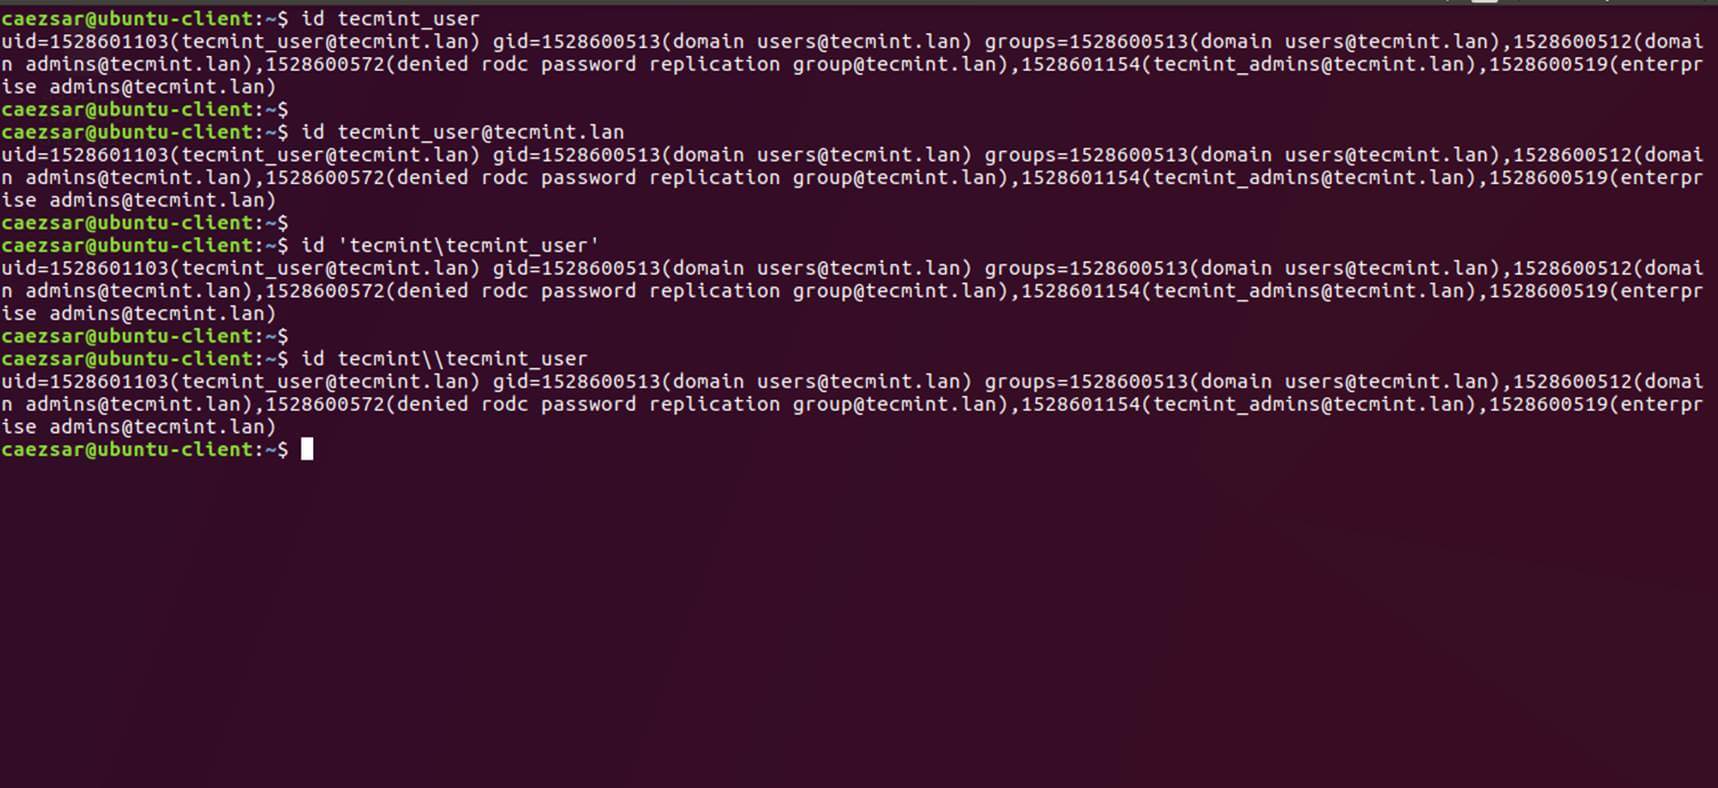
21、 你也可以用 Linux `id` 命令获取 AD 账户的信息,命令如下:
|
||
|
||
```
|
||
$ id tecmint_user
|
||
```
|
||
|
||
[][16]
|
||
|
||
*检验 AD 用户信息*
|
||
|
||
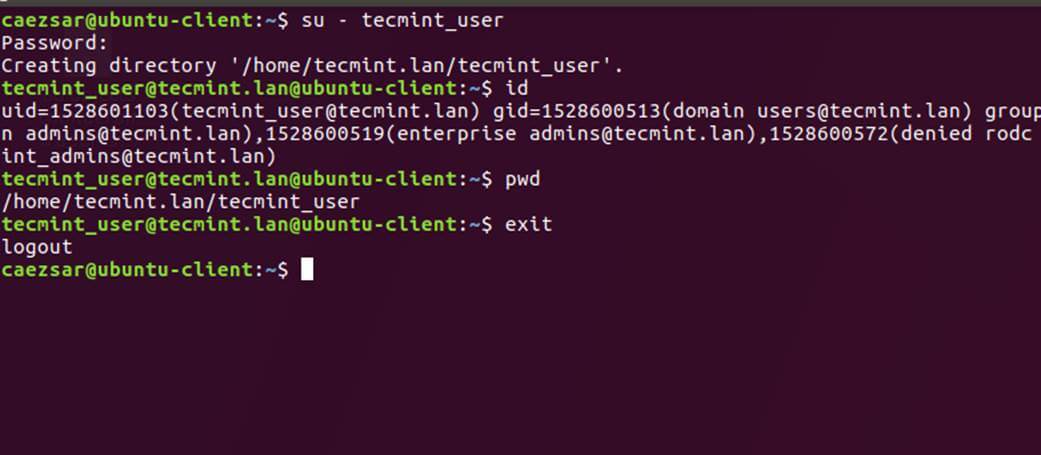
22、 用 `su -` 后跟上域用户名参数来认证 Ubuntu 主机的一个 Samba4 AD 账户。运行 `id` 命令获取该 AD 账户的更多信息。
|
||
|
||
```
|
||
$ su - your_ad_user
|
||
```
|
||
|
||
[][17]
|
||
|
||
*AD 用户认证*
|
||
|
||
用 `pwd` 命令查看你的域用户当前工作目录,和用 `passwd` 命令修改密码。
|
||
|
||
23、 在 Ubuntu 上使用有 root 权限的域账户,你需要用下面的命令添加 AD 用户名到 sudo 系统群组:
|
||
|
||
```
|
||
$ sudo usermod -aG sudo your_domain_user@domain.tld
|
||
```
|
||
|
||
用域账户登录 Ubuntu 并运行 `apt update` 命令来更新你的系统以检验 root 权限。
|
||
|
||
24、 给一个域群组 root 权限,用 `visudo` 命令打开并编辑 `/etc/sudoers` 文件,并加入如下行:
|
||
|
||
```
|
||
%domain\ admins@tecmint.lan ALL=(ALL:ALL) ALL
|
||
```
|
||
|
||
25、 要在 Ubuntu 桌面使用域账户认证,通过编辑 `/usr/share/lightdm/lightdm.conf.d/50-ubuntu.conf` 文件来修改 LightDM 显示管理器,增加以下两行并重启 lightdm 服务或重启机器应用修改。
|
||
|
||
```
|
||
greeter-show-manual-login=true
|
||
greeter-hide-users=true
|
||
```
|
||
|
||
域账户用“你的域用户”或“你的域用户@你的域” 格式来登录 Ubuntu 桌面。
|
||
|
||
26、 为使用 Samba AD 账户的简称格式,编辑 `/etc/sssd/sssd.conf` 文件,在 `[sssd]` 块加入如下几行命令。
|
||
|
||
```
|
||
full_name_format = %1$s
|
||
```
|
||
|
||
并重启 SSSD 守护进程应用改变。
|
||
|
||
```
|
||
$ sudo systemctl restart sssd
|
||
```
|
||
|
||
你会注意到 bash 提示符会变成了没有附加域名部分的 AD 用户名。
|
||
|
||
27、 万一你因为 `sssd.conf` 里的 `enumerate=true` 参数设定而不能登录,你得用下面的命令清空 sssd 缓存数据:
|
||
|
||
```
|
||
$ rm /var/lib/sss/db/cache_tecmint.lan.ldb
|
||
```
|
||
|
||
这就是全部了!虽然这个教程主要集中于集成 Samba4 活动目录,同样的步骤也能被用于把使用 Realm 和 SSSD 服务的 Ubuntu 整合到微软 Windows 服务器活动目录。
|
||
|
||
--------------------------------------------------------------------------------
|
||
|
||
作者简介:
|
||
|
||
Matei Cezar - 我是一名网瘾少年,开源和基于 linux 系统软件的粉丝,有4年经验在 linux 发行版桌面、服务器和 bash 脚本。
|
||
|
||
------------------
|
||
|
||
via: https://www.tecmint.com/integrate-ubuntu-to-samba4-ad-dc-with-sssd-and-realm/
|
||
|
||
作者:[Matei Cezar][a]
|
||
译者:[XYenChi](https://github.com/XYenChi)
|
||
校对:[wxy](https://github.com/wxy)
|
||
|
||
本文由 [LCTT](https://github.com/LCTT/TranslateProject) 原创编译,[Linux中国](https://linux.cn/) 荣誉推出
|
||
|
||
[a]:https://www.tecmint.com/author/cezarmatei/
|
||
[1]:https://linux.cn/article-8065-1.html
|
||
[2]:https://www.tecmint.com/wp-content/uploads/2017/07/Configure-Network-Interface.jpg
|
||
[3]:https://www.tecmint.com/wp-content/uploads/2017/07/Set-realm-name.png
|
||
[4]:https://www.tecmint.com/wp-content/uploads/2017/07/Configure-Samba-Server.jpg
|
||
[5]:https://www.tecmint.com/wp-content/uploads/2017/07/Test-Samba-Configuration.jpg
|
||
[6]:https://www.tecmint.com/wp-content/uploads/2017/07/Check-Kerberos-Authentication.jpg
|
||
[7]:https://www.tecmint.com/wp-content/uploads/2017/07/Join-Ubuntu-to-Samba4-Realm.jpg
|
||
[8]:https://www.tecmint.com/wp-content/uploads/2017/07/List-Realm-Domain-Info.jpg
|
||
[9]:https://www.tecmint.com/wp-content/uploads/2017/07/Add-User-to-Realm-Domain.jpg
|
||
[10]:https://www.tecmint.com/wp-content/uploads/2017/07/Add-Domain-to-Realm.jpg
|
||
[11]:https://linux.cn/article-8097-1.html
|
||
[12]:https://www.tecmint.com/wp-content/uploads/2017/07/Confirm-Domain-Added.jpg
|
||
[13]:https://www.tecmint.com/wp-content/uploads/2017/07/PAM-Configuration.jpg
|
||
[14]:https://www.tecmint.com/wp-content/uploads/2017/07/List-Domain-Accounts.jpg
|
||
[15]:https://www.tecmint.com/wp-content/uploads/2017/07/check-Winbind-nsswitch.jpg
|
||
[16]:https://www.tecmint.com/wp-content/uploads/2017/07/Check-AD-User-Info.jpg
|
||
[17]:https://www.tecmint.com/wp-content/uploads/2017/07/AD-User-Authentication.jpg
|
||
[18]:https://www.tecmint.com/author/cezarmatei/
|
||
[19]:https://www.tecmint.com/10-useful-free-linux-ebooks-for-newbies-and-administrators/
|
||
[20]:https://www.tecmint.com/free-linux-shell-scripting-books/
|