15 KiB
Getting Started With Docker
In our previous tutorial, we have explained how to install Docker in Ubuntu , and how to install Docker in CentOS. Today, we will see the basic usage of Docker. This guide covers the Docker basics, such as how to create a new container, how to run the container, remove a container, how to build your own Docker image from the Container and so on. Let us get started! All steps given below are tested in Ubuntu 18.04 LTS server edition.
Getting Started With Docker
Before exploring the Docker basics, don’t confuse with Docker images and Docker Containers. As I already explained in the previous tutorial, Docker Image is the file that decides how a Container should behave, and Docker Container is the running or stopped stage of a Docker image.
1. Search Docker images
We can get the images from either from the registry, for example Docker hub, or create our own, For those wondering, Docker hub is cloud hosted place where all Docker users build, test, and save their Docker images.
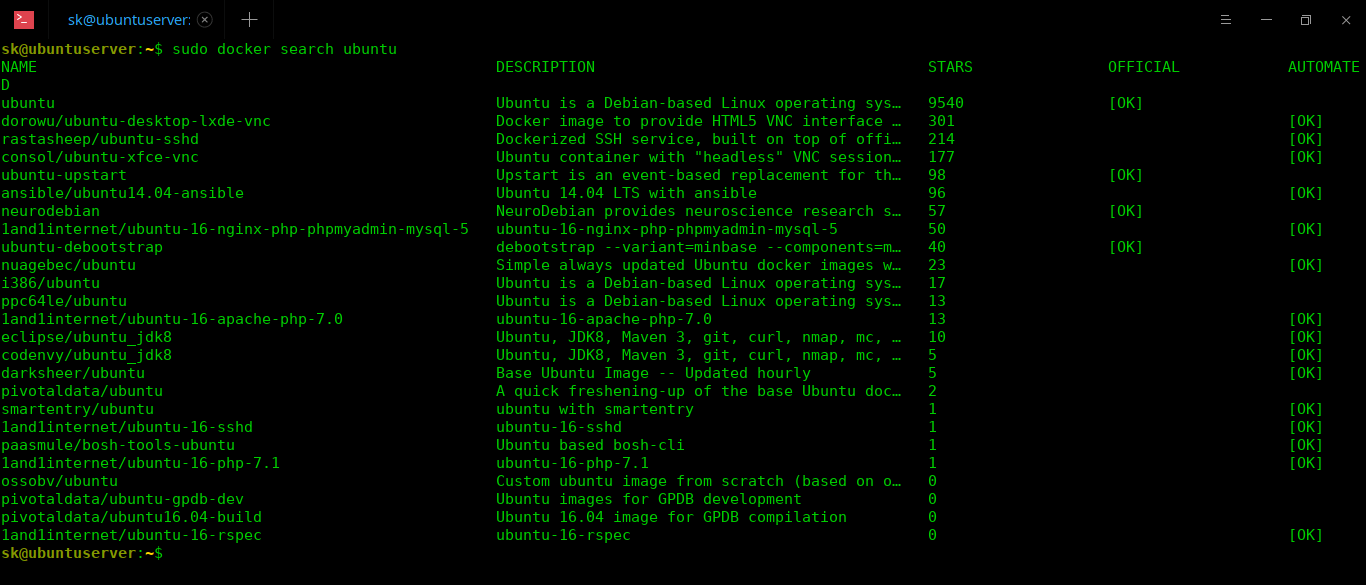
Docker hub has tens of thousands of Docker images. You can search for the any Docker images with “docker search” command.
For instance, to search for docker images based on Ubuntu, run:
$ sudo docker search ubuntu
Sample output:
To search images based on CentOS, run:
$ sudo docker search ubuntu
To search images for AWS, run:
$ sudo docker search aws
For wordpress:
$ sudo docker search wordpress
Docker hub has almost all kind of images. Be it an operating system, application, or anything, you will find pre-built Docker images in Docker hub. If something you’re looking for is not available, you can build it and make it available for public or keep it private for your own use.
2. Download Docker image
To download Docker image for Ubuntu OS, run the following command from the Terminal:
$ sudo docker pull ubuntu
The above command will download the latest Ubuntu image from the Docker hub.
Sample output:
Using default tag: latest
latest: Pulling from library/ubuntu
6abc03819f3e: Pull complete
05731e63f211: Pull complete
0bd67c50d6be: Pull complete
Digest: sha256:f08638ec7ddc90065187e7eabdfac3c96e5ff0f6b2f1762cf31a4f49b53000a5
Status: Downloaded newer image for ubuntu:latest
Download docker images
You can also download a specific version of Ubuntu image using command:
$ docker pull ubuntu:18.04
Docker allows us to download any images and start the container regardless of the host OS.
For example, to download CentOS image, run:
$ sudo docker pull centos
All downloaded Docker images will be saved in /var/lib/docker/ directory.
To view the list of downloaded Docker images, run:
$ sudo docker images
Sample output:
REPOSITORY          TAG                 IMAGE ID            CREATED             SIZE
ubuntu              latest              7698f282e524        14 hours ago        69.9MB
centos              latest              9f38484d220f        2 months ago        202MB
hello-world         latest              fce289e99eb9        4 months ago        1.84kB
As you see above, I have downloaded three Docker images – Ubuntu , CentOS and hello-world.
Now, let us go ahead and see how to start or run the containers based on the downloaded images.
3. Run Docker Containers
We can start the containers in two methods. We can start a container either using its TAG or IMAGE ID. TAG refers to a particular snapshot of the image and the IMAGE ID is the corresponding unique identifier for that image.
As you in the above results “latest” is the TAG for all containers, and 7698f282e524 is the IMAGE ID of Ubuntu Docker image, 9f38484d220f is the image id of CentOS Docker image and fce289e99eb9 is the image id of hello_world Docker image.
Once you downloaded the Docker images of your choice, run the following command to start a Docker container by using its TAG.
$ sudo docker run -t -i ubuntu:latest /bin/bash
Here,
- -t : Assigns a new Terminal inside the Ubuntu container.
- -i : Allows us to make an interactive connection by grabbing the standard in (STDIN) of the container.
- ubuntu:latest : Ubuntu container with TAG “latest”.
- /bin/bash : BASH shell for the new container.
Or, you can start the container using IMAGE ID as shown below:
sudo docker run -t -i 7698f282e524 /bin/bash
Here,
- 7698f282e524 – Image id
After starting the container, you’ll be landed automatically into the Container’s shell (Command prompt):
Docker container’s shell
To return back to the host system’s Terminal (In my case, it is Ubuntu 18.04 LTS) without terminating the Container (guest os), press CTRL+P followed by CTRL+Q. Now, you’ll be safely return back to your original host computer’s terminal window. Please note that the container is still running in the background and we didn’t terminate it yet.
To view the list running of containers, run the following command:
$ sudo docker ps
Sample output:
CONTAINER ID        IMAGE               COMMAND             CREATED             STATUS              PORTS               NAMES
32fc32ad0d54        ubuntu:latest       "/bin/bash"         7 minutes ago       Up 7 minutes                            modest_jones
List running containers
Here,
- 32fc32ad0d54 – Container ID
- ubuntu:latest – Docker image
Please note that Container ID and Docker image ID are different.
To list all available ( either running or stopped) containers:
$ sudo docker ps -a
To stop (power off the container) from the host’s shell, run the following command:
$ sudo docker stop <container-id>
Example:
$ sudo docker stop 32fc32ad0d54
To login back to or attach to the running container, just run:
$ sudo docker attach 32fc32ad0d54
As you already know, 32fc32ad0d54 is the container’s ID.
To power off a Container from inside it’s shell by typing the following command:
# exit
You can verify the list of running containers with command:
$ sudo docker ps
4. Build your custom Docker images
Docker is not just for downloading and using the existing containers. You can create your own custom docker image as well.
To do so, start any one the downloaded container:
$ sudo docker run -t -i ubuntu:latest /bin/bash
Now, you will be in the container’s shell.
Then, install any software or do what ever you want to do in the container.
For example, let us install Apache web server in the container.
Once you did all tweaks, installed all necessary software, run the following command to build your custom Docker image:
# apt update
# apt install apache2
Similarly, install and test any software of your choice in the Container.
Once you all set, return back to the host system’s shell. Do not stop or poweroff the Container. To switch to the host system’s shell without stopping Container, press CTRL+P followed by CTRL+Q.
From your host computer’s shell, run the following command to find the container ID:
$ sudo docker ps
Finally, create a Docker image of the running Container using command:
$ sudo docker commit 3d24b3de0bfc ostechnix/ubuntu_apache
Sample Output:
sha256:ce5aa74a48f1e01ea312165887d30691a59caa0d99a2a4aa5116ae124f02f962
Here,
- 3d24b3de0bfc – Ubuntu container ID. As you already, we can
- ostechnix – Name of the user who created the container.
- ubuntu_apache – Name of the docker image created by user ostechnix.
Let us check whether the new Docker image is created or not with command:
$ sudo docker images
Sample output:
REPOSITORY                TAG                 IMAGE ID            CREATED              SIZE
ostechnix/ubuntu_apache   latest              ce5aa74a48f1        About a minute ago   191MB
ubuntu                    latest              7698f282e524        15 hours ago         69.9MB
centos                    latest              9f38484d220f        2 months ago         202MB
hello-world               latest              fce289e99eb9        4 months ago         1.84kB
List docker images
As you see in the above output, the new Docker image has been created in our localhost system from the running Container.
Now, you can create a new Container from the newly created Docker image as usual suing command:
$ sudo docker run -t -i ostechnix/ubuntu_apache /bin/bash
5. Removing Containers
Once you’re done all R&D with Docker containers, you can delete if you don’t want them anymore.
To do so, First we have to stop (power off) the running Containers.
Let us find out the running containers with command:
$ sudo docker ps
Sample output:
CONTAINER ID IMAGE COMMAND CREATED STATUS PORTS NAMES
3d24b3de0bfc ubuntu:latest "/bin/bash" 28 minutes ago Up 28 minutes goofy_easley
Stop the running container by using it’s ID:
$ sudo docker stop 3d24b3de0bfc
Now, delete the container using command:
$ sudo docker rm 3d24b3de0bfc
Similarly, stop all containers and delete them if they are no longer required.
Deleting multiple containers one by one can be a tedious task. So, we can delete all stopped containers in one go, just run:
$ sudo docker container prune
Type “Y” and hit ENTER key to delete the containers.
WARNING! This will remove all stopped containers.
Are you sure you want to continue? [y/N] y
Deleted Containers:
32fc32ad0d5445f2dfd0d46121251c7b5a2aea06bb22588fb2594ddbe46e6564
5ec614e0302061469ece212f0dba303c8fe99889389749e6220fe891997f38d0

Total reclaimed space: 5B
This command will work only with latest Docker versions.
6. Removing Docker images
Once you removed containers, you can delete the Docker images that you no longer need.
To find the list of the Downloaded Docker images:
$ sudo docker images
Sample output:
REPOSITORY                TAG                 IMAGE ID            CREATED             SIZE
ostechnix/ubuntu_apache   latest              ce5aa74a48f1        5 minutes ago       191MB
ubuntu                    latest              7698f282e524        15 hours ago        69.9MB
centos                    latest              9f38484d220f        2 months ago        202MB
hello-world               latest              fce289e99eb9        4 months ago        1.84kB
As you see above, we have three Docker images in our host system.
Let us delete them by using their IMAGE id:
$ sudo docker rmi ce5aa74a48f1
Sample output:
Untagged: ostechnix/ubuntu_apache:latest
Deleted: sha256:ce5aa74a48f1e01ea312165887d30691a59caa0d99a2a4aa5116ae124f02f962
Deleted: sha256:d21c926f11a64b811dc75391bbe0191b50b8fe142419f7616b3cee70229f14cd
Troubleshooting
Docker won’t let you to delete the Docker images if they are used by any running or stopped containers.
For example, when I try to delete a Docker Image with ID b72889fa879c , from one of my old Ubuntu server. I got the following error:
Error response from daemon: conflict: unable to delete b72889fa879c (must be forced) - image is being used by stopped container dde4dd285377
This is because the Docker image that you want to delete is currently being used by another Container.
So, let us check the running Container using command:
$ sudo docker ps
Sample output:
Oops! There is no running container.
Let us again check for all containers (Running and stopped) with command:
$ sudo docker ps -a
Sample output:
As you see there are still some stopped containers are using one of the Docker images. So, let us delete all of the containers.
Example:
$ sudo docker rm 12e892156219
Similarly, remove all containers as shown above using their respective container’s ID.
Once you deleted all Containers, finally remove the Docker images.
Example:
$ sudo docker rmi b72889fa879c
That’s it. Let us verify is there any other Docker images in the host with command:
$ sudo docker images
For more details, refer the official resource links given at the end of this guide or drop a comment in the comment section below.
Also, download and use the following Docker Ebooks to get to know more about it.
** Download – Free eBook: “Docker Containerization Cookbook”
** Download – Free Guide: “Understanding Docker”
** Download – Free Guide: “What is Docker and Why is it So Popular?”
** Download – Free Guide: “Introduction to Docker”
** Download – Free Guide: “Docker in Production”
And, that’s all for now. Hope you a got the basic idea about Docker usage.
More good stuffs to come. Stay tuned!
Cheers!!
via: https://www.ostechnix.com/getting-started-with-docker/


