7.9 KiB
Duc – A Collection Of Tools To Inspect And Visualize Disk Usage
Duc is a collection of tools that can be used to index, inspect and visualize disk usage on Unix-like operating systems. Don’t think of it as a simple CLI tool that merely displays a fancy graph of your disk usage. It is built to scale quite well on huge filesystems. Duc has been tested on systems that consisted of more than 500 million files and several petabytes of storage without any problems.
Duc is quite fast and versatile tool. It stores your disk usage in an optimized database, so you can quickly find where your bytes are as soon as the index is completed. In addition, it comes with various user interfaces and back-ends to access the database and draw the graphs.
Here is the list of currently supported user interfaces (UI):
- Command line interface (ls),
- Ncurses console interface (ui),
- X11 GUI (duc gui),
- OpenGL GUI (duc gui).
List of supported database back-ends:
- Tokyocabinet,
- Leveldb,
- Sqlite3.
Duc uses Tokyocabinet as default database backend.
Install Duc
Duc is available in the default repositories of Debian and its derivatives such as Ubuntu. So installing Duc on DEB-based systems is a piece of cake.
$ sudo apt-get install duc
On other Linux distributions, you may need to manually compile and install Duc from source as shown below.
Download latest duc source .tgz file from the releases page on github. As of writing this guide, the latest version was 1.4.4.
$ wget https://github.com/zevv/duc/releases/download/1.4.4/duc-1.4.4.tar.gz
Then run the following commands one by one to install DUC.
$ tar -xzf duc-1.4.4.tar.gz
$ cd duc-1.4.4
$ ./configure
$ make
$ sudo make install
Duc Usage
The typical usage of duc is:
$ duc <subcommand> <options>
You can view the list of general options and sub-commands by running the following command:
$ duc help
You can also know the the usage of a specific subcommand as below.
$ duc help <subcommand>
To view the extensive list of all commands and their options, simply run:
$ duc help --all
Let us now se some practical use cases of duc utility.
Create Index (database)
First of all, you need to create an index file (database) of your filesystem. To create an index file, use “duc index” command.
For example, to create an index of your /home directory, simply run:
$ duc index /home
The above command will create the index of your /home/ directory and save it in $HOME/.duc.db file. If you have added new files/directories in the /home directory in future, just re-run the above command at any time later to rebuild the index.
Query Index
Duc has various sub-commands to query and explore the index.
To view the list of available indexes, run:
$ duc info
Sample output:
Date Time Files Dirs Size Path
2019-04-09 15:45:55 3.5K 305 654.6M /home
As you see in the above output, I have already indexed the /home directory.
To list all files and directories in the current working directory, you can do:
$ duc ls
To list files/directories in a specific directory, for example /home/sk/Downloads , just pass the path as argument like below.
$ duc ls /home/sk/Downloads
Similarly, run “duc ui” command to open a ncurses based console user interface for exploring the file system usage and run “duc gui” to start a graphical (X11) interface to explore the file system.
To know more about a sub-command usage, simply refer the help section.
$ duc help ls
The above command will display the help section of “ls” subcommand.
Visualize Disk Usage
In the previous section, we have seen how to list files and directories using duc subcommands. In addition, you can even show the file sizes in a fancy graph.
To show the graph of a given path, use “ls” subcommand like below.
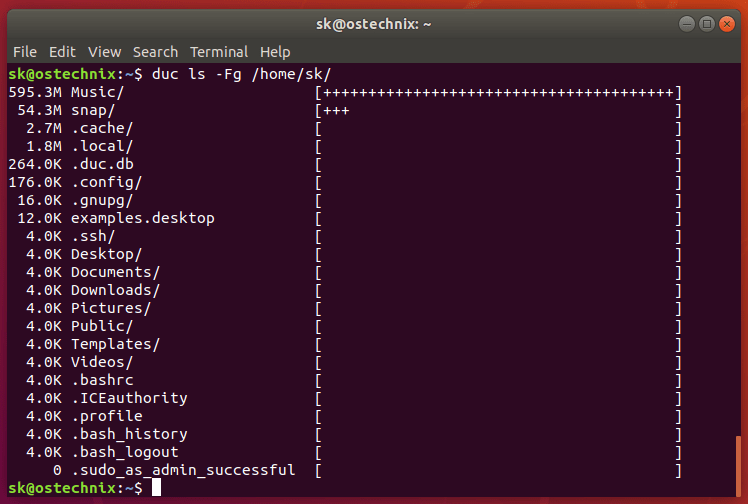
$ duc ls -Fg /home/sk
Sample output:
Visualize disk usage using “duc ls” command
As you see in the above output, the “ls” subcommand queries the duc database and lists the inclusive size of all files and directories of the given path i.e /home/sk/ in this case.
Here, the “-F” option is used to append file type indicator (one of */) to entries and the “-g” option is used to draw graph with relative size for each entry.
Please note that if no path is given, the current working directory is explored.
You can use -R option to view the disk usage result in tree structure.
$ duc ls -R /home/sk
Visualize disk usage in tree structure
To query the duc database and open a ncurses based console user interface for exploring the disk usage of given path, use “ui” subcommand like below.
$ duc ui /home/sk
Similarly, we use “gui” subcommand to query the duc database and start a graphical (X11) interface to explore the disk usage of the given path:
$ duc gui /home/sk
Like I already mentioned earlier, we can learn more about a subcommand usage like below.
$ duc help <subcommand-name>
I covered the basic usage part only. Refer man pages for more details about “duc” tool.
$ man duc
Related read:
- Filelight – Visualize Disk Usage On Your Linux System
- Some Good Alternatives To ‘du’ Command
- How To Check Disk Space Usage In Linux Using Ncdu
- Agedu – Find Out Wasted Disk Space In Linux
- How To Find The Size Of A Directory In Linux
- The df Command Tutorial With Examples For Beginners
Conclusion
Duc is simple yet useful disk usage viewer. If you want to quickly and easily know which files/directories are eating up your disk space, Duc might be a good choice. What are you waiting for? Go get this tool already, scan your filesystem and get rid of unused files/directories.
And, that’s all for now. Hope this was useful. More good stuffs to come. Stay tuned!
Cheers!
Resource:
via: https://www.ostechnix.com/duc-a-collection-of-tools-to-inspect-and-visualize-disk-usage/


