12 KiB
Sharing the computer screen in Gnome
You do not want someone else to be able to monitor or even control your computer and you usually work hard to cut off any such attempts using various security mechanisms. However, sometimes a situation occurs when you desperately need a friend, or an expert, to help you with a computer problem, but they are not at the same location at the same time. How do you show them? Should you take your mobile phone, take pictures of your screen, and send it to them? Should you record a video? Certainly not. You can share your screen with them and possibly let them control your computer remotely for a while. In this article, I will describe how to allow sharing the computer screen in Gnome.
Setting up the server to share its screen
A server is a computer that provides (serves) some content that other computers (clients) will consume. In this article the server runs Fedora Workstation with the standard Gnome desktop.
Switching on Gnome Screen Sharing
By default, the ability to share the computer screen in Gnome is off. In order to use it, you need to switch it on:
-
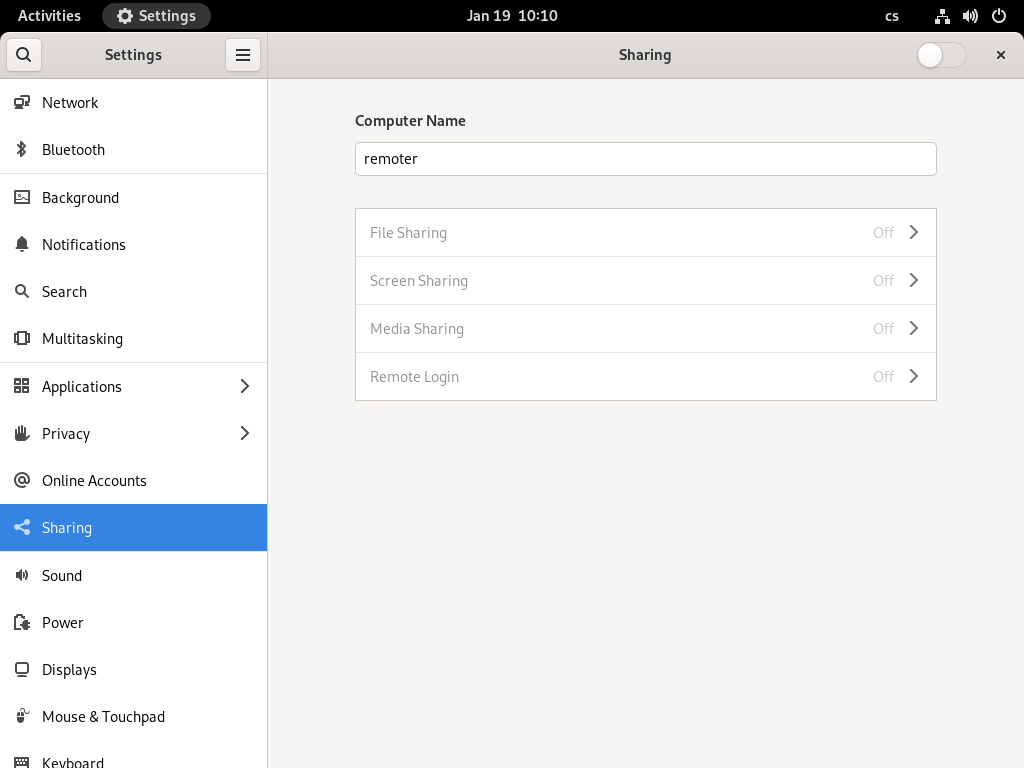
Start Gnome Control Center.
-
Click on the Sharing tab.
-
Switch on sharing with the slider in the upper right corner.
-
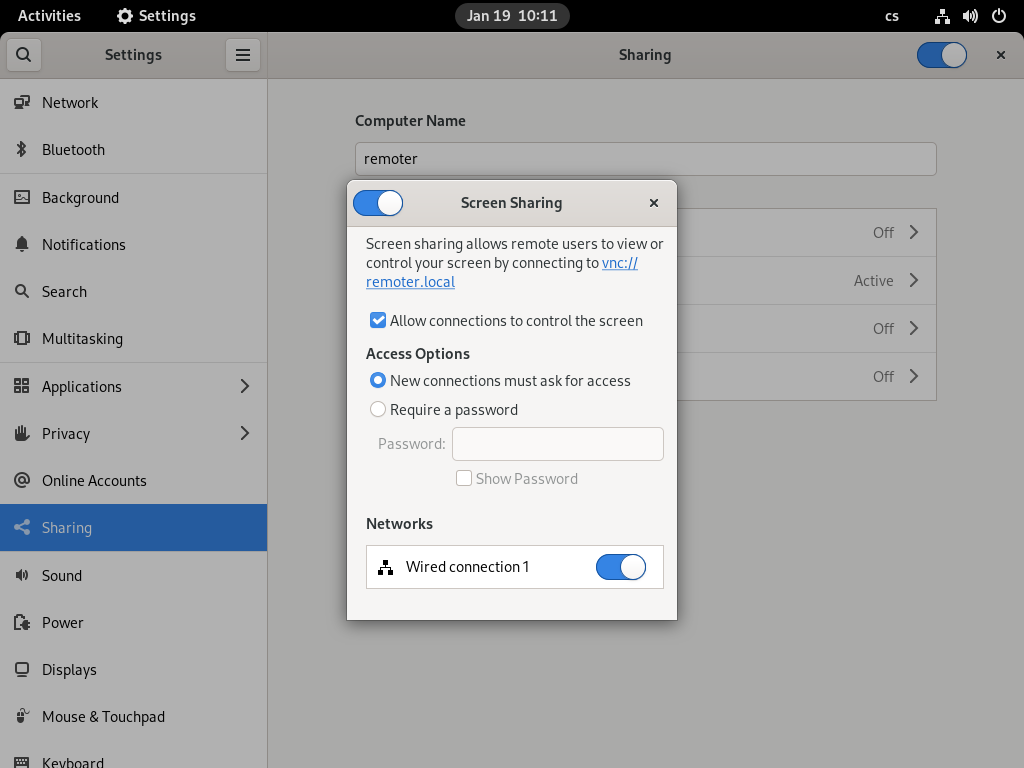
Click on Screen sharing.
-
Switch on screen sharing using the slider in the upper left corner of the window.
-
Check the Allow connections to control the screen if you want to be able to control the screen from the client. Leaving this button unchecked will only allow view-only access to the shared screen.
-
If you want to manually confirm all incoming connections, select New connections must ask for access.
-
If you want to allow connections to people who know a password (you will not be notified), select Require a password and fill in the password. The password can only be 8 characters long.
-
Check Show password to see what the current password is. For a little more protection, do not use your login password here, but choose a different one.
-
If you have more networks available, you can choose on which one the screen will be accessible.
Setting up the client to display a remote screen
A client is a computer that connects to a service (or content) provided by a server. This demo will also run Fedora Workstation on the client, but the operating system actually should not matter too much, if it runs a decent VNC client.
Check for visibility
Sharing the computer screen in Gnome between the server and the client requires a working network connection and a visible “route” between them. If you cannot make such a connection, you will not be able to view or control the shared screen of the server anyway and the whole process described here will not work.
To make sure a connection exists
Find out the IP address of the server.
Start Gnome Control Center, a.k.a Settings. Use the Menu in the upper right corner, or the Activities mode. When in Activities, type
settings
and click on the corresponding icon.
Select the Network tab.
Click on the Settings button (cogwheel) to display your network profile’s parameters.
Open the Details tab to see the IP address of your computer.
Go to your client’s terminal (the computer from which you want to connect) and find out if there is a connection between the client and the server using the ping command.
$ ping -c 5 192.168.122.225
Examine the command’s output. If it is similar to the example below, the connection between the computers exists.
    PING 192.168.122.225 (192.168.122.225) 56(84) bytes of data.
    64 bytes from 192.168.122.225: icmp_seq=1 ttl=64 time=0.383 ms
    64 bytes from 192.168.122.225: icmp_seq=2 ttl=64 time=0.357 ms
    64 bytes from 192.168.122.225: icmp_seq=3 ttl=64 time=0.322 ms
    64 bytes from 192.168.122.225: icmp_seq=4 ttl=64 time=0.371 ms
    64 bytes from 192.168.122.225: icmp_seq=5 ttl=64 time=0.319 ms
    --- 192.168.122.225 ping statistics ---
    5 packets transmitted, 5 received, 0% packet loss, time 4083ms
    rtt min/avg/max/mdev = 0.319/0.350/0.383/0.025 ms
You will probably experience no problems if both computers live on the same subnet, such as in your home or at the office, but problems might occur, when your server does not have a public IP address and cannot be seen from the external Internet. Unless you are the only administrator of your Internet access point, you will probably need to consult about your situation with your administrator or with your ISP. Note, that exposing your computer to the external Internet is always a risky strategy and you must pay enough attention to protecting your computer from unwanted access.
Install the VNC client (Remmina)
Remmina is a graphical remote desktop client that can you can use to connect to a remote server using several protocols, such as VNC, Spice, or RDP. Remmina is available from the Fedora repositories, so you can installed it with both the dnf command or the Software, whichever you prefer. With dnf, the following command will install the package and several dependencies.
$ sudo dnf install remmina
Connect to the server
If there is a connection between the server and the client, make sure the following is true:
- The computer is running.
- The Gnome session is running.
- The user with screen sharing enabled is logged in.
- The session is not locked, i.e. the user can work with the session.
Then you can attempt to connect to the session from the client:
-
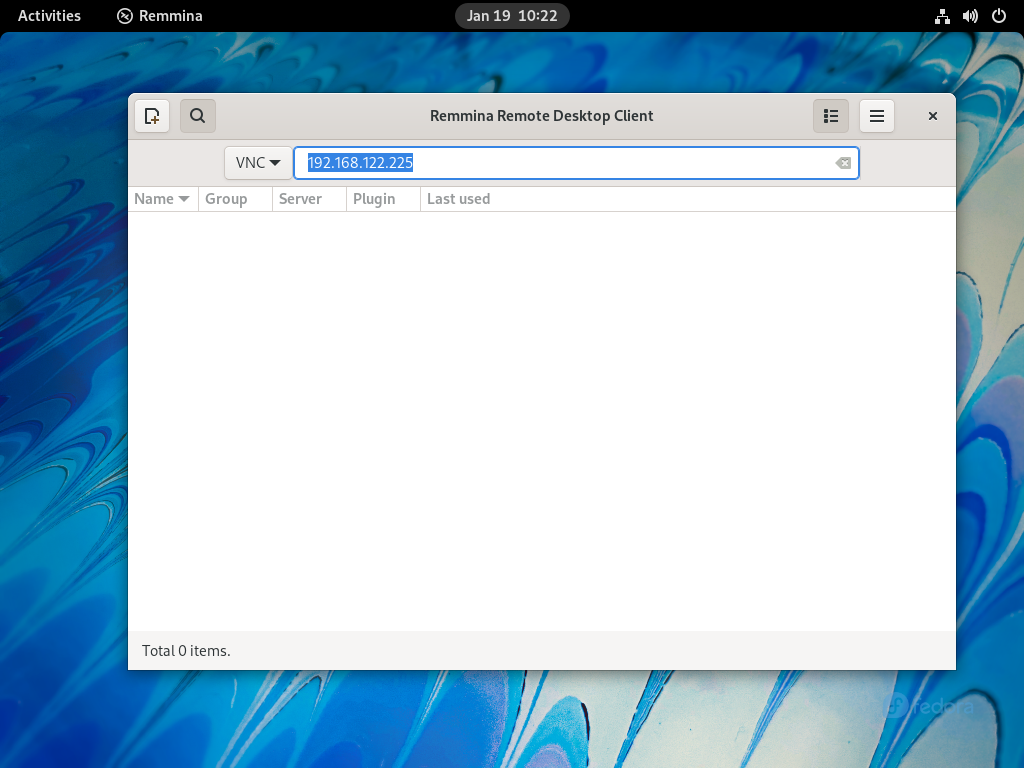
Start Remmina.
-
Select the VNC protocol in the dropdown menu on the left side of the address bar.
-
Type the IP address of the server into the address bar and hit Enter.
-
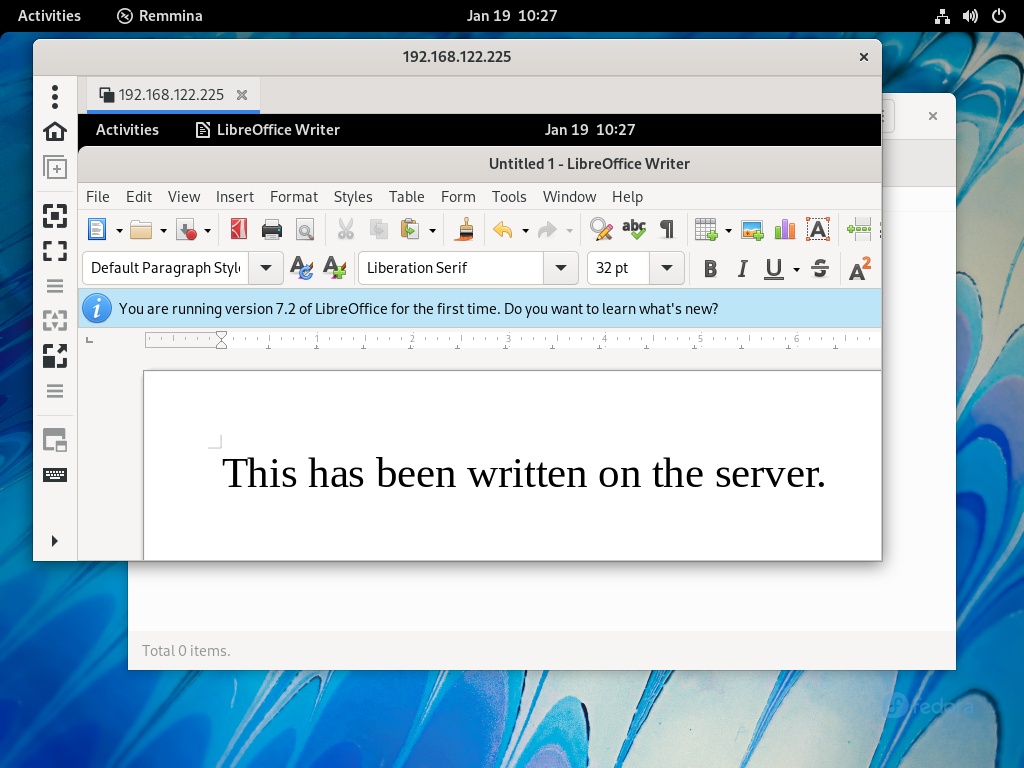
When the connection starts, another connection window opens. Depending on the server settings, you may need to wait until the server user allows the connection, or you may have to provide the password.
-
Type in the password and press OK.
- Press

to resize the connection window to match the server resolution, or press

to resize the connection window over your entire desktop. When in fullscreen mode, notice the narrow white bar at the upper edge of the screen. That is the Remmina menu and you can access it by moving the mouse to it when you need to leave the fullscreen mode or change some of the settings.
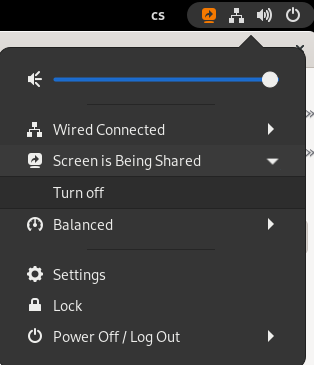
When you return back to the server, you will notice that there is now a yellow icon in the upper bar which indicates that you are sharing the computer screen in Gnome. If you no longer wish to share the screen, you can enter the menu and click on Screen is being shared and then on select Turn off to stop sharing the screen immediately.
Terminating the screen sharing when session locks.
By default, the connection will always terminate when the session locks. A new connection cannot be established until the session is unlocked.
On one hand, this sounds logical. If you want to share your screen with someone, you might not want them to use your computer when you are not around. On the other hand, the same approach is not very useful, if you want to control your own computer from a remote location, be it your bed in another room or your mother-in-law’s place. There are two options available to deal with this problem. You can either disable locking the screen entirely or you can use a Gnome extension that supports unlocking the session via the VNC connection.
Disable screen lock
In order to disable the screen lock:
- Open the Gnome Control Center.
- Click on the Privacy tab.
- Select the Screen Lock settings.
- Switch off Automatic Screen Lock.
Now, the session will never lock (unless you lock it manually), so it will be possible to start a VNC connection to it.
Use a Gnome extension to allow unlocking the session remotely.
If you do not want to switch off locking the screen or you want to have an option to unlock the session remotely even when it is locked, you will need to install an extension that provides this functionality as such behavior is not allowed by default.
To install the extension:
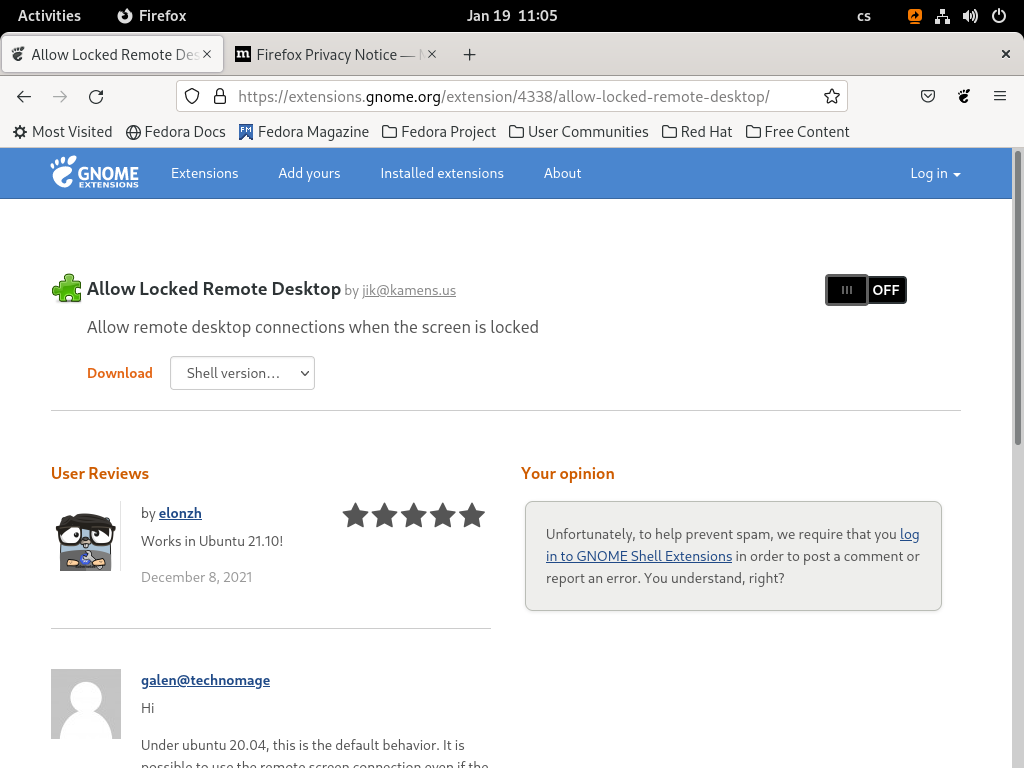
- Open the Firefox browser and point it to the Gnome extension page.
-
In the upper part of the page, find an info block that tells you to install GNOME Shell integration for Firefox.
-
Install the Firefox extension by clicking on Click here to install browser extension.
-
After the installation, notice the Gnome logo in the menu part of Firefox.
-
Click on the Gnome logo to navigate back to the extension page.
-
Search for allow locked remote desktop.
-
Click on the displayed item to go to the extension’s page.
-
Switch the extension ON by using the on/off button on the right.
Now, it will be possible to start a VNC connection any time. Note, that you will need to know the session password to unlock the session. If your VNC password differs from the session password, your session is still protected a little.
Conclusion
This article, described the way to enable sharing the computer screen in Gnome. It mentioned the difference between the limited (view-only) access or not limited (full) access. This solution, however, should in no case be considered a correct approach to enable a remote access for serious tasks, such as administering a production server. Why?
- The server will always keep its control mode. Anyone working with the server session will be able to control the mouse and keyboard.
- If the session is locked, unlocking it from the client will also unlock it on the server. It will also wake up the display from the stand-by mode. Anybody who can see your server screen will be able to watch what you are doing at the moment.
- The VNC protocol per se is not encrypted or protected so anything you send over this can be compromised.
There are several ways, you can set up a protected VNC connection. You could tunnel it via the SSH protocol for better security, for example. However, these are beyond the scope of this article.
Disclaimer: The above workflow worked without problems on Fedora 35 using several virtual machines. If it does not work for you, then you might have hit a bug. Please, report it.
via: https://fedoramagazine.org/sharing-the-computer-screen-in-gnome/
作者:Lukáš Růžička 选题:lujun9972 译者:译者ID 校对:校对者ID

