mirror of
https://github.com/LCTT/TranslateProject.git
synced 2024-12-26 21:30:55 +08:00
265 lines
12 KiB
Markdown
265 lines
12 KiB
Markdown
CentOS 7.3 安装指南
|
||
============================================================
|
||
|
||
基于 Red Hat 企业版的源代码的最新版本的 CentOS 7 在今年的 12月发布了 CentOS Linux 7 (1611) ,包含了许多 bug 修复、新的包更新,比如 Samba、Squid、libreoffice、SELinux、systemd 及其它软件,并支持第七代 Intel 酷睿 i3、i5、i7 处理器。
|
||
|
||
本指南会向你展示如何在 UEFI 的机器上使用 DVD ISO 镜像来安装 CentOS 7.3。
|
||
|
||
如果你要是用 RHEL,看下我们的 [RHEL 7.3 安装指南][2]。
|
||
|
||
#### 要求
|
||
|
||
- [下载 CentOS 7.3 ISO 镜像][1]
|
||
|
||
要在 UEFI 的机器上正确安装 CentOS 7.3,首先按下键(`F2`、`F11` 或 `F12`,取决与你的主板类型)进入主板的 UEFI 设置,并且确保 QuickBoot/FastBoot 以及 Secure Boot 已被禁用。
|
||
|
||
### CentOS 7.3 安装
|
||
|
||
1、 在你从上面的链接下载完成镜像之后,使用 [Rufus][3]将它烧录到 DVD 或者创建一个可启动的 UEFI 兼容 USB 盘。
|
||
|
||
将 USB/DVD 放入主板上连接的驱动器中,重启电脑并用特定的功能键(`F12`、 `F10`,取决于主板类型)让 BIOS/UEFI 从 DVD/USB 启动。
|
||
|
||
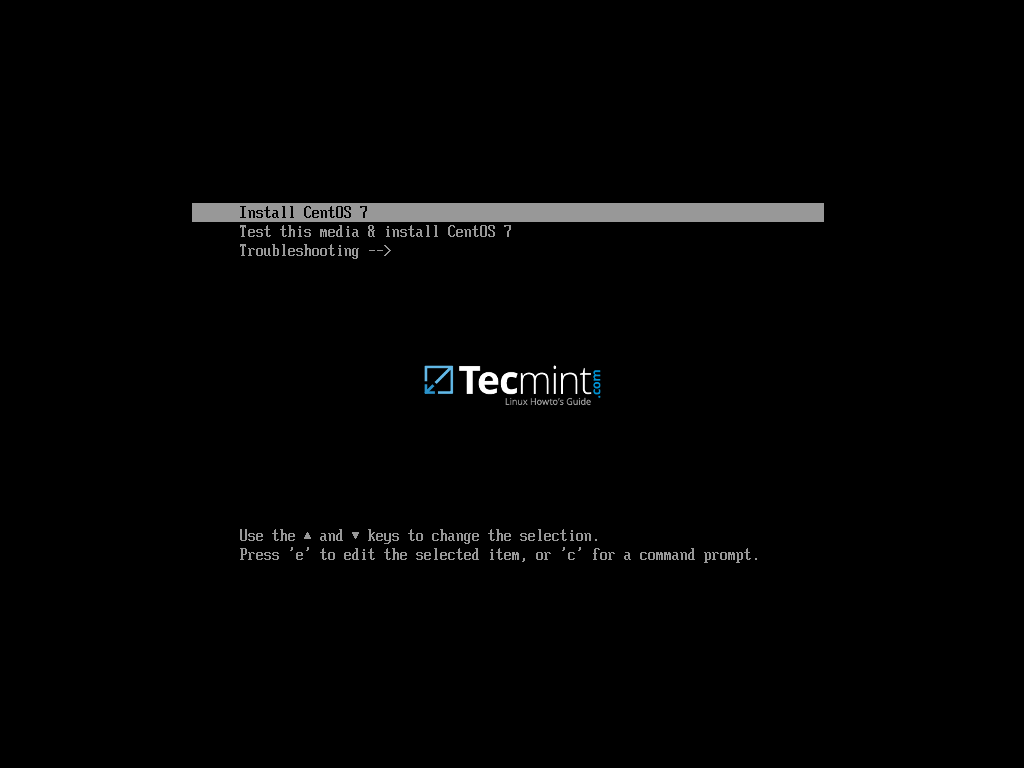
ISO 镜像启动完成后,你机器上会显示如下首屏。在菜单中选择 “Install CentOS 7”并按下回车继续。
|
||
|
||
[
|
||
|
||
][4]
|
||
|
||
*CentOS 7.3 启动菜单*
|
||
|
||
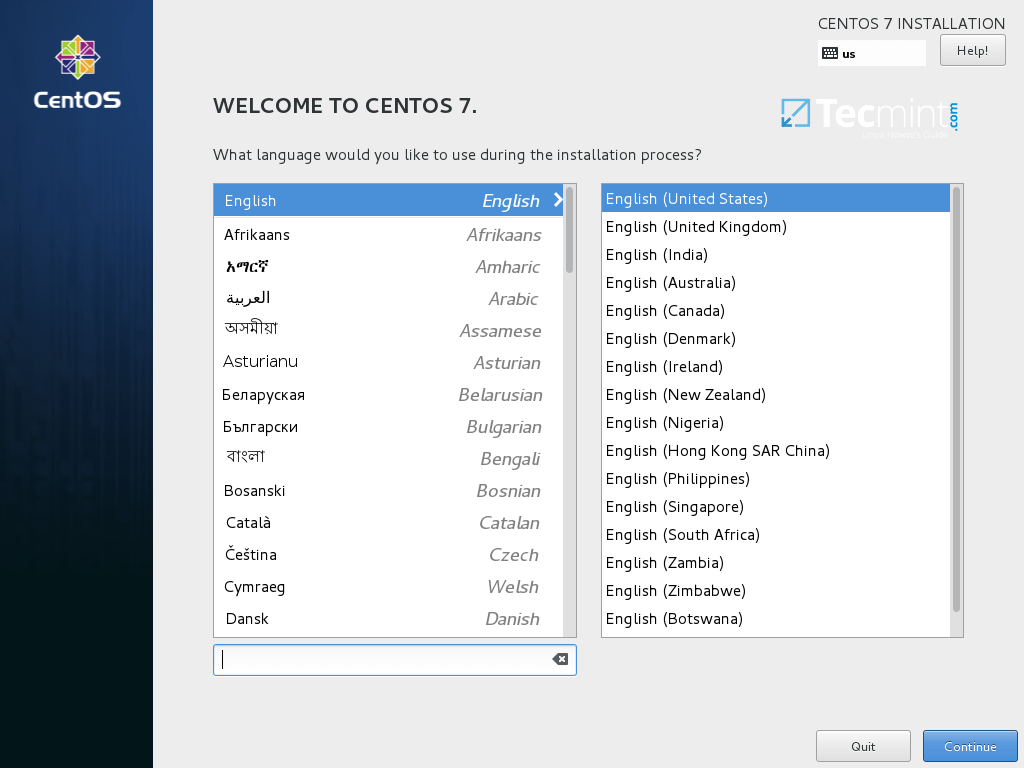
2、 在安装镜像加载到内存完成后,会显示一个欢迎页面。选择你在安装中使用的语言并按下“继续(Continue)”按钮。
|
||
|
||
[
|
||
|
||
][5]
|
||
|
||
*选择 CentOS 7.3 安装语言*
|
||
|
||
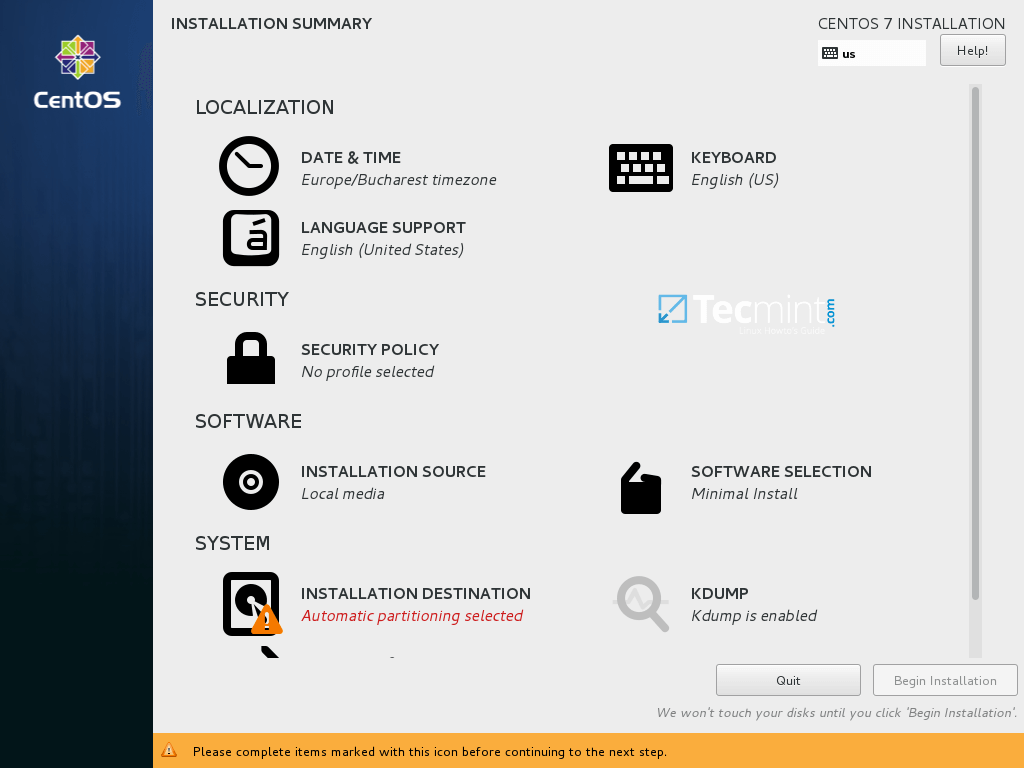
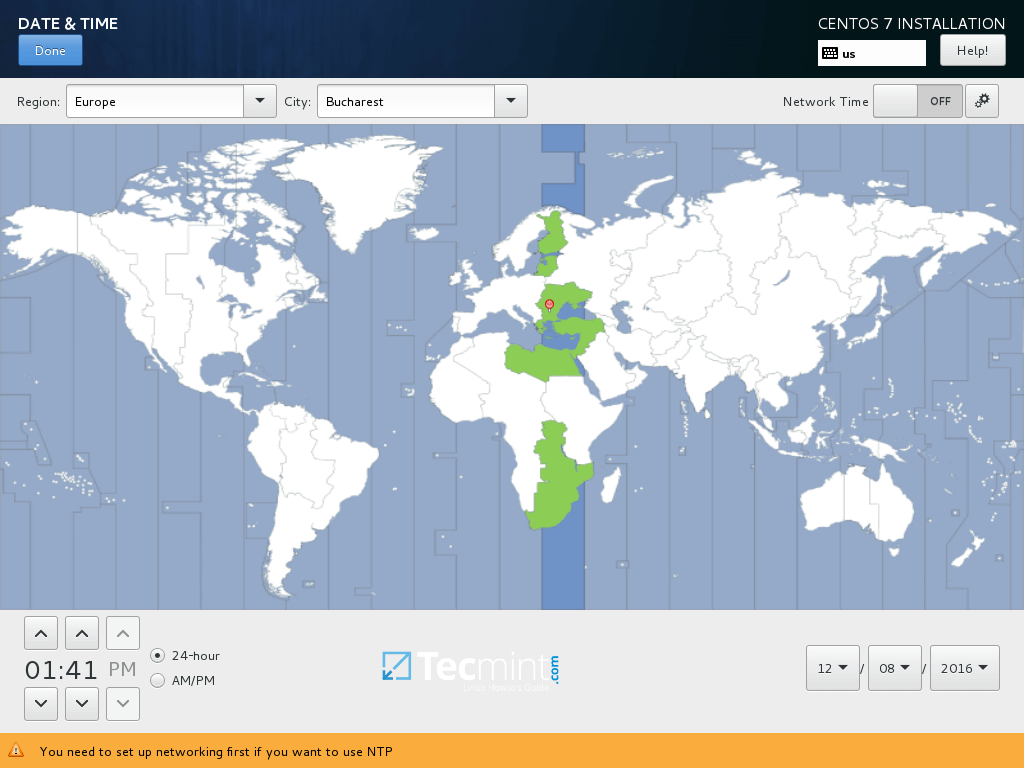
3、 在下一个页面点击“日期和时间(Date and Time)”,从地图中选择你的地理位置。确认日期和时间正确配置了并点击“完成(Done)”按钮来回到主安装界面。
|
||
|
||
[
|
||
|
||
][6]
|
||
|
||
*CentOS 7.3 安装总结*
|
||
|
||
[
|
||
|
||
][7]
|
||
|
||
*选择日期和时间*
|
||
|
||
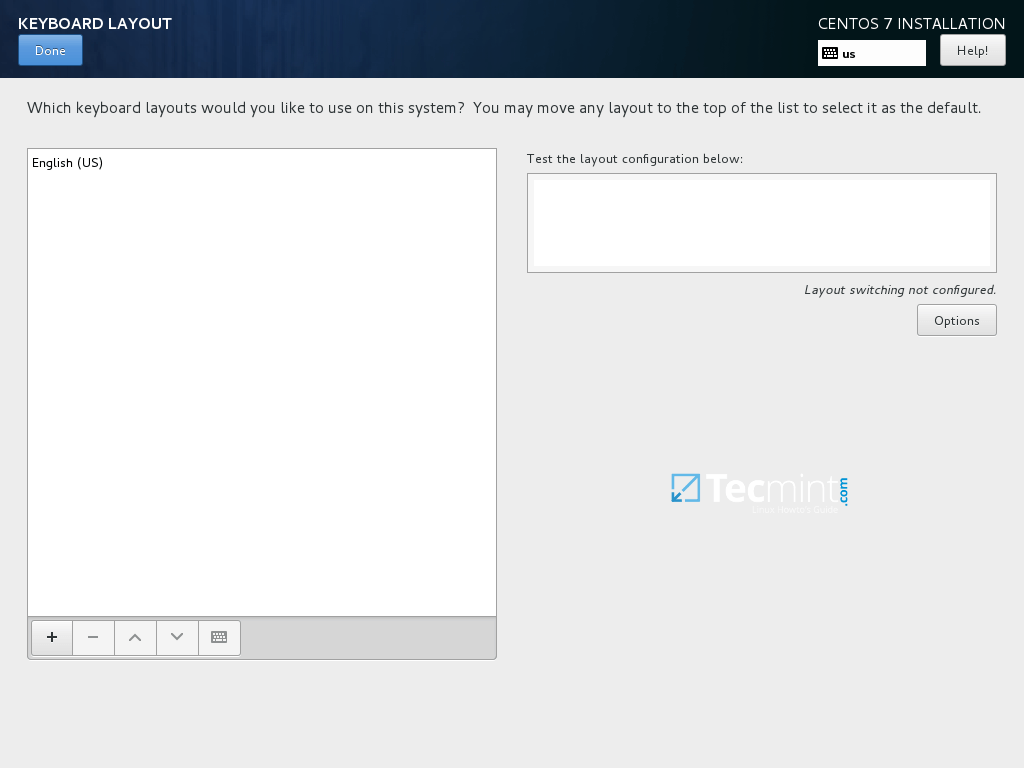
4、 点击“键盘(Keyboard)”菜单进入键盘布局页面。选择或者添加一个键盘布局并点击“完成(Done)”按钮继续。
|
||
|
||
[
|
||
|
||
][8]
|
||
|
||
*选择键盘布局*
|
||
|
||
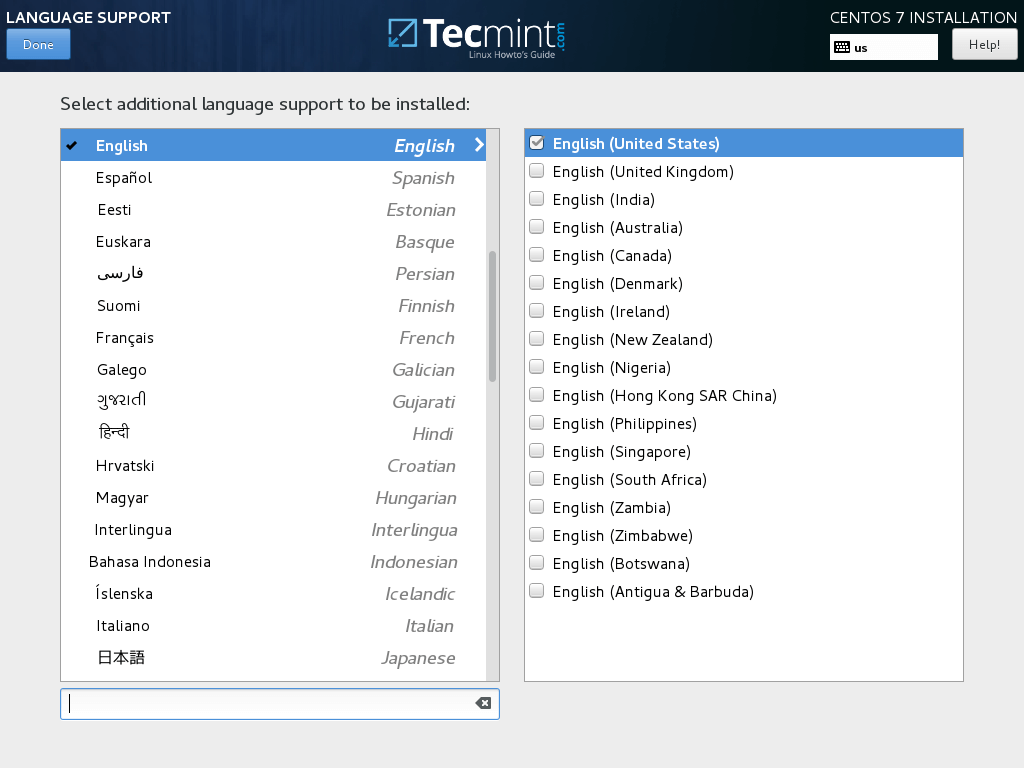
5、 接下来,为你的系统添加或者配置一个语言并点击“完成(Done)”按钮进入下一步。
|
||
|
||
[
|
||
|
||
][9]
|
||
|
||
*选择语言支持*
|
||
|
||
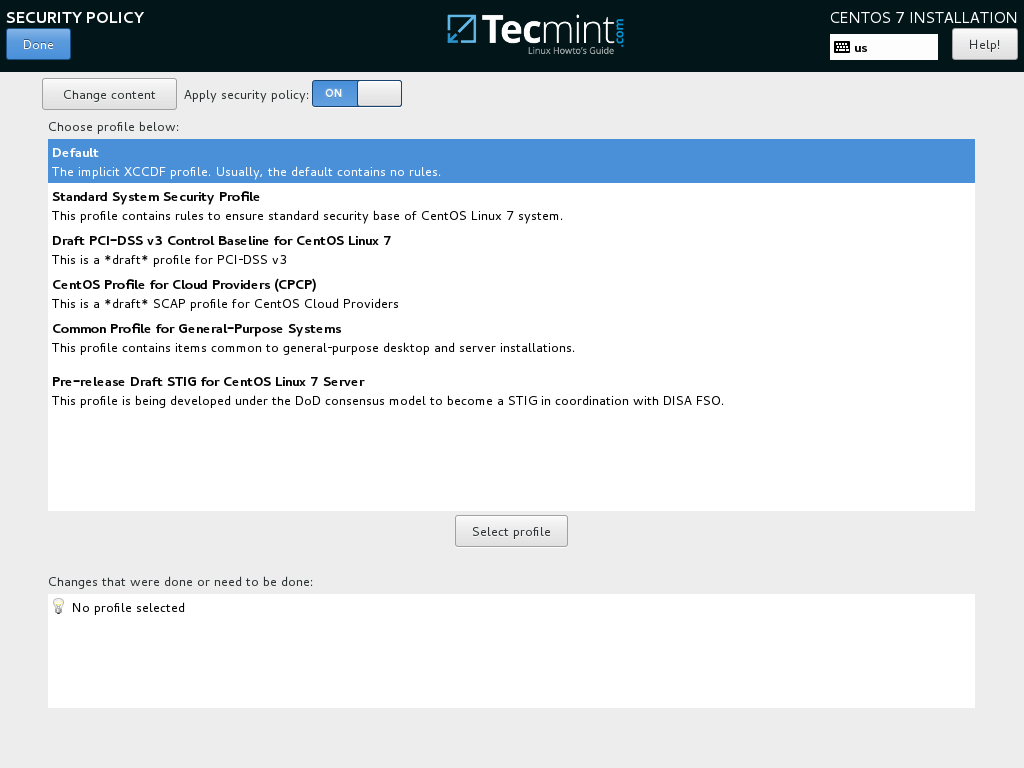
6、 在这步中,你可以通过选择列表中安全配置来设置你的系统“安全策略(Security Policy)”。
|
||
|
||
点击选择配置按钮来选择你想要的安全配置并点击“应用安全策略(Apply security policy)”按钮到 On。点击“完成(Done)”按钮后继续安装流程。
|
||
|
||
[
|
||
|
||
][10]
|
||
|
||
*启用 CentOS 7.3 安全策略*
|
||
|
||
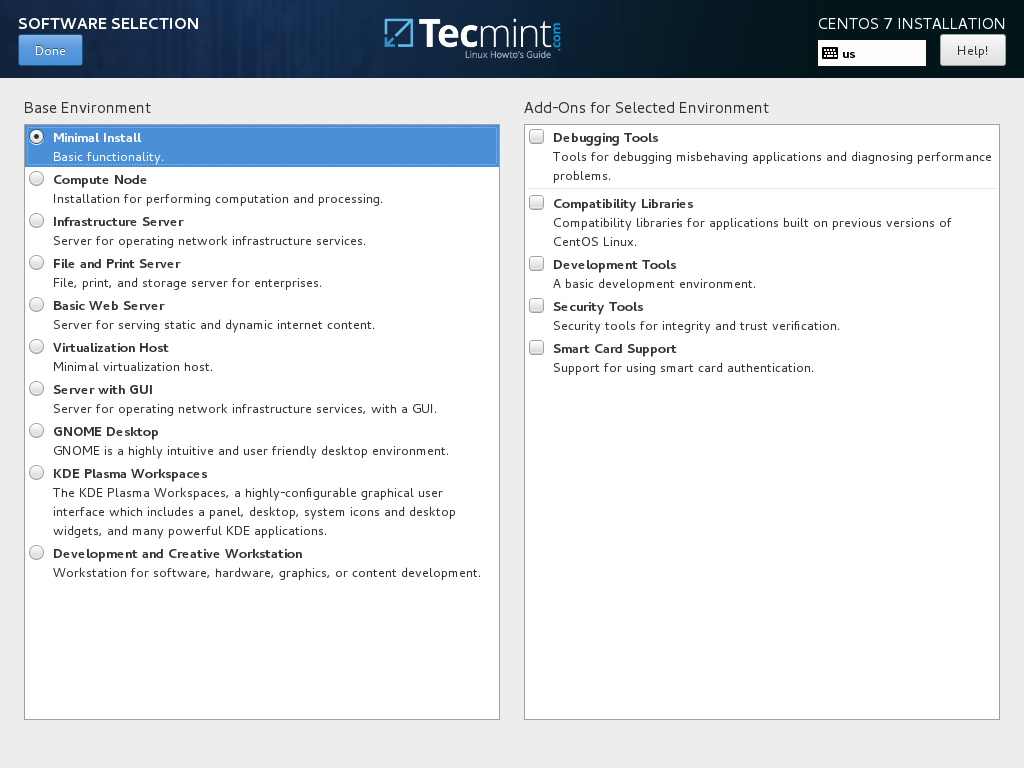
7、 下一步中你可以点击“软件选择(Software Selection)”按钮来配置你的基础机器环境。
|
||
|
||
左边的列表是你可以选择安装桌面环境(Gnome、KDE Plasma 或者创意工作站)或者安装一个服务器环境(Web 服务器、计算节点、虚拟化主机、基础设施服务器、带图形界面的服务器或者文件及打印服务器)或者执行一个最小化的安装。
|
||
|
||
为了随后能自定义你的系统,选择最小化安装并附加兼容库,点击“完成(Done)”按钮继续。
|
||
|
||
[
|
||
|
||
][11]
|
||
|
||
*CentOS 7.3 软件选择*
|
||
|
||
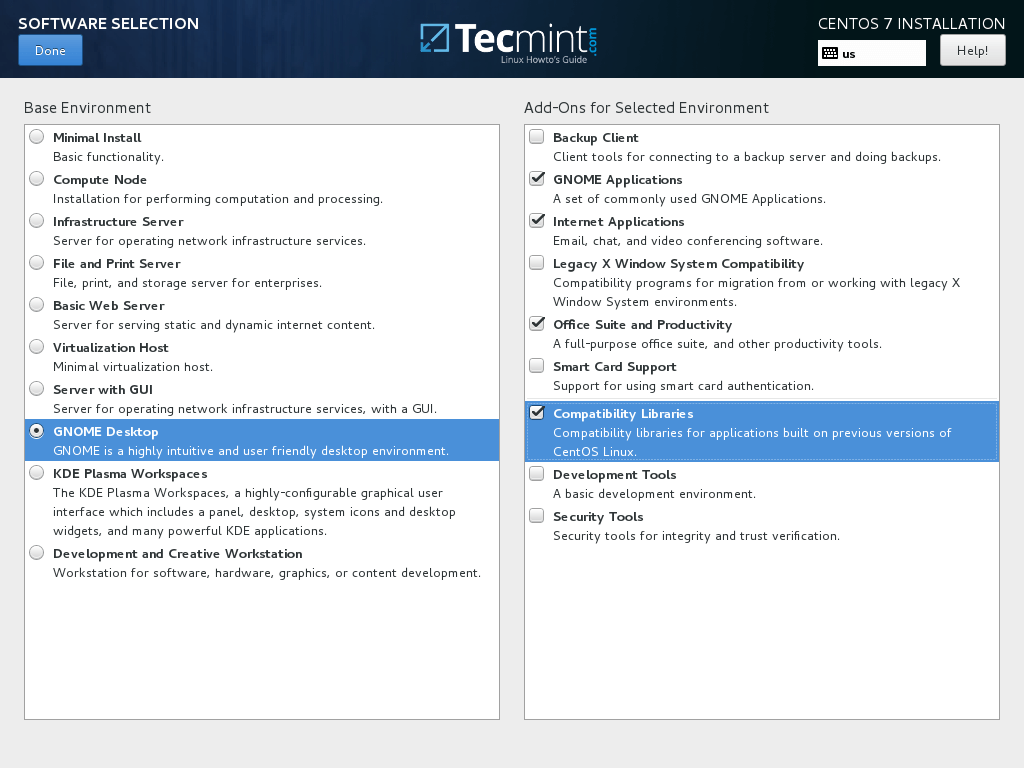
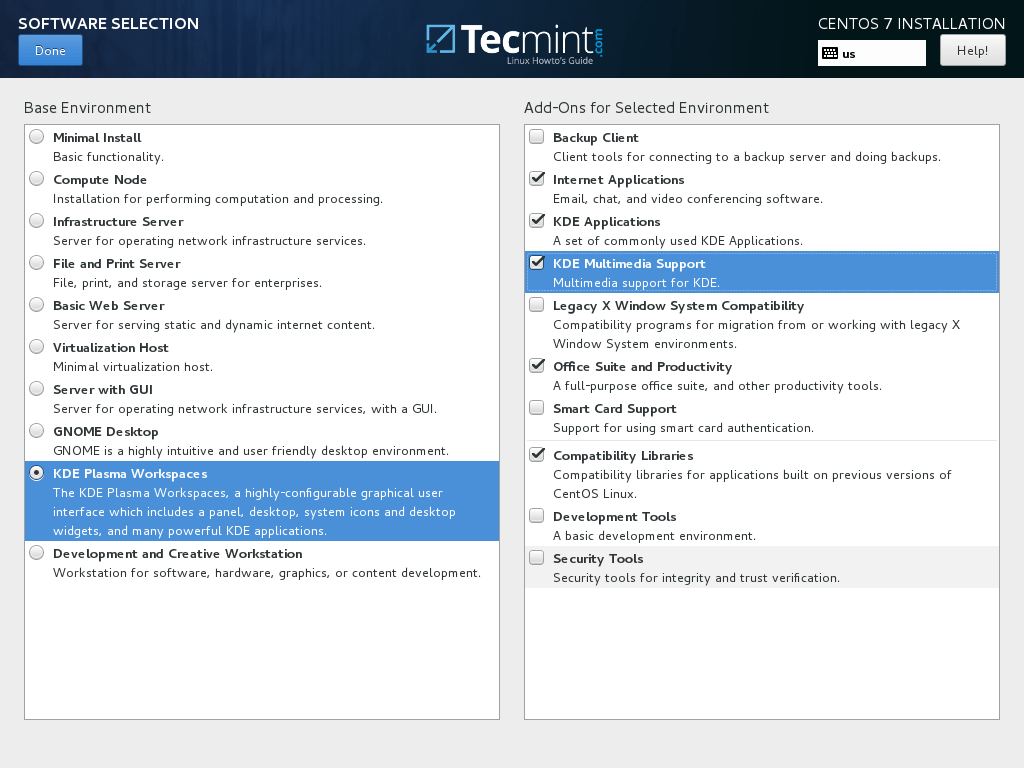
对于完整的 Gnome 或者 KDE 桌面环境,使用下面的截图作为指引。
|
||
|
||
[
|
||
|
||
][12]
|
||
|
||
*Gnome 桌面软件选择*
|
||
|
||
[
|
||
|
||
][13]
|
||
|
||
*KDE 桌面软件选择*
|
||
|
||
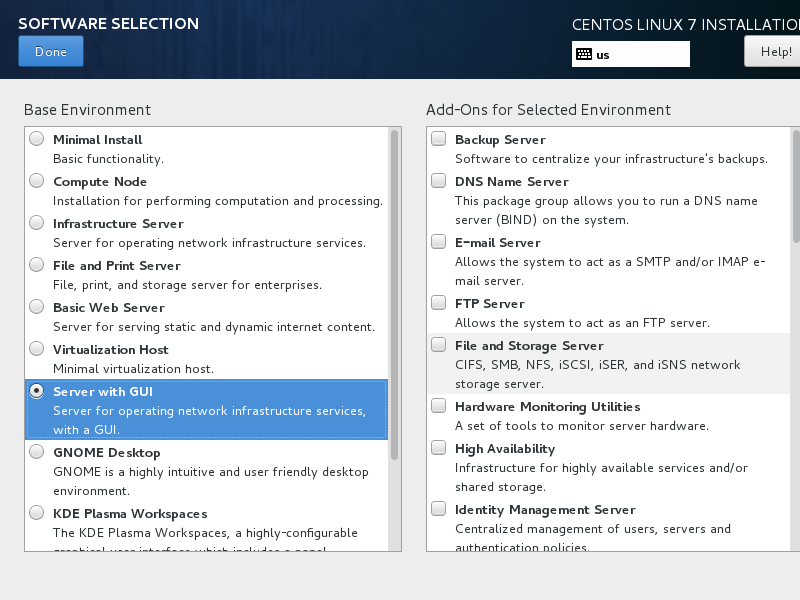
8、 假设你要在服务器上安装一个图形界面,选择左边那栏“带 GUI 的服务器(Server with GUI)”那项,并在右边那栏中根据你需要提供给客户端的服务选择合适的附加软件。
|
||
|
||
你可以选择的服务是非常多样化的,从备份、DNS 或者 e-mail 服务到文件存储服务、FTP、HA 或者[监控工具][14]。只选择对你网络设置最重要的服务。
|
||
|
||
[
|
||
|
||
][15]
|
||
|
||
*选择带 GUI 的服务器*
|
||
|
||
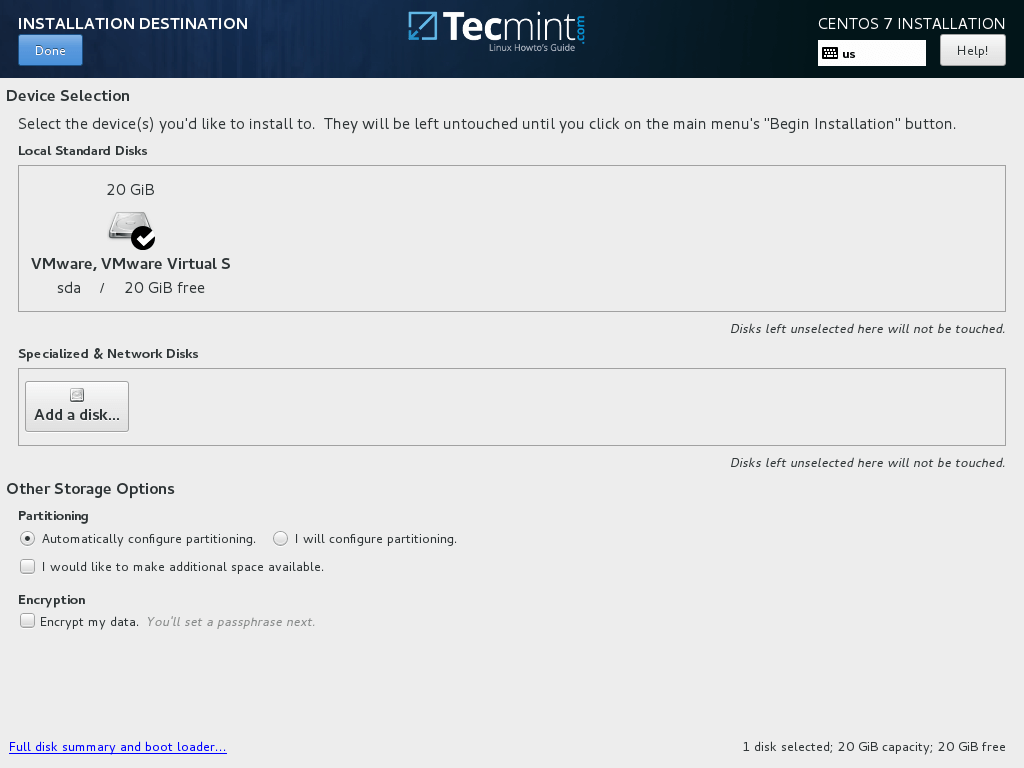
9、 如果你不使用特定的网络协议比如 HTTP、HTTPS、FTP 或者 NFS 的额外仓库,安装源保持默认,并点击“安装位置(Installation Destination)”来创建一个磁盘分区。
|
||
|
||
在“设备选择(Device selection)”页面,确保你已经选择了本地磁盘。同样,在“其他存储选项(Other Storage Options)”中确保选择了“自动配置分区(Automatically configure partitioning)”。
|
||
|
||
这个选项可以确保你的磁盘会恰当地根据磁盘空间和 Linux 文件系统层次结构进行分区。它会为你自动创建 `/(root)`、`/home`和 swap 分区。点击“完成(Done)”来应用磁盘分区方案并回到主安装界面。
|
||
|
||
重要提醒:**如果你想要创建自定义分区及自定义分区大小,你可以选择“我要配置分区(I will configure partitioning)”选项来创建自定义分区。**
|
||
|
||
[
|
||
|
||
][16]
|
||
|
||
*安装 CentOS 7.3 安装位置*
|
||
|
||
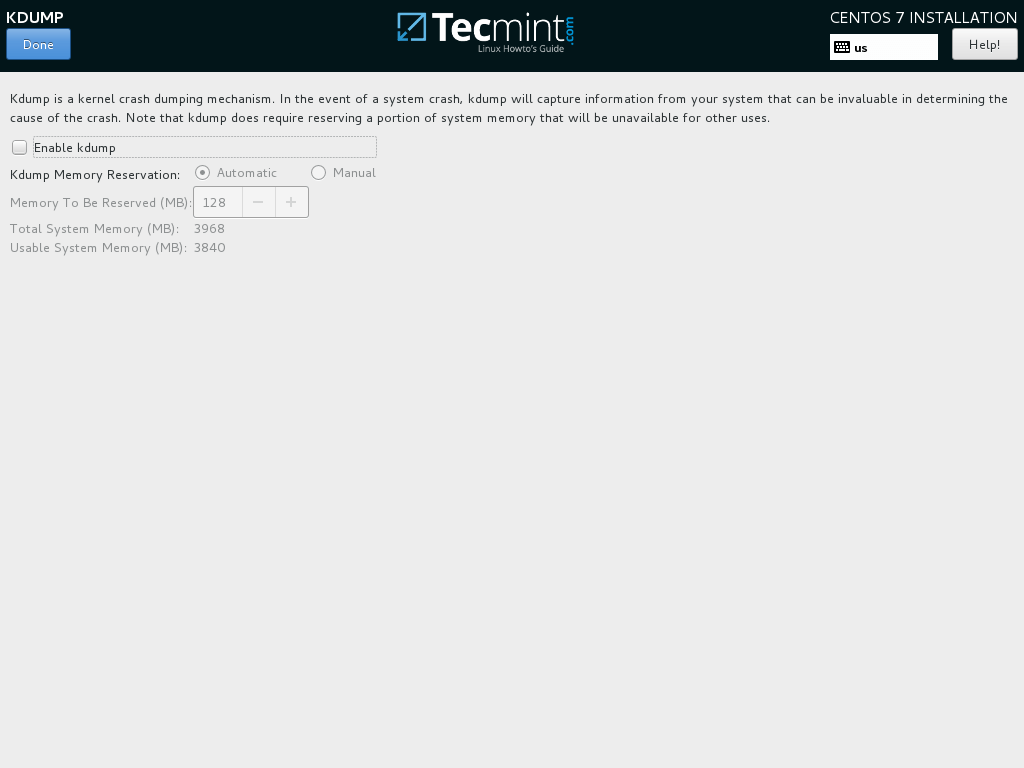
10、 接下来,如果你想要释放系统内存,点击 KDUMP 选项并禁用它。点击“完成(Done)”并回到主安装界面。
|
||
|
||
[
|
||
|
||
][17]
|
||
|
||
*Kdump 选择*
|
||
|
||
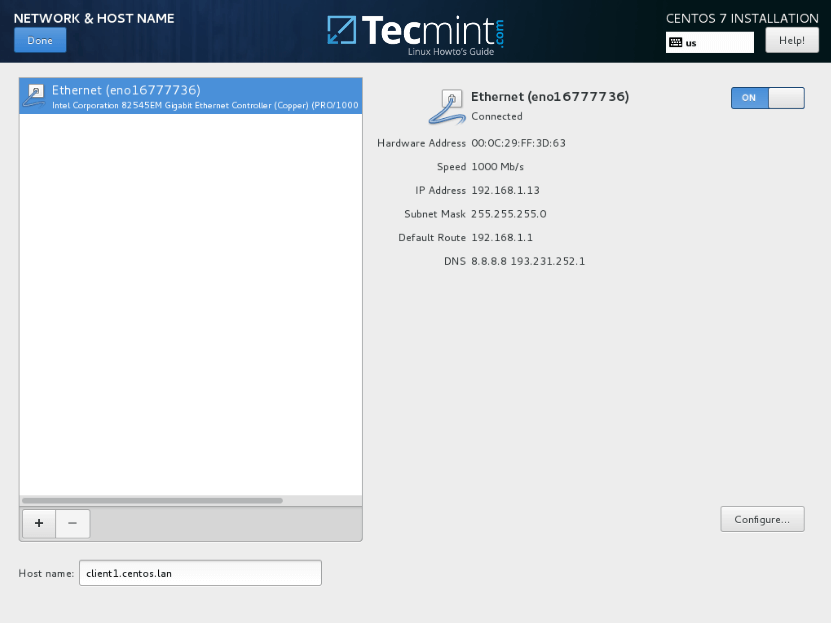
11、 在下一步中设置你的主机名并启用网络服务。点击“网络和主机名(Network & Hostname)”,在主机名中输入你的 FQDN(完整限定网域名称),如果你在局域网中有一个 DHCP 服务器,将以太网按钮从 OFF 切换到 ON 来激活网络接口。
|
||
|
||
[
|
||
|
||
][18]
|
||
|
||
*设置网络及主机名*
|
||
|
||
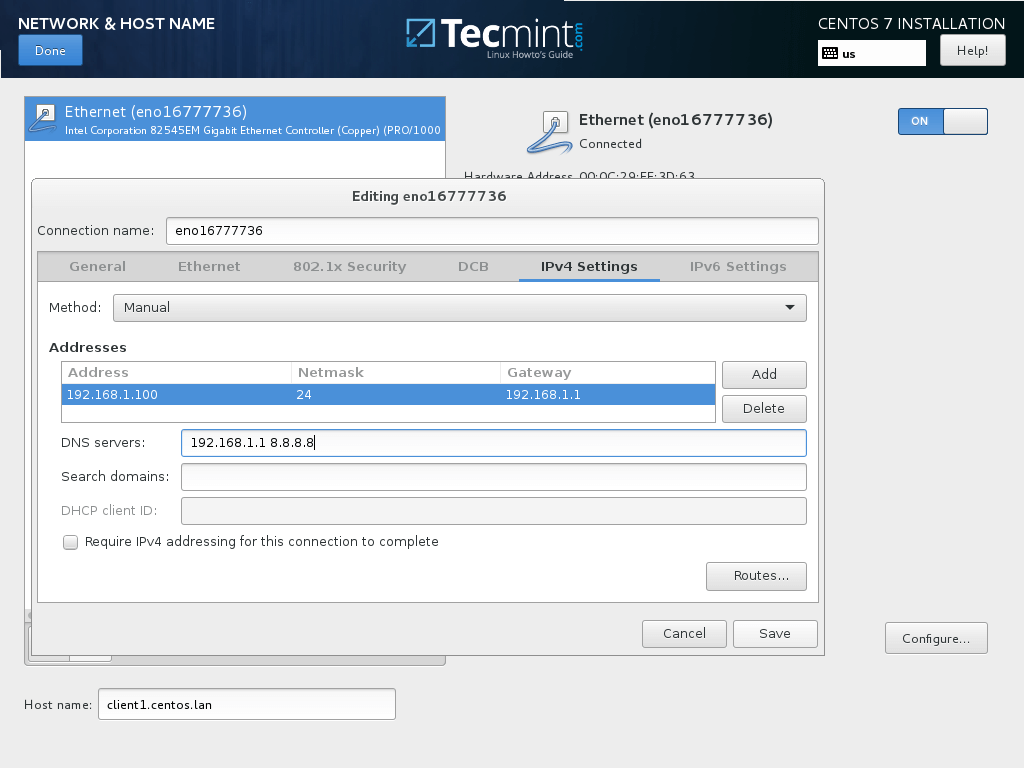
12、 为了静态配置你的网络接口,点击“配置(Configure)”按钮,手动如截图所示添加 IP 设置,并点击“保存(Save)”按钮来应用更改。完成后,点击“完成(Done)”按钮来回到主安装菜单。
|
||
|
||
[
|
||
|
||
][19]
|
||
|
||
*配置网络和 IP 地址*
|
||
|
||
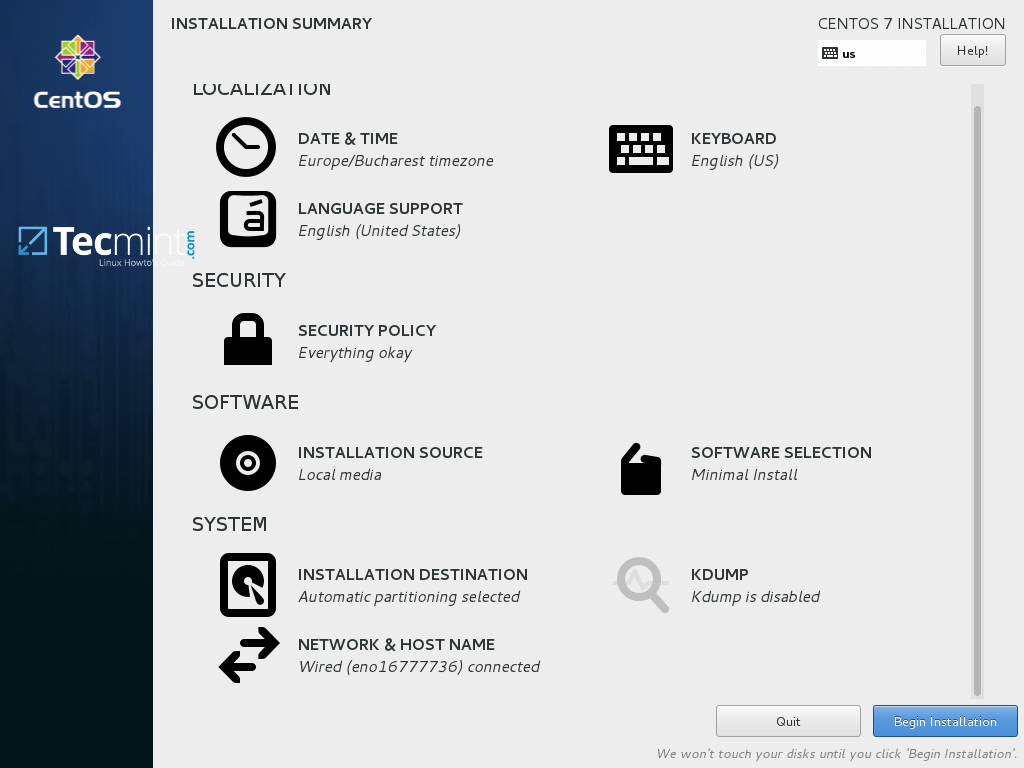
13、 最后检查下所有到目前为止的配置,如果一切没问题,点击“开始安装(Begin Installation)”按钮开始安装。
|
||
|
||
[
|
||
|
||
][20]
|
||
|
||
*开始 CentOS 7.3 安装向导*
|
||
|
||
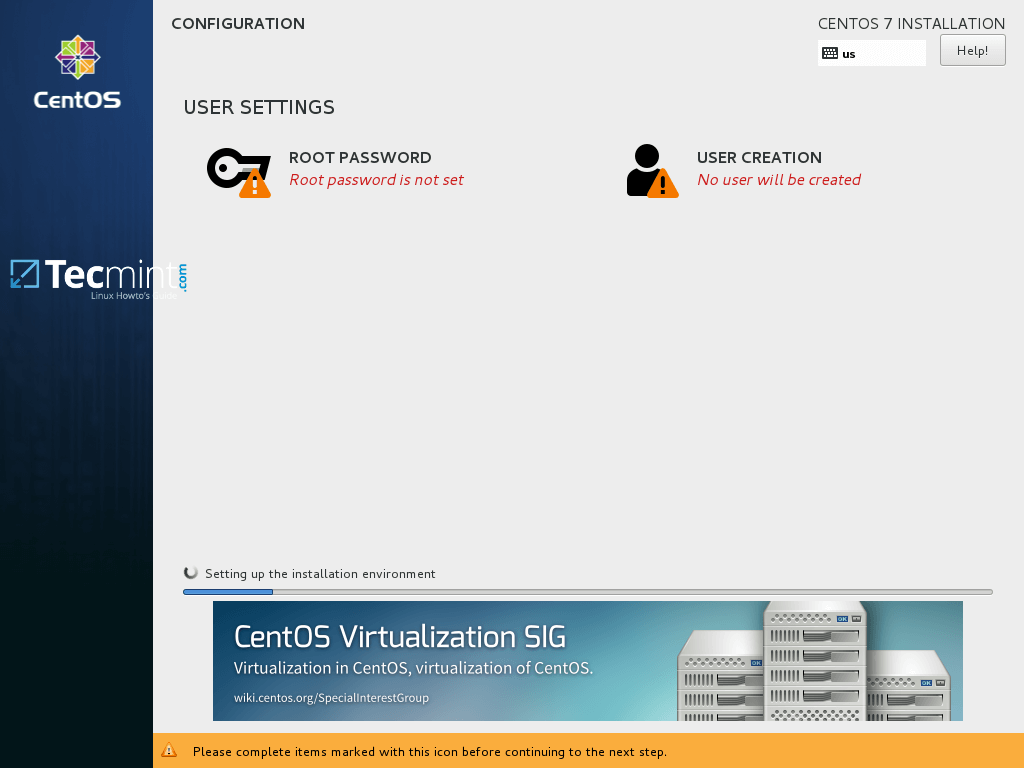
14、 开始安装后,一个新的设置用户界面会显示出来。首先点击 “root 密码(ROOT PASSWORD)”并添加一个强密码。
|
||
|
||
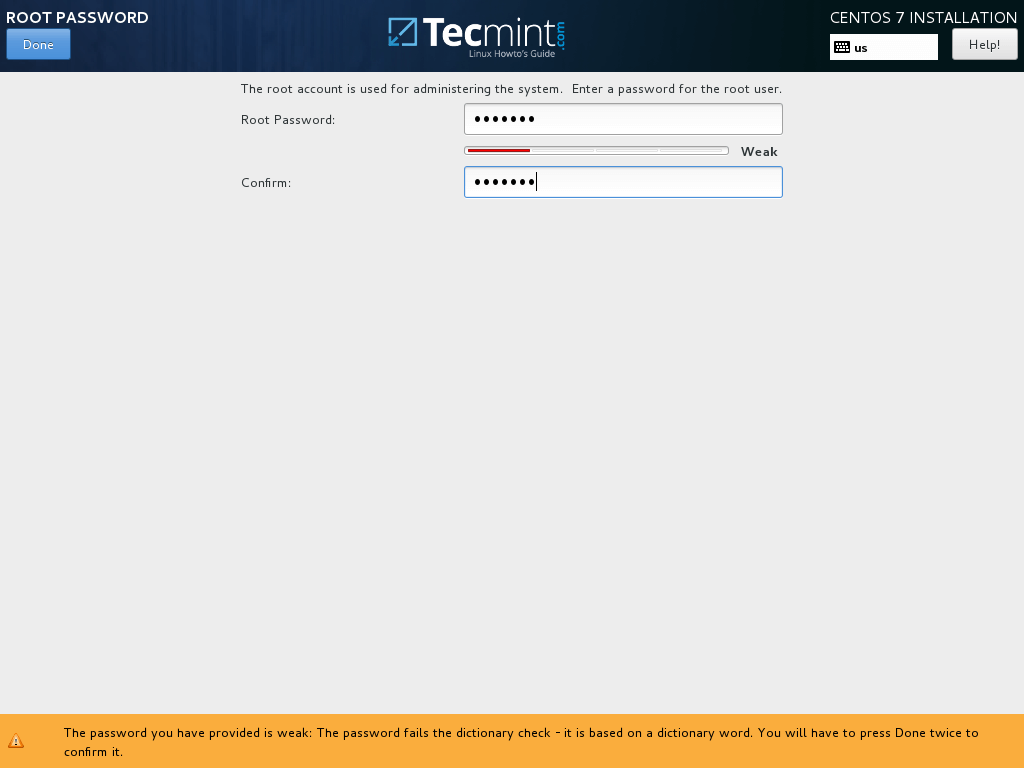
root 账户是每个 Linux 系统的最高管理账户密码,它拥有所有的权限。设置完成后点击完成按回到用户设置界面。
|
||
|
||
[
|
||
|
||
][21]
|
||
|
||
*选择 root 密码*
|
||
|
||
[
|
||
|
||
][22]
|
||
|
||
*设置 root 密码*
|
||
|
||
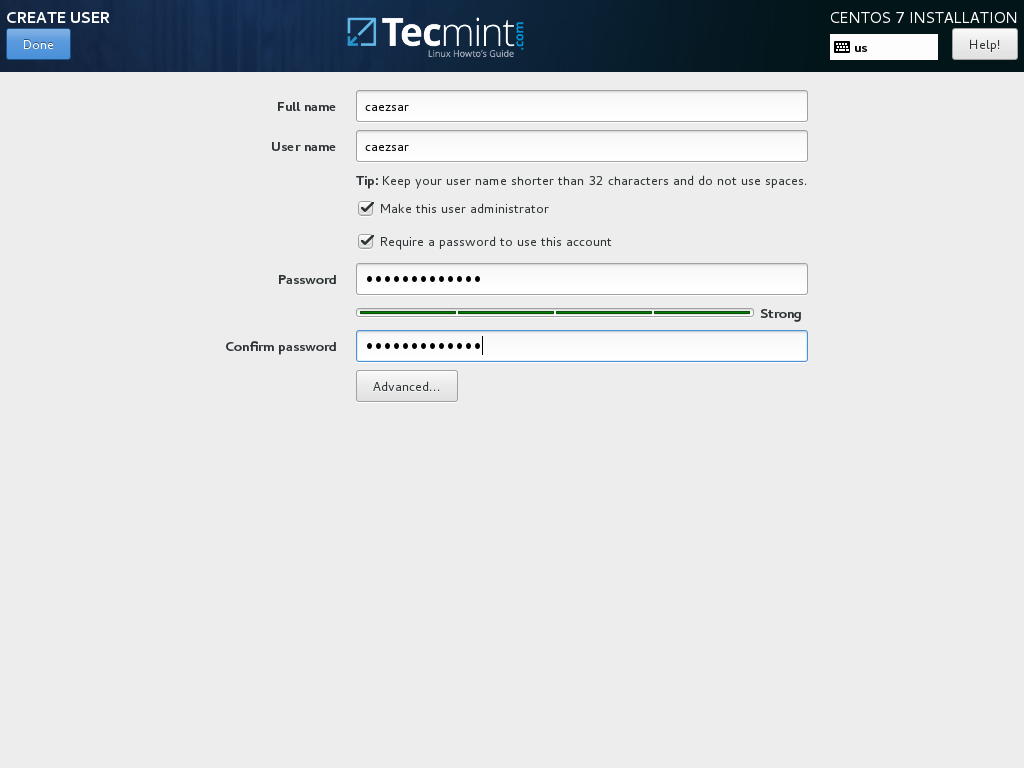
15、 用 root 账户运行系统是非常不安全和危险的,因此建议你点击“创建用户(User Creation)”按钮创建一个新的系统账户来[执行每日的系统任务][23]。
|
||
|
||
添加新的用户,并同时选择下面的两个选项来授予用户 root 权限以及每次在登录系统时手动输入密码。
|
||
|
||
当你完成最后一项点击“完成(Done)”按钮并等待安装完成。
|
||
|
||
[
|
||
|
||
][24]
|
||
|
||
*创建用户账户*
|
||
|
||
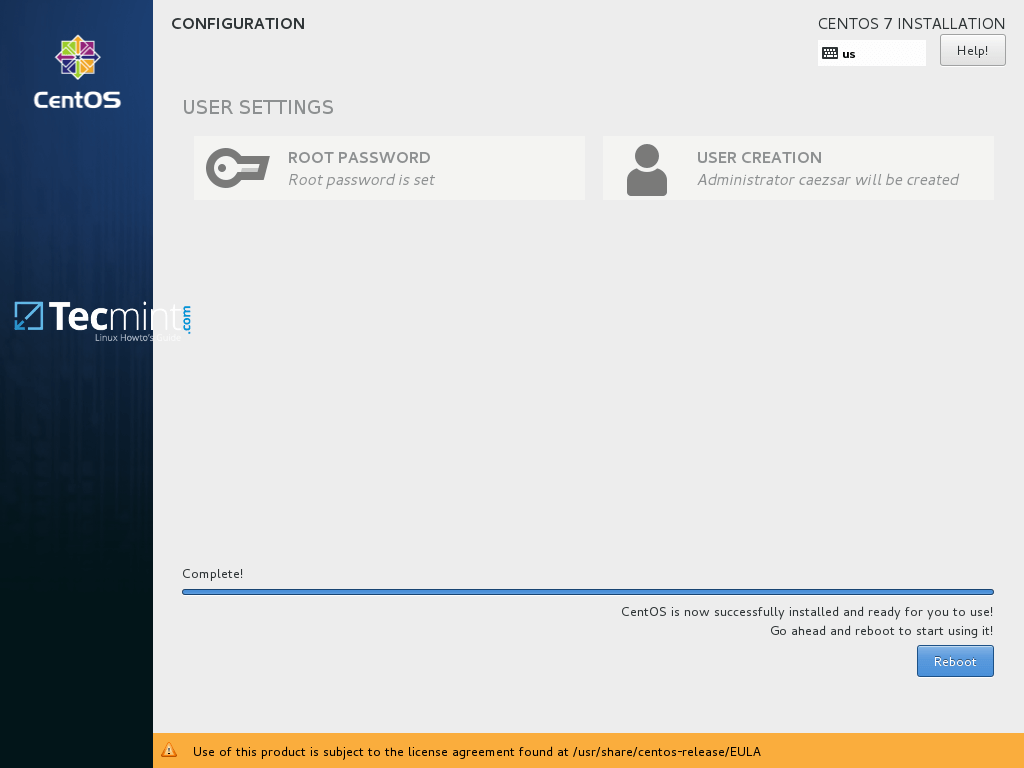
16、 几分钟后安装程序会报告 CentOS 已经成功安装在你机器中。要使用系统,你只需要移除安装媒介并重启机器。
|
||
|
||
[
|
||
|
||
][25]
|
||
|
||
*CentOS 7.3 安装完成*
|
||
|
||
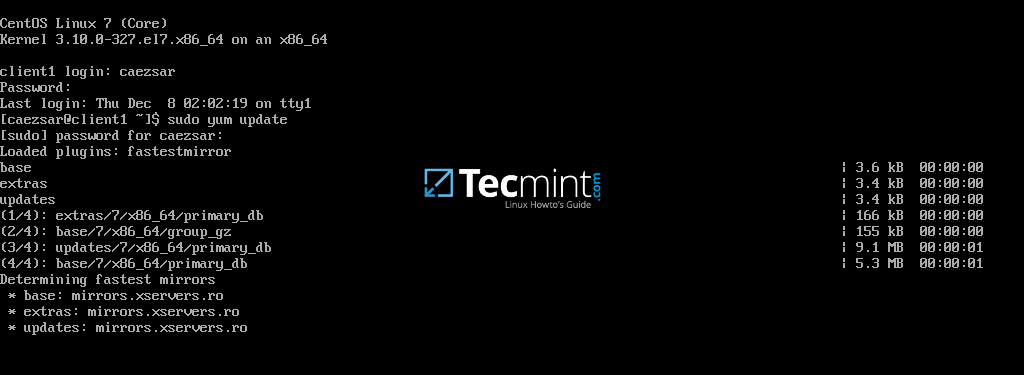
17、 重启之后,使用安装中创建的用户登录系统,并且用 root 权限执行下面的命令来执行系统更新。
|
||
|
||
```
|
||
$ sudo yum update
|
||
```
|
||
|
||
[
|
||
|
||
][26]
|
||
|
||
*更新 CentOS 7.3*
|
||
|
||
所有 [yum 管理器][27]的问题都选择`yes`,最后再次重启电脑(使用 `sudo init 6`)来应用新的内核升级。
|
||
|
||
```
|
||
$ sudo init 6
|
||
```
|
||
|
||
就是这样!在你的机器中享受最新的 CentOS 7.3 吧。
|
||
|
||
|
||
------------------
|
||
|
||
作者简介:
|
||
|
||
Matei Cezar
|
||
|
||

|
||
|
||
我是一个电脑上瘾的家伙,一个开源和 Linux 系统软件的粉丝,有大约 4 年的 Linux 桌面、服务器和 bash 脚本的经验。
|
||
|
||
--------------------------------------------------------------------------------
|
||
|
||
via: http://www.tecmint.com/centos-7-3-installation-guide/
|
||
|
||
作者:[Matei Cezar][a]
|
||
译者:[geekpi](https://github.com/geekpi)
|
||
校对:[wxy](https://github.com/wxy)
|
||
|
||
本文由 [LCTT](https://github.com/LCTT/TranslateProject) 原创编译,[Linux中国](https://linux.cn/) 荣誉推出
|
||
|
||
[a]:http://www.tecmint.com/author/cezarmatei/
|
||
[1]:http://isoredirect.centos.org/centos/7/isos/x86_64/CentOS-7-x86_64-DVD-1611.iso
|
||
[2]:http://www.tecmint.com/red-hat-enterprise-linux-7-3-installation-guide/
|
||
[3]:https://rufus.akeo.ie/
|
||
[4]:http://www.tecmint.com/wp-content/uploads/2016/12/CentOS-7.3-Boot-Menu.png
|
||
[5]:http://www.tecmint.com/wp-content/uploads/2016/12/Select-CentOS-7.3-Installation-Language.png
|
||
[6]:http://www.tecmint.com/wp-content/uploads/2016/12/CentOS-7.3-Installation-Summary.png
|
||
[7]:http://www.tecmint.com/wp-content/uploads/2016/12/Select-Date-and-Time.png
|
||
[8]:http://www.tecmint.com/wp-content/uploads/2016/12/Select-Keyboard-Layout.png
|
||
[9]:http://www.tecmint.com/wp-content/uploads/2016/12/Select-Language-Support.png
|
||
[10]:http://www.tecmint.com/wp-content/uploads/2016/12/Enable-CentOS-7-Security-Policy.png
|
||
[11]:http://www.tecmint.com/wp-content/uploads/2016/12/CentOs-7.3-Software-Selection.png
|
||
[12]:http://www.tecmint.com/wp-content/uploads/2016/12/Gnome-Desktop-Software-Selection.png
|
||
[13]:http://www.tecmint.com/wp-content/uploads/2016/12/KDE-Desktop-Software-Selection.png
|
||
[14]:http://www.tecmint.com/command-line-tools-to-monitor-linux-performance/
|
||
[15]:http://www.tecmint.com/wp-content/uploads/2016/12/Select-Server-with-Gui.png
|
||
[16]:http://www.tecmint.com/wp-content/uploads/2016/12/Select-CentOS-7.3-Installation-Destination.png
|
||
[17]:http://www.tecmint.com/wp-content/uploads/2016/12/Kdump-Selection.png
|
||
[18]:http://www.tecmint.com/wp-content/uploads/2016/12/Set-Network-Hostname.png
|
||
[19]:http://www.tecmint.com/wp-content/uploads/2016/12/Configure-Network-and-IP-Address.png
|
||
[20]:http://www.tecmint.com/wp-content/uploads/2016/12/Begin-CentOS-7.3-Installation.png
|
||
[21]:http://www.tecmint.com/wp-content/uploads/2016/12/Select-Root-Password.png
|
||
[22]:http://www.tecmint.com/wp-content/uploads/2016/12/Set-Root-Password.png
|
||
[23]:http://www.tecmint.com/file-and-directory-management-in-linux/
|
||
[24]:http://www.tecmint.com/wp-content/uploads/2016/12/Create-User-Account.png
|
||
[25]:http://www.tecmint.com/wp-content/uploads/2016/12/CentO-7.3-Installation-Complete.png
|
||
[26]:http://www.tecmint.com/wp-content/uploads/2016/12/Update-CentOS-7.3.png
|
||
[27]:http://www.tecmint.com/20-linux-yum-yellowdog-updater-modified-commands-for-package-mangement/
|