mirror of
https://github.com/LCTT/TranslateProject.git
synced 2024-12-26 21:30:55 +08:00
145 lines
4.1 KiB
Markdown
145 lines
4.1 KiB
Markdown
如何在 Ubuntu 上建立网桥
|
||
=======================================================================
|
||
|
||
> 作为一个 Ubuntu 16.04 LTS 的初学者。如何在 Ubuntu 14.04 和 16.04 的主机上建立网桥呢?
|
||
|
||
顾名思义,网桥的作用是通过物理接口连接内部和外部网络。对于虚拟端口或者 LXC/KVM/Xen/容器来说,这非常有用。网桥虚拟端口看起来是网络上的一个常规设备。在这个教程中,我将会介绍如何在 Ubuntu 服务器上通过 bridge-utils (brctl) 命令行来配置 Linux 网桥。
|
||
|
||
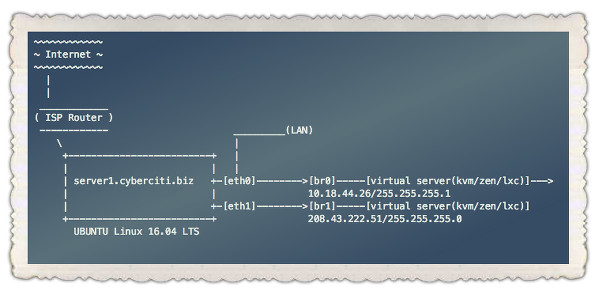
### 网桥化的网络示例
|
||
|
||

|
||
|
||
*图 01: Kvm/Xen/LXC 容器网桥示例 (br0)*
|
||
|
||
在这个例子中,eth0 和 eth1 是物理网络接口。eth0 连接着局域网,eth1 连接着上游路由器和互联网。
|
||
|
||
### 安装 bridge-utils
|
||
|
||
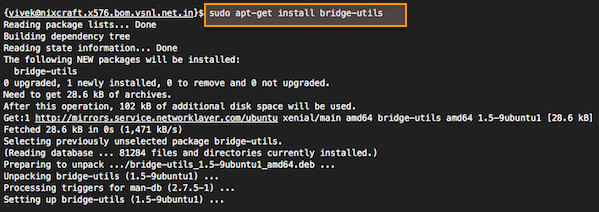
使用 [apt-get 命令][1] 安装 bridge-utils:
|
||
|
||
```
|
||
$ sudo apt-get install bridge-utils
|
||
```
|
||
|
||
或者
|
||
|
||
````
|
||
$ sudo apt install bridge-utils
|
||
```
|
||
|
||
样例输出:
|
||
|
||

|
||
|
||
*图 02: Ubuntu 安装 bridge-utils 包*
|
||
|
||
### 在 Ubuntu 服务器上创建网桥
|
||
|
||
使用你熟悉的文本编辑器修改 `/etc/network/interfaces` ,例如 vi 或者 nano :
|
||
|
||
```
|
||
$ sudo cp /etc/network/interfaces /etc/network/interfaces.bakup-1-july-2016
|
||
$ sudo vi /etc/network/interfaces
|
||
```
|
||
|
||
接下来设置 eth1 并且将它映射到 br1 ,输入如下(删除或者注释所有 eth1 相关配置):
|
||
|
||
```
|
||
# br1 使用静态公网 IP 地址,并以 ISP 的路由器作为网关
|
||
auto br1
|
||
iface br1 inet static
|
||
address 208.43.222.51
|
||
network 255.255.255.248
|
||
netmask 255.255.255.0
|
||
broadcast 208.43.222.55
|
||
gateway 208.43.222.49
|
||
bridge_ports eth1
|
||
bridge_stp off
|
||
bridge_fd 0
|
||
bridge_maxwait 0
|
||
```
|
||
|
||
接下来设置 eth0 并将它映射到 br0,输入如下(删除或者注释所有 eth0 相关配置):
|
||
|
||
```
|
||
auto br0
|
||
iface br0 inet static
|
||
address 10.18.44.26
|
||
netmask 255.255.255.192
|
||
broadcast 10.18.44.63
|
||
dns-nameservers 10.0.80.11 10.0.80.12
|
||
# set static route for LAN
|
||
post-up route add -net 10.0.0.0 netmask 255.0.0.0 gw 10.18.44.1
|
||
post-up route add -net 161.26.0.0 netmask 255.255.0.0 gw 10.18.44.1
|
||
bridge_ports eth0
|
||
bridge_stp off
|
||
bridge_fd 0
|
||
bridge_maxwait 0
|
||
```
|
||
|
||
### 关于 br0 和 DHCP 的一点说明
|
||
|
||
如果使用 DHCP ,配置选项是这样的:
|
||
|
||
```
|
||
auto br0
|
||
iface br0 inet dhcp
|
||
bridge_ports eth0
|
||
bridge_stp off
|
||
bridge_fd 0
|
||
bridge_maxwait 0
|
||
```
|
||
|
||
保存并且关闭文件。
|
||
|
||
### 重启服务器或者网络服务
|
||
|
||
你需要重启服务器或者输入下列命令来重启网络服务(在 SSH 登录的会话中这可能不管用):
|
||
|
||
```
|
||
$ sudo systemctl restart networking
|
||
```
|
||
|
||
如果你证使用 Ubuntu 14.04 LTS 或者更老的没有 systemd 的系统,输入:
|
||
|
||
```
|
||
$ sudo /etc/init.d/restart networking
|
||
```
|
||
|
||
### 验证网络配置成功
|
||
|
||
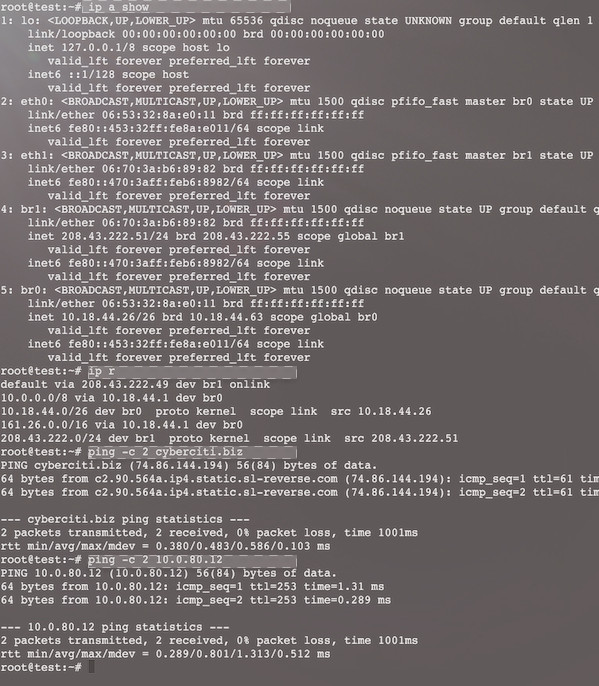
使用 ping/ip 命令来验证 LAN 和 WAN 网络接口运行正常:
|
||
```
|
||
# 查看 br0 和 br1
|
||
ip a show
|
||
# 查看路由信息
|
||
ip r
|
||
# ping 外部站点
|
||
ping -c 2 cyberciti.biz
|
||
# ping 局域网服务器
|
||
ping -c 2 10.0.80.12
|
||
```
|
||
|
||
样例输出:
|
||
|
||

|
||
|
||
*图 03: 验证网桥的以太网连接*
|
||
|
||
现在,你就可以配置 br0 和 br1 来让 XEN/KVM/LXC 容器访问因特网或者私有局域网了。再也没有必要去设置特定路由或者 iptables 的 SNAT 规则了。
|
||
|
||
|
||
--------------------------------------------------------------------------------
|
||
|
||
via: http://www.cyberciti.biz/faq/how-to-create-bridge-interface-ubuntu-linux/
|
||
|
||
作者:[VIVEK GITE][a]
|
||
译者:[MikeCoder](https://github.com/MikeCoder)
|
||
校对:[wxy](https://github.com/wxy)
|
||
|
||
本文由 [LCTT](https://github.com/LCTT/TranslateProject) 原创编译,[Linux中国](https://linux.cn/) 荣誉推出
|
||
|
||
[a]: https://twitter.com/nixcraft
|
||
[1]: http://www.cyberciti.biz/tips/linux-debian-package-management-cheat-sheet.html
|
||
|