25 KiB
A guide to simplifying invoicing with this open source tool
]project-open[ simplifies one of the most challenging activities in IT:
writing customer invoices.

Many IT projects are late, over budget, and subject to dramatic changes during development. This makes invoicing for them one of the most taxing activities in IT. It's stressful—it involves dealing with ambiguities, conflicting interests, and human error. Worse, every single decision made during the project affects how much you can bill for. When a sales guy brags—incorrectly—that your software "includes this feature," you can't invoice for the time to build it. When a support guy admits something is a bug rather than an imprecise spec, you won't be able to charge money for it.
This tutorial explains a methodology and a tool to streamline this process. Together, they help reduce frustration, improve customer relationships, and achieve a higher percentage of billable hours. The tool is free, open source, and can be applied to a wide range of organizations—from a self-employed IT guy to a multimillion-dollar software business.
This article can also serve as a guide on how to handle financial tasks if you decide to become self-employed or set up a startup. It doesn't cover project management or similar disciplines; I'm focusing only on invoicing here. The first part of this article describes the invoicing methodology, while the second part shows you how to apply the methodology within []project-open (or ]po[ for short).
The general invoicing process
There's a general process for writing invoices no matter what tool you use. Some organizations may be more or less formal with certain steps, but all project-based businesses follow the same basic process:
Figure 1. Invoicing processes (Frank Bergmann, CC BY-SA 4.0)
Assign a contract type
From an invoicing perspective, the most important property of a project is the contract type. You can invoice services for a fixed price (the risk of time and other overruns is 100% on your side), time and materials (you bill by the hour, and the customer takes on the risk of overruns), or a mixture of both (you specify some deliverables with a fixed price, but other parts of the contract are billed using time and materials). Sometimes invoicing is tied to certain objectives (milestone billing) or time periods (periodic invoicing), but these are just variants of the two contract types above.
Agile projects tend to be more time-and-materials based because the specs (and therefore the amount of work) for each user story change over the course of the project. Classic waterfall projects tend to be more fixed-price based, but this depends on the project and negotiation position. The following information applies to all contract types.
Define your project
Project definition is normally a separate step before execution begins. If you want to get paid, you have to start here and define the scope of your project with watertight deliverables. Otherwise, you're at the mercy of your customer's goodwill to let you off the hook if there are ambiguities later.
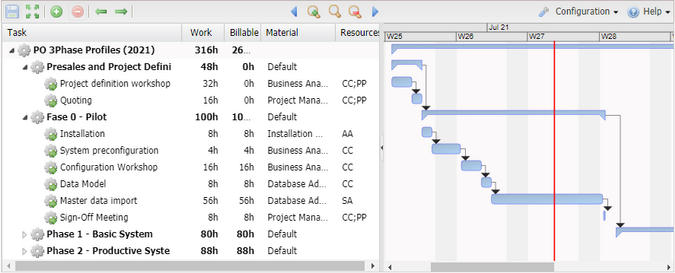
Figure 2. Initial project definition Gantt chart (Frank Bergmann, CC BY-SA 4.0)
The Gantt chart above shows a sample ]po[ project. To define a project with unambiguous deliverables:
- Define the project as a list of tasks to work on. Every task must have a clear deliverable so that it's easy to tell if the task is complete or not.
- Create an estimate (the Work column) of how long it will take to complete the task. This helps you track time overruns. A second column, Billable Hours, allows you to account for unbillable time (e.g., time spent in presales activities is generally not billable).
- Define a Material for each task if you charge different rates for different task types. For example, you may charge US$ 100 per hour for project management while database administration costs US$ 60 per hour.
- Optional: Assign Resources to each task to specify who should do the work.
Entering information this way makes it very easy to produce invoices and status reports later.
Manage project change requests, bugs, and issues
Projects tend to change during their course due to unforeseen issues, new ideas from the customer, and many other reasons. Most of these changes mean additional work for you. It's important to track whether this work is paid or unpaid. Customer extension requests or scope increases are usually paid, while bugs or other issues tend to be unpaid.
There are different ways of tracking change requests (CRs):
- Contractually: Formally record change requests as an email or a signed CR document so that there are no ambiguities when invoicing.
- Operationally: You probably want to add CRs as tasks in your project. This is just like creating the initial tasks list. You may want to group additional tasks below a summary task to indicate they aren't covered by the original scope.
- Bug tracker: It may also be useful to keep a separate log for quality issues and bugs (usually non-billable changes).
Whatever method you use, make sure you tag the work as tasks vs. bugs in some way to remind you to treat them differently when writing an invoice later.
Issue periodic status reports
Customers expect you to provide periodic information about the progress of their projects. That's because IT projects are usually late and over budget. This can be an unpleasant duty, particularly if you have to report overruns, but it makes good business sense.
A weekly status report frequently contains the following sections:
- A list of tasks you're working on, optionally with their completion status
- A list of tasks you've started working on in this reporting period
- A list of tasks you've finished in this reporting period
- The reasons it took you so long to finish the tasks above
Get customer signoff
Before you can write an invoice, you usually need approval from the customer confirming all deliverables are complete. This may be the most difficult phase of the entire project because it often involves negotiating accountability for any overruns you encountered in the project.
I recommend you start considering this phase when you first define the project so that every task is bound to a clearly defined deliverable and completion status isn't up for debate. You may also define explicit acceptance criteria during project definition to avoid ambiguities. When negotiating the details of a task with the customer during project execution, remember to record all decisions so that you can easily find this documentation when trying to get signoff.
Invoice
Once you've gotten signoff, writing the invoice is relatively easy. You just need to multiply the billable hours by the agreed rate per hour or day:
- Look at all billable tasks and determine planned hours, billable hours, and actual hours.
- Can you bill the overrun hours to the customer? If so, you'll probably have to explain why the customer should pay for this and where this has been agreed upon contractually.
- Multiply the billable hours by the hourly rate for the respective service type.
Once you calculate the final amount, you may need to add taxes according to your local regulations, which will differ depending upon the country, state, county, or even city where your business is located. Finally, enter the calculation into a standardized invoice document and send it to the customer.
Track accounts receivable and payments
Once the invoice has been sent to the customer, you have to track the payments in your bank account and connect them to the respective invoices. You may also have to send reminders to your customers if they're late with payments.
Do profit & loss and post-mortem
After all the work is finished, you'll want to see how much money you earned from the project. This can be very easy or quite complex if the work involves salaried employees, external consultants, efforts shared with other projects, travel costs, etc. At the end, you'll have a profit-and-loss statement that consists of the invoiced amount minus all of your costs.
This may also be a good moment to review your project in general (called a post-mortem) and your estimation process in particular. Compare the estimated time with the actual time spent and how the various decisions and events during the project affected the balance. This should inform your sales and quoting process for the next project.
Create invoices with ]project-open[
Now that you know the process, let's look at implementing it using the free and open source tool ]po[.
Download, install, and configure ]po[
It only takes a few minutes to get ]po[ running on your computer. You can get native installers (along with help and instructions) for various Linux flavors or Windows from the ]po[ website.
After installing ]po[, follow the configuration wizard and choose the Other/Everything and Complete/Full Installation options to enable all system options. Project invoicing is disabled in the simplified configurations.
Define a project
To create a new project, use Projects -> New Project and choose Gantt Project or one of its subtypes. The ]po[ Gantt editor contains everything you need to set up your project. You can structure your project hierarchically with Summary tasks or keep it as a flat list. The Gantt timeline on the right-hand side is optional for the invoicing process. It's only used for tracking progress during project execution.
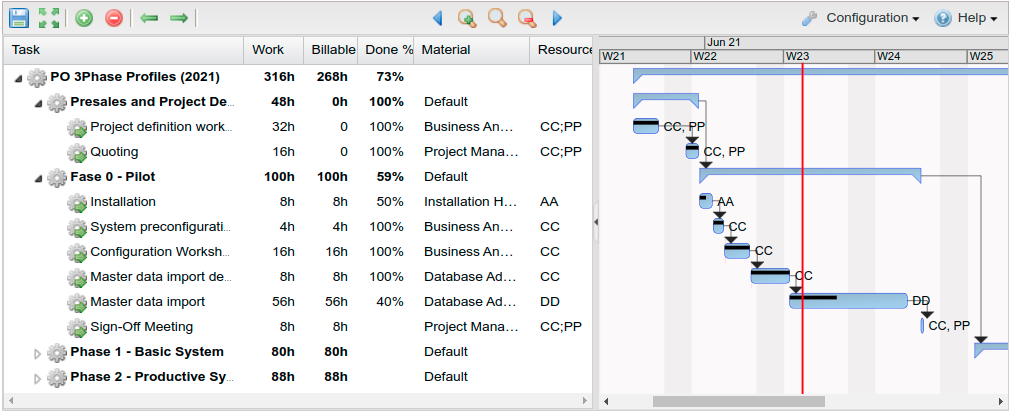
There are columns for all the task properties described below. The Material and Billable Hours columns aren't visible in ]po[ by default. To make them visible, click the v button to the right of each column header and enable the column. You can change the column order by dragging and dropping:
Figure 3. Gantt chart with project definition and status (Frank Bergmann, CC BY-SA 4.0)
- Task: This is the name of the task.
- Work: Enter the estimated hours to finish the task.
- Billable Hours (optional): Allows you to specify billable time if it is different from Work.
- Done %: The project manager enters the progress toward completing the task.
- Material: This is the service type of the task, for example, project management or frontend development. You can edit the list of materials in Master Data -> Materials. These service types tie in with the list of rates (see below) to define prices for different types of work or different resources.
- Resources: To assign resources to tasks, you first have to use the Projects -> <project name> -> Members portlet to add resources to the project. After you reload the page, these resources will be available in the Gantt editor, where you can assign them to tasks in the Resources column.
- Notes: This field is not available as a column. Double-click on the icon before any task to open the Task property panel that includes a large free-text area for notes.
]po[ will automatically calculate the duration (setting the end date) of a task if you have defined its Work and Resources. Similarly, it will calculate the duration of a Summary task (a parent task with several subtasks) based on its children. You can create dependencies between tasks by dragging and dropping with your mouse.
Log your hours
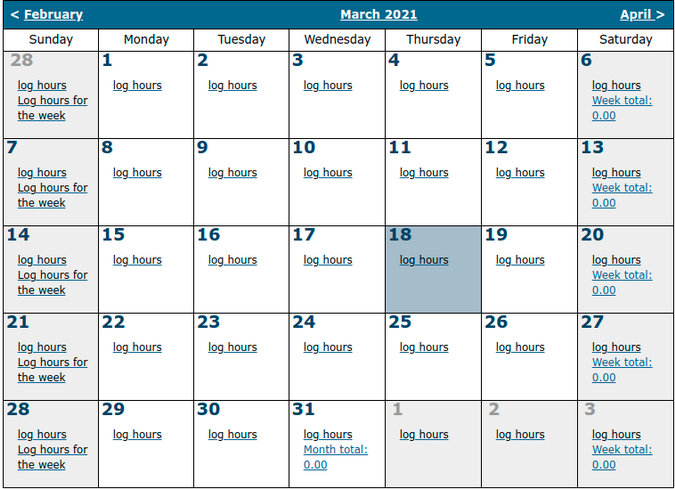
Use the Timesheet menu to get to the calendar page. Click Log hours for a specific day.
Figure 3. Time sheet calendar (Frank Bergmann, CC BY-SA 4.0)
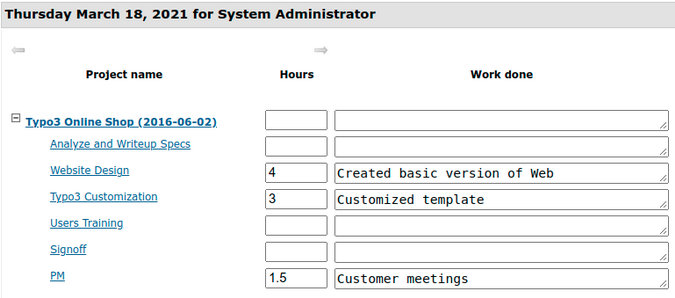
You'll see a list of all projects on which you are a member. There, you can log hours and add comments about what you've done.
Figure 4. Logging hours (Frank Bergmann, CC BY-SA 4.0)
Add issues and change requests
You can add new tasks to the Gantt editor any time during the project to reflect change requests.
You can also add a bug tracker to your project. From the left-hand side of the project, find Project -> Admin Project -> Create a Subproject. Then create a new subproject with the name <Project> Bug Tracker and type Ticket Container. This new bug tracker will appear in the Gantt editor together with the included tickets marked with different icons. The bug tracker will also appear in the Tickets -> New Ticket section so that the project manager, the customer, or other stakeholders can log various types of issues. Please see the Documentation tab on the []po website for details about the ]po[ helpdesk functionality, as this is beyond the scope of this tutorial.
Report your status
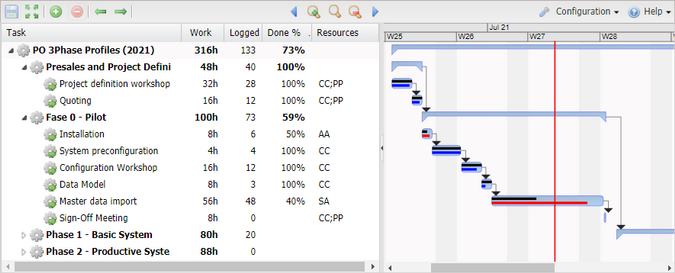
The ]po[ Gantt editor also serves as a visual status report. Basically, all tasks to the left of the red line ("today") should show 100% in the Done % column.
Figure 5. Project status Gantt chart (Frank Bergmann, CC BY-SA 4.0)
Look at the Master data import task in Figure 5:
- Is the task on time? The black bar inside the Gantt bar represents the 40% from the Done% column. The rectangle ends to the left of the red line representing today, indicating the task is late.
- Is the task within budget? The red rectangle in the Gantt bar is red. It represents the Logged Hours as a percentage of Work. We can see that the team has already spent 48 of the planned 56 hours, but the task is only 40% done. Continuing like this, it would take 120 hours (= 48h / 40%) to complete the task. The bar's color changes to blue if Logged Hours < Work * Done%.
]po[ includes other more advanced status reporting tools, including Earned Value Analysis (EVA), Milestone Trend Analysis, and various specialized reports. The documentation provides more information on these tools.
Get to sign off
]project-open[ doesn't include specific support for getting your customer to sign off on your project. However, the detailed information attached to each task—which you documented at the start—will be extremely helpful in proving that everything's been done in accordance with the decisions you and your customer made together. Take note of any difficulties and take them into account when defining the next project.
Create an invoice manually
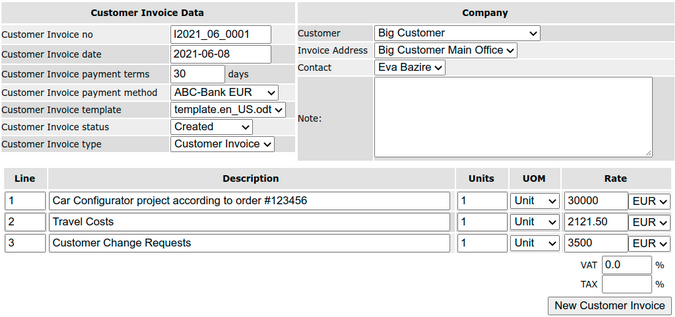
This is the simplest and most flexible way to create invoices and is suitable for very small or fixed-price projects. Use <project> -> Finance -> New Customer Invoice from Scratch to start. (Do not use the Finance tab at the top of the ]po[ menu—go to your specific project and use the project's Finance tab there). You'll see a screen like this:
Figure 6. Creating an invoice manually (Frank Bergmann, CC BY-SA 4.0)
Fields in the invoice header:
- Invoice no: This is the invoice identification for tax reporting purposes. This number is created automatically and numbered per month. Alternative numbering schemes are available.
- Invoice date: This is the date you created the invoice (for tax reporting purposes).
- Payment terms: This is the number of days until the invoice is due.
- Payment method: This is how the customer should pay. You can modify the available payment options in Admin -> Categories -> Intranet Invoice Payment Method.
- Invoice template: This is a LibreOffice template that will render the invoices. Admin -> Invoice templates shows the list of available templates. Here you can also download a template and upload a modified version.
- Invoice status: Created is a freshly created invoice. The other options are for tracking the payment process. You can configure invoice states in Admin -> Categories -> Intranet Cost Status.
- Invoice type: Customer Invoice is the default type of invoice.
- Customer: You can set up new customers in Master Data -> Companies -> New Company or the CRM section of ]po[.
- Invoice address: One customer may have multiple places of business, so enter the address where you want this invoice sent.
- Contact: Enter the person who should receive the invoice. ]po[ can send out invoices directly as emails.
- Notes: Enter any notes relevant to the invoice.
- VAT: Most countries use value-added tax (VAT). You can also configure VAT types (instead of a numeric value) for certain countries.
- TAX: Some countries add a second tax to invoices. You can disable this field in Admin -> Parameters -> intranet-invoices if you don't need this.
Fields in the invoice lines:
- Line: This is a way to order the invoice line items.
- Description: Enter a description of the item.
- Unit: Enter the units of what you invoice (e.g., how many hours, days, etc.).
- UoM: This stands for unit of measure, and it can be the number of hours, days, or just units.
- Rate: This is the price per unit using the default currency. You can configure currencies in Master Data -> Exchange Rates and define the default currency in Admin -> Parameters -> DefaultCurrency.
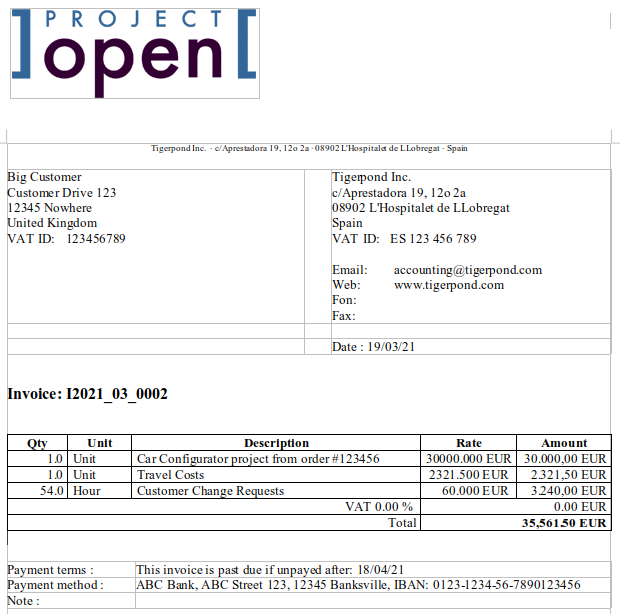
Clicking the Preview using Template link will launch your text processor (Microsoft Word or LibreOffice Writer) if it's installed on your computer. You can now edit the invoice before you send it to the customer.
Figure 7. Invoice print preview (Frank Bergmann, CC BY-SA 4.0)
Create an invoice semiautomatically
]po[ also has a wizard that converts logged hours "automagically" into invoice line items for you. This process applies to fixed-price, time-and-materials, and periodic invoicing types.
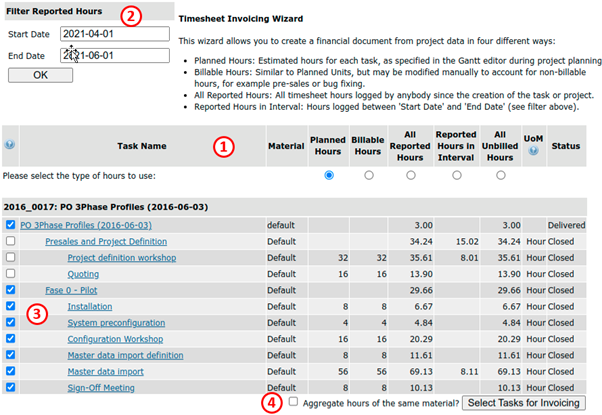
Use <project> -> Finance -> New Customer Invoice from Timesheet Tasks to start the wizard.
Figure 8. Invoice wizard (Frank Bergmann, CC BY-SA 4.0)
The main part of the screen (labeled (1) in the image above) shows five different types of hours per task. This works a bit like a report but lets you take actions using the provided user interface elements:
- Planned Hours: The estimated hours for the task, as specified in the Gantt editor during project planning
- Billable Hours: Similar to Planned Hours, but you can manually modify this to account for non-billable time
- All Reported Hours: All timesheet hours logged by anyone, ever
- Reported Hours in Interval: Hours logged between the start date and end date in the filter (2) at the top of the screen
- All Unbilled Hours: Hours that aren't included in any previous invoice created using this wizard. This figure is useful when doing periodic invoicing to see if hours "slipped through" in past invoicing runs.
The checkboxes (3) in the first column let you manually deselect certain tasks. The Aggregate hours checkbox (4) lets you create invoice lines per task (when unchecked) or invoice lines per material (when checked). Select aggregate if there are many tasks in your project; otherwise, your invoice could become very long.
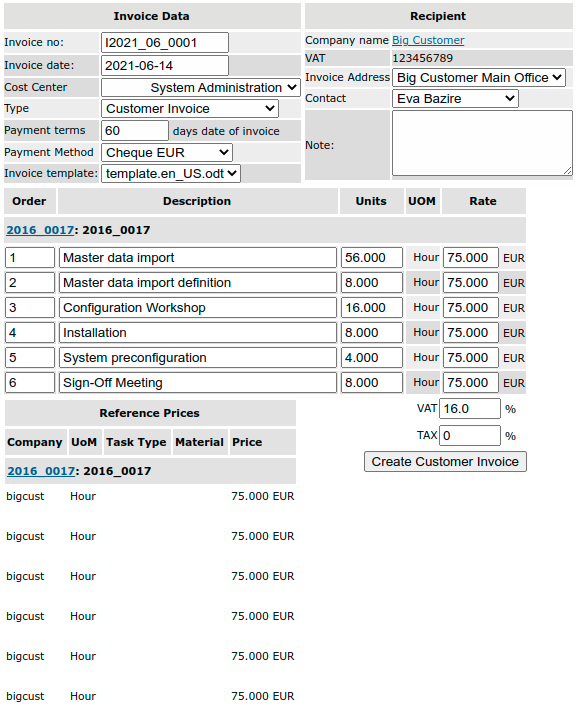
Your result is an invoice like this:
Figure 9. Invoice proposed by the wizard (Frank Bergmann, CC BY-SA 4.0)
This is similar to the manually created invoice but with additional information:
- The invoice lines are copied from the selected tasks in the previous screen. Summary tasks are excluded because, otherwise, the number of hours would be duplicated.
- The Rate column includes the best matching rate for the task (see below).
Select the Create Customer Invoice button to finish the process. But before doing that, you may want to check that the prices are right.
Check the price list and reference prices
The Reference Prices section in the figure above explains how the best matching rate is determined for each of the six invoice lines (this is why the same line is repeated six times).
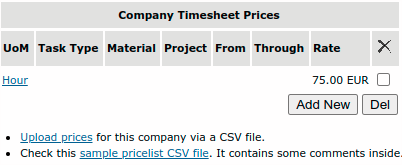
The source of this data is the Company Timesheet Prices portlet.
Figure 10. Price list with one entry (Frank Bergmann, CC BY-SA 4.0)
This example contains a single line with Hour as the UoM and 75.00 EUR as the Rate; all other fields are empty. We could translate this as: "All hours for this customer cost EUR 75.00." This is a suitable definition of a "default rate" if you want to keep things simple.
Use the price-finding algorithm
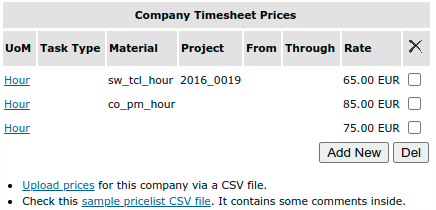
Unfortunately, reality tends to be complex. Consider the example below. It defines a discount for TCL Programming Hours but only for the specific project Motor Development (2016_0019).
Figure 11. Price entry in a specific project (Frank Bergmann, CC BY-SA 4.0)
The price-finding algorithm will select the most suitable rate for each line of the new invoice by choosing the one with the highest number of matching fields and discarding those with hard mismatches. The Reference Prices section will list all candidate rate entries, from best match to worst.
In the end, though, it's up to you to modify the proposed rates. This option for manual intervention is designed to handle the most unusual cases.
Next steps
There are a number of steps that come after writing an invoice. Detailing them would exceed the scope of this tutorial. However, the functionality is available as part of the ]po[ Community Edition:
- Accounts receivable: The Finance -> Accounts Receivable section allows you to follow up on invoices and send reminders to customers.
- Procurement and accounts payable: ]po[ includes a project-based procurement and vendor-management system.
- Profit and loss: You'll be interested to see if you made a profit on your project or not.
- Learned lessons: You may want to do a post-mortem to review the project and learn what to do differently the next time.
- Cash-flow forecasting: Starting with your current bank account level, your invoices, and your CRM sales funnel, this will calculate the moment when your company will run out of money.
- Management accounting: This consists of many that reports that will answer most questions about your business out of the box. There's a tutorial on how to write your own reports.
- Tax reporting: ]po[ captures almost everything a service company needs for tax reporting. There are export interfaces for various accounting software packages.
What are your biggest challenges with invoicing customers? Please share your pet peeves in the comments.
via: https://opensource.com/article/21/7/open-source-invoicing-po
作者:Frank Bergmann 选题:lujun9972 译者:译者ID 校对:校对者ID

